Rise of the Tomb Raider - Lost City Relics
Updated: 7/23/17(†)
This guide, along with the annotated level maps linked below, should help find any relics you missed. If you are playing this level for the first time, you may want to follow the main walkthrough instead.
Weapons, Equipment, and Outfits are covered elsewhere. Other collectibles are detailed on separate pages:
Documents · Murals · Coin Caches · Archivist Maps · Explorer Satchels · Survival Caches · Codices · Crypt Treasures · Challenges
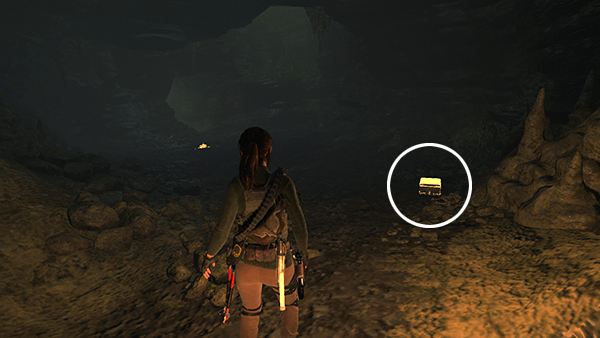
RELIC 1
The first two relics are in the Chamber of Exorcism Challenge Tomb. You can follow the walkthrough to find them or, if you've already raided the tomb, return to the Citadel Plaza Base Camp, go down the stairs to the south, and then head back to the bear's den in the northeast corner of the city. The relic is in the cave beyond the doorway you broke down with your climbing axe. (Click screenshot to enlarge.)
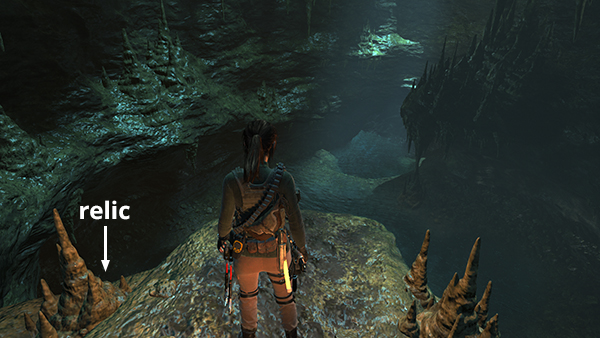
RELIC 2
This relic is also in the Chamber of Exorcism Challenge Tomb. If you're coming from the bear's den, it's below on the left as you enter the large cavern with the pool. If you're backtracking from the Geothermal Cavern Base Camp, it will be on the far side of the pool at water level. (screenshot) See the walkthrough and map for details. (Click screenshot to enlarge.)
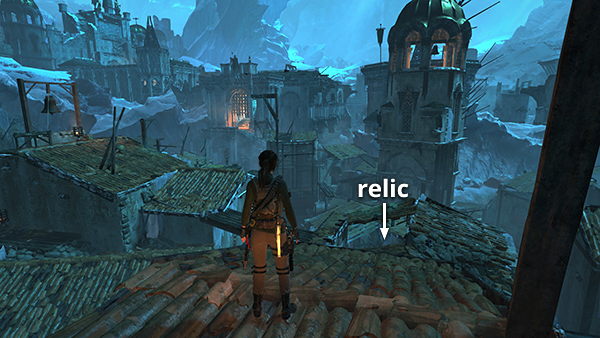
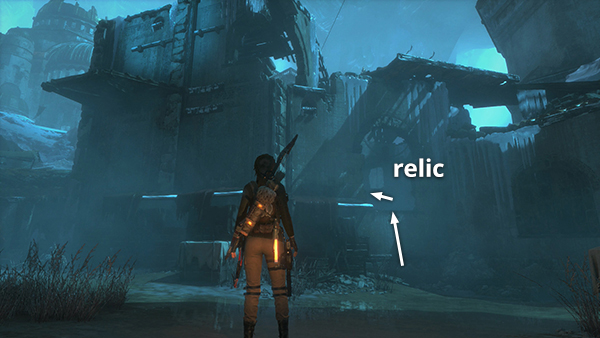
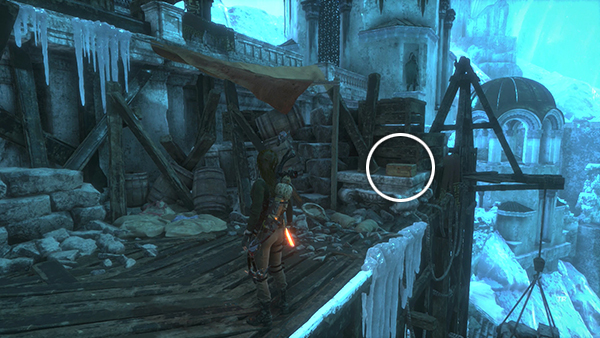
RELIC 3
This relic is inside one of the ruined buildings in the center of the city streets area. It's the one marked B on the map, and it's just north of the building where you land after riding the zip line down from the Threshold of Kitezh Base Camp, as shown here. The relic is on the lower level of this two-story infirmary. (Click screenshot to enlarge.)
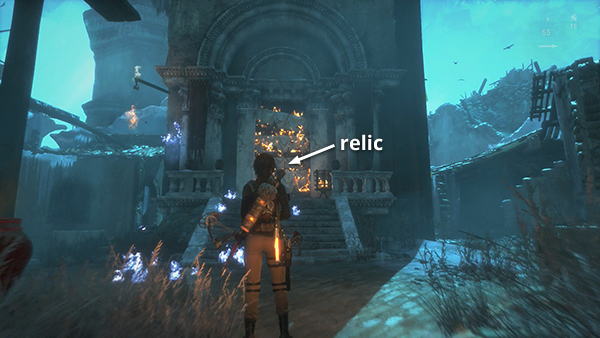
RELIC 4
This relic is in the room at the base of the tall tower with the gold dome. Use a fire arrow or molotov to destroy the debris blocking the doorway so you can get inside. See the map and walkthrough for more info. Be sure to pick up the relic right away to avoid a potential invisible wall bug, also described in the walkthrough. (Click screenshot to enlarge.)
RELIC 5
The next relic is in the large building just northwest of the tower with the gold dome. The interior of this dilapidated stable is full of horse skeletons. See the walkthrough and map for details. (Click screenshot to enlarge.)
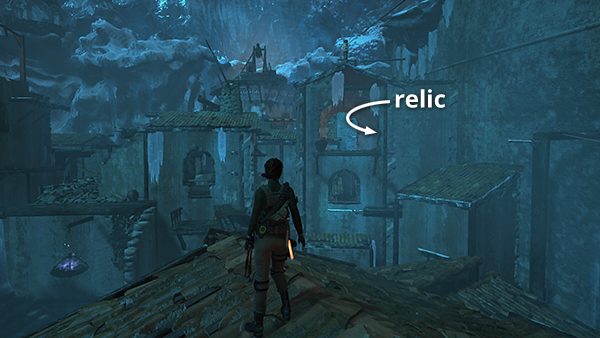
RELIC 6
This relic is in the building in the northwest corner of the city streets area. If you missed it, return to the Citadel Plaza Base Camp, go through the gate to the south, and then ride the zip line down into the building just below. The relic is inside on the right. (Click screenshot to enlarge.)
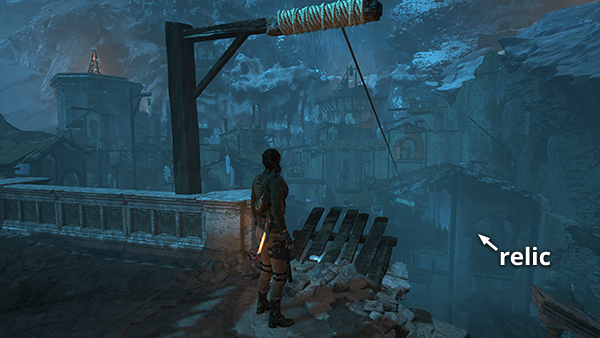
RELIC 7
This relic is on the upper level of a building about halfway along the western city wall. To get back there, start at the Citadel Plaza Base Camp, go through the gate to the south, and then make your way across the rooftops, keeping the outer wall on your right. The relic is in the room marked in the screenshot, behind a wooden impact barrier. Refer to the map and walkthrough if necessary. (Click screenshot to enlarge.)
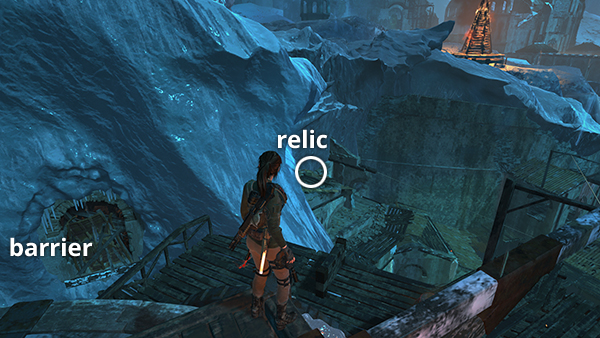
RELIC 8
This relic is sitting on a small roof near the southern trebuchet. If you missed it the first time, climb back up to the trebuchet as described in the walkthrough. Use explosives to destroy the impact barrier below and go through the room behind it and out the window to reach the relic. (Click screenshot to enlarge.)
RELIC 9
This relic is on the elevated walkway on the south side of the open area near the second gate, where you fought the Deathless warriors and obtained Armor Piercing Arrows. If you missed it, return to the Citadel Plaza Base Camp, climb the stairs to the west, and scramble up the wall on the left side of the doorway. (screenshot) Then follow the walkway around to the relic. See the map and Part 2 walkthrough. (Click screenshot to enlarge.)

RELIC 10
The last relic is found during the climb from the citadel to the Chamber of Souls. If you passed it in all the excitement, return to the Citadel Gate Base Camp and use climbing arrows to reach the ledge above, as described in the walkthrough. The relic is on the right as you pull up onto the wooden ledge. (Click screenshot to enlarge.)
Top of Page | Collectible Guides | Main ROTTR Page
†UPDATE HISTORY: 7/4/16 - Page first posted online.
7/23/17 - Added bug note for 4th relic, thanks to a tip from Cathryn.
WAS THIS WALKTHROUGH HELPFUL? If not, I apologize and invite you to contact me with any questions. If you need help right away, I recommend the r/TombRaider subreddit. Other fan-run forums are listed at tombraiders.net/stella/community.html. If this site was useful, please consider supporting it financially or in other ways. For details, visit tombraiders.net/stella/support.html. As always, I welcome your corrections/suggestions. Thank you!
Copyright © 2015 - Stellalune (). All rights reserved. Feel free to copy or print this walkthrough for personal use. By all means, share it with friends, but please include this credit line so people can send me their feedback. No part of this walkthrough may be reproduced on another site without permission. As an Amazon Associate I earn from qualifying purchases. Follow this link for details about this site's advertising and privacy policy.
Stella's Tomb Raider Site: tombraiders.net.