LEVEL 3: THE COLOSSEUM | Updated: 10/31/01 |
Kills: 9 Items: 3, plus Uzis, 2 Gemstone Pieces, 2 keys, Philosopher's Stone and 3 Golden Rose Secrets*
UNDERGROUND CELLS WITH SKELETONS: Start forward. Just beyond the grate letting light in from above, look on the right for a movable block with a metal ring on it. (The block is outlined in this screenshot.) Push it to reveal a secret room containing a golden rose (secret #1, 7/36). Return to the main passage and continue to the right. Start through the narrow space between the high stone walls.
Cut Scene: The floor crumbles beneath Lara's feet revealing a lava pit below.
As soon as the cut scene ends, run forward, jumping at the edge of the solid floor to clear the gap.
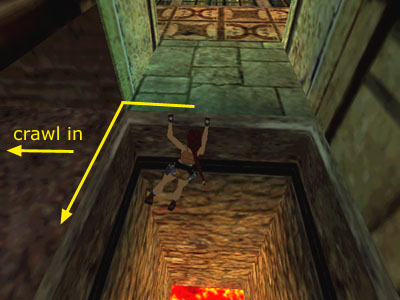
ROOMS WITH GRATING FLOORS/LION CAGES: The exit is closed. Hang from the doorsill above the lava pit. Traverse to the left and around the corner. Then pull up into the crawlspace (as shown in this screenshot). At the edge, press Jump to somersault into the small room below. Push the square button to open the exit from the room above the lion pit. Climb back into the opening and crawl backwards toward the opening, holding Action to drop and hang from the ledge above the lava pit. Traverse back around the corner and pull up. Go through the room with the grating floor and slide down the ramp.
Shoot the lion inside on the right. Press the button on the wall to open the door. Immediately roll, drawing weapons, and shoot another charging lion. Go through the second room and climb the ladder. Take the GEMSTONE PIECE from the pedestal.
ROCK-WALLED ROOMS WITH RAMPS AND STONE PILLARS: When you enter the next room, a gladiator rushes Lara from the left. When you've killed him, go into the alcove from which he came and pick up a small medipack. Go up the ramp to another similar area. Again a gladiator attacks from the left. The alcove where he came from contains Uzi clips and a button. Push it to open a door on the upper level. Go up the next ramp and the next. At the top level, you'll meet another gladiator and a lion. Kill both and go into the alcove to claim the UZIS and a large medipack. Return down the ramp to the wide doorway.
HUGE CAVE WITH ROPE AND LEDGES: Safety drop off the right side of the walkway between the entrance and the center platform. (If you drop here, Lara will land on the ledge below and not lose health, as she would from a longer drop.)
Here comes your first timed puzzle. Climb the stairs to the platform with the rope. (It's probably a good idea to save your game before starting so you can reload if you flub it.) Pulling the rope three times raises a pedestal in the middle of the center platform. You have about 30 seconds to get up there before the pedestal recedes. Some suggestions follow. See this series of screenshots if you need visuals.
Position Lara facing the center platform as she pulls the rope. After pulling it three times, run forward off the platform onto the ledge below. Run to the right and jump to the thin stone ledge. Run along the thin stone ledge and jump at the end to land on the paler stone block with the bi-level top.
If you've done everything up to this point without hesitation, you can take a moment to set up the next jump: Turn left and walk to the top edge of the bi-level block. Hop back once, and then take a running jump to grab the edge of the ledge that juts out toward the center platform. Pull up.
Turn left to face the center platform. Take another running jump to grab the edge of the center platfrom. Pull up and grab the second GEMSTONE PIECE from the pedestal.
TIMED RUN - SOME ALTERNATE METHODS:
Alternate Path from Rope to Bi-Level Block: Pull the rope, hop back once, angle Lara to the right and take a running jump off the corner of the platform to land on the thin stone ledge. Be sure not to press Action during this jump or Lara won't get enough distance. Run along the thin stone ledge and jump at the end to land on the paler stone block with the bi-level top.
Another Alternate Path from Rope to Bi-Level Block: Pull the rope, side-flip to the right and slide down onto the steps. Turn right to face the thin stone ledge, then run underneath it. You'll run into the tall block with the bi-level top. Jump straight up to grab the edge and pull up onto it.
Yet Another Alternate Path from Rope to Bi-Level Block: Start with Lara's back to the center platform. Pull the rope, backflip, then roll. Lara will wind up in the spot shown above. Run forward and veer right, jumping to land on the thin stone ledge. Run along the thin stone ledge and jump at the end to land on the paler stone block with the bi-level top.
Alternate from Bi-level Block: Instead of making the diagonal jump to grab the jutting part of the ledge, run straight forward along the bi-level block and jump at the very edge. Grab the high ledge ahead and pull up. Either turn left and run along the ledge (pressing the Look button if you need to get oriented) onto the part that juts out toward the center platform or, after pulling up, side flip to the left then roll. Lara will now be facing the center platform. Take a running jump, grab the edge and pull up.
(NOTE: If you just can't do it, feel free to download one of my saved games with Lara at the pedestal. Click for the PC savegame or Macintosh savegame. For help with PC savegame and .zip files, see here. For the Mac file, you'll need Stuffit Expander 5.1 or later to extract the save file. After extracting, place in your Save folder, but be sure to remove your own saves first and place them in a safe storage folder so they aren't overwritten. For Mac assistance, please visit MacRaider. Special thanks to Kerrie at MacRaider for this and other saves.)
After taking the GEMSTONE PIECE, follow the walkway to the right. The door opens when you approach it. As you enter, the gate ahead closes. Step forward and fall through the floor.
Cut Scene: Lara and Pierre exchange banter on the edge of a deep pit. A transcript appears here.
WALKWAY ABOVE DEEP PIT: Before going on, backtrack for a secret. Turn around and take a running jump over the slope to the flat area beyond. (Or, jump to the flat area above the slope and walk along above it. Or, hang from the ledge and traverse past the slope, then pull up.) Climb through the opening back into the HUGE CAVE WITH THE ROPE AND LEDGES.
Climb back up to the pedestal where you got the second gemstone piece. Go through the doorway where Lara just fell through the floor. This time the gate opens as you approach. Take a running jump across the gap. In the next room you'll find another golden rose (secret #2, 8/36). Safety drop into the chute and slide back down to the WALKWAY ABOVE THE DEEP PIT.
Go up the ramp into the room with the circular receptacle. Combine the two GEMSTONE PIECES (check your instruction booklet or see or see Controls if you need help doing this) and place the GEMSTONE in the receptacle.
Cut Scene: The mechanism turns and the floor begins to collapse.
As soon as you regain control, hop back once then backflip to land on a small, solid ledge on the opposite side of the lava pit. (Or, roll and then take a running jump to ledge.) Take a running jump from the small ledge to the opening below the receptacle where you placed the stone. Drop back and grab the edge of the opening. Traverse to the left and around the corner. Continue traversing along the horizontal crevice to the ledge on the other side of the pit.
Enter the small room beyond and climb onto the low block. Jump up to grab the edge of the opening overhead and pull up.
ROOM OVERLOOKING THE ARENA: Another lion and his gladiator buddy attack. If you like, you can drop back into the hole and shoot these two by jumping in place on the block while firing pistols. You may need to climb up once or twice to get their attention.
When the gladiator dies, he drops the first COLOSSEUM KEY. It's difficult to see on the patterned floor, so search carefully where he fell. Use this key in the lock to the left of the double doors.
Cut Scene: Another statue—this one with a hammer—comes to life in the next room.
Try to keep your distance from the animated statue. Each time he bangs his hammer, a shock wave emanates from it and Lara takes damage if she's too close. If you don't want to go head-to-head with him, run back to the hole and drop through. If he doesn't come to the edge of the opening, climb out to get his attention then drop in again. Once he's standing above the opening, position Lara with her back against the wall and keep firing with pistols until the statue is destroyed.
Go into the next room and climb through the small, square opening. Take the second COLOSSEUM KEY from the pedestal. Use this to unlock the second set of double doors. Slide down the ramp.
LEDGE WITH GOLDEN SUN AND PHILOSOPHER'S STONE: Before taking your prize, go after the third secret. Take a running jump over the spike pit to the T-shaped ledge. From there, take a running jump over more spikes to grab the small ledge on the far side of the cave. Pull up. Crawl through the opening and continue to a small room where you'll find a golden rose (secret #3, 9/36). Return to the golden-sun ledge.
Use the CROWBAR to pry the PHILOSOPHER'S STONE from the wall and end the level.
FMV Sequence: To save space here, I've included a transcripts of the FMV (full-motion video) sequences between this level and the next on a separate page.
*Note on Secrets: There are 36 golden roses in the game. If you find them all, after the credits you'll be able to access "Special Features" from the options menu. This is a collection of storyboards, etc., created during the game design.
WAS THIS WALKTHROUGH HELPFUL? If not, I apologize and invite you to contact me with any questions. If you need help right away, I recommend the r/TombRaider subreddit. Other fan-run forums are listed at tombraiders.net/stella/community.html. If this site was useful, please consider supporting it financially or in other ways. For details, visit tombraiders.net/stella/support.html. As always, I welcome your corrections/suggestions. Thank you!
Copyright © 2000- - Stellalune (). Special thanks are given to the participants in the alt.games.tombraider newsgroup, without whom some parts of this walkthrough couldn't have been written. No part of this walkthrough may be reproduced without permission.
Stella's Tomb Raider Site: tombraiders.net.