NOTES ON THE REMASTER: I have attempted to provide a running count of all kills and pickups, including totals for health packs, chocolates, sellable items, and cash, as well as notebook entries, which are needed for some achievements/trophies. If I've missed any, I do apologize. Please let me know if you discover anything not mentioned here. These guides are based on classic tank controls, but I hope they will be useful for those using modern controls.
LEVEL 13: THE HALL OF SEASONS (Remaster)
Updated: 4/13/25(†)
IMPORTANT: This page also includes links to the shorter, element-themed side levels, NEPTUNE'S HALL, BREATH OF HADES, SANCTUARY OF FLAME, and WRATH OF THE BEAST, which can be played in any order. See below for details.
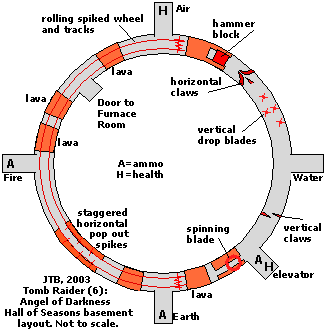
LEVEL MAP by VGCartography (used with permission)*
Angel of Darkness Remastered Video Walkthrough by Eldincy‡
Items: 17, including 5 health items, First Obscura Painting, V-PACKER SHOTGUN (if you don't have it already)**
Kills: 8 (optional)**
Upgrades: Upper Body
Notebook Entries: 1
**NOTE: In addition to the kills and pickups noted above, you'll get one item and meet one enemy when you pass through the TOMB OF ANCIENTS and ARCHAEOLOGICAL DIG on your way back to the LOUVRE. Everything in the four element levels are counted on their separate pages.
ENTRANCE HALL WITH CRYSTAL RECEPTACLES: Go through the door into a short hallway with four receptacles decorated with paintings and stone carvings. Each carving represents one of the four traditional (Western) elements: Earth, Fire, Air, and Water. (screenshot) Your goal is to find four crystals to place in these receptacles.
MAIN ROOM - ELEMENT BUTTONS & DOORS: There are 3 undead knights (1-3) roaming around in the large room ahead. You can knock them down with melee attacks or weapons—even destroy them by knocking them down twice—but the knights respawn every time you return to this room. To save ammo/health, just avoid them for now.
For the achievement/trophy "This Is Lara!" you'll need to send the knights into a pit. I have included a strategy for this later, to save backtracking.
In the middle of the room is a floor mosaic depicting the Western zodiac. At the center of this mosaic are four buttons with the same element symbols you saw in the entrance hall: Fire, Earth, Air, and Water. (screenshot) There are four sets of three doors (12 doors in all) along the outer wall. Stepping on one of the four buttons opens one set of doors. Beyond each door is a lever. One lever in each set opens the door to a new area. The other two levers open trapdoors that that deposit Lara in a trap-filled basement. To determine which lever opens the "safe" door, examine the carved signs above the lever alcoves (not the signs above the outer doors). The sign near the correct lever will match the sign on the button. (screenshots)
By using the correct levers, you can avoid making extra trips through the hazardous basement, but if you fall into the trap room by accident, this separate "BASEMENT OF DOOM" walkthrough can help navigate.
You can explore the side areas in any order. Step on one of the element buttons, go to the three open doors, and choose the one with the matching element sign above the lever (not the sign above the outer door). Pull the lever to open the inner gate and go through to the new area. (If Lara takes a little damage from the knights while pulling the levers, don't stress. Your health is restored as you enter each new level.) The links below lead to the walkthroughs for each level:
The viper ammo (1) sitting on the floor in the connecting passageway between the middle and right earth doors (screenshot) can be obtained at any time. I mention it during the WRATH OF THE BEAST walkthrough.
WHEN YOU HAVE ALL FOUR ELEMENT CRYSTALS: Return to the short hallway where you first entered this level. Place the WATER, AIR, FIRE, and EARTH CRYSTALS in the 4 receptacles to unlock the door to the FURNACE ROOM, below in the "BASEMENT OF DOOM." As you place each crystal, you'll see one part of the X-shaped lock disengage. (screenshots)
NOTE: If you like, you can knock down the 3 undead knights (1-3) before placing the crystals. Melee attacks or shotgun blasts work well (one shot at close range should bypass the shield and knock them down), but any weapon other than the taser will do. If you're working on the achievement/trophy, "This Is Lara!" (for knocking knights into pits), be sure to knock each knight down only once. Two knockdowns will destroy them, and you'll want them alive for the next part.
IMPORTANT: If you have already explored the BASEMENT, or don't care about 100% completion, choose one of the Fire or Air trapdoors, as they come in closer to the FURNACE ROOM (i.e., the door you just unlocked with the crystals). For all pickups use one of the Earth trapdoors, as described below. For help navigating the trap room, refer to the stand-alone BASEMENT OF DOOM guide and/or this printable map. (Thanks to John B.).
To get to the BASEMENT, you'll need to deliberately choose a "wrong" lever and fall through one of the trapdoors. If you've been following this walkthrough, you should use the Earth entrance for the most direct route with all pickups. So, step on the button with the earth symbol to open three doors. (Maybe these doors are already open if you explored the Earth area last). (screenshots)
If you don't care about luring the knights to the pit, go through the left door and pull the lever to fall through the trapdoor. Pick up a Viper clip (2) on the landing. (Lara will land almost on top of it if you used the left lever.) Then slide down the ramp into the BASEMENT. (screenshots)
If you are working on the "This Is Lara!" achievement/trophy, instead head for the right door. Run to the lever, in the far left corner near the bars. Wait for all 3 knights to approach. You may need to run out to get their attention, then lure them inside. When they're all standing on the trapdoor, pull the lever to drop them (and Lara) into the room below. That's three more knights for achievement/trophy. (These are knights 6-8/17 if you followed the same sequence I have.) You can now destroy the knights, or just outrun them. If you choose to run, head to the left and grab the Viper clip (2) lying on the floor before the knights close in. Roll, run/jump past them, and slide down the ramp into the BASEMENT. (screenshots)
BASEMENT OF DOOM - EARTH ENTRANCE TO FURNACE: Pick up V-Packer shells (3) in the passage below the ramp. Then proceed into the huge, circular trap room. Turn left and stay close to the left wall. Duck and crawl forward toward the lava pit and wait for the rolling spiked wheel to move past. (screenshots)
When it's safe, stand up and take a running jump across the lava (or take a standing jump from the edge to grab the opposite edge, then pull up). Walk carefully past the horizontal spikes that pop out of the walls as Lara approaches. If you weave between them in a serpentine path, you can avoid being skewered. (screenshots)
Continue forward, then left, into the FIRE PASSAGE. It's hard to spot in the dark, but you'll see it when you get close. Pick up a Viper clip (4). Then return to the trap room and jump across the next 2 lava pits. (It's either a standing jump-and-grab for the first pit, followed by a running jump across the second; or running jumps for both, taking care not to run off the ledge between pits.) The entrance to the FURNACE ROOM is just ahead on the right. (screenshots)
FURNACE ROOM: This is the door you opened using the 4 ELEMENT CRYSTALS, above. Go through and descend the spiral staircase. The gate at the bottom opens as you approach. Use the lever to open the next gate and close the one behind. Proceed down more stairs into the FURNACE ROOM proper. (screenshots)
Follow the wooden walkway to the left. Turn the valve near the air sign to supply one of the elements the machine needs to work. (screenshot)
Turn around and follow the walkway back toward the entrance. Before you reach it, turn toward the center of the room and take a running jump to the circular wooden platform surrounding the machine at the middle level. Move around to the other side of the machine and find a chain running up and outward toward one of the V-shaped wooden supports on the outer wall. Jump up to grab the chain and traverse to the other end. Drop onto the curved ledge. Go left and climb the ladder (or just pull up onto the ledge above). Turn the valve near the water sign, to let water into the boiler. (screenshots)
From the water valve, drop back down onto the curved ledge, and traverse back to the center along the chain. Walk around the circular platform to the left. Just before the light-colored, vertical pipe, turn to face out over the room and take a running jump to the small wooden platform across the gap. There are two ladders here: one leading upward and another, in a dark alcove, leading down. Climb the ladder leading up and dismount on the right. Turn the valve near the earth sign to fuel the furnace. (screenshots)
From the earth valve, climb back down the ladder. Go right, into the dark alcove, and jump to grab the ladder. Climb or drop down to the ledge below and step out onto the wooden beam. If you don't care about kills and pickups, grab the chain overhead and traverse across to the center platform. Then skip the next paragraph. (screenshots)
If you want it all, safety drop to the floor. There's another undead knight (4) roaming around down here. Position Lara near the inside edge of the circular walkway, wait for the knight to approach, and then knock him off the edge into the lava pool, using your fists, feet, or shotgun. (He's number 9/17 for the achievement/trophy "This Is Lara!") Grab the Viper clip (5) on the stone floor to the left of one of the big black gears anchoring the support chains. Then climb the ladder to get back up to the central platform near the boiler. (screenshots)
LIGHTING THE FURNACE: Locate the valve near the fire sign on one side of the boiler at the center of the wooden platform. Once you have used the air, water, and earth valves, the cage over the fire valve opens so you can turn it. When you do, the machine roars to life and is revealed to be a giant, pre-Renaissance Cuisinart. (screenshots)
To avoid the deadly blades, step straight back from the valve and safety drop to the floor. Turn around on the spot (there are blades to the left and right) and move away from the center of the room. Head left toward the ladder on one of the wooden support posts and climb up. At the top, go around to the other side of the next ladder to climb up. The exit is just ahead on the left. Climb the stairs, pull the lever to cycle the gates, then continue up the spiral staircase. (screenshots)
BASEMENT OF DOOM - FURNACE TO ELEVATOR: If you've been following this walkthrough, and want all pickups, head to the right. Take a running jump across a lava pit. Run forward, then left, into the AIR PASSAGE to avoid the rolling spiked wheel. (Or move near either side wall and duck to avoid the roller.) Pick up a large health pack (6) in the passageway. Then return to the trap ring and continue to the left. (screenshots)
Walk to the edge of the next lava pit. Take a standing jump and grab the ledge below the giant hammer block. Pull up but don't run forward (obviously). Wait for the block to pound down, then start running at it. As it's rising, you should be able to run under it before it comes down again. Stop just beyond the lava pits to avoid running on into the claw-shaped blades. To clear them, run through just as the blades begin to retract. Then move toward either wall and stop. The next set of vertical blades open like flowers, slicing as Lara passes by. Walk through carefully, staying as far from each blade as you can. Or run past along the wall before the blades can fully extend. Next comes a pair of vertical claws. Step forward slowly to activate them. Then run through as the blades begin to retract. (screenshots)
The ELEVATOR is just beyond the claw trap on the left. Go in and pull the chain to raise the elevator. When it pauses between floors, turn around to find bandages (7) and V-Packer shells (8) in a small alcove. Then pull the chain again to ascend to the MAIN ROOM. Then pull the chain again to ascend to the MAIN ROOM. The gates open as you approach. (screenshots)
MAIN ROOM - CLIMBING TO THE UPPER LEVELS: Back in the room with the zodiac mosaic, you'll find four huge pillars moving up and down. Even if you dropped the 3 undead knights (1-3) through the trapdoor earlier, they'll probably still be milling about here. (The undead are nothing if not persistent.) You can knock them down again, destroy them by knocking them down twice, or just avoid them.
When you're ready to move on, stand facing the shortest moving pillar. Jump up to grab the edge when it's at its lowest point and pull up. Walk to the edge and then jump onto the next higher pillar when the two pillars are closest in height. Repeat the process for the third and fourth pillars. Once you're standing on the tallest pillar, face the center, walk to the edge, and jump straight up to grab the huge, metal ring when the pillar is highest. Pull up. (screenshots)
NOTE: I encountered a bug here, in both the classic and remastered games, where Lara would not grab the metal ring. Saving and reloading and/or adjusting Lara's position along the curved edge of the pillar fixed it.
MIDDLE-LEVEL WALKWAY: One of the spokes leading out from the metal ring is flat on top. Walk along it to the edge and vault over the railing. Now head for the stairs leading up to the next level. A fence prevents you from reaching the stairs by going to the left, but if you're after the achievement/trophy "This Is Lara!" you'll want to go left first. As you approach the sealed alcove just ahead, an undead knight (5) bursts out. Run on toward the fence to lure the knight to the break in the railing. Then circle around behind it and kick or blast it off the edge. (screenshots)
NOTE: If you don't care about this achievement/trophy, you can just avoid that area and outrun the other knights.
Follow the walkway back in the other direction to the next sealed alcove. Again, as you approach, another undead knight (6) bursts out. Fortunately there's a gap in the railing right here. Move to the edge. Wait for the knight to approach. Then run/jump around behind him and kick/blast him off the edge. (That's 12/17.) Continue along the walkway, past an empty alcove and a jagged hole in the floor, and climb the stairs. (screenshots)
UPPER-LEVEL WALKWAY: The door on the right doesn't open yet. The open doorway to the left leads to the upper walkway overlooking the main room. There are 2 more undead knights (7-8) here. You'll probably meet the first at the top of the stairs. The other waits on the far side of the walkway. Again, you can destroy them, knock them off the edge for "This Is Lara!" like you did the others, or just avoid them and go on. (Also, any knights you left alive on the level below may eventually make their way up the stairs.) (screenshots)
NOTE: If you've knocked every possible knight into every possible pit, you should now have 13/17 toward the achievement/trophy. (screenshot) The others are in the VAULT OF TROPHIES and ECKHARDT'S LAB, much later in the game.
Continue all the way to the far end of the broken walkway. Grab onto the climbable wall on the left. Climb up and right to a small ledge with a lever. (Be sure to climb all the way over to the right before dropping down on the narrow ledge.) Use the lever to open the door at the top of stairs leading up from the MIDDLE LEVEL. (screenshots)
NOTE: The ceiling here is climbable but Lara isn't strong enough to make it across...yet.
If you sidestep out to the narrow end of the ledge, you can take a carefully angled standing jump down to the doorway, but this is tricky. It's easy to crash into the broken arch ahead. So save first if you attempt it. Alternatively, climb back down the climbable wall the way you came and follow it around to the door at the top of the stairs. (screenshots)
Go through, pick up V-Packer shells (9). Then push the uneven wall on the right to get an upper-body strength upgrade. Pick up the large health pack (10) to the left of the broken chunk of wall. Then return to the walkway and run all the way around to the climbable wall. Climb back up and to the right to the ledge with the lever. (screenshots)
MAIN ROOM - CLIMBING TO THE TOP OF THE DOME:This next section is tricky, so save beforehand. Grab onto the climbable wall near the lever and climb straight up toward the ceiling. Just keep holding Forward and Lara will do the rest. When she turns to face out over the room, traverse forward then left to the small ledge. (After the upgrade, Lara has just enough strength to make it all the way.) Drop onto this ledge to regain your strength and quick-save again. (screenshots)
Walk to the edge of the ledge so the middle of the room is on Lara's left. Jump straight up to grab the climbable ceiling. Traverse forward, but stay toward the left edge of the climbable ceiling. (If you swing too far right, Lara will have farther to traverse and won't have enough strength to make the climb.) Once you've passed the V-shaped notch in the ceiling, you can stay toward the middle of the climbable area as you continue forward. At the edge of the ceiling, just keep pressing Forward, and Lara will swing around and start climbing the angled ceiling of the dome. Continue toward the top and, when Lara's grip power is almost gone, climb to the left and drop onto the next ledge. (screenshots)
This is the very top of the dome. The gate opens as you approach. Follow the hall to another gate and continue up the stairs. Save the game in a new slot before entering the next room or immediately after the cutscene. You'll probably want to play the next section twice: once for an achievement/trophy and again for all pickups.
Cutscene: Lara enters a tomb and reads the inscription on the crypt, unlocking a new notebook entry (36/62): The Latin "Ultra vigilis umbram, ecce veritas," and the English translation, "Through the spirit of the keeper, behold the truth." Or, in this particular case, the truth hurts. ;) (Again, this page on Von Croy's Notebook lists all entries. Don't forget to open the Notebook in your Inventory and read this new entry for the "Memento Mori" achievement/trophy.)
RED GHOST/BROTHER OBSCURA: The goal is to grab the FIRST OBSCURA PAINTING (counted below) from the hands of the statue holding it, but the ghostly guardian, BROTHER OBSCURA (unkillable), is not going to give up his treasure easily. If he touches Lara, her health drains away. To further complicate things, the painting moves randomly from statue to statue. The painting glows blue so you can tell where it is, but you can't take it unless you first stun the ghost. If you try, the painting will just move to another statue. So the basic mechanic is shoot the ghost until his health bar drops to zero. At that time, the ghost's red glow disappears and he remains still for a few seconds. During that brief window, you must run to the blue light and grab the painting before the ghost revives and comes at you again, with full health. If you also want the "Ghost in a Nutshell" achievement/trophy, you'll need to get the painting and escape in 1 minute or less, without taking damage.
For the achievement/trophy, bring out the heavy weapons immediately. If you have the dual Vectors, use them. Otherwise the shotgun will do. Backflip off the steps where Lara is standing after the cutscene, get a lock on the ghost, and start firing. When he swoops toward you, immediately duck to avoid taking damage. You can shoot while firing, but once he passes overhead, stand up, turn around, and continue shooting, while backing away from him toward the statue holding the painting. (screenshots)
As soon as the ghost's health bar is depleted, and his red glow disappears, quickly holster your guns (otherwise Lara continues to aim at the ghost) and run to the statue with the blue light. You'll notice the boss health bar quickly refilling as you go. When it's full, he revives, and the painting moves to another statue. So as soon as you see the Hand icon, press Action to grab the FIRST OBSCURA PAINTING (11, if you skip the other pickups). It may help to approach the statue on a slight diagonal and grab the painting from the side. Then crouch again so the ghost can't hurt you. (screenshots)
The exit (same as the entrance) opens when you take the painting. Crawl toward it until you're sure the ghost is not in your way. Then stand up and run/jump to the doorway and down the stairs. If you make it in time and haven't taken any damage, the achievement/trophy should pop when you reach the bottom of the stairs. (screenshots)
When the achievement/trophy unlocks, you'll probably want to reload your earlier save and replay this section the slow way to get all the pickups. If not, just continue with "EXITING THE RUINS," below.
If you don't care about the achievement/trophy, or already have it, here's a slightly less stressful alternative with all pickups: The ghost can't harm Lara (much) while she's crouching, so as soon as the cutscene ends, duck and start crawling around the outer edge of the room for the pickups. You'll find a large health pack, 2 boxes of V-Packer shells, and the V-PACKER SHOTGUN (or more shells if you already have the gun) along one edge of the room and 2 more boxes of shells on the other side (11-16). (screenshots)
When you have everything, figure out which of the standing statues has the blue light. Crawl toward it but don't get too close or the painting will move to a different statue. (screenshots)
NOTE: If the painting has migrated to one of the statues farthest from the exit, I'd recommend chasing it until it moves to one of the statues closer to the door. That will make your escape a little easier.
Save the game and draw the shotgun or other weapon. (If necessary stand up briefly to do this, then immediately crouch again.) Lara's aim won't be as good, but she'll lose little or no health if you stay low. Blast away. Then, when he moves past you, turn on the spot and continue firing. The remastered game graciously gives us a boss health bar. When the ghost's health is depleted, he'll be weakened for a few seconds. Notice his red glow disappears briefly. He may still fly toward you, but he can't do any damage, and the painting should stay where it is. Immediately holster your gun (otherwise Lara continues to aim at the ghost) and run toward the statue with the blue light. Notice the boss health bar quickly refilling as you go. When it's full, he revives, and you're back to square one. So as soon as you see the Hand icon, press Action to grab the FIRST OBSCURA PAINTING (17). (If Lara won't take it, try approaching the statue slightly off center and grab the painting from the side.) Then crouch again so the revived ghost can't hurt you. When you take the painting, the exit (same as the entrance) opens. Crawl through and proceed down the stairs. (screenshots)
EXITING THE RUINS: The ghost won't follow Lara any farther. So you can relax now. The door on the right, where you entered this area, is now closed. Proceed straight ahead to the end of the now-flooded hallway. (screenshots)
You now return briefly to the TOMB OF ANCIENTS, and more water pours in. Swim up through the opening in the ceiling then forward through the doorway into the tall room with the BROKEN BRIDGE, which is now completely flooded. Swim up to the ceiling of the huge room, where there's an air pocket. Here you'll find some bandages (5, Tomb of Ancients). (screenshots)
Now you're aiming for the tunnel that will take you back up to the museum. It's just above and to the right of the ornate doorway with the wooden beam above it. (The other ornate doorway is the one you just came from.) Swim into this tunnel, and when you reach the wooden crossbeam, follow the shaft straight upward. (screenshots)
ARCHAEOLOGICAL DIG: You're back in this level for a moment. Climb onto the crate then over the fence. There may be a security guard (6, Archaeological Dig) behind the fence to the left. (I encountered him before the first patch, but not after, even though I'd killed all of the guards during my first visit to this level.) You can shoot or tase him through the chain link if you like, or just ignore him. Then approach the big metal doors to enter the next level, GALLERIES UNDER SIEGE. (screenshots)
NOTE: The last pickup and kill are included in the stats for TOMB OF ANCIENTS and ARCHAEOLOGICAL DIG, respectively.
†UPDATE HISTORY: Updates made prior to the Tomb Raider IV-V-VI Remastered release, including credit for tips sent in by other players, are tracked in the archived classic guide.
4/13/25 - Remaster walkthrough posted.
5/29/25 - Made a few minor tweaks when replaying with patch #1.
*NOTE ON LEVEL MAPS: VGCartography's Angel of Darkness maps follow a slightly different level-numbering convention than I do. For example, here, the elemental levels off the Hall of Seasons are included on the same large map as the hub level. Visit VGCartography on DeviantArt and follow on Twitter/X and YouTube for more fantastic game maps.
‡NOTE ON VIDEO GUIDES: Eldin's videos don't always follow the same strategies I use in my walkthroughs, but if you prefer that format, I think you'll find them very helpful.
WAS THIS WALKTHROUGH HELPFUL? If not, I apologize and invite you to contact me with any questions. If you need help right away, I recommend the r/TombRaider subreddit. Other fan-run forums are listed at tombraiders.net/stella/community.html. If this site was useful, please consider supporting it financially or in other ways. For details, visit tombraiders.net/stella/support.html. As always, I welcome your corrections/suggestions. Thank you!
Copyright © 2003- - Stellalune (). Feel free to copy or print this walkthrough for personal use. By all means, share it with friends, but please include this credit line so people can send me their feedback. No part of this walkthrough may be reproduced on another site without permission. Follow this link for details about this site's advertising and privacy policy.