IMPORTANT: If you haven't already done so, you may want to review the INTRODUCTORY NOTES on the storyline, controls, treasures/relics and saving/checkpoints. These appear at the start of the PROLOGUE walkthrough.
As always, I highly recommend that you do not rely exclusively on the autosave. Instead be sure to save manually at least once or twice each level. Then, if you miss something or run into a bug, you can reload rather than having to replay the entire level. Many common bugs are documented in this walkthrough. They are in hot pink text, like this, so they're easy to spot. I have also included an overview of major bugs without game spoilers. However, not every potential problem is covered here. So be safe; save often in new slots. In case you need them, Underworld Save Files for PC, PS3 and Wii are available.
LEVEL 1: MEDITERRANEAN SEA - PART 1: THE PATH TO AVALON | Updated: 7/24/11(†) |
Health Items: 1 Treasures: 10* Relics: 0 Keys/Puzzle Items: 2
*There are 26 treasures in the entire Mediterranean Sea chapter. Ten of these can be found in this level. They are numbered 1/26 through 10/26 below.
Another cinematic follows the introductory credits. It opens with Lara's boat floating on the Mediterranean. The caption reads, "One Week Earlier." Lara hears a beeping and climbs down into the boat's cabin to activate her laptop computer and speak with her colleagues, Zip and Alister, over a satellite uplink. She says she hasn't made much progress yet but thinks she's close to finding the entrance to Avalon, which her father believed was nearby. Alister warns her not to lose perspective. After all, the odds of finding her mother still alive after all these years are remote at best. Lara agrees but insists she must still search for the truth.
ON THE SURFACE: You regain control with Lara standing at the stern of the cabin cruiser. On-screen text indicates that a journal entry has been unlocked.
NOTE: Lara keeps a journal in her PDA, which also includes game hints, inventory, weapon selection and other features. For more info, see the section on the PDA on the Underworld Controls page. Lara's journal entries provide additional information that may be helpful in your explorations.
SUBMERGED RUINS: Jump off the back of the boat and swim downward toward the ruins below. Lara automatically equips her scuba gear. As you explore, you'll encounter 3 or 4 sharks. They won't all attack at once, but you should keep an eye out for danger. If you want to, you can swim around the open water a bit to locate and kill them before you turn your attention to the ruins.
NOTE: Lara's pistols now work underwater, but she also has a spear gun and sticky grenades that can help make short work of the sharks. Lara has instant access to two weapons: her pistols and one alternate. At the start of the game, this is the spear gun. To switch between pistols and spear gun, just press the Change Weapon button. Later, when you want a different secondary weapon, access the Change Weapon screen in the PDA. To use a grenade, press and hold the Target Lock key to target an enemy. When the targeting reticle turns red, showing the enemy is within range, press the Grenade key. Lara also has a new underwater combat maneuver: the evasive dodge. Hold Target Lock to keep one shark targeted. Then move to the left or right and press Crouch. Again, see the Underworld Controls page for more info.
The entrance to the ruins is located within the stone tower. For players who prefer to cut straight to the chase, I will first describe the way in. Then, if you want to explore further and collect the various hidden treasures in this area, those instructions follow.
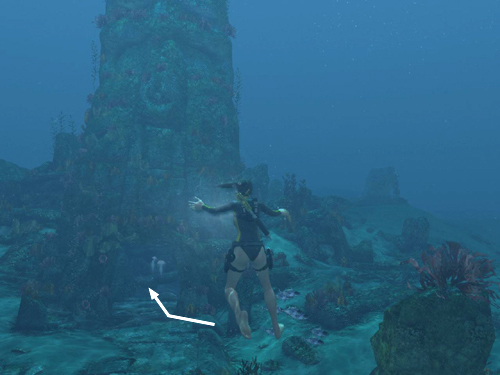
UNLOCKING THE PUZZLE DOOR: Swim to the base of the rough, vegetation-covered stone tower. Go through the wide doorway (shown in this screenshot) and down into the room below. Try to avoid the luminescent jellyfish, as their stings are poisonous, though not deadly unless you linger next to one. Ahead is an ornate, metal door mechanism consisting of three interlocking circles. One of the circles has a wheel-shaped handle at its center. The other two are missing their handles.
The FIRST HANDLE is lying in plain sight on a small stone pedestal just in front of the door. Swim down to it and press Interact to pick it up. Swim up to the metal door and position Lara near the center of one of the circles with no handle. Press Interact to put the handle in its place, but don't turn it yet. It'll be easier to solve the puzzle with all three handles present.
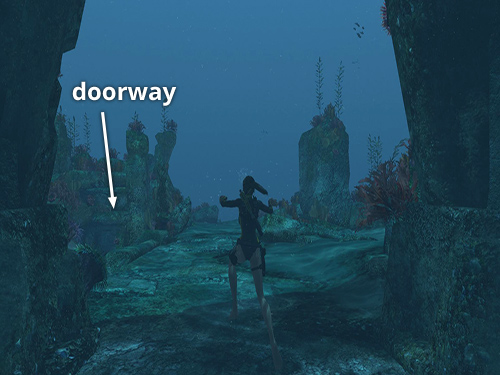
If you're not interested in treasures and want to go straight to the second handle, turn around and swim out through the door where you entered. When Lara is just outside the door facing out along the sea floor, ahead and a bit to the left you'll see an overgrown mound with a small, rectangular doorway (shown in this screenshot). That's where you're headed. Skip down to the section SECOND DOOR HANDLE, below.
If you are collecting treasures, here is a screenshot-map with an overview of the treasure locations for this first area. Additional details for each treasure follow. (Thanks to Nick & Charlotte for this great map.)
First, instead of exiting the puzzle door room the way you entered, face the puzzle door and swim upward through the opening in the right side of the ceiling. (These screenshots show the spot.) Swim up through the rocky tunnel. When you near the top, turn around and look down to spot the treasure (1/26) lying on rock shelf. There's an audible chime as you swim close to it, indicating you've found something special. Press Interact to pick it up.
NOTE: For more information about treasures and relics, refer to the introduction to the Prologue walkthrough.
Continue upward and out of the tunnel. As you emerge on the sea bottom, turn right and swim toward the overgrown mound with the small, rectangular doorway (shown in this screenshot).
SECOND DOOR HANDLE: Swim through the doorway into the ruined room below. Watch out for the stinging jellyfish as you swim forward and downward beneath the jutting rock slabs. At the bottom of the room, turn right and continue forward. At the next turning you'll see the SECOND HANDLE on another small pedestal off to the right.
Before swimming over to the handle, turn left and swim through the opening in the rocks into the sandy area beyond. Turn right and you'll see the treasure (2/26) lying on the floor near the wall. Take it and swim back out under the slab and straight on toward the handle. (These screenshots show the path to the treasure and handle.)
Now pick up the huge HANDLE and carry it back to the puzzle door within the stone tower.
NOTE: If you haven't already killed the 4 sharks, watch out for them as you make your way back to the door carrying the heavy handle. Normally you can press Crouch to drop an object, but here that control is used for swimming. So if you are attacked, just fire your weapons and Lara will automatically drop the handle. Be sure to note where it falls so you can pick it up later.
OPENING THE DOOR: Place the second handle in the empty hole at the center of one of the metal circles. With all three handles in place, you're now ready to solve the interlocking circle puzzle. Examine the carvings on the eye-shaped segments that make up each circle. Some have flat lines in their centers to represent closed eyes. Others have bulls-eye designs, representing open eyes. The goal is to rotate the three circles so that the segments that make up the top center circle all have open-eye designs.
If you haven't turned any of the handles yet, this is not difficult. First, swim close to the handle at the center of the top circle and press Interact to turn it once. Then turn the left handle once. Then turn the right handle twice. When you've solved the puzzle, the door opens.
NOTE: There's an autosave checkpoint just inside the door. If you want to go hunting for treasures before going on, you may want to swim through and use that checkpoint first. If you don't care about collecting bonuses, skip down to the section titled ENTERING THE RUINS, below.
TREASURE HUNTING: There are a total of six treasures scattered throughout these ruins (26 in the entire Mediterranean level). If you've followed this walkthrough so far, you've found two of them.
The third is located in another underground chamber. Swim out of the puzzle room through the wide door where you first entered. Turn right and look for a rough mound overgrown with seaweed. Behind the seaweed is a doorway. Swim through it and then down and to the right into the room below. (These screenshots show where to go.)
NOTE: It's quite dark in here, so if you haven't done so already, turn on Lara's Utility Light by pressing F (PC) or D-Pad Left (PS3, Xbox).
Swim forward through the rectangular doorway. Ahead on the right you'll see another pedestal, this one empty. It was probably made to hold the handle that was already in place when you arrived. Turn around so the pedestal is behind Lara. Then swim through the opening above the pile of rocks straight ahead. In the area beyond, there are 3 jellyfish. The treasure (3/26) is below and to the right of them. Take it and swim out the way you came.
The next treasure is located on the side of the tall stone tower. Swim toward it and face the side with the big doorway leading inside. (Check these screenshots if you need a visual.) Imagine the tower is a huge, elongated head. The doorway is the "mouth," and partway up the structure on each side there are two flat ledges that resemble eyes. The treasure (4/26) is lying on the ledge on the left.
Now turn around so the stone tower is behind Lara. Swim out toward the right edge of the ruins and look for a tumbledown structure with long, rectangular stone slabs. The entrance is located on the side farthest from the stone tower beneath those slabs. (You can see it in this series of screenshots.) Swim inside and follow the dark tunnel to a room with a sloping pile of sand. The treasure (5/26) is lying in plain sight. Grab it and swim back outside.
The sixth treasure is located on the far side of the ruins. Swim back toward the stone tower and then past it toward the right edge of the ruins (i.e., right when facing the tower). Look for another structure with flat stone slabs canted above the opening. (Again, check the screenshots if you need them.) Swim beneath the archway formed by the fallen blocks to find the opening. Follow the dark tunnel (again, use the Utility Light if you need it) to find the treasure (6/26) lying on the floor beneath a group of jellyfish.
ENTERING THE RUINS: When you have everything, swim back to the stone tower and go through the puzzle door. Try to avoid the jellyfish as you make your way along the corridor. It twists and turns but does not branch off, so you can't get lost. Just keep going forward.
When you come to a place where the passageway turns to the right and is partially blocked by a jumble of rocks, swim over the boulders and then turn around and look back in the direction from which you came. There's another treasure (7/26) on the floor to the right. (This screenshot shows it.)
Pick it up and continue forward until you reach the round hole with the huge tentacle sticking out of it. This appendage will take a swat at Lara but shouldn't injure her. Now any normal person would probably say "no thanks" at this point, but you're Lara Croft, so swim through the hole where the tentacle went and make your way upward to the surface.
Climb out of the pool on the low ledge and then vault up into the doorway. Ahead is a larger room carved out of rough stone slabs. On the right there's a cluster of breakable ceramic jars. Stand near them and press Interact to smash them. The rounded one contains a treasure (8/26).
On the opposite side of the room there are two step-like ledges. Climb up and over them to reach the next room.
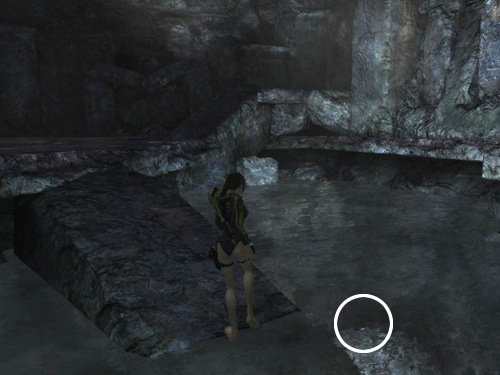
ROUGH STONE ROOM WITH POOL AND LEDGES: The exit from this room is on the right, but the ledge there is too high to reach from the water. So you'll need to find another path.
First hop into the water and swim down to the far left corner of the room, where you'll find another treasure (9/26). (See this screenshot if you're having trouble spotting it.)
Use the sloping stone ramp to climb out of the water. Ahead on the left there's a shelf with a health potion.
NOTE: A health potion works just like the first aid kit you found in Croft Manor. Stand near it and press Interact to add it to your inventory. Then, if Lara needs healing, press the Use Health Pack button. Keep in mind that Lara heals partially over time, so if you're not in any immediate danger, wait and conserve your health items. You can also regain full health by reaching a checkpoint, saving the game and reloading.
In the corner ahead (i.e., the far right if Lara's back is toward the entrance), there's another ramp and a series of ledges. Climb onto the lowest corner ledge and jump up to grab the handhold on the side of the tall, square block in the corner. Climb around the corner to the right and continue climbing to the right until the corner block is behind Lara. (These screenshots show the sequence.) Jump up to grab the handhold above. Then jump back to grab the top of the corner block. Pull up to find 2 breakable jars. Again, press Interact to smash the rounded one, revealing another treasure (10/26).
There are 3 wooden poles sticking out of the wall to the left. You can ignore these. They're just another way up from the floor below. Instead turn around and jump back across the gap to grab the previous handhold. (Again, refer to the screenshots if necessary.) Climb around the to the right until Lara's back is toward the single horizontal pole. Press the direction key that makes Lara lean away from the wall or, if you're using a controller, or push the stick in that direction. (i.e., to the right if the camera is on Lara's left, back if the camera is behind her). Then jump in that direction to grab the pole. Now move the camera behind Lara and press Forward to swing around the pole. Just as Lara starts to swing upward, press Jump to let go and grab the handhold ahead. Climb around the corner to the right and drop down three times to reach the floor below.
BIG DOOR WITH PRESSURE PADS AND SERPENT HEADS: Opening the way to the next area requires a little ingenuity. The switch on the low platform in the middle of the room does not function yet. To make it work, you'll have to depress the 2 pressure pads on the floor below the serpent head statues.
First, stand facing the serpent head on the right, a little way back from the pressure pad. Grapple the metal ring on the snake's head and press Interact to pull. You'll need to tap the button several times to pull the head loose, but when it falls, it lands on the right pressure pad, holding it down.
Now locate the 2 small, carved stone blocks on the floor between the pads. Use Interact to pick one up. Carry it over to the left pressure pad and press Crouch to set it down. Repeat with the second block. Together, the two are heavy enough to hold down the pad.
NOTE: In the PC version, on some systems at least, this section can be a bit buggy. Sometimes the blocks bounce away crazily when you set them down. You may be able to fix this by going into the audio/video setup menu and turning V-Sync ON. If that doesn't fix the issue for you, try standing Lara on the pad facing the middle of the room, rather than the wall, when setting down each block. It may also help to point the camera at Lara, rather than viewing the room from behind her. In any case, just keep trying; it'll happen.
Once you have both pads depressed, climb onto the low platform and pull the switch to open the door.
Cinematic: Lara examines the carvings and finds them to be early Germanic in design, yet somehow much older. She deciphers the runes: "World of Mist," which she takes to mean Niflheim, the Norse realm of the dead.
†UPDATE HISTORY: 11/24/08 - First draft of walkthrough posted online.
11/25/08 - Moved note on weapons from the demo level to this level, since it's now the first level involving combat.
11/29/08 - Fixed the flashlight controls, thanks to tips from Rich B. and Al.
12/3/08 - Added keys/puzzle items count in header.
12/19/08 - Fixed a left/right mix-up in the "Treasure Hunting" section, thanks to Gerry N.
3/22/09 - Made numerous small changes for accuracy and clarity. Also noted the fourth shark, which may or may not appear in the underwater ruins. Thanks to Rebecca for first pointing it out. I'm not sure why it appears sometimes and not others. Perhaps it depends on how long you linger in this area.
12/24/09 - Added Nick & Charlotte's excellent screenshot map of the treasures in the first area.
7/24/11 - Added fix for bouncing movable blocks. Thanks to Marcos1 from the Steam forums for the discovery and Kees who told me about it.
WAS THIS WALKTHROUGH HELPFUL? If not, I apologize and invite you to contact me with any questions. If you need help right away, I recommend the r/TombRaider subreddit. Other fan-run forums are listed at tombraiders.net/stella/community.html. If this site was useful, please consider supporting it financially or in other ways. For details, visit tombraiders.net/stella/support.html. As always, I welcome your corrections/suggestions. Thank you!
Copyright © 2008- - Stellalune (). All rights reserved. The screenshots and videos included here were made using Fraps. Feel free to copy or print this walkthrough for personal use. By all means, share it with friends, but please include this credit line so people can send me their feedback. No part of this walkthrough may be reproduced on another site without permission. As an Amazon Associate I earn from qualifying purchases. Follow this link for details about this site's advertising and privacy policy.
Stella's Tomb Raider Site: tombraiders.net.