IMPORTANT NOTE ON SAVING & CHECKPOINTS: Checkpoints are the spots in each level where the game auto-saves. These are noted in blue and numbered in the walkthrough text to correspond with PC, Macintosh, PSP & Wii savegame files available for download. (Please note that the number and location of checkpoints vary slightly for the Nintendo Wii game.) Although it is also possible to save manually, the save system in Anniversary is very different from the older Tomb Raider games and differs in several ways from the TR Legend save system. Please see the Anniversary Controls page for details. This may save you a great deal of frustration as you make your way through Lara's latest adventure.
DESIGNERS' COMMENTARY: The commentary tracks are unlocked after completing each chapter (i.e., Croft Manor, Peru, Greece, Egypt and Lost Island). For details, see the Rewards page. You'll also find full transcripts of the commentaries here. (Many thanks to Treeble for these.)
LEVEL 1: MOUNTAIN CAVES | Updated: 8/26/13(†) |
Starting inventory: Dual pistols (unlimited ammo), 2 small medipacks
Kills: 14 Supplies: 5 (6)* Artifacts: 3 Relics: 1 Rubbing Rewards: 0(**)
Time Trial: 6:00(***)
CLIFFSIDE & CAVE ENTRANCE: The level begins with a CHECKPOINT. Head straight forward toward the back wall. Run up the snowy rock and jump to grab the narrow horizontal ledge on the wall ahead. Traverse to the right until you reach a break in the ledge and Lara won't go any farther. Press Right + Jump to clear the gap and grab on where the ledge continues. Climb around the corner and continue to the right. Near the end of the ledge, press and hold the direction key that makes Lara lean away from the wall (i.e., Down if the camera is behind her or Right if the camera is on her left) and Jump to grab the whitish stone plateau behind her. Pull up.
NOTE: Most of the controls in this game are the same as the ones in Legend. If you haven't played that game, try and follow the on-screen prompts, take a few minutes to review the instruction manual and/or my Anniversary Controls page, or practice a bit in the Croft Manor level.
Turn left and take a running jump across to the light-colored, tiered ledge ahead. Turn left and climb the ledges and handholds to the flat area in the corner above. Turn left once more so the big doors are below on the right.
The on-screen instructions explain how to grapple-swing. Take a running jump off the ledge and quickly press and release Grapple (no need to hold the key down) to attach the hook to the metal ring above the doors and hang from the cable. If you don't press Grapple quickly enough, Lara will land on the ledge below. Turn around and jump back to the light-colored, tiered ledge, which is now ahead on the right. Climb back up and try again. If you're having trouble with this, try releasing the Jump key once you've made the running jump and Lara is in the air. Then quickly press Grapple.
NOTE: The double-jump technique used for grapple-swinging in Legend no longer works in this game.
While hanging from the grapple cable, keep the camera pointed toward the ledge on the other side of the door. Press and hold Up to swing back and forth. The longer you hold the key the higher Lara will swing. When she's level with the ledge, swing toward it once more and press Jump to release the cable and land on the ledge. This is actually the end of a broken bridge that once spanned the chasm. Turn right and head up the steps to CHECKPOINT 2.
A brief cut scene shows the big doors at the entrance to the caves.
If you approach the Peruvian guide and press Interact, Lara will talk to him. He mentions an inscription above the door.
Climb the rocks to the left of the doors and jump to grab the flat ledge against the wall ahead; pull up. Use the metal ring above the doors to grapple-swing across to the ledge on the other side of the doors. Face the wall and grab the lowest handhold. Jump up to grab the next. Climb to the left. Then jump to the left to grab the ledge above the door. Pull up. Stand near the button and press Interact to use it.
Cut scene: The huge doors swing open and the guide stares into the darkness. A few moments later, a pack of wolves rushes out and attacks the man. Lara leaps to the rescue and kills the wolves. Unfortunately it's too late for the guide. Lara enters the cave and the doors close behind her.
CAVE INTERIOR – DART TRAPS: CHECKPOINT 3 registers after the cut scene. Follow the passage to a large carved stone pressure pad on the floor. Stepping on it activates the dart traps ahead. You can now choose whether to proceed past the traps or deactivate them. You may be able to run straight on past the traps without Lara taking any damage, but if you're not in a hurry, go carefully, stopping before each trap and waiting for a pause between darts before quickly moving past, and Lara won't be injured at all. You can also roll under the traps that have no floor-level darts. (Press Crouch while moving forward to roll.)
If you prefer to deactivate the traps, approach the first one and turn left. Grab the lowest handhold. Jump up to grab the next higher handhold. Then climb around the corner. Jump up again then jump up once more to grab the switch. After Lara's weight pulls it down, tap Crouch once to drop and grab the handhold below the switch. Jump back to grab the handhold on the other side of the pressure pad. Climb to the left around the corner. Drop and grab the second switch, deactivating the dart traps. Drop to the ground and continue along the passage and around the next bend to CHECKPOINT 4.
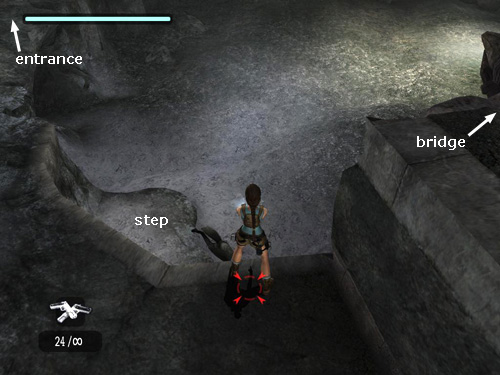
CAVE WITH STEPS & BROKEN BRIDGE: Go up the steps on the right. Follow the walkway around to the left, take a running jump across the gap and grab the wooden platform ahead; pull up. Continue around to the left. Jump the next gap to grab another higher wooden platform and pull up.
ARTIFACT #1: The obvious path is to the left but ignore that for now. Instead, take a detour to pick up an artifact. (The following sequence is shown in this series of screenshots.) Turn around and take a running jump to grab the stone ledge above the gap you just crossed. Pull up. Go to the end of the ledge and jump to the next one. Turn to face out over the broken wooden walkway and jump to the next ledge ahead. Follow the path under the rock overhang. At the end, turn right. You can see the artifact in the dark cave ahead. Between the ledge Lara is standing on and the cave with the artifact is a small whitish ledge with a man-made edge of darker stone. Take a running jump to grab that edge. Pull up. Step to the far edge but be careful not to slide down the slope accidentally. If you do, Lara will fall to the ground below, taking some damage, and you'll have to repeat the climb to this point. When you're ready, step onto the slope and, just as Lara starts to slide, jump and grab the ledge ahead. Pull up and take ARTIFACT #1 (9/44) by standing over it and pressing Interact. Hmmm. . . looks like a T. rex's tooth. ;)
NOTE: Special items like artifacts and relics do not appear in your regular inventory. To see how many you've collected press Escape/Pause and choose "Level Statistics" from the menu.
Continue forward past where the artifact was. Take a running jump across the gap (above where you walked earlier) to grab the handhold on the wall ahead. Traverse to the left around the corner and drop into the cave opening. Enter the caves and cross CHECKPOINT 5.
BAT CAVES: Three bats fly toward you from the tunnel straight ahead. Shoot them. Before going on, enter the small cave on the left. There's a raised opening in the far right corner but it's too high to reach. So climb onto the rounded, whitish rock and take a running jump to grab the edge of the opening. Pull up and get a large medipack. Drop down, return to the main passage and continue to the left.
There's an opening in the ceiling ahead where light and a few snowflakes filter in from outside. Around the next bend you'll encounter 3 more bats. Kill them and continue to CHECKPOINT 6.
LARGE CAVE WITH CENTRAL COLUMN: From the entrance you can look down over this large cave. You may notice another artifact off to the left on a high ledge. Ahead is a long slope with a metal ring above. If you don't want the artifact, just slide down the slope to the ground and skip the next 5 paragraphs.
ARTIFACT #2: To get the artifact, you must grapple-swing to the other side of the cave. Start to slide down the slope. About halfway down, press Jump then Grapple to leap off the slope and snag the metal ring on the celing with your grappling hook. (The path to the artifact is shown in these screenshots.)
If you don't manage to grapple in time and Lara slides down the ramp, shoot the 2 bats that fly toward you and then climb back up to the entrance using the rocks to the right of the ramp (as shown in these screenshots) and try again.
When you have grappled the ring successfully and Lara is dangling from the cable, hold Interact and press Up to climb up the cable a bit. If necessary, adjust the direction Lara is facing by tapping the Left/Right direction keys. Swing back and forth until Lara is level with the handhold on the wall ahead. When you get enough momentum going, swing toward the handhold and jump to grab it.
Climb to the left and jump straight up to grab the next handhold. (You can also grapple-swing directly to the higher handhold but that's a little trickier for beginnners.) Climb to the middle of this ledge and then jump back to grab the ledge behind you on the fat column in the middle of the cave. Climb to the right, drop down once, climb around the corner and continue to the right as far as you can go. Jump back to grab the edge of the ledge behind. Pull up and take ARTIFACT #2 (10/44).
To get down, carefully move to the point of the ledge. If you shift the camera outward, you can see a light-colored handhold below. Step off here and grab the edge. Drop once more to grab the handhold. Then drop to the ground.
Immediately draw pistols to kill the 2 bats that flutter down from the ceiling. Go to the side of the cave opposite the long slope, drop down into the shallow pit and use the switch to open the nearby door.
In the Wii version, this is a two-part puzzle: First go to the wall opposite the switch and press Interact to examine the carved panel. Press and hold A and then sweep the Wii remote up and down to use the brush to whisk away the dust obscuring the carving. When the image is clean, the archaeological tool kit automatically switches to the paper and charcoal. Hold the A button to wield the charcoal and use the remote to take a rubbing of the carving. Now go to the switch mechanism and press Interact to access the puzzle lock. Use the remote along with the A button to rearrange the three cylinders so the pictures match the ones you found in the carving: face, bird and crouching figure, from top to bottom. When you've solved the puzzle, the locked door opens.
Go through the door and follow the passage past CHECKPOINT 7 to a new area.
ROOM WITH WOODEN BRIDGES & WOLVES: Follow the ledge around to the start of the rickety wooden bridge. A pair of wolves appears below. You can take a few steps onto the bridge if you want to, but don't go too far out. If you do, the bridge collapses, dumping Lara into the wolf pit.
To shoot the wolves from above, approach the edge of the stone ledge or the bridge. The wolves will move in below Lara, making it hard to target them. Press and hold the Target Lock key to keep a lock on one wolf (as shown in this screenshot). Even though the wolf is out of your line of sight, Lara can still see it. Fire until it's dead. Then release and re-press Target Lock to target the second wolf. If you're playing the Wii version and want to target the wolves down below, instead of pressing Target Lock, just hold the camera control button (C) and move the remote until you can sight on the wolves. Aim with the remote and fire when the targeting reticle turns red. If necessary, change positions on the ledge for a better vantage point.
If you fall down by accident, there's a low rock step where you can climb out of the pit. It's located between the entrance and the bridge (also shown in the same screenshot).
If you choose to drop down and confront the wolves, note the on-screen instructions: Tap the Jump key to recover if Lara gets knocked down. If one of the wolves bites Lara and won't let go, tap the Left/Right keys in rapid succession (PC), shake the nunchuk back and forth (Wii) or waggle the control stick (other consoles) to break free.
Once the wolves are dead, if you didn't already do so accidentally, step out onto the bridge and allow it to collapse. Pick up a small medipack in the little cave beneath one end of the second, higher wooden bridge. (There's a second small medipak in the other dark cave in the Wii game. Use the flashlight—control pad Left—if necessary to see into the dark hollow.)
There's also an artifact glowing in a raised opening on one side of the pit, but you can't reach it yet. You'll get it later from the other side. For now, use the dangling end of the broken bridge as a ladder to climb up out of the pit to CHECKPOINT 8.
Notice the small medipack in the raised alcove on the left. To get it, first turn right and begin to climb up toward the higher bridge, but don't pull all the way up. While hanging from the top ledge, climb to the right as far as possible. Then jump back to grab a handhold on the square pillar behind. Climb around the pillar to the right. (The broken bridge will now be on Lara's right.) Jump up to grab the handhold above. Then jump back to grab onto the second square pillar. It's a long jump, and you'll see a message on screen reminding you that when Lara grabs with only one hand, you should press Interact to do a saving grab so she doesn't fall. Do that now to make the message go away. Climb around to the right as far as you can and then jump to the right to grab the edge of the alcove. Pull up, get the health pack, then drop down, cross the ledge and climb the handholds leading up to the second bridge.
This bridge is safe to cross over. On the other side, head to the left and climb up to the next room.
BEAR PIT: Turn right and approach the edge of the pit with caution. CHECKPOINT 9 registers near the dangling rope. A huge brown bear lurks in the pit below. Climb down the white stone handholds on the right wall. There's a rough stone step at the bottom where you can stand and shoot the bear. As long as she stays there, it can't reach Lara. If the bear won't come out of the dark passageway, try climbing back up the handholds, approaching the middle of the ledge and then climbing back down into the pit. That should get its attention.
Alternatively, you can climb down the handholds to trigger the bear's appearance, then climb back up and take a running jump from the edge of the pit to grab the dangling rope. Then swing across to the far side of the pit to shoot the bear from above. Or, while hanging from the rope, turn to the left to face the alcove with the large medipack. (Press the J key/L2 button to center the camera behind Lara to check that she's pointing in the right direction.) Climb down the rope a bit (by holding Interact then pressing Down), then swing and jump into that alcove. Get the health pack and shoot the bear from here.
ARTIFACT #3: When the bear is dead, drop down into the pit and follow the passage to a door and the switch that opens it. Go through and continue to ARTIFACT #3 (11/44). The door closes behind you, so hop down from the cave opening into the area where you fought the wolves earlier. Climb back up the end of the broken bridge, cross CHECKPOINT 8 again and climb up to the higher bridge. Cross the bridge and return through the passage to the bear pit and CHECKPOINT 9 again.
If you didn't already get the large medipack in the raised alcove on one side of the bear pit, do that now, either using the rope (as described above) or by taking a running jump along the ledge near the wall to grab the edge of the alcove (as shown in this screenshot). Once you've obtained the medipack, drop back down into the pit, climb back up the handholds to the ledge and once again jump to grab the rope.
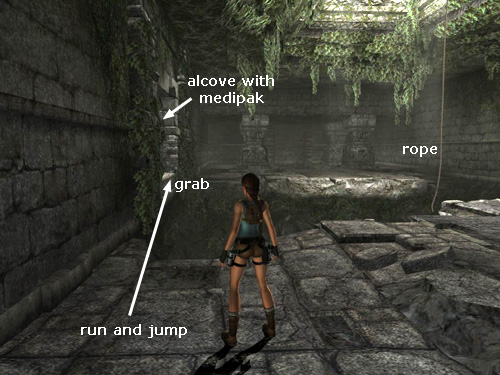
BEYOND THE BEAR PIT: Now swing across the pit to the other side and go behind the columns on the left to find another large medipack. Continue down the ramp, up a set of stairs and on to a shallow pit with greenery and a broken wooden structure. Take a running jump to grab the horizontal pole jutting out of the left wall. Position the camera behind Lara and then press Forward to swing around the pole. Just as Lara reaches the bottom of a swing, press Jump to leap from the pole and grab the opposite ledge. Climb up and follow the passage up the stairs to CHECKPOINT 10.
LARGE ROOM WITH SLOPING SIDES AND DART TRAPS: With good timing, it's possible to run past the dart traps and take little or no damage. But if you want to be really safe, approach each trap in turn, stopping just before the grooves in the floor that mark each trap. Watch the way the darts fly and run through just after a dart (or group of darts) passes.
Beyond the dart traps is a square pressure pad on the floor. Stepping on this will open the huge doors ahead, but you'll need to unlock them first.
NOTE: An on-screen message explains how to use Lara's journal to find clues about her current predicament. Press Tab/Select to go to the inventory screen. Press Down to see the Items section of the inventory. Press Left/Right to rotate through the items until Lara's journal is selected. Then press Enter (I think it's X in the PlayStation game) to access the journal. In this case, all it says is that the doors need to be opened. Not too helpful. ;)
The door-opening sequence is included in the same video walkthrough that shows how to obtain the RELIC.
Turn left and climb the handholds to the ledge above. A wolf's howl warns of an enemy ahead. Step forward cautiously, turn left and get ready to fight. If you immediately run forward to get a lock on the wolf and then jump back shooting, you should be able to kill it before it reaches Lara. When it's dead, turn around to face the huge counterweight hanging from a rope against the wall. Grab onto the handhold in the corner to the left. Jump up to grab the handhold above. Climb around the corner to the right and then jump to grab the counterweight. Lara's weight pulls it down, unlocking one side of the big doors.
Both counterweights are on timers. Once the first weight has been lowered, you have a little less than 2 minutes to get to the second counterweight, lower it, and then drop down and step on the pressure pad before the first counterweight returns to its original position. If you don't make it in time, you can try again. A low thumping sound is audible as the first weight gradually moves upward. When the sound stops, time is up.
Turn around and go through the small doorway from which the wolf emerged. At the end of the corridor, turn left and take a running jump to grab the first of three horizontal poles. Swing around and jump to grab the next pole, then the next, and from there, jump to the opposite ledge.
Again howling sounds warn you to proceed with caution. There's a second wolf ahead on the left. You can use the same technique as you did with the first wolf: run forward to get a lock on it and then jump back shooting. When it's dead, approach the small doorway to draw out a third wolf. Kill it the same way. Then go through the small doorway and follow the corridor to the end, where you'll find the second counterweight holding the doors closed.
Climb the handholds in the alcove to the right. Jump back to grab the horizontal pole, which then swings around toward the counterweight. Adjust Lara's position left to right if necessary so she's squarely facing the counterweight. Swing around and jump to grab the counterweight, which then descends, unlocking the other side of the big doors. Drop down near the doors and step on the pressure pad to open them and trigger CHECKPOINT 11.
The second counterweight is also timed to retract after a little less than 2 min tues. It too makes a thumping sound as it retracts. If you've already lowered the first weight and it hasn't retracted yet, you should have time to drop down and step on the pad. If the first weight has already returned to its original position, climb up the handholds to the left of the doors once more and lower the weight on that side again. Then drop down and step on the pad. If this doesn't work, wait for both weights to return to their original positions and repeat the whole procedure. If you need extra time, lower the counterweight to the right of the door first, then the one on the left.
HIDDEN RELIC: Once you've opened the doors, don't leave yet. There's still treasure to be had. Climb back up the handholds to the left of the big doors. Turn left and follow the corridor to the end, just as you did before, only this time no wolves. Swing across the three horizontal poles to the other side and follow that corridor to the end, where the second counterweight is.
Climb the handholds on the left. (The following sequence is shown in these screenshots and in this video.) Move the camera directly behind Lara and jump back to grab the horizontal pole. Don't wait for Lara to swing around the pole. Just keep holding the Down key and immediately press Jump to leap off the pole before it swings all the way to the side. If you time it right, Lara will grab onto the narrow stone ledge on the wall to the left of the counterweight. If you miss, just climb back up the handholds and try again.
Once Lara is hanging onto the narrow ledge, traverse to the left as far as you can and jump to grab the horizontal pole sticking out above the big doors. (Note that you cannot do this before the doors are opened because the poles are not extended.) Move the camera behind Lara and check to make sure she is squarely facing the small stone handhold on the wall ahead. Climb laterally along the bar if necessary to make sure she is. This is important because the right side of that narrow stone ledge is broken off so she won't be able to grab there. Swing around and jump to grab the handhold. Jump straight up to grab the handhold above. Move to the right a bit and jump to grab the higher horizontal pole behind. Swing, jump and grab the handhold on the opposite wall. Then jump straight up to grab the top of the ledge. Pull up to find a RELIC (1/8), the Killer Whale Bottle.
NOTE: If you'd like to learn more about the real-life inspirations for objects like this killer whale bottle, Tomb Raider Horizons publishes a fascinating series called "Arte-Factual," which covers art and artifacts from all the TR games.
In the Wii version the relic is hidden behind a section of crumbling wall. Approach it and press Interact to use your archaeological tool kit. Lara automatically selects the pickaxe. Swing the Wii remote to hack away at the rock to reveal the treasure. Then pick it up.
BUG NOTE: There is a potential bug here in the Wii game. If you don't obtain the relic the first time through the level, you may not be able to get it. If you return to this area after the next level loads, or if you reload a save from the Caves after completing the level, you may not be able to interact with the section of wall where the relic is hidden. Some possible solutions are included in a footnote below.
To get down, drop and hang from the long side of the ledge. You should now be above the narrow stone ledge you grabbed after swinging around the moving horizontal bar. Drop to grab that ledge then drop to the floor, taking no damage. Climb back down to the floor and go through the big doors to end the level.
IMPORTANT: At the end of each level, the game will ask if you want to save your progress. Be sure to do this. In fact, I strongly recommend saving manually at least a few times in each level. Then if you miss something, decide to replay a section to do something differently or encounter a bug in the game, you can choose from several saves instead of being stuck with only the autosave. For more information, see the Anniversary Controls page.
If you missed the relic, don't worry. You can still retrieve it after the level finishes. When the next level begins, Lara is still in this same room, and the relic should still be in place. Just follow the walkthrough above to get it. Then proceed up the stairs and continue with Level 2. You can also obtain any missed artifact or relic by loading an earlier save. See the Anniversary Controls for details. This may not work for this particular relic in the Wii version of the game, however, due to the bug described above.
†UPDATE HISTORY: 6/1/07 - First draft of walkthrough posted online.
6/11/07 - Added missing pickup, the second small medipack in the ROOM WITH WOODEN BRIDGES & WOLVES, thanks to Mike S. and Liz D.
8/29/07 - Added info about the timers on the door mechanism at the end of the level. Thanks to the many players who notified me about this, credited below. Added alternate method of obtaining the second large medipack, suggested by Niyaz. Also made several other minor changes for clarity and flow.
8/30/07 - Added final note about missed artifacts and relics.
2/5/08 - Added Nintendo Wii edition info.
2/11/08 - Changed the numbering system for artifacts, relics and rubbings, as explained in the note below.
4/29/08 - Added Macintosh save files and info. Thanks to Andrew W. and Chris H.
5/24/09 - Added note and fixes for relic bug in the Wii game.
10/11/09 - Added videos for all relics.
8/26/13 - Added link to Tomb Raider Horizons.
ACKNOWLEDGEMENTS: My gratitude goes to am sky, Desiree, Joyce, Karl Z., Linda, Liz D., Margaret, Mike S., Niyaz, Steve H. and Tombterp for their help with this level.
WII GAME RELIC BUG FIXES: If you're playing the Wii game and are unable to obtain the relic because you cannot interact with the crumbling wall where it is hidden, here are a few possible solutions:
*NOTE ON ITEM COUNT: There is an additional medipak in the ROOM WITH WOODEN BRIDGES & WOLVES in the Nintendo Wii game.
**ABOUT ARTIFACTS, RELICS & RUBBING REWARDS: Finding artifacts and relics (formerly known as "secrets") unlocks various extras like outfits and concept art. The Nintendo Wii game also includes "rubbing rewards" in some levels. I have numbered each of these bonuses in the walkthrough. So, for example, "Artifact #2 (10/44)" means that this is the second artifact in this particular level and the 10th out of 44 artifacts in the whole game. Please see Anniversary Rewards page for more info on all of these.
***ABOUT TIME TRIALS: After completing a level, you will be able to replay it in Time Trial mode to unlock cheat codes. For more info, please see the Time Trials and Rewards pages. For help beating this level's time trial, see Eldin's Mountain Caves - Time Trial Tips.
WAS THIS WALKTHROUGH HELPFUL? If not, I apologize and invite you to contact me with any questions. If you need help right away, I recommend the r/TombRaider subreddit. Other fan-run forums are listed at tombraiders.net/stella/community.html. If this site was useful, please consider supporting it financially or in other ways. For details, visit tombraiders.net/stella/support.html. As always, I welcome your corrections/suggestions. Thank you!
Copyright © 2007- - Stellalune (). All rights reserved. The screenshots and videos included here were made using Fraps. Feel free to copy or print this walkthrough for personal use. By all means, share it with friends, but please include this credit line so people can send me their feedback. No part of this walkthrough may be reproduced on another site without permission. As an Amazon Associate I earn from qualifying purchases. Follow this link for details about this site's advertising and privacy policy.
Stella's Tomb Raider Site: tombraiders.net.