IMPORTANT NOTE ON SAVING & CHECKPOINTS: Checkpoints are the spots in each level where the game auto-saves. These are noted in blue and numbered in the walkthrough text to correspond with PC, Macintosh, PSP & Wii savegame files available for download. (Please note that the number and location of checkpoints vary slightly for the Nintendo Wii game.) Although it is also possible to save manually, the save system in Anniversary is very different from the older Tomb Raider games and differs in several ways from the TR Legend save system. Please see the Anniversary Controls page for details. This may save you a great deal of frustration as you make your way through Lara's latest adventure.
LEVEL 2: CITY OF VILCABAMBA | Updated: 4/2/19(†) |
Kills: 17 Supplies: 8 Other: VILLAGE KEY (also 2 COGS - Wii version only)
Artifacts: 1 Relics: 0 Rubbing Rewards: 1(*)
Time Trial: 7:00(**)
NOTE: If you missed the relic in the previous level, you can still obtain it now. See the note at the end of the Mountain Caves walkthrough for info.
ENTRANCE FROM CAVES: CHECKPOINT 1 registers between levels. Start up the stairs but get ready to move when a bear appears in the doorway ahead. Follow the on-screen instructions for using the adrenaline dodge move. (Here it helps to move backward, away from the charging bear, as you attempt the dodge, rather than trying to move to the left or right in the narrow space between the dart traps.)
IMPORTANT: Failing to complete this little adrenaline dodge tutorial may result in a bug later on in the game, in which the maneuver does not work correctly when you really need it. As far as I know, this only happens in the Xbox 360 and possibly the PS2 games, but it merits a warning. Also, no matter which system you're using, you will need the adrenaline dodge to defeat certain bosses later in the game. So I do recommend learning how to use it. If you're playing the Xbox 360 or PS2 game, and you fail the tutorial, I highly recommend reloading the level-start autosave and replaying this section until you get it right. It could save big headaches later on.
The adrenaline dodge is also covered in detail on the Anniversary Controls page and in this video walkthrough.
If Lara is injured in the fight, note that medipacks and other equipment carry over from level to level, unlike in Legend. So you will probably have a few health packs left from the caves.
When the coast is clear, return up the stairs and follow the corridor to a pit with a vertical wooden column. Jump to grab it, press Down to slide down and then press Crouch to let go and drop. Go under the ledge to get a small medipack. To grab onto the second pole—the one with the stone base—run up the low ramp and jump to grab it. Alternatively, grab the handhold on the wall, jump to grab the next handhold to the left, jump up to the one above and from there, jump to grab the vertical pole. Climb up the pole and jump to the rim of the pit. Follow the passage through the wooden doors to CHECKPOINT 2.
OPEN AREA WITH HUTS & POOL: Go down the steps toward the village. When you reach the landing above the last flight of steps, 2 wolves attack. If you back up the stairs while firing, they shouldn't follow you very far, though you may have to go back down and draw them out several times in order to kill them. When the coast is clear, continue downstairs to CHECKPOINT 3.
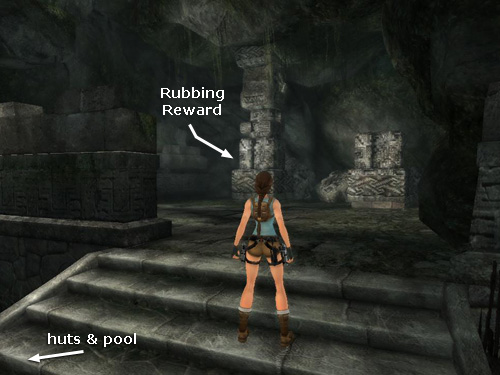
In the Nintendo Wii game, you'll find a RUBBING REWARD (1/12), titled "Soul of the Puma," on this landing. If Lara is standing at the top of the lower flight of steps with her back toward the village, the panel with the carving is ahead on the left. (The spot is indicated in this screenshot.) Approach it and press Interact. Then hold the A button and swish the Wii remote to brush away the dust. When the carving is clean, the tools automatically change to paper and charcoal. Use the same controls again to make the rubbing. Later, when you revisit Croft Manor, you'll see this rubbing on display. (See the Croft Manor walkthrough for details.)
Now head down that final flight of steps toward the village. As you approach the pool, another bear emerges near the buildings ahead. You can confront it or retreat up the stairs and shoot it from the landing. It won't follow.
Jump into the pool and swim down to the bottom, where you'll find a small medipack in one corner. Surface to breathe. Now get ready for a longer swim through the underwater tunnel. If you're unfamiliar with the swimming controls, it may help to first scope out where the tunnel opening is and come to the surface again. Then position Lara so she's treading water facing the opening, dive down and swim down through it. Tap Interact as you go to make Lara swim faster. Follow the passage as it curves around to the right. Then swim along the top of the tunnel to pass the log blocking the bottom half. When the tunnel opens into a small, flooded room, swim straight across to the opposite wall and press Interact to pull the lever mounted there. This opens the grating at the top of the room so you can surface and breathe. Swim to the middle of the shaft so Lara is directly beneath the opening and then head for the surface. Climb out of the water at CHECKPOINT 4.
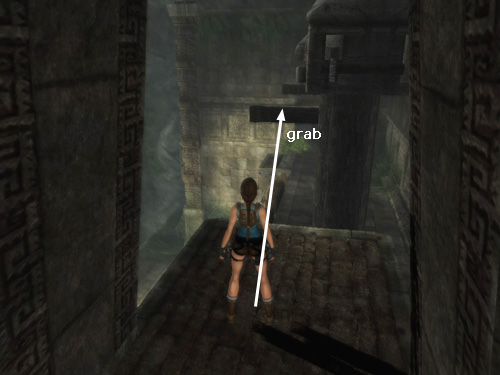
HUT INTERIOR: Use the switch on the wall to open the door leading back out to the area by the pool. CHECKPOINT 4a registers after you pull that switch. (If you save here and reload, the game puts Lara in this hut with the door open.) Go up the wooden stairs and take a running jump to grab the window of the next hut. Pull up.
If you miss the jump and land between the huts, just go back through the door you just opened, climb the stairs and try again. If you didn't open that door, you'll need to swim through the underwater tunnel again to get inside the hut.
INSIDE THE SECOND HUT: From the windowsill, run forward across the unstable wooden platform—on the right side where it juts out a little bit farther—and jump to grab the edge of the alcove ahead before the platform collapses. Get the small medipack and drop down. If you don't make it to the alcove on the first try, just pull the cage out of the doorway, push it beneath the alcove and use it to climb up. To move the cage, stand next to it and press Interact to make Lara grab onto it. Then use the direction keys to push/pull. Press Interact again to let go.
Push the cage through the small, square doorway into the next room and use it to climb onto the ledge on the right. Cross over the wooden platform and pick up a box of shotgun ammo and another small medipack. Drop down and get more shotgun shells and the VILLAGE KEY in the alcove beneath the platform. CHECKPOINT 5 registers when you take the key.
Pull or push the cage back through the small doorway into the other room. Shoot the lock holding the wooden doors closed. Then push the cage out into the open area, past the next hut and the pool, then to the right. Push it up against the vertical pole with the stone base.
PATH TO THE ARTIFACT: (The following sequence is shown in a series of screenshots.) Climb onto the cage and jump onto the base of the pole. Jump again to grab the pole. Climb to the top and jump from the pole to grab the jutting section of the ledge to the left. Pull up and shoot the 2 bats that attack Lara.
If you're unfamiliar with the controls, the jump from the pole to the ledge can be a little challenging. Try pointing the camera toward where you want Lara to grab. Then press Forward + Jump. Alternatively, jump and grab the narrow part of the ledge against the wall, then traverse to the left to where the ledge widens and pull up. The bats appear as soon as Lara touches the ledge, however, so make sure you traverse and pull up as quickly as you can.
From this ledge, you can spot the artifact across the valley on a ledge above the pool. That's where you're headed. There's no direct route, though. So start by jumping to grab the horizontal bar. Swing around, jump and grab the ledge ahead. Pull up near CHECKPOINT 6.
Turn left and use the metal ring above to grapple-swing across the gap to the narrow handhold on the far wall. Climb to the left then jump to grab the nearest horizontal bar. Swing, jump and grab the next bar. Then swing and jump to land on the ledge next to the small pool feeding the waterfall. Another pair of bats attacks, though they may get stuck under the ledge. You should be able to draw them out by walking to the opposite edge. Pick up ARTIFACT #1 (12/44). To get down from the ledge, jump to the sloping hut roof and slide to the ground. You can also drop into the pool, but you'll have to swim through the underwater tunnel into the hut in order to climb out of the water.
VILLAGE GATE: Go to the wooden gate between the two buildings where you jumped from window to window earlier. Use the VILLAGE KEY in the lock on the right to open the gate, and then go through to CHECKPOINT 7.
When you step forward, 2 wolves spring out. Retreat to the open area to fight them. When you re-enter the dark room with the carved column in the middle, another wolf comes from the area ahead on the right. Kill it and continue.
TEMPLE WITH ORNATE FAÇADE AND DOUBLE DOORS: On the other side of the open area is a large building with big double doors in the middle and two smaller doorways on each side. CHECKPOINT 8 registers at the top of the steps. You'll need to enter each of the side rooms to unlock the big doors, and it doesn't matter which way you go first.
In the Nintendo Wii game, the side doors are closed, and there are gear puzzle locks beside each door that need to be solved in order to enter. Approach either lock and pick up the COG lying on the ground nearby. Stand facing the lock mechanism and press Interact to bring up your inventory screen. Select the cog you just obtained and press A to use it. Now use the A button and remote to rearrange the cogs on the spindles until they connect the larger gears on the left and right. Then pull the switch to activate the mechanism and open the door. You'll need to repeat the process for the second side door, using another COG, found on the ground near the other lock, in order to enter there.
Go through the RIGHT DOORWAY and follow the hallway past CHECKPOINT 9 to a pool. Swim to the bottom to collect a small medipack. Climb out of the water near the entrance, go up the steps on the left and follow the walkway around to the end. Take a running jump across the water to grab the handhold on the far wall. Jump up to grab the decorative molding. Climb to the left and then jump up to grab a higher handhold. Climb to the left as far as you can and then jump to grab the molding on the next wall near the corner. Traverse to the left and pull up onto the jutting ledge.
Follow the ramps to the top. Step out onto another ledge overlooking the same pool and shoot the 2 bats that swoop down from above. Take a running jump to grab the next ledge. Pull up and go through the doorway, which overlooks the roof of the temple. Take a running jump to grab the thick wooden beam that protrudes horizontally from the door mechanism (this screenshot shows the spot). Lara's weight moves the mechanism, unlocking one side of the double doors. Drop to the roof.
You can't quite reach the ledge jutting out from the room on the other side of the roof. So instead climb down the face of the temple. If you drop and hang from one of the small, straight ledges above either doorway, you can then drop safely to the ground.
Go through the LEFT DOORWAY and follow the hallway past CHECKPOINT 10 to another pool. Go up the steps and around to the end of the ledge. Take a running jump to grab the ledge ahead; pull up. Jump to grab the narrow ledge on the wall ahead and to the right. Climb to the right as far as you can and then jump past the gap in the ledge to grab on where it continues. Climb nearly all the way to the corner. Then jump back to grab the ledge behind. Pull up and go through the doorway.
NOTE: There is a potential bug here, in which Lara will not grab the ledge in front of the passageway with the ramp. I have listed several possible fixes for this problem in a footnote below.
Follow the ramps to the top. Step out and shoot 3 more bats. Take a running jump to grab the opposite ledge and pull up. Go through the doorway and jump to grab the beam protruding from the door mechanism, just as you did before. This time, when the mechanism turns, the doors open and CHECKPOINT 11 registers. Drop down via the ledges above either doorway and go through the doors.
BEYOND THE BIG DOORS: Follow the hall to CHECKPOINT 12, which is above a pit. Jump over to the ledge at the top of the ramp. The on-screen instructions explain how to slide and grab the pole ahead, but don't do that yet. Instead slide all the way to the bottom of the ramp and kill the wolf lurking in the dark area ahead. Then pick up the shotgun ammo. To get out of the pit, pull the cage out of the small alcove and move it under the light-colored handhold on the wall beside the ramp. Climb back up to the rim of the pit where you started. Then jump back to the ledge above the ramp.
This time slide down and, as Lara slides, jump to grab the horizontal bar. Swing around, jump and grab the ledge ahead; pull up. The on-screen instructions explain how to perch on top of a vertical pole. Basically, you just jump in that direction and Lara lands automatically. If she loses her balance, just tap Interact once to right her. Jump to grab the next ledge on the left or right side, not in the middle where the edge is broken. The easiest way to jump from the perching position is to point the camera where you want Lara to go and then press Jump + Forward.
Follow the hallway to the next pit. Take a running jump to grab the light stone handhold on the far wall. Drop to the ground. Go to the other side of the pit and climb onto the chunk of rock on the right. Grab the handhold on the wall, traverse to the right a bit and then jump back to grab the horizontal pole. Swing around the pole and jump to grab the handhold on the opposite wall. Climb to the left a little and then jump up to the higher handhold.
NOTE: If Lara won't grab the stone handhold in the section above, try running along the chunk of rock diagonally and jumping to grab it. Or, skip the rock altogether and climb onto the stone base below the horizontal pole. Then jump straight up to grab the pole.
Climb around the corner and continue climbing to the left until Lara is hanging near the middle of the ledge with the flying darts above. Rather than pulling up and risking injury, make sure Lara is positioned so the vertical pole is directly behind her (as shown in this screenshot) and then jump back to perch on it. When making the jump to the next ledge, aim for the left side, where it juts out a bit farther.
Continue along the hallway. As you near the waterfall ahead, the air grows misty (a nice design touch). Head toward the opening to trigger CHECKPOINT 13 and end the level.
†UPDATE HISTORY: 6/1/07 - First draft of walkthrough posted online.
6/2/07 - Adjusted supplies count. (No new items added, but the count was off in the original draft.)
6/3/07 - Added the note on the grab bug in the left side of the temple and some possible solutions (below).
6/11/07 - Added missed small medipack at the bottom of the pool in the village, thanks to Andy and Susie F.
8/30/07 - Corrected item count. (I had included all supplies in the walkthrough but miscounted them for the total.) Included tips for buggy grab in the second pit beyond the big doors, thanks to Jem and Tish. Added missed CHECKPOINTS 5 and 8, and renumbered subsequent checkpoints. Fixed a couple of typos and revised several sections slightly for clarity and flow.
2/5/08 - Added Nintendo Wii edition info.
2/8/08 - Fixed the name of the rubbing reward, which I had listed incorrectly. Whoops!
2/11/08 - Changed the numbering system for artifacts, relics and rubbings, as explained in the note below.
4/29/08 - Added Macintosh save files and info. Thanks to Andrew W. and Chris H.
4/22/09 - Added link to TRA Flight patch in bug solution below.
1/9/10 - Added bug note at start of level.
2/25/11 - Amended bug note since it seems the adrenaline dodge glitch applies to both the Xbox 360 and PS2 games. Thanks to Von Croy for confirming PS2 involvement.
4/2/19 - Added bug fix #3, enabling V-sync, thanks to a tip from zegzav on YouTube, sent in by Marc O.
ACKNOWLEDGEMENTS: Thanks to Andy M., Chris O., Dan O., Dan W., Ivan B., Jem, Jena, Sharron M., Tish, Von Croy, Will B. and Wizard for help with this level.
*ABOUT ARTIFACTS, RELICS & RUBBING REWARDS: Finding artifacts and relics (formerly known as "secrets") unlocks various extras like outfits and concept art. The Nintendo Wii game also includes "rubbing rewards" in some levels. I have numbered each of these bonuses in the walkthrough. So, for example, "Artifact #2 (10/44)" means that this is the second artifact in this particular level and the 10th out of 44 artifacts in the whole game. Please see Anniversary Rewards page for more info on all of these.
**ABOUT TIME TRIALS: After completing a level, you will be able to replay it in Time Trial mode to unlock cheat codes. For more info, please see the Time Trials and Rewards pages. For help beating this level's time trial, see Eldin's City of Vilcabamba - Time Trial Tips.
POSSIBLE FIXES FOR GRAB BUG IN LEFT SIDE OF TEMPLE: A number of players have encountered a bug in which Lara will not grab the ledge in front of the passageway with the ramp. Perhaps this will addressed in a forthcoming patch, but in the meantime, here are a few suggestions other players have shared with me:
IMPORTANT NOTE ABOUT SAVEGAME FILES: The PC save files linked to this walkthrough include instructions for use. Additional save files can be found on a separate Anniversary save page. Please note that my saves were made using the North American DVD version of the game. As far as I know, they are compatible with most other DVD versions and with the Direct2Drive download version. They will not work with certain unofficial versions, which use a different source code. Saves for one of the torrent versions are available on my Anniversary save page.
WAS THIS WALKTHROUGH HELPFUL? If not, I apologize and invite you to contact me with any questions. If you need help right away, I recommend the r/TombRaider subreddit. Other fan-run forums are listed at tombraiders.net/stella/community.html. If this site was useful, please consider supporting it financially or in other ways. For details, visit tombraiders.net/stella/support.html. As always, I welcome your corrections/suggestions. Thank you!
Copyright © 2007- - Stellalune (). All rights reserved. The screenshots and videos included here were made using Fraps. Feel free to copy or print this walkthrough for personal use. By all means, share it with friends, but please include this credit line so people can send me their feedback. No part of this walkthrough may be reproduced on another site without permission. As an Amazon Associate I earn from qualifying purchases. Follow this link for details about this site's advertising and privacy policy.
Stella's Tomb Raider Site: tombraiders.net.