TOMB RAIDER: THE PROPHECY for GAME BOY ADVANCE - PART 4 - CULT FORTRESS
NOTE: Letter designations for buttons (B#), switches (S#), doors (D#), etc., in the text refer to labels on the corresponding level maps. The buttons are numbered to match their corresponding doors (e.g., button 1 opens door 1, switch 3 disarms trap 3, etc.). All pickups are marked on the map (I hope). Enemies and some hazards are noted in the walkthrough but not on the maps.
Level 24 (password HILL)
Again, there's no map for this short level. Head up the map slowly with guns drawn. There are 3 wolves on the platform ahead. If you go cautiously, you can kill them one at a time. Take care not to fall off the high walkways.
Continue upward, then right. Jump the next four gaps. Then follow the zigzag walkway up and right. The next wider gap requires that you sprint to get a good run-up. (Hold L, run and press A to jump.) The next gap can be done with or without sprint, but if you don't sprint be sure to jump at the very edge so Lara can grab the next ledge.
If you advance upward cautiously, you'll meet a wolf then another wolf and a shadow. Rushing ahead means you'll deal with all three together. Continue up and left along the walkway. Then turn right, jump another gap and slowly advance upward to an open area with 3 shadows. You can back away shooting, but take care not to fall.
The gate at the top opens as you approach. Enter the cult fortress here.
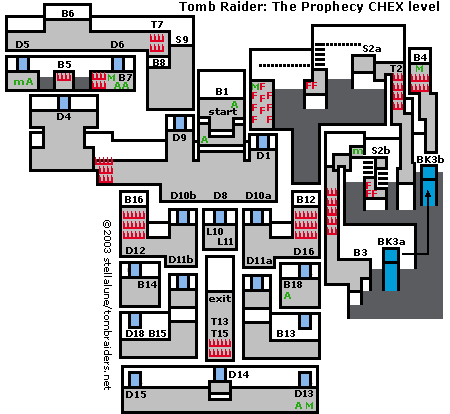
Level 25 (password CHEX) - click for printable map/map key
You start this level at the top center of the map. Get the Uzi ammo (2x) to the right and on the step below. Hop down onto the checkerboard floor and kill the wolf. Then walk around the checkerboard until a red-robed acolyte appears. When you kill him, the button (B1) on the platform where you started is reset. Press it to open the gate (D1) to the right.
Go through and then carefully make your way past the flame traps as they cycle off. Pick up the large medipak, cross the top burner and jump up to grab the molding on the wall. Traverse to the right but pause before the next set of flame traps until they cycle off. Then continue right, drop down and quickly get off the burners.
Climb the ladder, traverse to the right and use the timed switch (S2a) to temporarily disarm the spike trap (T2) below/right. Jump down and sprint (hold L while running) over the trap before the spikes pop back up. At the bottom of the hallway is a ledge above a deep pit. Jump to grab the ledge on the left; pull up.
The switch here (S2b) also disarms the same trap (T2) over which you just ran. Ignore it for now. Hop down on the left side, taking care not to land on the burners. Climb the short ladder and traverse to the left. Pull up and get the small medipak. Climb down twice on the left and then wait for the spike trap to retract before running over it. Don't linger or Lara will be skewered when the spikes pop back up.
Fight another red-robed baddie in the next room. Mind the edge above the pit. Then press the button (B3) to move the carved block (from BK3a to BK3b). Return up the hall with the spike trap as you did before. Climb the two ledges on the right. Hang from the ledge and traverse to the short ladder. Climb down and quickly run off the burners without falling into the pit. Climb the other ladder to the ledge with the timed switch (S2b), but don't use it yet.
Jump across the gap to the ledge on the right then to the carved block (BK3b). Climb from the block into the hallway above. Cross over the spike trap when it retracts. Get the large medipak and press the button (B4) to open a gate (D4) way off to the left.
Now, to get there.... First run back across the spikes when they retract. Hop down onto the carved block and then jump over to the left to the timed switch (S2b). Use it to temporarily disarm the spike trap (T2) above/right. Jump over to the right and sprint up the hallway and over the trap before the spikes pop back up. At the top of the hallway, climb up to the left and traverse left above the deep pit. Climb down to the ledge with 2 burners. Stand below the left burner and when it cycles off grab the next molding and traverse across the pit to the left. Drop onto the ledge with many burners and carefully make your way to the bottom.
Re-enter the checkerboard room (through gate D1) and cross to the left. Wait for the spikes to retract and then climb onto the ledge above. Fight a wolf and another red-robed figure in this room and exit at the top (through gate D4). Wait for the spikes below the button (B5) to retract and then quickly press the button and get off. This opens the gate (D5) to the left. Jump across the pit, pick up Golden Gun ammo and a small medipak, and go through.
Three wolves and another red-robed guy ambush you here, but if you go slowly you can take them out one at a time. Watch out for the spikes to the left. When you've killed all four enemies, the button (B6) resets. Press it to open the gate (D6) on the bottom wall to the right. Go through and pick up Golden Gun and Uzi ammo, plus a large medipak. Press the button (B7) to temporarily disarm the spike trap (T7) outside. Quickly run across it and hop down into the next room on the right.
Fight another red-robed acolyte and then press the button (B8) to open the middle gate (D8) on the bottom wall of the checkerboard room. Use the timed switch (S9) in the top right corner to open the exit (D9) from this room. Sprint through before it closes.
(NOTE: This next bit involves a number of levers, buttons and gates, so it's easy to get confused. You might find it easier to just refer to the map, which has labels for all the corresponding levers/buttons and doors.)
Go through the gate (D8) you just opened, at the bottom center of the checkerboard area. Here you'll find 2 levers (L10 and L11). Each of these can be approached from either side and pulled to the left or right to open and close different gates in this area (D10a and b, D11a and b). Here's one possible way of exploring:
Pull the upper lever (L10) to the right to open the gate to the right (D10a). Pull the lower lever (L11) to the left to open both lower gates (D11a and b). Exit the lever room, turn right and enter through the next gate (D10a). Kill the skeleton and go to the right. Wait for the spike trap to retract and run across. Press the button (B12) to open a gate (D12) off to the left. When the spikes retract again, run back across. Go left and down through the gate (D11a) you opened with the second lever. Hop down, kill the 2 wolves and press the button (B13) to open the gate (D13) just below/right. (NOTE: This also lowers half the spike trap, T13, in front of the level exit.)
Go through the gate (D13) below into a room with tapestries and coats of arms on the wall. This room runs all along the bottom of the map. Kill a wolf and a bad guy in a red robe, and pick up a large medipak and Golden Gun ammo. Advance to the left to deal with another wolf and another red-robed guy. The other two exits are still barred. So, for now, return to the gate on the right (D13). Return up the map to the checkerboard room.
Go left and back down into the room with the 2 levers. This time, pull the upper lever (L10) to the left, opening the gate to the left (D10b). (This also closes the gate to the right, D10a.) Leave the lower lever (L11) alone, since both lower gates (D11a and b) should already be open.
Exit the lever room. Turn left and go through the next gate (D10b). Kill the skeleton and go left. Enter the small room below the spike trap (through gate D12). Press the button (B14) to open the gate (D14) below the level exit, in the room with the tapestries and coats of arms at the bottom of the map. Exit above and go around the corner to the right. The gate here (D11b) should be open if you pulled the second lever (L11) to the left earlier. Hop down into the lower part of the room and press the button (B15) to open the gate (D15) just below/right. (NOTE: This also lowers half the spike trap, T15, blocking the level exit.)
If you don't care about one more Uzi ammo pickup, you can head for the exit now: Go through the gate (D15) below into the long room with the tapestries and coats of arms. Kill the wolf and red-robed cult member if you didn't do so earlier. Head for the middle of the room. Climb onto the low step and continue up, past the disarmed spike traps (T13 and T15) to the exit.
Or, if you want the extra clips, from button B15, climb back into the room above and go left. Wait for the spike trap to retract and run across. Press the button (B16) to open a gate (D16) off to the left. When the spikes retract again, run back across. Exit this room at the top and return to the next room on the right, with the 2 levers. Again pull the upper lever (L10) to the right. Exit and go into the room on the right. Now the gate (D16) below the spike trap is open. Enter and pick up the Uzi ammo. (The button, B18, opens another gate, D18, on the far left, but there's no need to bother now.)
To get to the exit, leave this room at the top, go left, down through the next gate (D11a) and then right past a button (B13). Continue through the gate (D13) below/right. Then go left toward the middle of the coat-of-arms room. Climb onto the low step and continue up, through the open gate (D14) and past the disarmed spike traps (T13 and T15) to the exit.
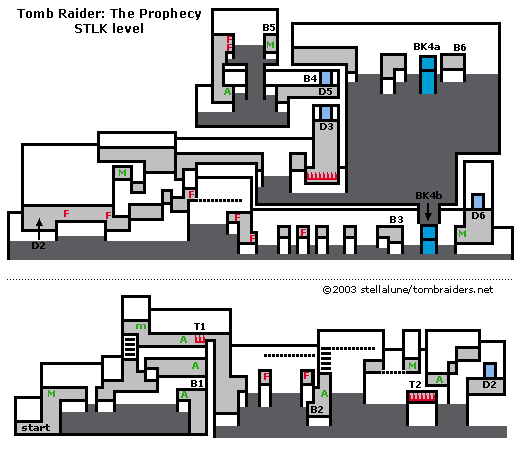
Level 26 (password STLK) - click for printable map/map key
You start at the bottom left corner of the map. Go right then up, along the rim of a chasm. Get the large medipak and continue right. Jump the gap and fight a shadow and a skeleton. Climb the ladder and pick up a small medipak and Uzi ammo. Hop down onto the ledge below the spikes (T1), shoot another skeleton and pick up Golden Gun ammo. Drop to the ledge below and fight a third skeleton. Pick up the Uzi ammo and press the button (B1) to disarm the spike trap (T1) above.
Climb back up to the retracted spikes and go right then down. Kill another skeleton and jump onto the ledge with the fire traps to the right. When the flames cycle off, grab the molding and traverse to the right above the chasm. Wait for the flames below to subside and drop down. Hop off the ledge on the right. Pick up more Uzi ammo.
Press the button (B2) to disarm a spike trap (T2) and open a gate (D2) off to the right. Climb the ladder and traverse above the chasm to the right. Drop down, grab the lower edge of the ledge and traverse to the right. Pull up near the large medipak. Grab it and hop down onto the retracted spikes (T2). Climb up on he right, get the Uzi ammo and then climb two more ledges to the right. Hop down on the other side and go through the open gate (D2).
You emerge in another part of the same level. (This is shown in the upper half of the map. The starting point is labeled 'D2'.) Head to the right and fight a shadow, but watch out for the burners. Carefully run past them, taking care not to run off the edge into the deep pit. Climb onto the ledge to the right.
There's another ledge above, but ignore that for now. Instead, continue to the right. Climb over the low ledge and position Lara behind the next single flame trap. When it cycles off, move forward and drop and hang from the ledge. Traverse to the right and drop down to the left of the next burner. Run over it when it turns off. Then, when the other burner on the lower part of the ledge cycles off, take a running jump across it to grab the next ledge; pull up. (You don't have to sprint here, but it helps.)
Continue jumping from ledge to ledge all the way along this wall to the right. One of the ledges has a burner on it. You can time the jump carefully so Lara lands when it's off. The last two jumps are wider but don't require sprinting if you jump just at the edge. There's a button (B3) on the last ledge. Press it to open a gate (D3) elsewhere.
(NOTE: The jump to the right from here is too far, even by sprinting, but you'll be back later when it can be done.)
Jump back across the ledges to the left the way you came. On the Z-shaped ledge with 2 burners, grab the molding and traverse back to the left. When the burner above goes off, pull up and run forward. Then continue left up one ledge, then down one.
Now use the ledges to climb up toward the top of the map. Pick up the large medipak and fight 2 shadows. Head to the right and fight a skeleton. Then sprint and jump to get across the next gap to the right. Wait for the spike trap below to retract, hop down and run off the spikes. Fight the 2 shadows and exit at the top (through gate D3).
The gate ahead (D5) isn't open yet. The button (B4) moves a carved stone block from the upper part of the map (BK4a) to the lower (BK4b). You can press the button as many times as you want. I recommend leaving the block at the top of the map for now.
The next jump to the left is a very long one. You must sprint (hold L while running) and jump as close to the edge as possible in order to grab the edge on the other side of the chasm. You'll find Golden Gun ammo on the other side and a shadow waiting in the hall above. At the top of the hall is a flame trap near another wide gap. Sprint and jump across. Get the large medipak and press the button (B5) to open the last gate (D5) you passed. Sprint and jump back across and then quickly get off the burners.
Return down the hallway. Make the long jump back to the right and go up through the gate (D5) you just opened. Destroy the 2 shadows. Then take a long running jump across the pit to the right. (You don't have to sprint but it helps.) Shoot the skeleton. If you moved the carved block earlier and it's not sitting in the gap to the right, you must sprint to make the next jump. Otherwise jump across the deep pit using the block. Press the button (B6) to open the gate (D6) barring the exit, located near the bottom right of the map.
Repeat the jumps back to the left. Exit through the gate (D5) below. Now, if you didn't do so earlier, press the button (B4) to move the stone block to the bottom of the map (position BK4b).
Go back down through the next gate (D3), to the spike trap. When it retracts, climb onto the ledge on the left. Sprint and jump across the gap to the left. Continue left to the ledge above the single burner and drop down near it. When it goes out, drop and grab the edge and traverse to the right. Make your way across the ledges to the right as you did before.
When you get to the ledge with the button (B3), you should see the carved stone block in the middle of the gap you couldn't cross before. Jump to the block, then down to the ledge below. Destroy the 2 shadows, pick up the large medipak and exit through the gate above.
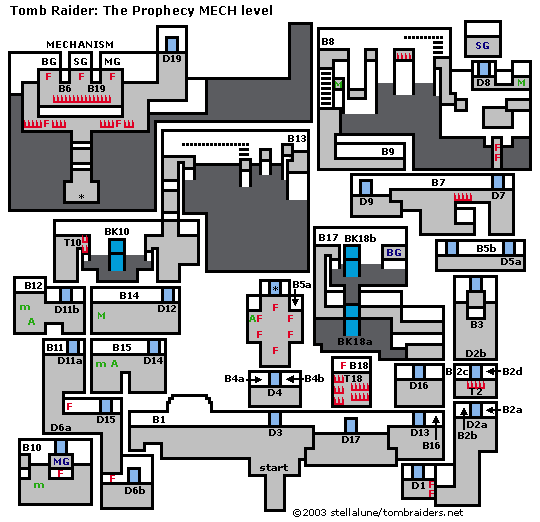
Level 27 (password MECH) - click for printable map/map key
From the start, at the bottom center of the map, head up and to the left. You'll soon meet a white-robed cult priest. They're a bit tougher to kill than the lower-level guys, but you'll manage. On the far left side of the room, press the button (B1) to open a gate (D1) way off to the right.
Return to the right now and keep going past the start. There are several closed gates (D3, D17 and D13) along the top wall, and you'll encounter a shadow near the second gate. Destroy it and continue right. Look for the gate you just opened (D1) at the bottom right. Go through and run past the flame trap when it turns off. Fight another shadow.
Two buttons flank the next gate. Press the right button (B2a) to open the outer gate (D2a). The left button (B2b), which is on a timer, lowers a spike trap (T2) in the next room and opens or closes the inner gate (D2b) beyond the spikes, depending on whether it's open or closed to start. When you begin, this gate is open, so B2b lowers the spikes and closes the gate, which doesn't help much. Enter the inner room, where there are 2 more buttons. Press the left button (B2c) to close the inner gate (D2b). Go back to the outer gate and press the left button (B2b). This lowers the spikes and opens the inner gate for a few seconds. Run through quickly. (NOTE: The button to the right of the spikes, B2d, looks like it's supposed to re-open the outer gate, but that gate never closes after you first open it. So it's not necessary.)
Kill another cult priest in the next room and press the button (B3) to open a gate (D3) back near the start. This also re-opens the timed gate (D2b) and lowers the spikes permanently so you can exit.
(NOTE: The gate above opens automatically, but the gates beyond, D5a and b, are malfunctioning. You'll fix them a bit later on. So for now, don't bother with them.)
Return down through the spike-and-button rooms to the bottom of the map. Turn left and climb onto the ledge with the fire trap when the burners go out. Exit upward and then head back to the left. Go through the gate (D3) you just opened, which is just above the alcove where you started the level. Enter the anteroom above and press the left button (B4a) to reset the right button (B4b). Press that one to open the gate (D4).
Go upward into a room with many flame traps. Destroy a shadow, pick up Golden Gun ammo and press the button (B5a) to reset the button (B5b) that controls the malfunctioning doors (D5a and b) off to the right. The gate below (D4) closed behind you, so exit the flame-trap room at the top. The gate there opens as you approach.
You emerge near the upper left of the same map. (The connecting areas are marked with asterisks.) Climb the two ledges, taking care not to fall into the chasm. Lara notices right away that the mechanism is missing something. You'll need to find THREE GEARS to make the machine work.
The spike traps are cycling too fast to get past. To get around them, approach the first set of spikes on the right. Drop and hang off the ledge and traverse along below the spikes and fireball trap to the right. Pull up and go up the map. Climb onto the platform to the left, avoiding the burners and more spikes. Press the button on the left (B6) to open three gates below (B6a, B6b and D4, the last being the gate at the bottom of the flame-trap room). The button on the right (B19) doesn't work yet.
Return to the previous area the way you came—down to the front right corner of the platform, traverse past the spikes, pull up and climb down the ledges to the exit. Go down through the room with many burners back to the long, rectangular room near the start.
First head back to the right. Go through the gate (D1) at the bottom right, cross over the burners and go up the map through the spike-and-gate room to the ledge with the button on it (B3), which you pressed earlier. Climb onto the ledge and go through the gate, which opens automatically.
Press the button (B5b) to open the gate (D5a) to the right. Enter and go up and left to a spike trap. When it retracts, quickly run across and kill a shadow. Press the next button (B7) to open the gate (D7) to the right of the spikes. When they retract again, run across and go through the gate.
Go carefully along the narrow walkway above the chasm. Watch the burners. When both cycle off, run across. You can get the large medipak on the ledge above/right now, or wait until you come back this way later. First you need to jump to grab the ledge on the left and pull up. Climb up and follow the walkway up to the ladder. Climb it and traverse to the left. Drop onto the retracted spikes and take a running jump across the chasm to the ledge on the left. From there, jump to the next ledge where there's a button (B8). Press it to open the gate (D8) back to the right.
When you jumped off the spikes, they popped up, so you can't get back the way you came. But instead of climbing down the ladder, climb down the ledge to the right of it to get a large medipak. Hop down to the walkway below. Then carefully hop down on the left side so Lara doesn't fall into the pit. Continue down and around the corner to the right, destroy another shadow and press the button (B9) to open the gate (D9) just below. Exit there.
Return to the right. Run past the spikes when they retract. Re-enter through the gate above (D7), cross the narrow walkway with the burners and climb up the ledges to the right. Get that large medipak if you didn't before. Then traverse along the ledge to the left and pull up. Go through the open gate (D8) and pick up the SMALL GEAR (SG).
Exit the way you came and continue all the way down the map to the bottom right. Climb up past the burners when they go out. Exit upward (through gate D1) and go to the left, past the start to the left end of the long room.
Go through the gate (D6b) below and climb onto the ledge near the fireball trap. Shoot the shadow in the room above, steering clear of another fireball trap. Then go through the gate (D6a) at the lower left. Pick up the MEDIUM GEAR (MG) and a small medipak. Again, watch out for the fireball trap. Press the button (B10) in the upper left corner to lower some spikes (T10) and raise a block (BK10) elsewhere.
Exit and head up the map on the left side. Press the button (B11) to open the next 2 gates (D11a and b). A white-robed priest appears. Kill him and go up into the next room. Pick up Uzi ammo and a small medipak. Press the button (B12) to open a gate (D12) off to the right.
Exit this room and continue up the map. Kill a shadow and take a running jump over the retracted spikes (T10) to the carved stone block (BK10). From there, jump to the ledge on the right and destroy another shadow.
Exit this room at the top and climb the ledges to a big room with a deep pit. Traverse to the right along the molding and climb down the short ladder onto a small ledge. Jump across the ledges to the right. Press the button (B13) to open a gate (D13) way off to the right. Return across the pit the way you came.
Follow the hallway down to the room with the pit and carved block to the left. Continue straight down through one of the gates (D12) you opened before. Fight another white-robed bad guy, pick up a large medipak and press the button (B14) to open the gate (D14) just below. Go through into a room with a shadow, a small medipak, Uzi ammo and another button (B15). Press it to open the gate below/left (D15). Exit there.
Continue down to the ledge with the fireball trap. Hop down, go right then up (through gate D6b) to emerge in the long room where you started. Go all the way to the right end of this room. You'll find the last gate (D13) on the upper wall open. Press the button (B16) next to it to open the gate (D16) in the next room. Go through.
Climb onto the ledge and go to the left along the rim of the chasm. Pass over a carved stone block (BK18a) and continue left then up to a button (B17). Press it to open a gate (D17) down below.
When you approach the edge of the chasm, Lara says she can handle it, and she can. But there's an easier way. Instead of sprinting and jumping across the gap to grab the opposite ledge, head back down the map. Cross over the carved block to the right and climb down the ledges. Go back into the main room and head left. Go through the gate (D17) you just opened into a room with inactive spike and fireball traps (T18) and a button (B18). Press the button to arm the traps and move the carved block from the bottom of the chasm to the top (BK18a to BK18b).
Exit the room carefully to avoid the traps. Return to the right and up through the gates (D13 and D16). Climb the ledges and go left, jumping the gap where the carved block used to be. Continue left then up. Now you can use the carved block to jump across the chasm more easily. Pick up the BIG GEAR (BG) on the other side. Jump back the way you came and return to the main room (through gates D16 and D13).
Now you should have all 3 gears—small, medium and large. If not, check the walkthrough to see what you've missed. If you have all of them, return to the left and go back up through the gates opposite the starting point (D3 and D4). Go through the room with many burners and exit at the top.
Now you're back at the room with the mechanism. Once again, you'll need to traverse along the ledge to the right in order to avoid the spike and fireball traps. Pull up, run forward and climb onto the center platform. Wait for each burner to turn off before running forward to replace the gears in the square compartments. From left to right: BIG GEAR, SMALL GEAR and MEDIUM GEAR. (NOTE: It's not possible to place them incorrectly; only the correct gear can be chosen from inventory.) When all the gears have been placed, the button (B19) on the right will be reset. Press it to open the gate (D19) above and to the right. Go through to exit the level.
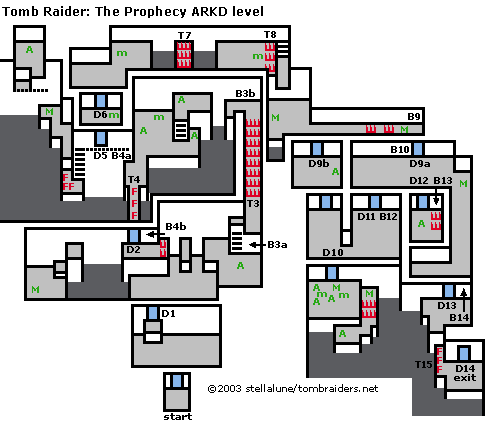
Level 28 (password ARKD) - click for printable map/map key
You begin at the bottom of the map. Go into the next room, where a cult priest materializes. He uses magic to summon a shadow, so take him down quickly. Then deal with the shadow. When you kill the priest, the gate (D1) opens automatically. Climb up and enter the next room.
Here you'll meet a red-robed figure who also conjures a shadow. As you fight them, watch out for the deep pit to the left. When the red-robed cult member falls, the gate (D2) above opens, but you can't reach it because of the spikes. Instead, climb onto the ledge on the right and fight a black-robed acolyte. Get the Golden Gun ammo and press the button (B3a). This temporarily disarms the spike trap (T3) in the hallway above. Quickly climb the ladder, traverse right, pull up and sprint over the spikes before they spring back up.
(NOTE: In case you miss something in the previous area and need to go back, the button at the top of the hallway, B3b, also lowers the spikes for a few seconds so you can run back over them.)
Jump across the gap to the left and get more Golden Gun ammo. Jump or climb down on the other side, fight another red-robed acolyte and pick up some more goodies—Uzi ammo (2x) and a small medipak. Press the button (B4a) on the left side of this area to temporarily extinguish the flame traps (T4) below. Sprint across, taking care not to accidentally run off the edge of the walkway into the chasm.
On the other side of the burners, go through the gate (D2) that opened earlier when you shot one of the cult members. Watch out for the spikes as you take a long running jump (sprint required) to the left across the wide gap. Grab the opposite edge and pull up. Hop down on the other side and fight another black-robed enemy. When he dies, a gate (D5) opens elsewhere. Pick up the large medipak and climb back up the ledges. Sprint and jump back across the gap. Press the button (B4b) to temporarily shut off the burners and sprint back up across the fire-trap walkway.
Grab the molding above the button (B4a) and traverse all the way to the left. (Ignore the open gate above for now.) Climb down the ladder and run across the flame trap when it goes off, but watch out for the deep pit. Climb the ledge above and follow the walkway along the side of the pit to a large medipak. Grab it and traverse along the next short bit of molding to the left. Climb to the small room above and fight another black-robed acolyte. When he dies, the inner gate (D6) off to the right opens.
Get the Uzi ammo, hop down to the step below and traverse back to the right. Follow the walkway down to the ladder, climb down, cross the burners again and climb up the other ladder. Traverse to the right and pull up into the open doorway (D5). Pick up the small medipak and enter the next room (through gate D6).
Here you'll meet another red-robed enemy, plus a shadow if he has time to summon one. Kill him and the spike trap (T7) to the right retracts. Pick up the small medipak and jump across the pit to the disarmed spike trap. Jump to the next ledge and fight a white-robed priest (and possibly another shadow as well). When he falls, the spikes (T8) to the right retract. Pick up the small medipak and hop down into the room below.
Get the large medipak. Avoid the deep pit directly below. Instead, follow the hallway to the right. The next 2 spike traps cycle up and down. Cross the first when it's safe and then wait for the second to retract before running on. Pick up another large medipak and press the button (B9) to open 2 gates (B9a and b), one just below and the below and to the left.
Enter the room directly below and fight another white-robed figure, plus a shadow if he has time to summon one. When the coast is clear, get the large medipak at the bottom right and find the button (B10) concealed behind the tapestry to the left of the doorway (D9a). Press it to open a gate (D10) in the room below/left.
Exit the room at the top, where you came in, and make your way carefully past the spike traps. Go through the next door (D9b) on the bottom wall. Kill the black-robed enemy who materializes and get the Golden Gun ammo. The door below opens automatically.
Go through and continue straight down to the room full of goodies you unlocked with the concealed button (B10). Including the items on the lower ledges, you'll get 2 large medipaks, 2 small medipaks, 2 sets of Uzi ammo and 2 sets of Golden Gun ammo. The spikes prevent you from making the long running jump across the pit to the right. Don't worry; you'll get over there from the other direction.
Go back into the room above. On the right you'll encounter another cult priest /summoned shadow duo. The gate above (D11) opens automatically when the robed guy dies. Press the button (D12) to open the next gate (D12) to the right. Go into that small room, pick up Uzi ammo and, when the spikes retract, quickly press the button (B13) to open a gate below (D13). Run off the spikes and exit the room.
Go right. Get the large medipak if you didn't do so earlier. Then continue toward the bottom of the map. Go through the gate (D13) below. A red-robed acolyte materializes and summons a shadow if you don't kill him immediately. Press the button (B14) to open the gate barring the exit (D14). Hop down and go over the burners (T15), which were extinguished when the red-robed guy died. Go through the doorway (D14) to the next level.
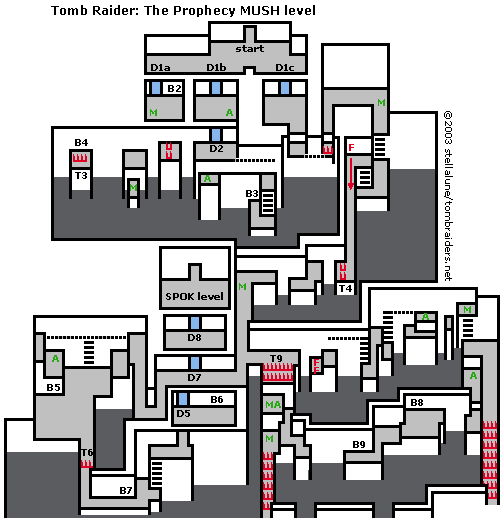
Level 29 (password MUSH) - click for printable map/map key
You begin at the top center of the map. Explore the first room cautiously. As you do, 3 robed enemies materialize. When you've defeated all three, the 3 gates along the bottom wall (D1a, b and c) open.
Behind the left gate is another small room with a large medipak and a button (B2). Press this to open the second gate (D2) in the room to the right. Go in there, get the Uzi ammo and exit through the lower gate onto a ledge near a deep chasm. Hop down onto the ledge with the Golden Gun ammo. Then traverse along the molding to the right. Drop onto the ledge and climb down the ladder to another ledge. Press the button (B3) to disarm a spike trap (T3) off to the left. Climb back up the ladder, traverse back to the left and climb onto the ledge near the open gate (D2).
Take a careful running jump across the gap to the right. Be sure not to land on or run into the spikes. Hang from the front edge of the ledge and traverse to the left below the spikes. Pull up on the other side. Jump to the next ledge and climb down to the ledge below for a large medipak. Climb back up.
Sprint and jump to grab the next ledge on the left. Pull up. Walk over the disarmed the spike trap (T3) and press the button (B4) to disarm another spike trap (T4) off to the right. Sprint and jump back to the previous ledge. Now jump to the right and grab the ledge with the spikes, pull up, drop and hang from the front edge of the ledge, traverse past the spikes and pull up again. Then jump once more to the right.
Go back through the room above. Turn right and continue to the next open gate (D1c) on the bottom wall. Go through and hop down onto the ledge below. Watch out for the deep pit ahead. Drop and hang from the ledge and then traverse to the right. Pull up and wait for the spikes ahead to retract. Then climb onto the ledge above. Follow the hallway around to the right, picking up a large medipak as you go. Climb down the ladder (again there's a pit beside the walkway) and up the next ladder.
The trap in the corner shoots triple fireballs. It's possible to jump and avoid the fireballs as you run down the walkway, but this takes a bit of coordination. It's easier to step in front of the trap just after it shoots out a set of fireballs and then sprint to the other end of the walkway and around the corner to the left. Be careful not to run on into the chasm.
[IMPORTANT: If you didn't use button B4 earlier, the spikes here (T4) will still be up. In that case, drop and hang from the end of the ledge and traverse to the left to get past them. Pull up and continue.]
Jump across the ledges to the left and get a large medipak. Follow the walkway to the bottom and go left past 2 closed gates (D5 and D7). Continue along the walkway as it U-turns and heads upward. Climb down into the room below and fight a red acolyte at the top of the room and a priest near the bottom. Watch out for the pits to the bottom and right. Killing the white-robed guy resets the button (B5) on the left. Press it to open one of the gates (D5) you passed earlier.
You can't get past the spikes (T6) on the walkway below, so instead climb the ladder at the top of the room. First traverse to the left to get some Uzi ammo. Then traverse back to the right and climb out. Follow the walkway down, right, up and right again to the gate you just opened (D5). Press the button (B6) in the room below to disarm the spike trap (T6) back to the left. Then go through the lower doorway.
Climb down the ladder to the left. Again watch out for the deep pit below. Press the button (B7) to the left to open another of the gates (D7) above. Return to the hallway where the gate opened either by climbing back up the ladder and going through the room at the top, or by going around to the left to the room where you fought the last two enemies and climbing out the way you did before.
From the hallway with the two now-open gates (D5 and D7), head to the right, up a bit and right again past a large spike trap (T9). Take a running jump across the gap to the right. The flame traps go out automatically. Jump from the ledge above the burners to the next ledge on the right. Or, traverse along the molding and climb down the ladder.
Follow the walkway upward. Hop down to the ledge below, climb the ladder and traverse along the molding to the right. Drop onto the next ledge and then climb onto the one above/right, where there's some Uzi ammo. Jump twice to the right to get on a ledge with a large medipak. Climb down the ladder and follow the walkway downward, picking up more Uzi ammo as you go. When you reach the spikes, jump the gap to the left. Press the button (B8) to open the final gate (D8) in the area back to the left.
Continue to the left and press the next button (B9) to disarm the big spike trap (T9) you passed earlier. To get back there, you can either take the long route back around to the right or sprint and jump across the gap to left of the button (B9). You'll need to jump right at the edge to grab the opposite ledge.
Below the spike trap are two ledges with large medipaks and one set of Uzi clips. Mind the spikes below and the pit on the left.
(NOTE: I keep wondering if there's a way to get beyond the two sets of spikes at the bottom right and center of the map. It looks like something's there, if only you could disarm the spikes. So far I haven't figured out a way. If anyone's done it, please clue me in.)
After getting all the goodies, climb out at the top, cross over the disarmed spike trap (T9) and go to the left, down and left again. Now go up through the open gates D7 and D8 to end the level.
Cut scene: Lara stumbles onto one of the cult priests. She challenges him to combat, with the winner to take the stones. He agrees.
Level 30 (password SPOK)
This brief level takes place in just two rooms, which are included on the previous level's map. Fight the cult priest and his summoned shadows. You can move into the room below, but the next gate is closed, so you can't go any farther. When you defeat the priest, another short cut scene plays.
Cut scene: The disembodied voice of the cult member tells Lara the only way to win is to destroy the Great Grey One.
Level 31 (password LITH)
Again, there's no map for this small, final area. Lara enters the inner sanctum. Apparently, she notes, the Great Grey One is sleeping. Be careful as you move around the elevated walkway. If Lara falls off the edge, it's all over. Don't bother fighting the Grey One until you've placed the three stones—red, black and white—in the three color-coded receptacles. She is invulnerable until you do.
It takes quite a few shots to bring her down. When you've done a certain amount of damage, she'll retreat into her sphere and summon helpers: first a trio of skeletons, next a trio of shadows, and finally a white-robed minion. Deal with each and then return to the boss. Keep using medipaks to stay alive and dodge her fireballs and energy bolts. Eventually you'll defeat her and finish the game. Good work!
WAS THIS WALKTHROUGH HELPFUL? If not, I apologize and invite you to contact me with any questions. If you need help right away, I recommend the r/TombRaider subreddit. Other fan-run forums are listed at tombraiders.net/stella/community.html. If this site was useful, please consider supporting it financially or in other ways. For details, visit tombraiders.net/stella/support.html. As always, I welcome your corrections/suggestions. Thank you!
Walkthrough and maps copyright © 2004- - Stellalune (). All rights reserved. Feel free to copy or print this walkthrough for personal use. By all means, share it with friends, but please include this credit line so people can send me their feedback. No part of this walkthrough may be reproduced on another site without permission. As an Amazon Associate I earn from qualifying purchases. Follow this link for details about this site's advertising and privacy policy.
Stella's Tomb Raider Site: tombraiders.net.