Stella's Tomb Raider Anniversary Mobile/Cell Phone Game Walkthrough
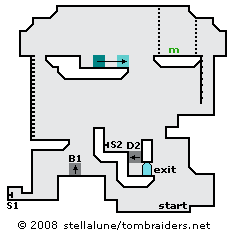
 TRAINING: Follow the on-screen prompts to learn the controls. Walk/run to the left along the bottom of the map. You'll pass underneath the exit and Lara will comment. Climb up the ledges and down the other side.
Draw pistols, crouch and shoot the switch (S1) to raise a block (B1) behind you. Head back to the right and climb onto the block you just raised. Face left and press Up to jump straight up and grab the ledge above. Pull up.
Climb the ladder. At the top, face right and press Action to jump the gap. Approach the movable block and press Action to grab onto it. Then press Right to push it in that direction as far as it will go. Press Action again to let go. Climb on top of the block, walk to the right edge and jump to grab the next ledge. Pull up and take the medipack. Slide down the rope and head to the left.
Jump the gap, continue to the left and pull the switch (S2) to open the trapdoor (D2). Drop down through the opening and press Up to exit through the door.
 LEVEL 1: HUMBLE BEGINNINGS
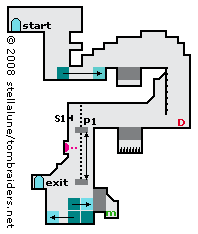
Walk to the right and stop at the edge. Press Action to jump the gap. Press Down to drop and hang from the edge. Press Down again to drop and grab the ledge below, then again to drop onto the movable block.
Push the block as far as possible to the right. Climb over it and quickly run across the break-away floor. Falling through will not hurt Lara, but the next trap like this will have spikes below, so get a feel for how it works.
Slide down the rope and pick up the dynamite. Turn left and walk to the edge of the next section of break-away floor, this time above a spike pit. Run across quickly but be sure to stop before the edge.
Shoot the switch (S1) on the left wall to start a platform (P1) moving up and down. When it reaches the top, jump onto it. Ride it downward, past a dart trap. As the platform moves, drop and hang from the left edge. When it reaches the bottom, drop onto the stacked movable blocks.
Stand next to the crumbling wall on the right. When the question mark icon (?) appears, press Action to go to Lara's inventory. Select the dynamite and press Action again to use it. Quickly climb over the block to the left and drop down on the other side to avoid being injured in the blast. Climb back over and get the small medipak in the alcove.
Pull the upper movable block to the right. Then pull/push the lower left block against the left wall. Climb onto it to reach the exit. Press Up to go through and end the level.
 LEVEL 2: A DISTANT GLOW
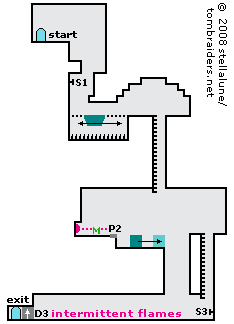
Climb down the ledges until Lara is level with the switch (S1). Shoot it to start a platform moving below. Hang from the ledge and when the platform moves under Lara, drop onto it. Step to the right edge, then when the platform moves to the right, jump over the spikes to the ledge.
Climb down the ladder and drop to the floor below. Lara will lose some health. If you don't have enough health to survive the fall, you'll have to go back to the main menu and replay level 1, taking care not to lose too much health there, so that Lara starts level 2 with full or nearly full health.
After dropping from the ladder, go to the left. Stepping on the pressure pad (P2) on the ledge causes darts to fire out of the carved head. So don't do that. Instead climb onto the movable block, step to the left side, and jump over the pad to land near the medikit. Then jump back over the pad.
Push the block all the way to the right. Climb onto it and jump to grab the next ledge. Pull up and climb down the ladder and drop to the floor.
Use the switch (S3) to open the door (D3) blocking the exit. Before the door closes again, quickly run and jump over the flames to reach the exit door. If you don't make it in time, return to the switch and try again. Press Up to go through the doorway and finish the level.
Walkthrough text and diagrams copyright © 2008- Stellalune (). Feel free to copy or print this walkthrough for personal use. By all means, share it with friends, but please include this credit line so people can send me their feedback. No part of this walkthrough may be reproduced on another site without permission. As an Amazon Associate I earn from qualifying purchases. Follow this link for details about this site's advertising and privacy policy.
WAS THIS WALKTHROUGH HELPFUL? If not, I apologize and invite you to contact me with any questions. If you need help right away, I recommend the r/TombRaider subreddit. Other fan-run forums are listed at tombraiders.net/stella/community.html. If this site was useful, please consider supporting it financially or in other ways. For details, visit tombraiders.net/stella/support.html. I also welcome any and all suggestions to improve things. Thank you!
Stella's Tomb Raider Site: tombraiders.net.