Stella's Tomb Raider Mobile/Cell Phone Game Walkthrough - Quest for Cinnabar
 Level 14: Summit Labyrinth (MP2513)
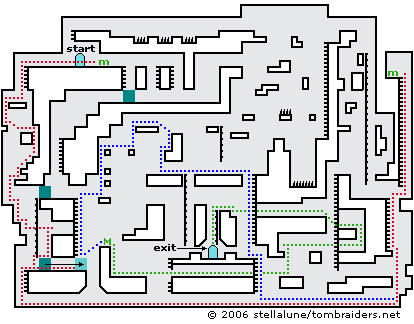
As the intro text suggests, this level is basically a large maze with the exit as the goal. There are a number of possible ways to get there. This walkthrough describes a fairly direct route that also gets all three item pickups. The route described here is also shown on the map. If you prefer, you can skip the pickups and go straight to the exit.
Following the route marked in red on the map: Get the medipack near the start and then go to the left. Climb down the short ladder and drop onto the small platform. Drop down on the left. Jump to the square block and then drop down on the right side. Go down the steps and drop to the ledge below. (Ignore the movable block and rope to the right.) Drop down twice more and jump to the right, past the dangling rope, to a ledge above another movable block.
Drop down onto the movable block and then push it to the right as far as it will go. You can't reach that medikit on the wall yet, but if you move the block now, you'll be able to get to the medikit from the other side later.
Return to the left and climb down the ladder to the floor. Run all the way across the bottom of the map to the right side. Climb up, jumping back and forth to reach each higher ledge. Climb the first ladder, jump across the gap to the right and climb the ladder above. At the top is a medipack. Climb all the way down to the floor the way you came.
Following the route marked in blue on the map: Return along the bottom of the map to the left. Lara will pass beneath two ledges, then come to a ledge with a ladder above. Grab that ladder and climb up. You can see the exit door to the left but you can't reach it yet.
Jump to grab the ladder above and climb to the top. Turn left and jump the gap. Go to the left beneath a dangling rope and jump the next gap. At the middle of this ledge, jump and grab the ledge above (the one shaped like a backwards 'L'). Climb on top of it, turn left and jump to grab the narrow ledge just beneath the skull-motif blocks on the ceiling. Cross this ledge and drop down onto the tiny square block below. Turn left and jump to the next tiny square block. Drop down on the left side, grabbing onto two more small square blocks and finally landing on a small rectangular block. Turn left and jump to the top of the ladder. Climb down onto the block you moved earlier. Jump from the right edge of the movable block to the medikit.
Following the route marked in green on the map: After getting the medikit, drop down on the right side. Go to the right and jump into the opening between the 2 short ladders.
Continue to the right, passing beneath the exit. When you reach the next ladder, don't climb it. Instead jump past it to grab the edge of the ledge ahead. Pull up and turn around. Jump straight up to grab the tiny ledge overhead. Pull up, turn right, then jump to grab the square block. Pull up and jump from the right edge of the square block past the ladder and into the alcove beyond it.
Don't climb the ladder. Instead, go into the alcove and climb onto the ledge above. Walk to the edge and jump past the ladder to grab the next ledge. Pull up and go left. When you reach the next ladder, don't climb it. Instead jump past it to grab the edge of the ledge ahead. Pull up.
Now Lara is right above the exit. Slide down the rope and finish the level.
NOTE ON ITEM & MAP CODES: Each level and item has a code, which can be found on the map screen or item info screen. Once you have a code, you can enter it on a page at the Tomb Raider Mobile or Eidos Mobile UK web site to access a level map or detailed item information. My walkthroughs include all of the item info, as well as my own maps, which are a bit more detailed than the unlockable ones.
Copyright © 2006- Stellalune (). In-game item descriptions copyright © Eidos, Ltd. Feel free to copy or print this walkthrough for personal use. By all means, share it with friends, but please include this credit line so people can send me their feedback. No part of this walkthrough may be reproduced on another site without permission. As an Amazon Associate I earn from qualifying purchases. Follow this link for details about this site's advertising and privacy policy.
WAS THIS WALKTHROUGH HELPFUL? If not, I apologize and invite you to contact me with any questions. If you need help right away, I recommend the r/TombRaider subreddit. Other fan-run forums are listed at tombraiders.net/stella/community.html. If this site was useful, please consider supporting it financially or in other ways. For details, visit tombraiders.net/stella/support.html. I also welcome any and all suggestions to improve things. Thank you!
Stella's Tomb Raider Site: tombraiders.net.