Stella's Tomb Raider Mobile/Cell Phone Game Walkthrough - Quest for Cinnabar
 Level 8: The Buddha Shrine (MP5756)
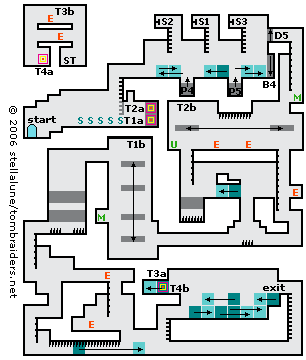
Go to the right and place a bell in the hand of each Buddha statue. It doesn't seem to matter which bell you use for each statue, but they must be placed in order from left to right. Activating the third statue extends a ladder from the ceiling. Activating the fourth and fifth statues moves aside the blocks revealing a pair of teleporters. Strictly speaking, you need not activate the fourth and fifth statues, but each one enables a possible shortcut.
The most substantial shortcut can be taken by activating all five statues then stepping into the lower teleporter (T1a). Lara emerges near the ceiling of the room below (T1b) and falls, hopefully landing on a moving platform below. This platform moves up and down continually but you can't see it from the room above. So the timing is a bit difficult to predict. If you don't pause more than a moment between statues, Lara should land on the moving platform taking little or no damage. If Lara falls and dies, just restart the level and try again. Once you succeed, pick up the walkthrough below at the (*).
Another shortcut eliminates only one room but will still save some time. Place a bell in the hands of the first through fourth statues. Climb onto the block on the right to enter the upper teleporter (T2a). Lara emerges near the ceiling of the room to the left (T2b), hopefully landing on the moving platform, rather than falling to her death. Again, if you don't hesitate as you activate the statues, the timing should be just about right. Immediately duck to avoid the spikes on the ceiling, and then pick up the walkthrough below at the (**).
If you want to explore every part of the level, place bells in the hands of the first three Buddha statues. Then climb the ladder to a room with three more ladders above. Pull the movable block beneath the middle ladder, climb up and pull the switch (S1) to raise blocks in the floor making it flat all the way across. Climb down and move the block underneath the left ladder. Climb up and use that switch (S2) to lower the blocks in the floor forming shallow pits and also raising the spikes between the two pits.
Climb down and pull the block once to the left. You must do this or Lara won't be able to climb out of the pit safely. Climb over it and drop into the pit. Lara will land on a pressure pad (P4) which raises a block (B4) to the right. Climb out of the pit on the left side, climb over the block and push it beneath the ladder again. Climb up and use the switch (S2) once again to make the floor level.
Climb down and push the block beneath the rightmost ladder. Climb up and use the switch (S3) to raise the spikes and lower the blocks in the floor again. Climb down and pull the block once to the right. Climb over the block and drop into the pit, landing on another pressure pad (P5). This opens a door (D5) above on the right. Climb out of the pit and onto the movable block to reach the door you just opened.
Slide down the rope to land on a ledge with a medikit. If Lara's health bar is mostly full, leave the health for now. Hang from the edge and wait for a moving platform to approach from the left. Drop onto it and either hang from the edge or duck as it passes beneath the spikes on the ceiling.
(**) Walkthrough continues here if you took the second shortcut, above.
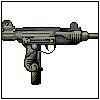
Hang from the left edge of the moving platform. When it moves all the way to the left, drop down to the ledge with the Uzis (GN1372). Grab them and quickly shoot the 2 monks on the right.
NOTE: If you took the shortcut or chose not to get the medikit earlier, you can still do so now. Climb back onto the moving platform, duck or hang from the edge when it passes beneath the spikes. When it moves to the right, stand up and jump up to grab the ledge above. Get the medikit, wait for the moving platform, drop onto it, then drop to the floor. (Watch out for the two openings in the floor.)
Climb down into the opening on the right and slide down the rope. There's a monk on the ledge above and to the right. Climb up and shoot him if you like, or just leave him and go on. (You can also ignore the movable block.)
Go to the left, jump over the spikes, and continue to a tall room with a moving platform. Stand beneath the platform and jump up to grab it. Pull up.
(*) Walkthrough continues here if you took the first shortcut, above.
Stand at the left edge of the moving platform. If you need health, jump to the alcove with the medikit when the platform moves level with it. Then wait for the platform and jump back onto it. Ride the platform all the way to the top and jump into the hallway on the left. (This jump is a bit tricky. It may help to jump just before the platform reaches its highest point.)
The blocks with skull designs warn of danger below. Hang from the edge and drop onto the crumbling floor. Move to the middle and fall through. Fall through another crumbling floor to land between 2 sets of spikes. Jump over the spikes to the left. Slide down the rope. Draw guns and shoot the purple spirit on the right.
There are two ways to get down from here: The path to the right involves another enemy, a monk. The path straight down along the left wall, involves a spike trap.
If you choose to go to the right, jump across the gap. Then follow the hallway to the right, slide down the rope and shoot the monk below. Drop down on the right. (Skip the next paragraph.)
Alternatively, if you choose the left path, climb down two ledges and then slide down another shorter rope to land at the bottom left corner of the map. To the right is a low hallway with a movable block and spikes that extend and retract. Timing your moves carefully so Lara doesn't get skewered, wait for the spikes to retract and run into the hallway. Duck next to the movable block. When the spikes retract again, stand up, grab the block and push it to the right. If you don't hesitate, you can manage two pushes before the spikes extend and you must let go of the block and duck again. To be extra safe, just push once, then duck. Repeat this process to push the block all the way out of the hallway. Climb over the block and continue to the right.
Climb either of the two ladders leading to the room above. Here you'll find 6 movable blocks. The exit is behind the block on the right ledge, but before you move the blocks to reach it, take a side trip to pick up an artifact.
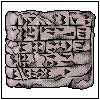
Climb onto the leftmost block. Jump to the ledge on the left and push the block there to reveal a teleporter (T3a). When you let go of the block, Lara is transported to another room at the top left corner of the map (T3b). Immediately draw guns and shoot the monk. Drop down twice on the right side and pick up the Stone Tablet (QC5801). Climb back onto the ledge, kill another monk, then drop down on the left. Go through the teleporter (T4a) to emerge back in the room with the 6 movable blocks (T4b).
Now climb down to the floor and move the blocks so you can reach the exit. (This is a bit hard to describe but the map shows how the blocks should be arranged.) First, push the block on the left against the other two, so you have three blocks lined up along the floor. Climb onto the blocks and pull the upper block once to the left. Climb over it and push it once more to the left. Hop down and pull, then push, the rightmost block against the right wall. Pull, then push the middle block against the rightmost block. Now you can climb up and pull the block on the ledge to the right revealing the exit.
 |
|
 |
|
NOTE ON ITEM & MAP CODES: Each level and item has a code, which can be found on the map screen or item info screen. Once you have a code, you can enter it on a page at the Tomb Raider Mobile or Eidos Mobile UK web site to access a level map or detailed item information. My walkthroughs include all of the item info, as well as my own maps, which are a bit more detailed than the unlockable ones.
Copyright © 2006- Stellalune (). In-game item descriptions copyright © Eidos, Ltd. Feel free to copy or print this walkthrough for personal use. By all means, share it with friends, but please include this credit line so people can send me their feedback. No part of this walkthrough may be reproduced on another site without permission. As an Amazon Associate I earn from qualifying purchases. Follow this link for details about this site's advertising and privacy policy.
WAS THIS WALKTHROUGH HELPFUL? If not, I apologize and invite you to contact me with any questions. If you need help right away, I recommend the r/TombRaider subreddit. Other fan-run forums are listed at tombraiders.net/stella/community.html. If this site was useful, please consider supporting it financially or in other ways. For details, visit tombraiders.net/stella/support.html. I also welcome any and all suggestions to improve things. Thank you!
Stella's Tomb Raider Site: tombraiders.net.