Stella's Tomb Raider Mobile/Cell Phone Game Walkthrough - Elixir of Life
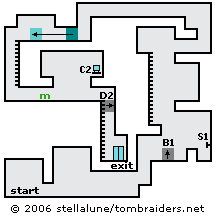 TRAINING: Follow the on-screen instructions to learn the controls. Go to the right, practice running if you like by tapping Right twice. Lara passes beneath the exit but you can't reach it yet.
Continue to the right, climbing the ledges by pressing Up. Climb onto the low block and crouch by pressing Down. Shoot the switch (S1) to raise a block (B1) behind Lara. Holster your guns then climb onto the block you just raised. Stand at the left edge and jump straight up to grab the ledge above. Climb the ladder and jump across the gap to grab the ledge on the right. Pull up.
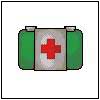
Climb onto the ledge above and follow the hallway to the left. Drop down, stand next to the movable box and press Action to grab it. Hold Left or tap the key three times to push the box three times to the left. Press Action again to let go. Climb over the box and then climb down the ladder. Drop to the floor. Stand over the medipack (GN4700) and press Down to use it. Then continue to the right.
Stand beneath the ledge on the right and jump straight up to grab it. Pull up and position Lara in front of the computer terminal (C2) so the '?' icon is visible. When you see this icon, it means Lara can interact with the object near her. Press Action to do that.
(NOTE: If you can't see the '?' Lara will jump when you press Action, so you sometimes need to be careful how you position her. For example, here, if she jumps instead of using the computer, she could jump off the ledge and get hurt.)
Using the computer opens a trapdoor (D2) below. Drop down and go to the right. Climb down the ladder and approach the elevator. Press Up to enter the elevator and finish the level.
 |
|
 |
|
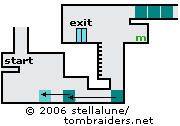 Level 1 – A Discreet Entrance (MP0902)
Hang from the ledge and drop to the floor. Pull the first movable block twice to the left. Pull the second movable block 4 times to the left. Now you can climb over it and enter the hallway behind it. Climb onto the ledge and then climb the ladder to the top. Jump across the gap to grab the ledge on the right. Pull up and get the medipack. (As far as I can tell, you can't do anything with the boxes on the ledge above.) Return to the edge and jump back across. Press Up to get into the elevator.
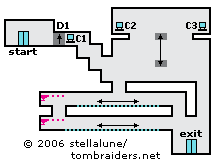 Level 2 – The Machine Room (MP1124)
Go to the left past the first computer terminal (C1). Using it closes a door (D1) behind Lara but doesn't seem to have any other effect. Go down the steps and jump across the gap.
Climb onto the moving platform when it descends. Move to either edge. When the platform reaches its highest point, jump to grab the ledge ahead. Pull up and use the computer terminal (C2 or C3) to reverse the direction of one of the conveyor belts below. Walk to the edge and when the moving platform returns, jump across to grab onto it; pull up. Move to the opposite edge and repeat the process to get to the other terminal and use it to reverse the direction of the other conveyor belt. Jump back to the moving platform, hang from either edge, ride down and drop to the floor.
Return to the gap in the floor, jump across then drop and hang from the left edge. Watch the green laser bolts fly by and drop down after one has passed. Duck to avoid the laser. Ride the conveyor belt to the left. At the end, wait for a laser bolt to pass, then move to the edge, drop and hang.
Wait for the laser gun below to shoot, then drop down and duck. Wait for another bolt, then stand up, step onto the next conveyor belt and duck again. Ride it to the right. Wait for a laser bolt to pass, then stand up and drop down into the room below. Get on the elevator to end the level.
NOTE ON ITEM & MAP CODES: Each level and item has a code, which can be found on the map screen or item info screen. Once you have a code, you can enter it on a page at the Tomb Raider Mobile or Eidos Mobile UK web site to access a level map or detailed item information. My walkthroughs include all of the item info, as well as my own maps, which are a bit more detailed than the unlockable ones.
Copyright © 2006- Stellalune (). In-game item descriptions copyright © Eidos, Ltd. Feel free to copy or print this walkthrough for personal use. By all means, share it with friends, but please include this credit line so people can send me their feedback. No part of this walkthrough may be reproduced on another site without permission. As an Amazon Associate I earn from qualifying purchases. Follow this link for details about this site's advertising and privacy policy.
WAS THIS WALKTHROUGH HELPFUL? If not, I apologize and invite you to contact me with any questions. If you need help right away, I recommend the r/TombRaider subreddit. Other fan-run forums are listed at tombraiders.net/stella/community.html. If this site was useful, please consider supporting it financially or in other ways. For details, visit tombraiders.net/stella/support.html. I also welcome any and all suggestions to improve things. Thank you!
Stella's Tomb Raider Site: tombraiders.net.