Stella's Lara Croft and the Guardian of Light Walkthrough - For Xbox 360, PlayStation 3, and Windows PC*
Throughout this walkthrough I use abbreviations for north (N), northeast (NE), southwest (SW), etc., to give directions. There is no compass in this game, but just to make it easier to navigate on screen, we'll assume north is up, west is left, east is right and south is down. Outdoor levels include a map screen in the Inventory in case you get lost. Also, I played using the medium combat difficulty setting so your experiences may differ slightly on a different setting.
*Although the PC, console and iOS versions are similar, there are significant differences in a few areas. The iOS version does not include this level. It skips directly from the Twisting Bridge level to Xolotl's Stronghold.
Level 10: Fiery Depths (Single Player) | Updated: 1/21/14(†) |
For the 2-player co-op walkthrough, please see here.
Score Challenges: 90K, 110K, 130K (Bonus: Spear of Fire) Reward Challenges:
Artifacts: Wind Drum, War Drum, Dark Drum A complete list of artifacts, relics and weapons can be found here. |
ENTRANCE AND FIRST LAVA PIT: There are health and ammo pickups at the start, which you probably won't need. Descend either of the staircases to the NE. A cut scene shows Lara and Totec planning their strategy. Apparently Lara loses the coin toss and has to take the “low road” through the volcanic tomb.
There's an AMMO UPGRADE on top of the first support column on the right (NE) side of the lava pit and a red skull (1/10) on the high ledge at the other end of the pit. To get the upgrade, throw 2 spears into the column, one from the stairs in the previous room and one at floor level. Hop up to the top of the column and grab the upgrade. Then jump across the tops of the other columns to the ledge ahead, where you'll find the red skull (1/10) in the corner just beyond the golden grapple ring, which you won't need if you've come this way. Take the skull and jump down to the broken walkway on the left. Then make your way across the broken bridge to the SW. (This page of screenshots shows this path, along with a few alternate routes to the skull and upgrade.)
NOTE: If you're doing the 5-minute time challenge, skip all the business above and just throw a spear or two into the wall with the flame vents, wait for them to cycle off and then jump across the spears to the ledge on the left. Then cross the broken bridge.
STAIRS ABOVE LAVA POOL: There's a golden handle at the top of the stairs, but before pulling it, head down the stairs, jump across the broken section and fight 2 skeletons that come up from below. Once they're out of the way, return to the top of the stairs and pull the handle. This turns off the flames in the CHALLENGE TOMB doorway below and also ignites the flame vents in the floor near the handle. As long as you move out of the way quickly, this trap isn't a problem. So as soon as you've pulled the handle all the way, release it and race down the stairs, jump the gap and continue to run/roll downstairs and through the door.
FIRST CHALLENGE TOMB: Inside, is a large, roughly rectangular walkway with flame vents beneath it. In the center is a lava pool with a tall pillar on top of which there's a relic. The goal is to roll 3 large balls onto 3 round pressure pads while avoiding the flames, which move in 2 waves, clockwise around the walkway. When all of the pads are depressed, the column lowers so you can get the relic. (screenshots)
Here's one way to do it: Wait for a wave of flames to pass. Then follow behind it as it moves to the left (clockwise) along the walkway. Pass the SW pressure pad and continue following the flames toward the NW corner. If necessary, wait near the NW pressure pad for the second wave of flames to pass and then grab the first ball, which is sitting on the walkway just to the right. Roll the ball back to the left onto the NW pad. That's one.
Now continue clockwise along the walkway, following the flames, to the NE pressure pad. If necessary, wait here for a wave of flames to pass. Then grab the second ball, which is sitting nearby on the walkway. Roll the ball onto the NE pad. That's two.
Now follow the walkway SE to find the third ball just beyond where you found the second. Roll it down toward the entrance. If you can stay ahead of the flames, just keep going; otherwise, step off the walkway onto the safe tiles near the start and wait until the flames pass. Then continue rolling the ball up the left side of the walkway and onto the SW pressure pad. That's three.
When all 3 balls are positioned on the pads, the square column in the middle of the room sinks. Wait for a wave of flames to pass. Then cross the walkway to the small, broken ledge above the lava pool. Jump onto the column and retrieve the Mask of Ehecatl Relic (Power Speed, Health and Ammo Regeneration). Jump back to the walkway and return upstairs to the main area.
SPIDER TILE PLATFORMS: Continue downstairs (SE) to the site of a Reward Challenge: Jump to all 6 spider tile platforms. Wait for the rotating flame jet on the right to pass over the spider tile platform in front of Lara and then jump onto it. It glows blue when activated. Quickly jump onto the second platform then the third. (Ignore the HEALTH UPGRADE for now.) Jump from the third to the fourth, which is just to the left. Now, without stopping, work your way back to the NE over the fifth spider platform—which has a red skull (2/10) on it—then the sixth, then back to the first and from there to the foot of the stairs where you started. As long as you begin just after the first flame jet passes the first platform and don't stop moving, you shouldn't run into any flames. In an emergency you can also hang from the edge of any of the platforms and let the flames pass overhead. Then pull up and continue. The reward: a AMMO POWERUP. (screenshots)
To get the HEALTH UPGRADE near the second platform, wait for the first flame jet to pass over the first platform. Jump onto it and then immediately jump to the second platform, then the ledge on the right with the upgrade. Grab it and jump back to the second platform. Quickly jump to the third, then the fourth, then the staircase to the SE. Now stop! (screenshots)
STAIRS WITH FLAMES AND REVOLVING TILES: There are flames billowing from the wall alongside the staircase, so don't just rush ahead. Notice how the flames cycle off in a wave. Stay in front of the inactive flame jets as you move down the stairs. Jump the gap and continue to the bottom.
Now observe the rotating tiles ahead. These tiles turn like rotating kebab skewers and have one flat side, which is safe to stand on. Jump onto the first set of tiles just as they turn flat side up. Run and jump onto the single tile ahead and keep moving forward onto solid ground. (screenshot) Grab some gems and continue downstairs. Smash the urns for a health pack.
CIRCULAR FIRE TRAP: As you approach this next trap, 2 long-haired ogres appear, one ahead, one behind. To avoid being pushed into the fire, I'd suggest rolling back past the ogre on the left and fighting them both while backing away. When they fall, they drop health and/or ammo.
When the coast is clear, approach the circular fire trap. Follow the moving flames all the way around the circle, picking up 2 red skulls (3 and 4/10) and various gems as you go. Or, grab one skull at a time, chasing one flame and pausing on each side of the walkway. Then hop up onto the pedestal to get the CHAINGUN. Whoo hoo! (screenshot)
NOTE: If you're replaying for the 5-minute time challenge, you can avoid the ogres and flames by jumping directly to the walkway below, as shown in this screenshot. The ogres still spawn as you pass, but you can just ignore them and move on.
Continue down the twisting walkway to the SE. To cross the next set of revolving tiles, wait until the first tile turns over into the flat position. Jump onto it, then continue running and jumping across the tiles—a set of two on the right, one on the left—and then the walkway ahead. Gather some gems and enter the next room. (screenshots)
BI-LEVEL ROOM WITH COLUMNS AND TILED FLOOR: In case that last gift from the gods wasn't a big enough hint, I'll tell you straight out: Equip that chaingun. You can thank me later. ;)
If necessary, smash the urns in the raised area near the entrance to find 3 boxes of ammo. As you move into the room, enemies begin to spawn, and flames flare up in both doorways preventing you from leaving until the fight is over.
Three fire shamans are the first to appear. (I don't actually know what they're called, but they resemble the shamans from previous levels, except that they shoot radiating blasts of flame.) The High-Power Single-Shot Rifle is great against a few individual shamans, but once the room gets crowded, the chaingun works like a charm.
After these first three die, a whole pack of regular enemies appears, along with 3 skeletons. If you take damage or run out of bullets, the urns on the lower level contain 3 health and 3 ammo.
Once you've destroyed the skeletons, 3 more fire shamans materialize—a pair on the ledge to the left, another on the right—followed by a bunch of other enemies on the lower level. You'll find more health and ammunition in the urns on the back ledge.
When the fight is over, the flames blocking the doorways go out. Gather up all the goodies you can use and exit to the NW. Head down the stairs and go through the doorway into a new area.
ROOM WITH RECTANGULAR LAVA POOL: Smash the urns for health, ammo and gems. Then throw a spear into the NE wall, preferably near either corner, wait for the flames to go out and quickly climb onto the ledge above. (screenshot)
LAVA POOL WITH PILLARS AND ROTATING FLAME JETS: The trap ahead has 4 round pillars set in a lava pit, along with 2 rotating flame jets. The bull's-eye target between the third and fourth pillars changes the direction in which the flame jets turn, but if you go quickly, you won't need to use it. Wait for the first flame jet to pass over the first pillar, moving counterclockwise. Jump onto the first pillar, then the second, then the third. You may need to pause for a moment on the third pillar until the second flame jet moves off the fourth pillar before jumping onto it. Then jump from the fourth pillar to the ledge. Pick up some gems on the left and then head down the stairs to the NW. (screenshots)
WALL OF FIRE WITH GRAPPLE RING: The floor below the golden ring has flame vents like the ones in the last Challenge Tomb. These flames move from left to right, so follow them across the ledge to get the gems on the other side. Then wait until the flames on the floor die down and run onto the walkway, grapple the golden ring and step off the edge. Extend the cable so Lara is hanging just above the horizontal flame barrier below. Swing back and forth to snag the red skull (5/10) on the right. Then swing to the left, jump and fall through the AMMO UPGRADE and land safely on the floor below. If you miss the AMMO UPGRADE on the way down, just throw a spear into the wall below it. Jump up onto the bull's eye and plant another spear just above the first. Then use the two spears to reach it. (screenshots)
NOTE: While swinging on the grapple cable, you can also drop a bomb onto the bull's-eye switch below and detonate it to flip the switch and turn off the flames. This isn't necessary but can be useful for the time challenge.
WALKWAY WITH FLAME VENTS AND ARROW TRAPS: Use the HEALTH SHRINE if you need it. Before trying to cross the walkway with the flames and flying arrows to the SE, destroy the arrow trap with your grenade launcher. You can't see the trap from this side, but if you step out into the path of the arrows and launch a grenade across the flame vents, you should hit the trap. (screenshots)
Next, wait for the flames to move off, then step out onto the walkway just far enough to trigger the appearance of a shield demon near the HEALTH SHRINE. Use the grenade launcher to remove his shield. Fight him on this side of the trapped walkway and take any health/ammo he leaves behind. Then follow the moving flames across the walkway to the other side.
Pick up more health and ammo if you need it. Then shoot the fire shaman off to the SE and jump over to the L-shaped ledge where he was standing. Gather some gems and a red skull (6/10). (Again, check the screenshots if necessary.)
To beat the Reward Challenge: Heal the rolling ball, move the huge ball to the left end of the ledge. Plant a bomb behind it and detonate the bomb to blast the ball across the gap. (You can also just push the ball across, but be careful Lara doesn't fall through the gap.) Jump across after it and roll it toward the walkway with the flame vents. Throw a spear into the wall just to the right of the first flame vent. Then jump on top of the ball and throw two more spears into the wall above the flames. Hop down, roll the ball close to the trapped walkway and use another bomb to blast the ball to the other side. Now use the spears to hop across the trap. As long as you position the spears high enough, Lara will be safe from the flames. Roll the ball onto the HEALTH SHRINE to receive the reward: a Wind Drum Artifact (+ weapon, + speed). (screenshots)
 Return across the flame-trap walkway once again. Then head down the stairs to the SW, jumping the gap on the way down.
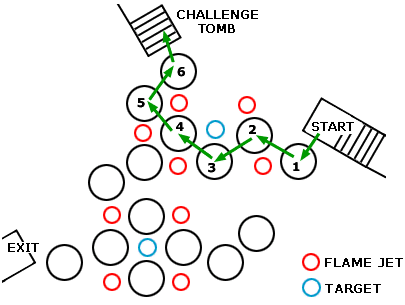
SECOND LAVA POOL WITH ROUND PILLARS AND ROTATING FLAME JETS: This trap resembles the one you encountered earlier, only there are more pillars and flame jets than before. There are 2 bull's-eye targets that change the direction of the flame jets' rotation. With precise timing, you can get from here to the Challenge Tomb on the north side of the lava pool without having to shoot the targets at all. This diagram shows the path marked with green arrows.
Wait on the ledge and watch the second flame jet (i.e., the one near the top of the screen of the two that are visible from here). When it sweeps across the pillar below it, jump onto the 1st pillar. Then quickly jump to the 2nd. Wait on the 2nd pillar for the next flame jet to pass over the 3rd pillar—the bluish one with the gems on it—and then jump onto it. Wait for the next flame jet to pass over the 4th pillar and then jump onto it. Ignore the pillar to the SW and jump directly onto the 5th one (to the NW). Quickly continue to the 6th pillar and then finally to the foot of the stairs. (screenshots/video walkthrough)
NOTE: In an emergency you can also hang from the edge of a pillar as the flame jet passes above. This can be a little tricky to pull off, though, since sometimes Lara steps off without grabbing the edge.
SECOND CHALLENGE TOMB: Enter the tomb and follow the walkway to the end. Jump onto the L-shaped wooden platform in the middle of the lava pool. Shoot the bull's-eye switch on the ledge ahead twice, so the L-shaped platform points NW and SW. Jump across to the bull's-eye and plant a bomb next to it. Then jump back to the L and over to the ledge to the SW. (screenshots/video walkthrough)
Pull the golden handle to open the barred alcove all the way across the room to the NE. In order to reach this alcove before it closes, release the handle, run toward the L-shaped platform and just before you jump onto it detonate the bomb to flip the switch and begin turning the platform. Run across it as it's moving and jump onto the ledge ahead. Run/roll forward into the alcove before it closes to claim the War Drum Artifact (+ weapon, + bomb).
NOTE: The first time you pull the handle, the camera shifts to show the alcove opening. You may want to wait for the handle to retract, pull it again, and then attempt the timed run without having to wait through the cut scene.
 Jump back onto the L-shaped platform, shoot the target to rotate the platform again and jump back to the entrance. Return up the stairs to the main area.
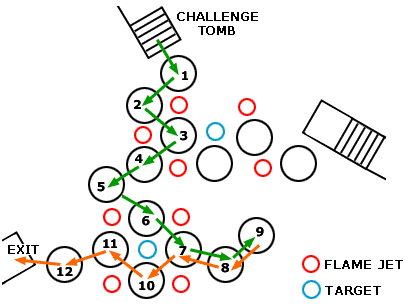
SECOND LAVA POOL WITH PILLARS AND FLAME JETS (again): Jumping across the pillars to the exit is a bit more difficult than getting from the entrance to the Challenge Tomb, especially if you're collecting goodies.
The path from the ledge in front of the CHALLENGE TOMB to the HEALTH UPGRADE down in the SE corner is indicated by the green arrows in the diagram below. Here's the sequence: Wait for the flame to the south to sweep across the nearest round pillar (labeled 1 in the diagram) and then jump onto the pillar. When the flame passes over the next pillar (2), jump onto it. Then wait for the flame to clear the next pillar to the SE (3) and jump onto it. While standing on the 3rd pillar, shoot the bull's-eye target on the right to change the direction in which the flame jets rotate. (screenshots/video walkthrough)
Wait for the flame to pass over the pillar to the SW (4) and then jump onto it. Wait for the next flame to pass over the next pillar to the SW (5), and then jump onto it. The 6th pillar is just to the SE. After the flame jet to the right of the pillar sweeps over it, jump onto it. While standing on the 6th pillar, quickly shoot the target to the south to change the direction of the flames. The jet to the SE then starts to move clockwise. Wait for it to sweep across the pillar to the SE (7) and then follow the flame across the next two pillars (7 and 8) to the one with the HEALTH UPGRADE (9). This pillar is safe.
When you catch your breath, follow the path marked by orange arrows to get the red skull and reach the exit. Starting on the pillar where the HEALTH UPGRADE was, shoot the target off to the left. This changes the flame jets' rotation so the nearest one begins to move counter-clockwise. Wait for it to pass over the nearest column (8) and then jump back onto it. Then follow the flame around to the next column (7), then the next (10), where the red skull (7/10) is located. Shoot the target again. Then follow the flame on the left across the next two pillars (11 and 12) to reach the exit.
NOTE: In an emergency you can also hang from the edge of a pillar as the flame jet passes above. This can be a little tricky to pull off, though, since sometimes Lara steps off without grabbing the edge.
Follow the walkway into a new area. Head down the stairs and use the AMMO CACHE in the corner if you need it and proceed into the room to the SE.
BI-LEVEL ROOM WITH SCORPION CREST: When you enter this room, the flames in the entrance and exit flare up, preventing you from leaving. Then a fire shaman and 2 skeletons appear.
In order to complete the Reward Challenge: Sacrifice 3 skeletons to the scorpion crest, concentrate on destroying the shaman first. You can shoot the skeletons so they don't bother you, but don't destroy their bones yet because you want them to rise up again. Then climb the stairs to the landing with the scorpion crest on the floor. When you do, 3 more fire shamans appear up here. Don't use explosives to fight them, since you might accidentally destroy a skeleton, preventing you from beating the challenge. I like the high-power, single-shot rifle here because it only takes one shot to bring down a shaman or skeleton giving you a little more control over where the skeletons fall. (screenshots/video walkthrough)
When only the 2 skeletons remain, plant a bomb on the floor tile with the scorpion and lure the skeletons onto it. Shoot them so they fall down on the crest and then detonate the bomb to destroy them. When the first pair has been destroyed, 2 more skeletons appear, one near the scorpion crest, one below. Repeat the process, planting a bomb on the crest, luring the skeletons onto it, shooting them until they fall down and then detonating the bomb to destroy them permanently. As long as you kill 3 of the 4 this way, you'll beat the challenge and receive a HEALTH POWERUP.
NOTE: If you accidentally destroy some of the skeletons outside the crest area, they won't count toward the reward challenge. If you like, you can quit and continue. The game will reload at the previous checkpoint just outside this room. Then you can try again.
 |
As soon as you've destroyed the third skeleton, whether or not you beat the challenge, a shield demon materializes near the crest. Disarm it with the grenade launcher, as usual, and then destroy it. If you destroy all 4 skeletons before killing the shield demon, that will be the end of the fight. If the 4th skeleton is still alive when the demon falls, 2 more fire shamans appear down below. Deal with them and the remaining skeleton.
Should you require supplies during all of this, there are 2 boxes of ammo and 2 health packs on the lower level, plus 2 health and 2 ammo on the landing, some of it inside the urns. The demon also drops health and/or ammo.
When the fight is over, the flames blocking the doorway to the SE go out and you can exit. Descend the long staircase, leaping across the gap partway down.
LAVA POOL WITH REVOLVING TILES: Ahead is another area with shish-kebab style rotating tiles. There are 2 red skulls (8 and 9/10) hovering above them, one on the left and one on the right. It's possible to get both in one go. (One possible path is indicated in the diagram at right and in this set of screenshots.) Or, if you prefer, you can make two passes, one for each skull. In either case, if you start just as the first set of tiles is about to turn over and don't hesitate at any point during the run, you should manage to avoid the flame jets on the right and make it to the end in time.
BROKEN WALKWAY WITH FALLING FIREBALLS: Collect the gems on the ledge beyond the trap and continue downstairs to the NW. Fireballs begin to rain from above. Try to avoid them as you gather the gems scattered around the broken walkway.
The final red skull red skull (10/10) is sitting in the northern corner of this walkway. (screenshot) If you've found the others as well, you'll receive the Golden Shroud of Cihuacoatl Relic (Power Bomb, Power Speed, Health and Ammo Regen!).
Move to the eastern corner of the broken walkway and jump across the lava pool onto the staircase to the NE. Climb the stairs to finish the level.
If you make it to the exit within 5 minutes, you'll beat the Reward Challenge and earn a Dark Drum Artifact as well (+ weapon, + defense).
†UPDATE HISTORY: 9/3/10 - First draft walkthrough posted.
9/13/10 - Fixed a couple of typos and a health/ammo mix-up. The reward for the spider-tile challenge is an ammo powerup, not a health powerup as originally written.
9/14/10 - Further revised spider tile section.
11/2/10 - Added screenshots and video. Revised the strategies for the wall of fire, rolling ball challenge and second lava pool with pillars and flame jets. Also made a few other minor changes for clarity and accuracy.
11/10/12 - Updated first challenge tomb strategy.
1/21/14 - Added update about missing levels in iOS version, thanks to a tip from Sean O.
ACKNOWLEDGEMENTS: Thanks to OB One T Raider for the Dark Drum info and to Cas for the tip about hanging from the edge of the spider tile platforms.
WAS THIS WALKTHROUGH HELPFUL? If not, I apologize and invite you to contact me with any questions. If you need help right away, I recommend the r/TombRaider subreddit. Other fan-run forums are listed at tombraiders.net/stella/community.html. If this site was useful, please consider supporting it financially or in other ways. For details, visit tombraiders.net/stella/support.html. As always, I welcome your corrections/suggestions. Thank you!
Copyright © 2010- - Stellalune (). All rights reserved. The screenshots and videos included here were made using Fraps. Feel free to copy or print this walkthrough for personal use. By all means, share it with friends, but please include this credit line so people can send me their feedback. No part of this walkthrough may be reproduced on another site without permission. Follow this link for details about this site's advertising and privacy policy.
Stella's Tomb Raider Site: tombraiders.net.