Stella's Classic Tomb Raider: Last Revelation Guide
NOTES ON THE REMASTER: This guide has not yet been updated for the remastered game. Revisions are in progress but will take time. I hope this version, based on the classic game, will still be helpful. Thanks for your patience.
IMPORTANT: This level, along with the TEMPLE OF KARNAK and the SACRED LAKE, are like one big level made up of linked parts. You can move between them as many times as you need to, but twice through each level should be enough if you explore thoroughly. This walkthrough attempts to cover everything with minimal backtracking.
LEVEL 8B: GREAT HYPOSTYLE HALL (second visit)
Updated: 2/21/25(†)
LEVEL MAP by VGCartography (used with permission)
Last Revelation Remastered Video Walkthroughby Eldincy‡
Kills: 10 Items: 13, including Sun Disk Secrets: 0*
NOTE: The numbers of kills, items, and secrets above are for this section only. The rest were covered in the Great Hypostyle Hall (first visit). One of the regular pick-ups will be the UZIS if you didn't find them in the TOMB OF SETH.
You return to this level after completing the TEMPLE OF KARNAK (second visit). Climb out of the pit and go up the ramp to the courtyard. There's a black-robed assassin (1) waiting just outside on the left. (screenshot) Kill him and take the Uzi clips (1) he drops.
NOTE: This is a different breed of bad guy from the thugs in light blue. They wear red-and-black robes and carry collapsible sword contraptions—what are these things?—that they can twirl around to shield themselves from bullets. They also carry guns and can switch from one weapon to the other. In dealing with them you might try keeping your distance and shooting them with pistols. Then, when they start twirling their knives, either turn your back on them briefly or put your weapons away. They'll retract their knives. Then you can start shooting again. Naturally, if you're trapped in close quarters, or if one of them draws a gun, you can retaliate with something more powerful, like the shotgun or Uzis.
DARK ROOM WITH UPPER LEVEL SUPPORTED BY SQUARE PILLARS (again): Go through the doorway to the north (i.e., the square opening with the carvings). (screenshot) Take out the assassin (2) lurking behind the first column on the right. (screenshot) Again, don't waste ammo shooting him when he's twirling his blades; he'll just deflect the bullets. If you see blood, you'll know you're hitting him; if you see sparks, he's deflecting. If you break line of sight or holster your own weapons, he should retract his blades. Then you can draw weapons and shoot him again.
If you want to avoid the next two enemies, climb to the upper level of the ROOM WITH SQUARE PILLARS and jump across to the sandy ledge on the south end. Follow this ledge around to the end. If you drop off after turning the corner, the two assassins won't appear. (screenshots)
If you do want all the kills, stay on the lower level. Exit through the sandy hallway on the far left (northwest). When you come to the corner just before the deep pit, you'll be ambushed by 2 assassins (3-4)—one from ahead, one from behind. If you opt to fight them in close quarters, use the shotgun and follow the same basic strategy above. Otherwise, take a running jump across the pit, grab the far edge, and pull up. (screenshot) Then draw pistols and shoot at the assassins until they run off. (screenshot) Jump back across the pit, pull up, wait for the assassins to return, and then roll and take a running jump-and-grab back to the far side of the pit. Repeat until they're both dead.
On the far side of the deep pit, continue to the SMALL OPEN SPACE BETWEEN BUILDINGS. (You've been here before too.) This time, go through the crawlspace in the northwest corner (screenshot), follow the passage to the end and use the HYPOSTYLE KEY, which you found in the TEMPLE OF KARNAK (second visit). This opens the door just beside the lock. (screenshot)
THREE CONNECTED ROOMS WITH DECORATED COLUMNS: Two assassins (5-6) come out as soon as you enter the FIRST (NORTH) ROOM, one from the doorway ahead and a little to the left, one on the far left. If you want all the pick-ups run to the left and quickly grab the small medipack (2) on the low block; otherwise one of the assassins will steal it and you won't see it again. Then backflip away a few times and take out the assassins. If you don't care about that item, you can instead run to the far right (southwest) corner and use the stone blocks there to climb onto the ledge above to avoid the assassins' blades. One will probably draw a gun if you engage him for a while. So you might want to switch to a more powerful weapon at this point. The other may lurk under the ledge. Change position or hang from the edge and pull up in order to draw him out. The shooter drops his UZIS (3) (or Uzi ammo if you already have the guns) when he dies. (screenshots)
NOTE: If you like, you can take a shortcut here to reach the next area, but you will miss several kills and pick-ups. Details are included on a separate page with screenshots.
MIDDLE ROOM: Go through the small, connecting room in the middle of the south wall, lower level. This leads into the MIDDLE ROOM. When you approach the shotgun shells (4), a third assassin (7) emerges from behind the block to the right. Deal with him as you did the others. Pick up the ammo and then enter the small room ahead on the right (southwest) to get a large medipack (5). Vault back up into the doorway, turn around, and grab the ledge above. Pull up into the small room above and move through to the other side. From the doorway overlooking the THIRD (SOUTH) ROOM, you can get a clear shot at the fourth assassin (8) lurking below. If you use pistols to conserve ammo, he may flee through the doorway into the MIDDLE ROOM. If that happens, just turn around, return to the other doorway, and shoot him from there. (screenshots)
THIRD (SOUTH) ROOM: From the upper doorway facing into the THIRD (SOUTH) ROOM, grab the overhead bars and traverse forward then to the right (west), all the way to the wall, so Lara is hanging in front of the black switch. Release and then quickly re-press Action to pull the switch. (screenshots)
Cutscene: The trapdoor rises between two of the high ledges in the MIDDLE ROOM.
After pulling the switch, immediately roll and take out another black-robed assassin (9) traversing across the bars toward you. If you spot him in time, you can easily shoot him down with pistols before he reaches you. (screenshots)
Drop down to the floor and pick up the flares (6) sitting on the sandy-colored block. Turn left and take a standing jump from the edge of the block to grab the edge of the upper doorway. Pull up into the connecting room and go through to the doorway overlooking the MIDDLE ROOM. Use the handholds to traverse forward then around to the left (west) to the now-raised trapdoor. When Lara reaches the trapdoor, drop onto the ledge and immediately roll and start shooting another assassin (10) swinging toward you. He drops some ammo, but don't bother going after it yet. (screenshots)
Turn back toward the (west) wall and pick up the Uzi clips (7) at one end of this ledge. Then use the block at the other end to climb to the upper level. Cross over the closed trapdoor and hop across the gap to the ledge on either side of the square column. When you approach the middle of the ledge, the camera angle shifts in order to draw your attention to the large stone ball balanced on the skinny pillar. Shoot the ball to knock it down, making a hole in the floor. (screenshots)
Now carefully maneuver Lara onto the ledge that juts out toward the column where the ball was. You'll regain camera control once you get there. Walk to the edge, take a standing jump onto the slope ahead, and hold Action as you slide back to grab the edge. Release Action to let go and drop to the floor. Turn around and go find the wideshot shells (8) the last assassin dropped. Then return to the hole and safety drop into it. Grab the Uzi ammo (9) in the dead-end crawlspace to the east. Then climb up into the dark passageway to the north. (screenshots)
GLOWING PYRAMID AND ROTATING NEEDLES: There are no enemies or traps in this area, so you can explore freely. A long passageway leads off to the north, but before going that way, enter the room on the left to get a look at the puzzle we're about to undertake. There's a block with a GLOWING PYRAMID on top and a pull chain that doesn't do anything yet. The other three sides of this room (north, west, and south) have raised openings leading into side chambers. (screenshots)
Start by climbing up into the opening to the west (i.e., on the opposite side of the glowing pyramid from the chain). Go inside to find flares and shotgun shells (10-11) on the left and right ledges. Return to the GLOWING PYRAMID ROOM, then climb the ladder into the north room to get some Uzi clips (12) from one of the ledges in the far left corner. Return again to the PYRAMID ROOM. (There are no goodies in the south room.) As you explore, you'll notice the large, obelisk-like needles suspended from the ceilings in the side rooms. These are part of an ancient mechanism. Activating it will allow you to proceed to the next area. (screenshots)
Exit the GLOWING PYRAMID ROOM through either of the doorways near the chain. Turn left (north) and follow the hallway to an opening in the ceiling with a ladder. Stand under the ladder, jump straight up to grab it, and then climb up to the FIRST (NORTH) WHEEL ROOM. (screenshots)
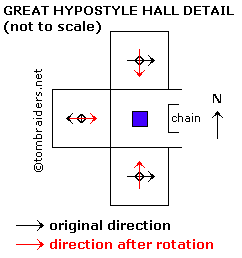
The huge, carved stone "needles," three in all, are mounted on wheels with handles so they can rotate. The goal is to rearrange them so they all point toward the GLOWING PYRAMID at the center. Use your compass and, if necessary, refer to the diagram and screenshots.
If you peer through the openings in the floor, you can see the GLOWING PYRAMID to the south and the FIRST (NORTH) NEEDLE, which is pointing east. To make things a little easier, the wooden handle on the wheel that turns the needle also points in the same direction. To point the needle toward the pyramid, turn the wheel clockwise one-quarter turn. That is, stand facing the side of the handle and press Action to push it once. (Each push is a quarter turn.)
Exit to the west and follow the passageway to the SECOND (WEST) WHEEL ROOM. Here, the needle and the handle on the wheel point west. You want them to point east. So grab the handle and give the wheel one-half turn (two pushes) in either direction. Continue to the THIRD (SOUTH) WHEEL ROOM. The last needle points east. You want it to point north. So grab the handle and give the wheel one-quarter turn (one push) counterclockwise. Now all the needles should be aligned correctly. (Again, check the screenshots if necessary.)
Return through the other wheel rooms and down the ladder to the passageway below. Follow it back to the GLOWING PYRAMID ROOM. Now pull the chain. (screenshot)
Cutscene: An ancient mechanism is activated, causing electricity to jolt from the point of each needle. This shatters the glowing pyramid, revealing a golden artifact. (screenshot)
Climb onto the block where the pyramid was and pick up the SUN DISK (13). (screenshot) Taking it opens a trapdoor in the floor near the west wall. (screenshot) Drop through the opening and follow the passage back to the SACRED LAKE.
*NOTE ON SECRETS: There are no secrets in this section, but if you have found all of the secrets up to this point, you should have 29/70.
†UPDATE HISTORY: 5/5/19 - First major update since this walkthrough was created in 1999. This revision includes many new screenshots as well as various other corrections and clarifications.
1/23/25 - Added running item and kill counts, which hopefully will be useful in the upcoming Remaster.
2/21/25 - Added VGCartography's level maps, with permission. Visit VGCartography on DeviantArt and follow on Twitter/X and YouTube for more fantastic game maps.
ACKNOWLEDGEMENTS: Special thanks to the participants in the alt.games.tombraider newsgroup and the old tombraiders.com forum, without whom parts of this walkthrough could not have been written. Thanks also to Dewo, Edward W., Kelvin B., Ken L., Nick B., Ryan, and Sharon E. for their help on this level.
‡NOTE ON VIDEO GUIDES: Eldin's videos don't always follow the same strategies I use in my walkthroughs, but if you prefer that format, I think you'll find them very useful.
WAS THIS WALKTHROUGH HELPFUL? If not, I apologize and invite you to contact me with any questions. If you need help right away, I recommend the r/TombRaider subreddit. Other fan-run forums are listed at tombraiders.net/stella/community.html. If this site was useful, please consider supporting it financially or in other ways. For details, visit tombraiders.net/stella/support.html. As always, I welcome your corrections/suggestions. Thank you!
Copyright © 1999- Stellalune (). Feel free to copy or print this walkthrough for personal use. By all means, share it with friends, but please include this credit line so people can send me their feedback. No part of this walkthrough may be reproduced on another site without permission. Follow this link for details about this site's advertising and privacy policy.
Stella's Tomb Raider Site: tombraiders.net.