CAIRO FLOWCHART
Updated: 5/5/19(†)
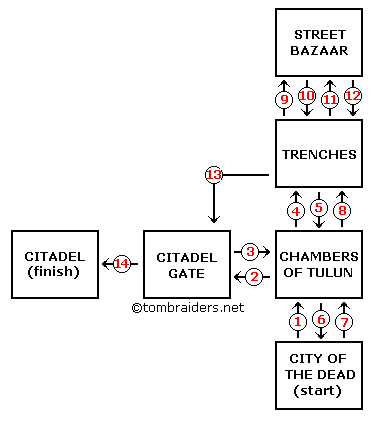
Levels 21 through 26, set in Cairo, are interconnected. Some backtracking among them is needed to find all the necessary items. This flowchart outlines the route through these levels. A more detailed table follows listing the important items and activities in each area. This table includes spoilers, such as artifact, area, and enemy names.
If you're missing a crucial item, either click its name in the table to go to the section in the walkthrough where it is found, or refer to the section of the walkthrough where the item is used (e.g., the door that a key unlocks, etc.) for notes explaining how to backtrack and find that item. You can also click the numbers 1–14 in the chart to go to the section of the walkthrough where each level change happens.
LEVEL |
KEY ITEMS |
NOTES |
City of the Dead (1st/MAIN) |
Motorcycle (available at start) |
You begin the Cairo section here and explore most of the level during this first visit. There is one area in the northwest part of the map that you can't reach until you have the nitro upgrade for the motorcycle. It is covered below. At the end of this section you open the northeastern gate and enter the CHAMBERS OF TULUN, indicated by the number (1) on the chart. |
Chambers of Tulun (1st) |
During your first pass through this level, you trap the Minotaur (or destroy him) so you can reach the entrance to the CITADEL GATE, at the top of the ladder on the west side of the level. (2) on the chart. You must leave the MOTORCYCLE in the CHAMBERS OF TULUN at this time. There is an area in the northeast corner of the map that you can't reach until you have the nitro upgrade for the motorcycle. This is covered below. |
|
Citadel Gate (1st) |
Here you first encounter Sergeant Aziza, an NPC who gives you information about crucial items you'll need to get through Cairo. You also find the NITROUS OXIDE CANISTER, one of the parts needed for the nitro upgrade. In order to continue, you must return to Aziza and climb back into the CHAMBERS OF TULUN the way you came. (3) on the chart. |
|
Chambers of Tulun (2nd) |
Motorcycle (again) |
You pass through this level again briefly in order to retrieve the MOTORCYCLE and drive into the TRENCHES. This sequence is covered at the end of the CITADEL GATE walkthrough. (4) on the chart. |
Trenches (1st) |
The VALVE PIPE is the second part needed for the nitro upgrade. When you have both the NITROUS OXIDE CANISTER and the VALVE PIPE, combine them to make the NITROUS OXIDE FEEDER and attach it to the motorcycle. Then follow the road south from the TRENCHES to re-enter the CHAMBERS OF TULUN. (5) on the chart. |
|
Chambers of Tulun (3rd) |
This third visit to the CHAMBERS OF TULUN is long enough to merit its own walkthrough. Now that you have the nitro upgrade, you can jump the motorcycle into the opening in the northeast corner of the map. Inside this building, you'll find the ROOF KEY, an optional item used later in the TRENCHES. If you want all secrets, you should then return to the south end of the CHAMBERS OF TULUN and drive back into the CITY OF THE DEAD. (6) on the chart. |
|
City of the Dead (2nd) |
|
This second visit to the CITY OF THE DEAD also has its own walkthrough. Now that you have the nitro upgrade, you can jump the motorcycle across the deep pit in the northwest part of the map to reach secret #2 (59/70). Then return to the northeast gate and drive back into the CHAMBERS OF TULUN. (7) on the chart. |
Chambers of Tulun (4th) |
|
You must pass through this level again briefly to get back to the TRENCHES. This sequence is covered at the end of the CITY OF THE DEAD (revisit) walkthrough. (8) on the chart. |
Trenches (2nd) |
|
This time you explore the rooftops in order to open a door so you can reach the entrance to the STREET BAZAAR. (9) on the chart. You must leave the MOTORCYCLE in the TRENCHES at this time. The ROOF KEY from the CHAMBERS OF TULUN (above) is only needed if you want every kill and pick-up in this part of the TRENCHES. |
Street Bazaar (1st) |
Lara encounters two of Aziza's men. She gets the MINE DETONATOR BODY and MINE POSITION DATA from them. Once you have these two items, you'll slide down a chute and re-enter the TRENCHES. (10) on the chart. |
|
Trenches (3rd) |
|
The chute leading down from the STREET BAZAAR deposits Lara in the southeast corner of the TRENCHES. You must then return to the northwest corner and climb the ladder to get back to the GARAGE area of the STREET BAZAAR (i.e., the entrance you used the first time). (11) on the chart. This short sequence is covered at the end of the STREET BAZAAR walkthrough. |
Street Bazaar (2nd) |
|
Go through the GARAGE to the COURTYARD. From there, you can proceed to the land mine area in the TRENCHES. (12) on the chart. This short sequence is covered at the end of the STREET BAZAAR walkthrough. |
Trenches (4th) |
Motorcycle (again) |
Combine the MINE DETONATOR BODY and MINE POSITION DATA to make the MINE DETONATOR. Use it to detonate the mines so Lara can cross the minefield and retrieve the MOTORCYCLE. You can then drive into the CITADEL GATE through a different entrance than you used the first time. (13) on the chart. This short sequence is covered at the end of the STREET BAZAAR walkthrough. |
Citadel Gate (2nd) |
|
Now that you have the motorcycle, return to the northwest end of the level to pick up Sergeant Aziza. He will help you enter the final Cairo level, the CITADEL. (14) on the chart. This short sequence is covered at the end of the STREET BAZAAR walkthrough. |
|
Once you enter the CITADEL, there is no going back. This level is self-contained, and when you finish it, you will proceed to Giza. |
Use your browser's 'back' button to return to the last page viewed
or follow this link to the level menu.
†UPDATE HISTORY: 5/5/19 - This page was added as part of the first major update since the walkthrough was created in 1999.
Copyright © 1999- - Stellalune ( ). All rights reserved. Feel free to copy or print this walkthrough for personal use. By all means, share it with friends, but please include this credit line so people can send me their feedback. No part of this walkthrough may be reproduced on another site without permission. Follow this link for details about this site's advertising and privacy policy.