LEVEL 10: LOUVRE GALLERIES | Updated: 1/16/07(†) |
Items: 6 health items, 2 security passes, Louvre Guard's Key, crowbar
Weapons & Ammo: 2 ammo items
Enemies: museum guards armed with tasers or pistols
Upgrades: lower body, upper body
Your notebook is updated as you begin the level. The note says, "Locate Carvier's office. Need security pass to reach archaeological dig."
Click for a printable map if you need one. (Thanks to John B.)
FIRST STAIRWELL: As you go up the stairs you'll encounter either one or two museum guards. One always appears and the other only does if you pass under the sweeping red light from the security camera on the landing. I tried using stealth on these guys but had no luck. The K2 Impactor taser worked great, though. Enemies take a second or two to fall down, but one shock is usually all you need. Plus using it allows you to pretend that Lara isn't actually killing innocent museum guards. You can also use hand-to-hand attacks or any other gun you like. Making noise doesn't seem to attract any additional guards. The first guard drops Impactor batteries.
Lara isn't strong enough to open the door under the security camera. You'll have an opportunity to return later. Continue up the stairs and around the corner to a door. Open it and go in.
FIRST GALLERY WITH ALARM SYSTEM: This room is protected by a series of laser tripwires. I've marked these as hazards, with pink type, but they won't harm Lara. In the first gallery the tripwires trigger an alarm, security gates come down at both ends of the room and an armed guard appears. To continue, kill the guard, reset the security system using the button on the wall near the entrance, and try again. You will need to successfully circumvent the lasers to get out the other side.
To get past the first set of lasers, climb onto the display case just beyond the entrance. Turn left, walk to the edge and jump to grab the top of the frieze. Pull up and take the large health pack. Turn to the right and take a running jump to the next display case against the left wall. Jump over to the middle case and turn left toward the end of the room. To get over the moving lasers, take a running jump when they are almost at their lowest point. Lara should sail over them and land on the next display case. Walk to the far edge. The next set of lasers cycle on and off. When they go off, take a standing jump from the edge of this case to land on the next one. Don't use a running jump or you may run on into the next laser.
Now hang from the right side of this display case and shimmy to the right above the floor-level lasers. There's a laser at waist level on the left side of the case, so don't try to traverse there. When you've cleared the lasers, drop to the floor. Climb onto the cabinet against the right wall. Position Lara with her chest or back against the wall and take a side flip through the gap in the crisscrossing lasers to land near the exit, or jump straight up to grab the molding above the cabinet and traverse to the left and drop down beyond the lasers. Go through the door.
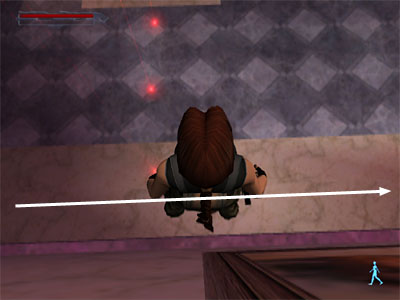
FOYER WITH ALARM SYSTEM: A cut scene shows some guards, goodies and points of interest. Crawl underneath the X-shaped laser trap. Turn sideways and side flip to clear the next set of lasers. Or, if the side flip isn't working for you, go to the right wall, stand right up against it and carefully sidestep past the nearest laser (as shown in this screenshot). If you trip the alarm, a guard with a gun comes in to join the one with the taser near the middle of the room and you'll have to kill both.
If you manage to get past the lasers without setting off the alarm, go into stealth mode and sneak along the right side of the room. You may be able to take out the guard with a stealth attack, depending on which way he's facing. If not, use your trusty taser. Pick up the LOUVRE LOW SECURITY PASS he drops. Continue forward to the end of the room.
VESTIBULE: Stay out of the red light from the security camera or another guard will appear at the end of the gallery behind you. On the left there's a sign for the Archaeological Dig Site and a door with a card reader that you can't use yet. Get the large health pack on the floor to the right, near another door which doesn't open from this side. Then return to the middle of the previous room where you killed the guard with the passcard. Go through the door into another gallery.
MONA LISA DISPLAY: Once more, watch out for the security camera. If you're caught in the red light, a guard comes up from behind. If you want to, you can go into stealth mode and sneak up on the guard in the next room. He moves around quite a bit though. Remember you can't use the stealth attack on a moving target.
So, this is where they keep Leonardo's famous Mona Lisa. It's well guarded, though, with lasers and, in case someone manages to penetrate them, a vent that pumps out poison gas. You'd better stay away from it for now.
The large display case in the middle of the room is movable, but Lara lacks the muscle to do it. Go to the smaller case in the far corner beyond the Mona Lisa and slide it out along the wall. This gives Lara a lower-body strength upgrade. Now she can move the bigger case. Push it as far as you can toward the Mona Lisa. It will stop when it reaches the row of benches. Return to the corner where the small case was and use the Low Security Pass at the card reader to temporarily disarm the lasers around the painting.
NOTE: There's a brief cut scene showing what happens. I recommend saving your game after this cut scene. Then if you need to redo the timed run, you can swipe the security pass again without having to wait through the cut scene. You may also want to move the small display case a little more if it's in the way.
After swiping the card, roll, run to the big case and climb on top. Since you'll need to take a running jump along the top of the case, I found it worked best to run toward the case at an angle, jumping over the low benches, then climb up the back of the case. From there it's a straight-ahead running jump to grab the edge of the Mona Lisa display before the lasers come back on.
VENTILATION DUCTS: Pull up and crawl into the duct. At the T, crawl to the right. A bit farther on the passage widens and Lara can stand. Continue to a split in the passage where there's a broken grating on the floor. Crawl through the duct ahead. (The passage to the left is a dead end.) Continue to a room with a fan and a yellow ladder. Climb the ladder and kick down the grate.
LOUVRE ROOFTOPS: There's a guard out on the roof. You may be able to go into stealth mode, peer out and try to sneak up on him. Or just pop out and shock or shoot him.
From the duct opening, go to the right and climb onto the air conditioner and then the curved metal duct. Turn to face the wall and jump straight up to grab the ledge. Pull up. Walk along the ledge. When your path is blocked by decorative grille work, hang from the ledge and shimmy past, then pull up and keep going. When you reach the overhead cable, jump up to grab it. Traverse along the cable without hesitating. Lara has just enough 'grab' to make it to the end and when she does, you get an upper-body strength upgrade.
NOTE: If you're finding this difficult, instead of grabbing the cable near the end, you can hang from the ledge, traverse around the corner to where the ledge juts out (shown in this screenshot), pull up and then jump up to grab the cable from there. Then Lara won't have quite as far to traverse.
After getting the upgrade, go to the right along the ledge to a drainpipe. Now check your inventory to see if you have a crowbar. If you do have the crowbar, climb all the way down the drainpipe and skip the next paragraph. If you don't have one, continue following the walkthrough below.
Climb halfway down the drainpipe, traverse to the right and pull up into the open window. If you inch forward, you'll get a clear view of the hallway ahead. There's a guard on patrol. With stealth and timing, you can sneak up on him and punch him out. Otherwise, just shock or shoot him. Take the LOUVRE GUARD'S KEY he drops. Return to the open window, climb out and shimmy down the drainpipe to the ground.
After climbing down the drainpipe, turn around go up the steps, open the mesh door and go through. Go to the blue door on the right and bust it down. (Lara is unable to do this before getting the previous upgrade.) Get some bandages inside. Lara can break down the other blue door, but there's nothing inside. Return through the mesh door to the drainpipe and climb past the open window to the top. Traverse to the right and pull up onto the ledge. Continue along the ledge. At the corner, jump across to the wider ledge and follow it all the way to the end of the building. If you have a crowbar, use it to break the lock off the door to the storage cage. Skip the next paragraph.
If you don't have a crowbar, climb down the ladder and go to the right. Open the blue door using the Louvre Guard's Key. Enter and get a CROWBAR. Exit, go right, climb the ladder and use the crowbar to pry the lock off the storage cage door.
Enter the storage cage, climb up on the whatever-it-is and crawl through the duct. Climb down the ladder and continue to an opening in the floor. Drop into a storeroom.
MUSEUM WORKROOMS & OFFICES: There are no goodies in this storeroom. Watch the small window set in the door until a guard walks past heading to the right. (This may take a little while.) Then open the door, go into stealth mode, sneak up on the guard and take him down. Of course, you can also just open the door and confront him.
You don't yet have a pass for the door at the end of the hall near the storeroom, so head toward the other end.
The first room on the right is a lab. You can skip it for now unless you want to cheat a little and take advantage of a useful bug. The inner room, beyond the glass doors, contains a cabinet with 3 RESPIRATORS. You aren't supposed to be able to get them yet, but if you position Lara in front of the cabinet a bit left or right of center, then press Duck and quickly press Action, Lara should crouch down and grab a respirator through the locked door. Adjust her position and repeat twice more to get the other two respirators. Then, later, when you return to this area in the Galleries Under Siege level, you'll be able to get a fourth respirator in the usual way. In addition to protecting Lara from toxic gas, respirators can be used like aqualungs, to extend her air gauge under water.
The second door in the long hallway leads to a security office. Enter, subdue the guard in the glassed-in room ahead and take the Vector ammo on the shelf to the right. There are also several security camera monitors. Use the one on the left to spy on Margot Carvier's office. (On the PC or Mac, use cursor keys or mouse to move the camera, Action and Jump keys to zoom in and out. On the PlayStation, use the left stick to move the camera and the right stick to zoom.) Zoom in on Carvier's computer to see a Post-It with her office access code: 14639. Press Duck to disengage from the camera. Return to the hallway and turn right.
MARGOT CARVIER'S OFFICE: Use the keypad near the office door to enter the code you just found. Go into the office and snoop around. The cabinets on the right are empty. The right side of the desk contains CARVIER'S SECURITY PASS. When you take it, your notebook is updated with the message, "Get access to the archaeological dig at the second buttress." Activating other objects in the room—the computer, the worktable, etc.,—provides information about Carvier's work on the Obscura Paintings, including the involvement of Eckhardt and the Lux Veritatis. Lara also learns that each of the five Obscura Engravings contains a map leading to one of the paintings, and that the five paintings together hide something called the Sanglyph or "Blood Sign".
After gathering all the intel you can, leave the office, run to the far end of the hall and use Carvier's Security Pass at the card reader to unlock the door. Enter and go down the stairs to the bottom. Follow the hall to a room with doors on the left and right. Go through the right door (the left doesn't open).
NOTE: This stairwell and the small room beyond are labeled "Stairs Up To Labs" and "Junction" in the map of the galleries.
THIRD GALLERY: This is a long, narrow room with paintings on the walls and a single display case in the middle. You may be able to sneak up on the guard inside. If not, shock or shoot him. Go to the far end of the room, swipe your security card at the card reader and go through.
VESTIBULE (again): Get the large health pack on the floor if you didn't pick it up earlier. The security camera alerts a guard to your presence. Enter, go left and shoot him before he gets to you. (Note that this guard won't appear if you already killed him on your first pass through this area.) The exit is on the right, near the Archaeological Dig Site sign. If you don't care about getting every pickup, you can go through that door now. Skip down to the last paragraph.
FOYER (revisited): To get the last two items, you'll have to go back to the beginning of the level. First make your way through the second gallery, past the door to the Mona Lisa display, to the door at the far end. It's OK to trip the alarms, but if this is the first time you've done so, another guard will appear behind you. If you already set off the alarms the first time you came through here, that guard won't show up again. At the far end of the room, turn left. Swipe your card in the card reader and go through the door.
FIRST GALLERY (revisited): The alarms are no longer set, so just run through to the end.
FIRST STAIRWELL (revisited): Go down the stairs where you entered this level. When you pass under the security camera on the landing, another guard will come from upstairs unless you killed him the first time through. Deal with him if necessary and open the office door. (Lara couldn't do this before getting the upper-body strength upgrade.) Enter and pick up bandages and a small medipack. Return up the stairs and through the first and second galleries.
VESTIBULE (once more): In the vestibule at the far end of the second gallery, go to the door to the left of the Archaeological Dig Site sign. Use Carvier's Security Pass in the card reader to unlock the door. Go through and down the stairs. You may be able to sneak past the guard in the gallery off to the right. (No goodies in there.) If not, kill him or just run away. At the bottom of the stairs, go through the doors, turn left and go through a storeroom, then turn right and continue down the stairs to the dig site entrance. Go through the blue metal doors to finish the level.
†UPDATE HISTORY: 1/16/07 - Made a few minor changes for ease of use and added a couple of screenshots. Added John B.'s map of the galleries, which I edited just a bit to better follow my walkthrough. Also renamed some of the areas in my text to correspond with his labels.
WAS THIS WALKTHROUGH HELPFUL? If not, I apologize and invite you to contact me with any questions. If you need help right away, I recommend the r/TombRaider subreddit. Other fan-run forums are listed at tombraiders.net/stella/community.html. If this site was useful, please consider supporting it financially or in other ways. For details, visit tombraiders.net/stella/support.html. As always, I welcome your corrections/suggestions. Thank you!
Copyright © 2003- - Stellalune (). I am eternally grateful to the members of the alt.games.tombraider newsgroup, whose contributions to this walkthrough are numerous. Thanks also to the developers of Fraps, the program used for all AOD screenshots. Special thanks to John B. for the map of the galleries, and to Bell, Cliff, Elaine, Shawn and Simon for help on this level, as well as many others who sent me the tip about the respirator bug. Feel free to copy or print this walkthrough for personal use. By all means, share it with friends, but please include this credit line so people can send me their feedback. No part of this walkthrough may be reproduced on another site without permission. As an Amazon Associate I earn from qualifying purchases. Follow this link for details about this site's advertising and privacy policy.
Stella's Tomb Raider Site: tombraiders.net.