TOMB RAIDER: THE PROPHECY for GAME BOY ADVANCE - PART 3 - ITALY
NOTE: Letter designations for buttons (B#), switches (S#), doors (D#), etc., in the text refer to labels on the corresponding level maps. The buttons are numbered to match their corresponding doors (e.g., button 1 opens door 1, switch 3 disarms trap 3, etc.). All pickups are marked on the map (I hope). Enemies and some hazards are noted in the walkthrough but not on the maps.
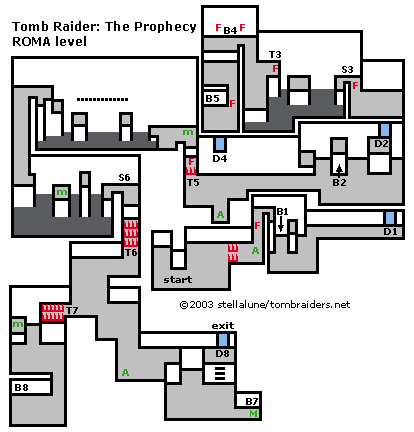
Level 17 (password ROMA) - click for printable map/map key
Cut scene: Lara sneaks into a building and overhears two red-robed figures talking about her. Apparently they've discovered that Lara has the stones and they've sent brothers to search her home.
From the start, near the center of the map, go to the right and fight the red-robed figure. When he's dead, the spikes on the right retract. Go past them, pick up the Uzi ammo and follow the hall upward, running past the flame trap when it cycles off.
In the next room, jump down to the ledge on the right then drop down and kill a wolf. Press the button (B1) to open the door (D1) at the right end of the hall. Head to the right, killing another wolf on the way. Enter the room above slowly in order to engage the red-robed acolyte and another wolf one at a time. Continue to the left and kill another wolf. Pick up Uzi ammo at the bottom left. Return to the right and press the button (B2) to open the door (D2) above. Climb onto the low ledge to the left and jump to grab the ledge above the button. Take another running jump to grab the ledge below the door. Pull up and immediately draw guns to shoot the charging wolf.
Enter the room above and kill another wolf. Go carefully past the flame trap at the top left and pull the switch (S3) to temporarily deactivate the flame trap (T3) off to the left. Take a running jump over the deep pit to grab the ledge with the large statue. (Be sure to sprint or jump right at the edge to get a long enough jump.) From there jump to grab the ledge with the flame trap. Pull up and quickly run off the burners.
Head up and left. Carefully run past the fireball trap and press the button (B4) to open a door (D4) farther down the map. Hop down off the ledge and kill the wolf. Go into the room below and fight another red-robed figure. When he falls, press the button (B5) to disarm the spike trap (T5) in the room below. Exit through the door (D4) at the bottom of the room and hop down into the room below. (There will be a wolf and some Uzi ammo here if you didn't cover this side of the room before.)
Exit the room at the top left past the deactivated spike trap (T5). Wait for the burners to cycle off. Then climb onto the ledge with the small medipak. Take a running jump across the pit to grab the ledge on the left. Pull up and traverse along the molding to the left. Drop onto the next ledge and jump to grab the ledge above/left. Climb onto the next ledge and follow the hallway left then down. You'll encounter a skeleton warrior about halfway down.
At the end of the hall is another deep pit. Take a running jump to grab the ledge to the right. Pull up, take the small medipak and jump to grab the next ledge. Pull up and take one more running jump down to the next ledge. Use the switch (S6) to temporarily lower the spikes (T6) below. Hop down and run off the trap before it springs back.
Another skeleton arises in the next room. Be sure not to back up into the spikes above/right or below/left, or go into the room below. If you do, you'll end up fighting 2 wolves as well. After dealing with the wolves, continue down and right. Pick up the Uzi ammo in the corner. Hop down off the ledge and kill another wolf and a red-robed bad guy, who materializes in the middle of the room. Get the large medipak at the bottom right corner and press the button (B7) to disarm the spike trap (T7) in the room above/left.
Climb the ladder and jump the gap to the left. Then go up and left through the previous room to the disarmed spike trap (T7). Jump down to the ledge with the small medipak. Then hop down and kill another wolf. Go into the room below, fight one more red-robed figure and then press the button (B8) to open the exit door (D8).
To get back there, climb out of this room at the top. Cross over the disarmed spike trap (T7) and go down/right through the next room. Take a running jump across the gap and exit the level through the open door (D8).
Level 18 (password MONK) - click for printable map/map key
You begin at the bottom left corner of the map. Climb onto the low ledge just above/right. Pick up Uzi ammo. Jump and grab the ledge to the right; pull up. Now take a long running jump to the next ledge on the right. This is the first time you must sprint in order to make the jump. (Hold the L button, run to the right and press A as close to the edge as possible for the longest jump.)
Climb onto the ledge with the fire traps. When they cycle off, press the button (B1) to disarm a spike trap (T1) below and to the right. When the burners across the gap to the right go off, jump across and get the large medipak. Jump back to the left (the drop to the ground is too far) and climb down the ledges, picking up more Uzi ammo on the way.
Continue on to the right. You'll pass the spike trap (T1) you just disarmed but the door (D3) there is still shut. In the next open area you'll meet 2 wolves and find more Uzi ammo on the ground. Climb onto the low ledge to the right of the clips. Climb up again for more Uzi ammo and a small medipak. Jump the gap to the left and press the button (B2) to disarm another spike trap (T2) elsewhere. Climb down to the ground and continue right.
Near the bottom right corner of the map you'll meet a black-robed acolyte. Take care of him and then climb the ladder, traverse along the ledge to the right and pull up. Climb the next ladder and fight a skeleton at the top. Press the button (B3) to open the door (D3) you passed earlier. Before climbing down, drop onto the ledge at the bottom right corner of the room to get a large medipak. Don't drop off that ledge; it's too far. Instead, climb back up and down the long ladder. You can then drop to the floor.
Return to the left to the door (D3) beyond the spike trap (T1). It should now be open. Go up then right to a button (B4) between two doors. Press it to open the door (D4) to the left. Go in, kill the red-robed enemy, dodging his fireballs and those from the flame trap on the top wall. Press the 2 buttons (B5 and B6a). One opens a door (D5) in another room to the left. The other opens the door (D6) just outside and to the right.
Inside the room to the right are a small medipak, more flame traps and 2 more buttons (B6b and B7). The door (D6) closes after you enter. One button reopens it. The other opens a set of doors (D7a and b) off to the right.
Before continuing up and right, you'll need to open the way to the level exit. So, follow the hallway back to the left then down past the first spike trap (T1) you disarmed. Continue left until you're almost back at the start of the level. Then head up the narrow hallway past a series of flame traps. Continue left and up through the door (D5) you opened earlier.
The room above has a mosaic of a dolphin on the floor and 2 wolves. After dealing with the wolves, climb the ledges on the left, pick up the large medipak and jump to the next ledge on the right. The jump across the next gap to the right is a bit tricky. You'll need to start at the top part of the ledge (near the top wall of the room), be sure to sprint (hold L while running) then jump in order to make it across. Climb onto the ledge in the upper left corner and press the button (B8) to open a door (D8) in the room above.
Carefully climb down (don't drop off the high ledge) and fight the red acolyte that appears below. Then make your way back to where you left off: Exit this room at the bottom left (through door D5) and go right and down past the burners. At the bottom of the map, go right then up past the disarmed spike trap (T1) and through the door (D3). Follow the hallway up then right past the two doors and button (D4, B4 and D6). Continue upward past the retracted spike trap (T2).
You can enter the next room through either door (D7a or b). There are 2 skeletons and a cult member inside. I recommend triggering one skeleton at a time and backing away along the hallway while shooting. Then take on the robed baddie. When he's dead, climb the ladder and traverse along the ledge to the middle. Pull up, grab the large medipak and press the button (B9) to disarm the spike trap (T9) below. Hang from the ledge again and traverse to the left. Climb down the short ladder and follow the hallway up and left.
Carefully jump the gap above the deep pit. Drop down to the lower ledge to get Uzi ammo and another large medipak. Then press the button (B10) to disarm the next spike trap (T10). Climb back up, jump the gap and then climb the ladder. Traverse to the left and drop onto the disarmed spike trap. Jump once more to the left.
Kill the red-robed enemy and exit through the door (D8) above. Shoot the wolf in the hallway and use the button (B11) to open the door (D11) to the left. Run through when the flame trap cycles off. In the small room beyond, wait for the flame trap to cycle off, press the final button (B12) to open the exit (D12) and continue to the next level.
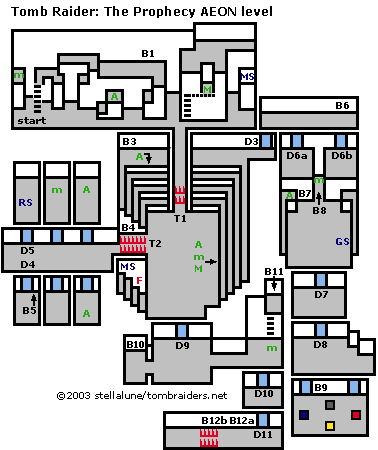
Level 19 (password AEON) - click for printable map/map key
You start near the top left corner of the map. Climb the ladder ahead and jump to the ledge on the left for a small medipak. Jump back to the right. Climb to the ledge above and cross over to the right. Hop down and run across this ledge. Ignore the skeleton for now. Take a running jump across the gap to grab the ledge to the right. Pull up and fight the cult member. As long as you let him live, he will use magic to reanimate the skeleton on the previous ledge. So deal with him first, then jump back across and destroy the skeleton.
Press the button (B1) to disarm a spike trap (T1) elsewhere. Drop onto the small ledge below/left for some Uzi ammo, and then climb back up. Jump back across to where the robed figure was. Cross this ledge to the top right corner and drop down to the ledge below to get the MANUELIUS STATUE (MS). Drop to the ground. Go left to the ladder, climb up, traverse to the right and pull up to get the large medipak. Drop back to the ground.
Go through the only opening in the bottom wall and follow the hallway down past the spike trap (T1) you disarmed earlier. In the large arena-like room below, you'll meet a red-robed acolyte and another skeleton warrior. Kill both. When the red-robed bad guy falls, the spike trap (T2) to the left retracts. Before going on, explore the ledges: At the top left pick up Uzi ammo and press the button (B3) to open the door (D3) at the top right. Up in that corner there's a skeleton, and along the right wall are more Uzi ammo plus small and large medipaks. At the bottom right, on the top ledge, protected by a flame trap, you'll find the MAXIMUS STATUE (MS).
Press the button (B4) above the disarmed spike trap (T2) on the left side of the arena. This opens one of the cell doors (D4) in the area to the left. When you enter, all but one of the remaining cell doors open, and a red-robed figure and 2 wolves attack. Kill them and pick up Uzi ammo in two of the cells and a small medipak in another. Use the button (B5) in the lower left cell to open the upper left cell door (D5). Enter and take the RICARDUS STATUE (RS).
Return over the spike trap to the arena room. Now there are two new enemies: a black-robed acolyte and another skeleton. Deal with them and then exit through the door (D3) in the top right corner.
Go to the end of the hallway with the centaur relief on the wall and press the button (B6) to open the 2 doors below (D6a and b). Enter through the left door to awaken a skeleton. Then back out shooting. Re-enter through the right door. A red-robed enemy appears here. After destroying him, drop down into the middle of the room to fight a black-robed enemy and another skeleton. Pick up Uzi ammo, a small medipak, and the GIORDANIUS STATUE. Press the 2 buttons (B7 and B8) to open 2 doors (D7 and D8) just below.
Go straight down through these doors into a room with 2 skeleton warriors. When you've destroyed both, the doors to the next room open. The button (B9) doesn't work yet. Place the four STATUES on the squares on the floor, in the correct order, to reset the button. To place a statue, stand Lara on a square, press Select, choose a statue from inventory, and press A. If you've chosen correctly, you'll hear a mechanical clinking noise. If it's the wrong statue, you'll hear Lara say, "hmmm," and the 'B' icon will appear, indicating you should press B to pick up the statue and try another. The correct order, clockwise from top, is: MAXIMUS, MANUELIUS, RICARDUS, GIORDANIUS.
When the statues have been placed correctly, the button (B9) pops up. Press it to open the door (D9) at the bottom of the arena, off to the left. Exit through the three rooms above to the hallway with the centaur relief. Go left and then down into the arena. You'll meet 2 more skeleton warriors where you fought skeletons before (i.e., near doors D6a and D3). Go through the now-open door (D9) at the bottom of the arena.
Another red-robed acolyte materializes here. Fight him and then press the button (B10) in the alcove to the left to open a door (D10) below and to the right. Then go right, pick up a small medipak and climb the ladder to another button (B11). Use this to open another door (D11) below.
Climb down and go through these doors to a small room with 2 buttons (B12a and b) and a spike trap (T12). Press only the left button to lower the spikes so you can exit. If you press the right button (B12b), it's OK. Just press the left one then the right one again and both sets of spikes should recede. Continue left to the next level.
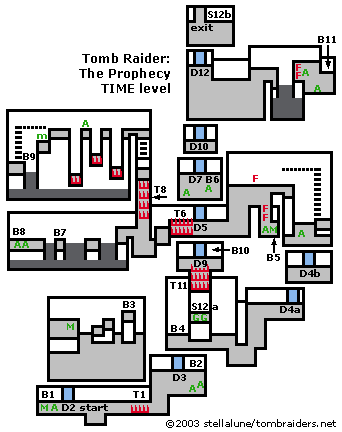
Level 20 (password TIME) - click for printable map/map key
From the start, at the bottom left of the map, go left, pick up Uzi ammo and a large medipak and press the button (B1) to disarm the spike trap (T1) to the right. Go past the disarmed trap, kill the wolf and press the next button (B2) to open the door (D2) near the first button. Return to the left and go through that door.
Two red-robed cult members appear. If you enter cautiously, you can trigger them one at a time. Kill both and climb the ledges to get another large medipak and reach the button (B3). Press it to open the door (D3) near the previous button. Return there (down to the start, right then up).
In the next room, just above the door there's another button (B4). Press it to open a set of doors (D4a and b) off to the right. You can't reach the platform with the switch and goodies yet, so continue right/up to the doors you just opened. Pick up Golden Gun ammo. (You'll get the gun soon.) Climb the ladder and traverse to the left.
The next room has several flame traps—set into the floor below and mounted on the wall above/left. When the floor burners cycle off, run down into the small room with Uzi ammo, a large medipak and another button (B5). Press it to open a door (D5) off to the left. Return past the flame traps and go left.
Pick up the Uzi ammo (2x) in the room beyond the door (D5) and use the button (B6) to lower the spikes (T6) outside. Exit and go left past the disarmed spike trap and on to a deep pit with several small ledges above. Jump across to the first button (B7). Press it to open the door (D7) next to the last button you used. Jump once more to the left to a larger ledge with Uzi and Golden Gun ammo. Press the button (B8) to disarm the other spike trap (T8) back to the right. Return across the pit to the right.
Head upward over the disarmed spike trap (T8) to a ladder. Climb to the top and then jump across the ledges to the left. Go carefully; if Lara falls, she'll land in the spikes below or fall into the pit. One ledge has Uzi ammo, another a small medipak. On the small medipak ledge, jump to grab the carved molding and traverse to the left. Climb down the ladder and press the button (B9) to open another door (D9) back to the right. Return up the ladder and across the pit the way you came. Return down the other ladder and over the spike trap (T8). Climb up to the right and go over the other disarmed spike trap (T6).
Carefully enter the room below, avoiding the spike trap (T11). Press the button (B10) to open a door (D10) in one of the rooms above. Exit and head straight up the map through three doors (D5, D7 and D10).
In the next room, there's a dolphin mosaic on the floor. A red-robed figure attacks, along with a wolf. If you back out of the room, the wolf will follow. Kill it and return to deal with the bad guy. Then go to the top right corner of the dolphin-mosaic room. When the fire trap on the other side of the deep pit cycles off, take a running jump to grab the other side. Pull up and quickly get off the burners. Pick up the Uzi ammo (2x) and press the button (B11) to disarm the final spike trap (T11).
Jump back across the pit to the left. Go through the dolphin-mosaic room and continue straight down to the spike trap you just disarmed. Cross it and hop down onto the ledge with the GOLDEN GUNS and a timed switch (S12a).
If you accidentally use the switch before collecting the guns, wait for it to reset before starting out again. Then you'll have more time.
Pull the switch to open a door (D12) at the top of the map. To get there, hop down off the bottom of the ledge and run to the right, up and right again, then up through two open doors (D4a and b). In the next room climb the ladder and traverse to the left. Run left past the flame trap, down then left again. Just before the disarmed spike trap (T6) sprint straight up through the series of open doors (D5, D7, D10 and the timed door D12). Sprinting on the straight-aways gets Lara there faster. Once you pass door D12, the timer stops. If you forgot anything (like the GOLDEN GUNS) you can use the switch (S12b) to reopen the door and explore some more. When you're ready, exit through the upper door.
Level 21 (password OLIM)
This is another short, transitional level, so there's no map. Head upward, taking care not to fall off the edge into the jungle below. Lara gets a clue from the inscription on the ruined wall. Where the slight ledge juts out to the left, take the proverbial "leap of faith" and walk out into thin air. As long as you go in a straight line to the left, Lara won't fall. On the other side of the gap, head upward to the next level.
Level 22 (password LAND) - click for printable map/map key
You start on the left side of the map. Get the Uzi ammo and then follow the hallway down and to the left to a timed switch (S1). This disarms the spike trap (T1) above for about 8 seconds. After that, the spikes pop back up. Throw the switch, run to the left a few steps then sprint (hold L) straight up to the button (B2) on the wall above the spike trap. Quickly press the button and then run off the spikes. The button opens the door (D2) to the right of the timed switch. Head back there now.
Enter, get the Uzi ammo and press the button (B3) to open a door (D3) in the room to the right. Exit the way you came and hop down into the next room. Go to the right, destroy the skeleton and press the button (B4) to open the door (D4) next to the previous button.
Now you have a choice of doors (D3 or D4) to access the top of the map. I found it a little easier to climb the ladder to the right and go through door D3. When you pass the spike trap (T6) a wolf runs in from the right and kills itself on the spikes. Two more wolves wait around the corner to the left. If you back up while shooting, watch out for those spikes.
Follow the hallway to the left then up. Climb a ledge and press the button (B5) next to the ladder to open a door (D5) elsewhere. Climb the ladder and traverse along the molding across the deep pit to the right. Climb or drop down to the room below. Press the button (B6) to the right of the ladder to disarm the spike trap (T6) in the area below. Pick up the small medipak below.
Enter the room to the right and fight another skeleton. When you explore the bottom part of this room, a cult member in black and purple appears. He will use magic to reanimate the skeleton unless you kill him quickly. Just watch out for the spike traps (T10a and b) off to the right.
In the room above (behind door D5), there are 2 buttons (B7a and b). The right button opens 3 doors to the right (D7a, b and c). (NOTE: If you press the left button first, only the middle door, D7b, will open. In that case, press the right button then the left button again and all three doors will open.)
Exit the room and go right, carefully skirting the spike trap (T10b) along the bottom edge.
The upper room (behind door D7a) leads to the exit, which isn't open yet. So head downward (through door D7b). Kill a skeleton and continue (through door D7c) to a ledge above a deep pit. Get the small medipak and press the button (B9) to open the door (D9) to the left. Jump over to it.
(NOTE: There's another ledge to the left, which connects to the area you explored earlier. There's no need to jump over there now if you've followed this walkthrough. But there'll be a wolf there if you didn't lure it onto the spikes at T6 earlier.)
Go through the door (D9) above the middle ledge. At the top of the room you'll find Uzi ammo and another button (B10). Press it to disarm both spike traps (T10a and b). Go left then up to the button (B11) above the upper spike trap. Press the button to open the exit door (D11). Go right then up to get there.
Level 23 (password DART)
Cut scene: A group of Teg-Du-Bhorez acolytes gathers around a glowing object. A priest in blue-and-white robes enters. He speaks of reawakening their master, the "Great Grey One" through a ritual called the "Third Reunion." One of the acolytes alerts the leader to Lara's arrival. The leader orders them to dispose of her. The cult members go into hiding as Lara approaches then ambush her as she examines the WHITE STONE.
Again, this is just a one-room level, so there's no map. You'll have full health at the start, but watch your health meter closely, since the 4 acolytes can dish out a lot of damage. The Golden Gun is a bit hard to control in close battle. You need to hold the fire button down to power it up, and then release it to fire, and in order to hit your target, Lara must be facing it squarely. For this battle, I found it's easier to use the Uzis (if you have sufficient ammo) and jump side to side in order to dodge the fireballs from the red guys. Once you've killed all four, there's another cut scene.
Cut scene: The cult leader tells Lara there's nothing she can do to prevent the Third Reunion. She counters that he'll need the stones, which she possesses. He says the stones are eternal but she is only mortal. She may keep them as long as she lives...which, we assume, he doesn't intend to allow for long. Lara realizes she now needs to find the Teg-Du-Bhorez headquarters and defeat them.
The chapter wrap-up text tells how Lara returns to her library and finishes deciphering the Tome of Ezekiel. She learns more about the Teg-Du-Bhorez and the three prophecies, which ultimately lead to the awakening of the Great Grey one and the beginning of the Apocalypse. Though it's not clear how she discovers where the cult is based, the next level takes Lara to their H.Q.
WAS THIS WALKTHROUGH HELPFUL? If not, I apologize and invite you to contact me with any questions. If you need help right away, I recommend the r/TombRaider subreddit. Other fan-run forums are listed at tombraiders.net/stella/community.html. If this site was useful, please consider supporting it financially or in other ways. For details, visit tombraiders.net/stella/support.html. As always, I welcome your corrections/suggestions. Thank you!
Walkthrough and maps copyright © 2004- - Stellalune (). All rights reserved. Feel free to copy or print this walkthrough for personal use. By all means, share it with friends, but please include this credit line so people can send me their feedback. No part of this walkthrough may be reproduced on another site without permission. Follow this link for details about this site's advertising and privacy policy.
Stella's Tomb Raider Site: tombraiders.net.