TOMB RAIDER: CURSE OF THE SWORD - CAVES
NOTE: I recommend saving about 10 shotgun rounds for the boss at the end of this section. Using the heavy ammo makes the final fight much easier. Letter designations for switches (S#), doors (D#), save crystals (C#), etc., in the text refer to labels on the corresponding level maps. The switches are numbered to match their corresponding doors (e.g., switch 1 opens door 1, switch 3 extends ledge 3, etc.). All pickups are marked on the map (I hope). Enemies and hazards are noted in the walkthrough but not on the maps.
Caves - Map 1 (click for printable map/map key)
You fall into this level at the top left corner. Shoot the zombie on the level below then somersault off the ledge. Go right, slide down the short slope and continue right. Shoot the giant ant across the gap and then hop down into the gap. Roll through the tunnel to the left to get some shotgun rounds. Then return to the opening above and climb up on the right side. Continue right to a doorway between two lit braziers. Go through to emerge from another doorway near the top left of the map. (The two connecting doors are marked D1a and b.)
Go to the right, pick up the small medipak partly hidden behind a rock and continue right to the save crystal (C1). A fat zombie in a diaper comes waddling over from the right. Kill him and then save your game. Continue right to another doorway. Go through to emerge on the other side of the wall to the right. (These doors are marked D2a and b on the map.)
Step off the edge to slide down a series of ramps. At the bottom, pick up a large medipak and go through yet another doorway (D3a).
The connecting door (D3b) is just on the other side of the wall to the left. Shoot the skinny zombie to the left (shotgun rounds are the way to go here) and continue that way, walking through the spikes. On the other side of the room, climb up two small ledges, shoot the giant ant above and then climb up once more. Go to the right, jump the first gap in the bridge and then safety drop to the ledge below to get some shotgun rounds. Safety drop to the ground, walk through the spikes to the left and climb back up to the bridge. Jump the first and second gaps and continue to the right. Shoot the giant ant and then climb onto the ledge with the greenish moss hanging on it. Shoot another ant above before climbing up.
Roll through the tunnel to the left, picking up the rapid bullets as you go. If Lara doesn't get them automatically, try rolling past them and then turning around. Or, roll out, adjusting her position and trying again.
On the other side, climb onto the ledge above and go through the doorway (D4a) to emerge from the doorway (D4b) to the right of the low tunnel. Climb the ledges to another wooden bridge. Pick up rapid bullets on the right near the stone head. Jump the two gaps in the bridge (a standing jump for the first, a running jump for the second) and go through the doorway (D5a) to the next area.
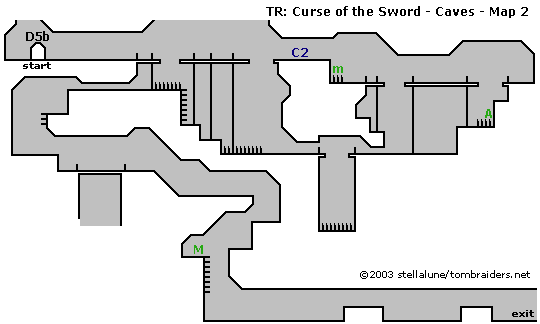
Caves - Map 2 (click for printable map/map key)
(NOTE: This map is wider than a standard 8½" x 11" sheet of paper. Unless your printer automatically scales images to fit the paper, be sure to print it using landscape (horizontal) orientation, or the edges will be cut off.)
You enter this map at the top left (through the doorway marked D5b). Immediately draw guns and shoot the 2 zombies to the right. Continue right to another broken bridge. Take a running jump across the first gap. (There are spikes below.) Shoot a goon with a club on the next section of bridge and then take a running jump across the next gap. Shoot the giant ant and use the save crystal (C2).
Go right, shoot the zombie below and safety drop off the ledge to land in the safe spot between the spikes and the wall. Pick up the small medipak and walk through the spikes to the right. Kill the bad guy across the gap and take a running jump over. Shoot a giant ant across the next gap and then take another running jump across.
Climb down the stone ledges below, making sure to safety drop off the lower ledge so Lara doesn't land in the spikes. Pick up the shotgun rounds in the spikes and walk to the left. You can't shoot the 2 zombies from above, so load up those shotgun rounds, jump down and deal with them.
Go to the left, past the statue holding the bowl of fire and roll under the low overhang. Be careful not to roll off the edge into the spike pit. Stand, shoot the zombie on the other side and take a running jump across. Shoot another zombie and keep going left. Walk through the spikes and climb two ledges and a ladder.
At the top, kill the 2 giant ants and walk to the left through more spikes. Roll through the tunnel, hop down one level and climb down the short ladder. Drop to the floor near another statue with a bowl of fire and go right. Kill the bad guy below and hop down. Shoot another goon to the right as you cross the bridge. Slide down the slope and deal with the 2 fat zombies. Go left past the two columns and hop down to the ledge below. Climb down once more and then take a running jump across the gap to the left. Pick up the large medipak and climb down the ladder.
You can probably shoot one of the 2 zombies below from the ladder before dropping down. Kill the remaining zombie and go to the right. This hallway contains a few low walls and 4 zombies, which you can easily destroy from above or below before going on. At the end, you exit to the boss level.
Caves - Boss Level
This is just a big, rectangular room with a few columns and statues, so I haven't made a map. Lara enters on the left, and the boss, the Bokor, is hovering near the center of the room. He's not all that hard to beat, provided you have some heavy bullets and a few medipaks set aside. As you fight him, dematerializes and reappears in various places around the room, alternating between hovering while throwing fireballs and popping in right next to Lara to punch her. Use a medipak when you need to, and whenever the Bokor becomes visible, blast him once or twice with the shotgun. Then wait for him to reappear again. It only takes about 7 direct hits with the shotgun to bring him down. When he falls, the game is over.
Final cut scene: Lara stands over the fallen cult leader. She takes the sword, vowing to put an end to its curse. Two days later she meets Jane back at the museum. Lara shows Jane the broken sword, explaining that it will never again be used to raise the dark magician Madame Paveaux.
WAS THIS WALKTHROUGH HELPFUL? If not, I apologize and invite you to contact me with any questions. If you need help right away, I recommend the r/TombRaider subreddit. Other fan-run forums are listed at tombraiders.net/stella/community.html. If this site was useful, please consider supporting it financially or in other ways. For details, visit tombraiders.net/stella/support.html. As always, I welcome your corrections/suggestions. Thank you!
Walkthrough and maps copyright © 2004- - Stellalune (). All rights reserved. Feel free to copy or print this walkthrough for personal use. By all means, share it with friends, but please include this credit line so people can send me their feedback. No part of this walkthrough may be reproduced on another site without permission. Follow this link for details about this site's advertising and privacy policy.
Stella's Tomb Raider Site: tombraiders.net.