TOMB RAIDER: CURSE OF THE SWORD - ROOFTOPS
NOTE: Letter designations for switches (S#), doors (D#), save crystals (C#), etc., in the text refer to labels on the corresponding level maps. The switches are numbered to match their corresponding doors (e.g., switch 1 opens door 1, switch 3 extends ledge 3, etc.). All pickups are marked on the map (I hope). Enemies and hazards are noted in the walkthrough but not on the maps.
Some general tips: As the cut scene implies, you have 5 minutes to complete this level. The clock at the top left of the screen counts down the seconds. Don't panic. It may take you several tries to get it. To make things easier, first run to the right, slide down the ramp and quickly use the save crystal (C1). Then, when you make a mistake, you can reload and try again from here. After a few practice runs, using the strategies described below, I was able to make the run with more than a minute to spare.
Turn the sound down. If you're like me, then the dramatic music will only freak you out. You'll probably do better without it.
Run instead of walking whenever possible. Once Lara is running, holding the B button will keep her running in the same direction. Then you can just press Up whenever you need her to jump. As long as you keep holding B, she'll continue running when she lands. After a few tries, you'll remember where the gaps are and be able to take running jumps across them without stopping or having to climb up the ladders.
Don't stop to kill the enemies that don't have shields; just run past them. The guys with the shields will prevent Lara from going forward, so you must shoot them. Crouch while shooting and Lara won't lose health. Sometimes you can crouch and roll toward them, then shoot, but don't get too close or they'll club Lara and you'll have to crouch and re-draw weapons again, losing precious seconds as well as health.
If you're pretty well fixed for medipaks, don't bother stopping to pick them up (at least not the small ones) unless you land right next to them. This also wastes time. Same goes for the chimneys: Unless you're desperately low on health, don't wait for them to stop smoking, just run past as fast as you can.
Pausing to use a medipak stops the clock, so don't hesitate to heal if Lara's health bar gets down into the red.
For each map, I give a rough estimate of the amount of time you should have on the clock when you finish. You may find you need more or less time on each map. My times are just suggestions.
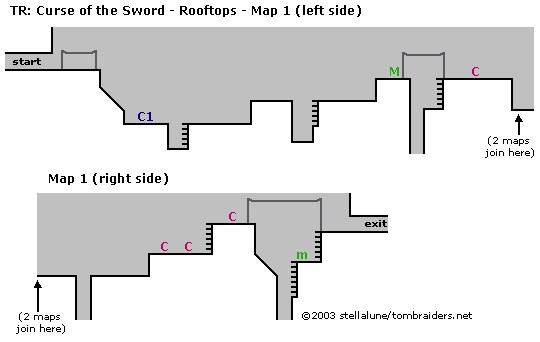
Rooftops - Map 1 (click for printable map/map key)
From the crystal (C1) near the first "Grub" sign, take a running jump across the gap. Run past the "Vaz" sign, climb up and crouch to shoot the guard. Take a running jump across to the next "Vaz" sign.
Run forward and climb up. Crouch and roll onto the large medipak to pick it up. Then stand, step forward and jump straight up to grab the clothesline. (Or, leave the medipak and just take a running jump to grab the clothesline.) Monkey swing across the gap and let go when Lara is directly above the ladder.
(NOTE: Gaps marked in pink are so deep that if Lara falls, she'll die. Others have ladders or are shallow enough to climb out of. Still, it's better to jump across when you can, to save time.)
Run forward past a chimney and off the next edge. Run forward, jumping the gap. (There are "Grub" and "Vaz" signs on each side.) Run forward, climb up, run forward a few steps and then crouch between the two chimneys. Shoot the guard with the shield. Climb the ladder, run across the rooftop with the chimney, keep running and jump to grab the clothesline. Monkey swing across the gap, drop down, crouch and shoot the next guard.
(Alternatively, you can run across the rooftop before the clothesline, run off the edge, slide down the slope and jump the gap to land on the ledge with the small medipak. Then climb the ladder, crouch and shoot the guard. This takes a bit longer.)
Run through the hallway to the right to enter the next map. If all has gone well, you'll have at least 3 minutes left on the clock.
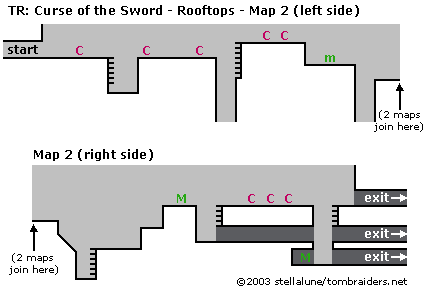
Rooftops - Map 2 (click for printable map/map key)
Run forward past the chimney and TV antenna. Jump to clear the gap. Run on past the thug with the gun and the next chimney. Jump at the edge of the next gap to grab the ladder, or better yet the top of the pink building. Climb up and keep running over the pink building, past an antenna and two chimneys. Run off the next edge to land near a small medipak.
Run forward, jumping the next gap. Run across the brown building, past another thug with a gun. Try not to jump at the edge. Instead step off, slide down the slope and jump to clear the shallow gap. (Otherwise, you fall in and have to climb the ladder to get out.)
Run on past the "Apple Radio" sign. Climb up two levels. On the top level, if you pull up, crouch and then roll forward, and Lara will pick up the large medipak without losing time. Stand, then take a running jump across the gap to the top of the next building.
This pinkish building has two levels where you can pass through: the roof and the floor below it. I recommend jumping straight across to the roof, then immediately crouching to shoot the guard. Then run past the three chimneys, jump the gap, and run into the windowed hallway straight ahead. Keep going and you're into the next map. If all has gone well, you'll have at least 1:30 to 1:45 left on the clock.
(NOTE: If you fall down the gap after the large medipak, run a few steps into the building, behind the blue windows, and crouch to shoot the guard there. Then run forward and fall down into the space between this building and the next. Lara will land on the bottom level between the last two buildings. Get the large medipak just inside the building on the left if you have time. Then run to the right along the glassed-in hallway to the next map. Although you can use the middle level to exit, dealing with the guard in the last building wastes too much time. Also, the middle level is the slowest one to get through on the next map. Therefore, recommend avoiding it.)
Rooftops - Map 3 (click for printable map/map key)
(NOTE: If you enter this map on the middle or bottom level, see the alternate walkthrough below.)
If you enter this map on the top level (which I found to be the fastest route), run forward past the chimney and jump to clear the first gap. Run forward past an antenna, climb up two ledges (there's a chimney on the middle level) and crouch to shoot the guard inside the glassed-in room at the top of the map. When he's dead, run on, down two levels (one has a chimney) and jump the next gap.
There's a small medipak on the rooftop ahead, but also a thug with a gun. You can't climb onto the roof beyond the medipak, so I recommend avoiding the medipak and thug. Instead, immediately after jumping across to this building, climb down the ladder and let go to land in the doorway below.
(*) Crouch, draw guns and roll forward once. Shoot the guard and then run on. Jump the gap to the next building, run past another thug with a gun, and climb the ladder beyond the large medipak. (Pick it up if you have time.)
Take a running jump to grab the clothesline and monkey swing across the next gap. Drop and then run past the chimney and off the edge. Slide down the long slope and jump near the end to grab the ladder on the side of the next building.
Climb up and run past the "Drink Fizzy" sign. Climb up and run through the brown hallway to the last map. You'll only need 10 seconds at most to get from the start of the next map to the point where the clock stops.
(Rooftops 3 - Alternate Walkthrough: If you entered this map at the middle level, run forward, crouch and shoot the guard. Run forward, jump the gap between buildings and immediately crouch and shoot the next guard. Run on past the thug with the gun. A bit farther on, you'll have to crouch and shoot another guard. Then take a running jump across the next gap. Pick up the walkthrough above at the * to finish this map.
If you entered this map on the bottom level, run forward past the thug with the gun and jump across the next gap. Run forward a few steps, crouch and shoot a guard. Run on past another thug with a gun and jump to grab the ladder on the side of the next building. Climb up to the doorway. Pick up the walkthrough above at the * to finish this map.)
Rooftops - Map 4
(NOTE: There is no printed map for this short "boss" level.)
Run forward and pick up the large medipak. Hop down near the Statue of Liberty. The countdown stops. Lara automatically draws her weapons and aims upward at the dude hanging from the helicopter.
Keep shooting as you sidestep left and right to avoid the bombs he's dropping. Tap Start at any time to pause the game and use a medipak. When he's taken enough hits, a cut scene will ensue.
Cut scene: As the man is hoisted aloft by the helicopter, Lara reaches upward. He slashes out at her with the sword. Then he says she's sealed her fate and she will now become the "chosen one." Lara falls back, injured. As the chopper flies off, she ponders his words.
Later at the Museum, Jane bandages Lara's wound and explains the thief's cryptic words. According to Jane, the thieves must have been members of the cult of the Dark Queen. This cult believes whoever has been cut by the sword is becomes a vessel for the queen's spirit. Jane tells Lara she must find and defeat the cult leader or she'll die. Jane advises Lara to go to Pino Lamor, an old shaman who lives in the subway, for help. She believes Lamor will help Lara once he sees she is "marked" by the sword cut. Jane urges her friend to go quickly, since the cult members will be coming after her.
WAS THIS WALKTHROUGH HELPFUL? If not, I apologize and invite you to contact me with any questions. If you need help right away, I recommend the r/TombRaider subreddit. Other fan-run forums are listed at tombraiders.net/stella/community.html. If this site was useful, please consider supporting it financially or in other ways. For details, visit tombraiders.net/stella/support.html. As always, I welcome your corrections/suggestions. Thank you!
Walkthrough and maps copyright © 2004- - Stellalune (). All rights reserved. Feel free to copy or print this walkthrough for personal use. By all means, share it with friends, but please include this credit line so people can send me their feedback. No part of this walkthrough may be reproduced on another site without permission. Follow this link for details about this site's advertising and privacy policy.
Stella's Tomb Raider Site: tombraiders.net.