TOMB RAIDER GBC: VOLCANIC TEMPLE A
NOTE: Letter designations for switches (S#), doors (D#), save crystals (C#), etc., in the text refer to labels on the corresponding level maps. The switches are numbered to match their corresponding doors (e.g., switch 1 opens door 1, switch 3 extends ledge 3, etc.). All pickups are marked on the map (I hope). Enemies and hazards are noted in the walkthrough but not on the maps. The exception in this level is the numerous fireball emitting traps. I haven't mentioned every one. If you're low on medipaks, try to conserve them since you'll probably lose some health to these traps.
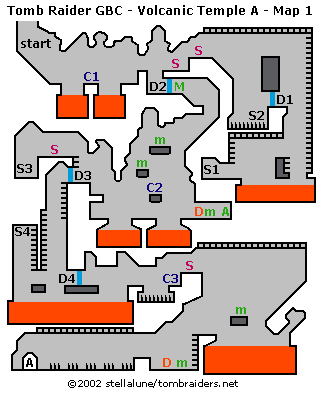
Volcanic Temple A - Map 1 (click for printable map/map key)
You fall into the level at the top left of the map and slide down a ramp. Take a running jump across the first lava pool to the save crystal (C1). Take another running jump to the next ledge. Climb over the low wall. The blue door (D2) isn't open yet, so climb over the ledges above it past 2 steam vents to a ramp above a spike pit. Jump up to grab the ceiling bars and monkey swing to the right, past a ledge with fire traps.
Climb down the ladder on the right edge of the map, past more fire traps and another blue door (D1), but not quite to the bottom. Backflip to the platform behind, which has a ladder on one side and a fire trap on top. Jump up to grab the next set of ceiling bars and monkey swing to the left. Climb down the ladder and drop to the ledge below. Use the switch (S1) to open the blue door (D1) you passed previously. Return up the ladder and across the bars to the platform with the fire shooter. Rather than trying a running jump to the ladder, climb down the short ladder on the side of the ledge, backflip and grab the other ladder. Climb up to the middle of the ladder and backflip to land near the blue door (D1).
On the other side of the door, safety drop to land in a clear spot to the right of the spikes. Use the switch (S2) to open the first blue door (D2) you passed earlier. To get back there, climb out of the spike pit, take a running jump to grab the ladder on the right edge of the map and climb to the top. Monkey swing along the ceiling bars to the left and drop near the steam vent.
Hop down two ledges to the left to the blue door (D1). Pick up the large medipak, slide down the ramp and duck to avoid the fire shooter. Safety drop off the ledge onto another slope and jump to grab the platform with the small medipak. Pull up. Step off the left side of the platform to land on another platform with a small medipak. Step off that platform on the right side to land on the platform with the save crystal (C2).
Drop to the ledge below and take a running jump over the lava pool to the right. Pick up dynamite, a small medipak and heavy bullets in the alcove and then jump back to the ledge between the two lava pools. Now take a running jump across the lava to the left. Duck to avoid the fire trap.
Climb up two ledges to a blue door (D3). Climb the short ladder above the blue door. Cross the ledge, watching out for the fire traps and steam vent. Use the switch (S3) to open the door and return there.
Go through the door, climb down the ladder as far as you can and then jump to grab the ladder behind. Climb to the bottom (past more fire traps) and drop onto a small ledge above a big lava pool. Jump up to grab the ladder on the other (left) side of the wall. Climb up and shoot the ceiling switch (S4) to open a door elsewhere. Climb back down and take a running jump across the lava pool to the right to the blue door (D4) you just opened.
Take a running jump across the lava to grab the ledge on the right. Pull up and shoot a bat. Take a running jump over the spike pit to the save crystal (C3). Climb up near the steam vent and kill another bat.
Use the monkey bars to swing over another big lava pool. When Lara is in front of the skull on the wall not quite halfway across the monkey bars, let go to land on a platform with a small medipak. Lara will lose some health this way, but it's easier. Alternatively, you can monkey swing all the way across to the right, turn around so Lara is facing left and let go. Lara will land on a slide. Jump near the end to land on the platform with no health loss.
From the platform with the small medipak, take a running jump to the left. Shoot a bat and climb down the ladder. Pick up a small medipak and dynamite, and climb onto the low wall to the left.
Ahead is a long hallway with spikes and fire traps. You can use the bars on the ceiling to monkey swing over the spikes, or climb down carefully into the spikes and walk to the left. I found that walking through the spikes made it easier to avoid the fireballs, since you can see where they're coming from.
Go through the snake-head doorway in the bottom left corner (marked "A" on the map) to reach the next area.
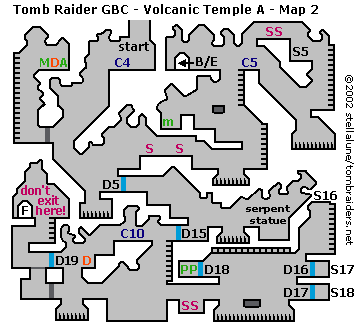
Volcanic Temple A - Map 2 (click for printable map/map key)
You fall into this area near the top middle of the map. There's a save crystal (C4) just to the left. Step off the left end of the ledge, slide down the ramp and jump to land near the gray door. Use dynamite to blow it open. Climb the ladder on the left wall, past some fire traps, and backflip to the ledge at the top. Shoot 3 bats and pick up a large medipak, dynamite and rapid bullets. Climb back down.
Slide down the next slope, jumping near the end to clear the spike pit and land next to a blue door (D5). Climb onto the ledge above the door and continue to the right past 2 steam vents. Take a running jump over another spike pit to a ledge with a fire trap and a ladder. Climb the ladder and backflip to the ledge behind.
Climb up and to the left, ducking to avoid the fire traps as you go. Get the small medipak on the other side of the low wall. Climb onto the small "floating" platform above and to the right. From there jump to grab the ladder to the right. Climb to the top where there's a save crystal (C5).
Slide down the ramp to the right of the crystal and jump near the end to clear the spike pit and land on a ledge. Climb the ladder on the right edge of the map, past a couple of fire traps. Backflip to the ledge behind and use the switch (S5) to open the blue door (D5) down below. Climb onto the ledge above the switch, go past the steam vents and safety drop back down next to the save crystal (C5).
You'll return later to explore down below. For now, head to the left. Jump the gap above the ladder and go through the doorway with the snake head (marked "B/E" on the map).
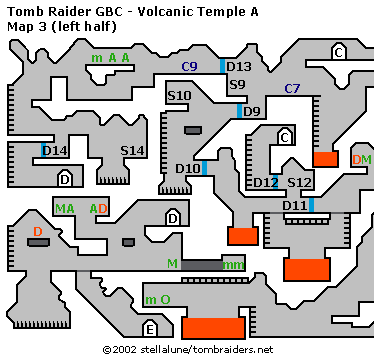
Volcanic Temple A - Map 3 (click for printable map/map key)
NOTE: The map for this area is larger than a standard 8½" x 11" sheet of paper. You can try printing it using landscape (horizontal) orientation. Or, download the left side and right side separately, print both and tape them together.
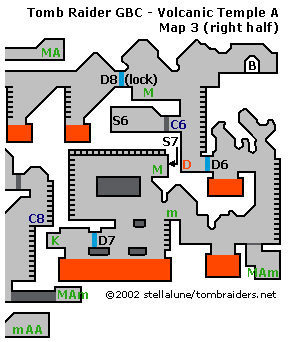
You enter this area at the top right corner through the doorway marked "B" on the map. Hop down to the left. Take a running jump across the gap and get the large medipak. The blue door ahead (D8) needs a key, so return to the right. Take a running jump to grab the ladder and climb down. Backflip to the ledge with the save crystal (C6) and gray door. Use dynamite to blow up the door. (If you don't have dynamite, there's some at the bottom of the ladder.)
Beyond the gray door, kill the 2 snakes and use the switch (S6) to open the blue door (D6) below. Jump back to the ladder and climb down to the door you just opened. Pick up more dynamite and take a running jump across the lava pool to the right. Take another running jump to grab the ladder on the right edge of the map. Climb down.
Use dynamite to blow up the white floor tiles and drop down into a pit with multiple fire traps, large and small medipaks and rapid bullets. Climb back out and continue to the left.
Take a running jump across the next lava pool and climb onto the wall to the left, where there's a small medipak. Ahead is a series of small platforms above a big lava pool. There are various fire traps throughout this area. Take a running jump to the first platform and another running jump to the ledge on the left side of the room. Climb the ladder ahead and either use the ceiling bars to monkey swing across to the right or drop to the platform with the spikes and fire traps, cross over it and jump the gap to the ledge with the large medipak. Use the switch (S7) to open the blue door (D7) below and to the left. Return to the left and down the ladder.
Take a standing jump from the edge above the lava pool to land on the ledge below and to the right. (Don't safety drop or Lara will land in the lava.) From there, take a running jump to the right to reach the blue door (D7) you just opened. Another running jump puts Lara on the ledge with the DOOR KEY (K). Get it and repeat the jumps back to the right. Take a third running jump to grab the ladder on the right side of the lava pool and then climb to the top.
Return to the right, jumping over the smaller lava pool and the gap where the white tiles were. Climb the ladder on the right edge of the map and backflip to the ledge. Jump back over the lava pool and climb the ladder above the blue door (D6) to get back up to where you started. I recommend stopping on the ledge halfway up the ladder to use the save crystal (C6) again.
At the top of the ladder, go to the left and use the DOOR KEY to unlock the blue door (D8). Slide down the slope and jump to clear the small lava pool and grab the ladder. Climb up and again slide and jump to grab another ladder above lava. Do the same a third time. At the top of the third ladder you'll find a save crystal (C7).
To the left are 2 blue doors and a switch (S9, D9 and D13) stacked one above the other. Use the switch to open the lower blue door (D9). Go through, slide down the slope and jump to the small platform ahead. (If you miss and land on the ledge below with the blue door, take a running jump to the left, over the spike pit, to grab the ladder. Climb up and backflip onto the small platform.) Climb up to the ledge on the left and use the switch (S10) to open the blue door (D10) below.
Climb down, go through the blue door and slide down another slope. Jump near the end to clear the lava pool and land on a ledge. Jump over the white break-away tiles. The blue door (D11) just ahead should be open. Go straight on through and jump over the second set of white break-away tiles. The blue door closes behind you.
(NOTE: In case I'm wrong about the blue door being open, there's also an alternate path below the break-away tiles. Climb down the ladder, monkey swing across the lava pool and climb up the ladder on the other side. Shoot the white tiles above and climb out.)
Climb onto the ledge above the fireball-shooting gargoyle. Climb up once more to a ledge with a large medipak and dynamite. Use the dynamite to blow up the gray door below on the right. Take a running jump to grab the ladder and climb down to the save crystal (C8).
Climb down the next ladder and then hop down to the ledge below. Roll through the concealed tunnel to the right and pick up large and small medipaks and heavy bullets. Roll back out and climb down to the left.
At the bottom, go to the right, kill 2 snakes and pick up a small medipak, heavy and rapid bullets. Return to the left and continue to another ladder. Climb up and use the ceiling bars to monkey swing across the lava pool to the left. Take the red ORB (marked "O" on the map) and the small medipak and then monkey swing back to the right.
Climb back up the ledges and ladders, past the save crystal (C8), to the top of the second ladder. Backflip to the ledge and go to the left. The blue door (D11) between the openings where the break-away tiles were is now closed. So climb down the ladder into the room below. Use the monkey bars to swing across the lava pool and climb out on the other side. Jump the gap to the right and climb onto the ledge above the blue door (D11).
Use the switch (S12) to open the other blue door (D12) just to the left. Enter, climb the ladder and backflip to the ledge behind. Go through the doorway with the snake head to emerge at the top of the same area. (Both connecting doorways are marked "C" on the map.) Roll through the low tunnel lined with fire traps to the right. Pick up a large medipak, heavy and rapid bullets and roll back out.
Go to the left end of the ledge and safety drop to land next to the save crystal (C7). To the left are the stacked blue doors and switch (S9, D9 and D13) you saw earlier. Last time you went through the lower door. This time, climb up to the top door (D13) and go through to find the next save crystal (C9).
Shoot the 2 mercenaries below on the left. Climb onto the ledge above where they were standing to find heavy and rapid bullets, plus a small medipak. Climb over the wall to the left. Take a running jump to grab the ladder on the left wall and climb down.
Go to the right. Jump the gap above the blue door (D14) and then drop down on the right side of the wall. Take a running jump across the spike pit and use the switch (S14) to open the blue door (D14) back to the left. Jump back across the spikes and climb over the wall to the blue door. Go through, drop down, and go through the snake-head doorway to emerge from another doorway below and to the right. (Both connecting doors are labeled "D" on the map.)
Jump to the small platform on the left. Kill the mercenary on the next ledge and jump over there. On the ledges above you'll find a large medipak, rapid bullets, heavy bullets and dynamite. Get the goodies and climb down to the floor.
Go to the right and pick up the large medipak. Roll through a hidden tunnel and shoot the mercenary lurking inside. Pick up 2 small medipaks and roll back out. To the left is a section of white floor tile. Use dynamite to blow it up.
(NOTE: There's nothing in the area farther to the left except some dynamite on a high platform above a large spike pit. If you missed the dynamite on the ledge above, continue to the left to get some. Otherwise, just go on.)
Slide down the ramp below the white tiles and exit through the snake-head doorway (labeled "E" on the map).
Volcanic Temple A - Map 2 (again)
You re-enter this area through the same doorway you used to exit earlier (at the top center of the map, marked "B/E"). Go to the right and take a running jump across the gap to the save crystal (C5).
After saving, climb down the ladder to the bottom and let go. Take a running jump to grab the ladder to the right. Take a running jump over the spike pit and continue to the left. Cross over the ledge with the steam vents and climb down two levels to a blue door (D5).
[NOTE: You passed this way the first time you explored this level. If you followed this walkthrough, the door should be open. If not, you'll need to climb back up to the upper right corner of this map to find the switch (S5) that opens it. The beginning of the section on Map 2 gives details.]
Go to the right, through the blue door (D5) and down/right to another blue door (D15). Take a running jump across the spike pit to the left. Stand on the ledge facing the huge serpent statue and place the ORB in its mouth (A button). This opens the blue door (D15).
Take a running jump back across the spikes, go through the blue door, and jump the gap to land near the save crystal (C10). Continue left and down, killing 2 snakes as you go. If you don't have dynamite you'll find some on the third step down. There's a closed blue door (D19) across the gap to the left and a gray door below it, but don't worry about those. That way is an alternate exit (see the note below).
Safety drop to the level below. (Don't jump or step off, or Lara will fall into the spike pit.) Go to the right and shoot the 2 mercenaries below. Hop down and cross to the left. Climb up and cross the shallow pit with the 2 steam vents. Take a running jump to the small platform in the middle of the big spike pit. Take another running jump to grab the ledge on the other side.
Climb up past the stacked blue doors (D16 and D17). Climb the ladder on the right wall and shoot the ceiling switch (S16) to open one of the blue doors below (D16). Climb down and use the switch (S17) behind the blue door to open the door below (D17). Climb down and use the switch (S18) behind that door to open another blue door (D18) on the other side of the spike pit.
To get back there, either repeat the running jumps across the spike pit, or climb up to the ledge above and take a running jump to grab the bars on the ceiling. Then monkey swing to the left.
Behind the blue door you just opened (D18) you'll find the FOURTH PANEL PIECE (PP). Taking it ends the level.
(IMPORTANT NOTE: There is an alternate exit from this level. If after using the switches in the bottom right of this map, you return to the blue and gray doors at the bottom left, the blue door (D19) will be open. You can then climb up to the snake-head doorway marked "F" on the map. That doorway also leads to the next level, VOLCANIC TEMPLE B; however, you don't have the FOURTH PANEL PIECE. It may be possible to complete the game without it, but I haven't tried it yet. So, for now, I recommend that you DON'T GO THROUGH DOOR "F".)
WAS THIS WALKTHROUGH HELPFUL? If not, I apologize and invite you to contact me with any questions. If you need help right away, I recommend the r/TombRaider subreddit. Other fan-run forums are listed at tombraiders.net/stella/community.html. If this site was useful, please consider supporting it financially or in other ways. For details, visit tombraiders.net/stella/support.html. As always, I welcome your corrections/suggestions. Thank you!
Walkthrough and maps copyright © 2004- Stellalune (). All rights reserved. Feel free to copy or print this walkthrough for personal use. By all means, share it with friends, but please include this credit line so people can send me their feedback. No part of this walkthrough may be reproduced on another site without permission. Follow this link for details about this site's advertising and privacy policy.
Stella's Tomb Raider Site: tombraiders.net.