Stella's Tomb Raider Anniversary Mobile/Cell Phone Game Walkthrough
 LEVEL 9: TREASURE TROVE
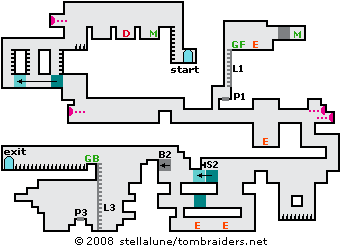
Climb the ladder almost but not quite to the top. Wait for a dart to pass overhead. Then climb up and quickly step down into the depression with the medikit. Wait until another dart passes before climbing over into the next depression. Get the dynamite, wait for the next dart, and then climb over the next low wall.
There are spikes beyond the third low wall, so this time wait for the dart, climb up and jump to grab the ledge below the dart trap. Drop down. Then climb down the ladder onto a movable block. Climb over the wall to the left and drop down. Pull the block to the left to position it under the wall with two ladders. Climb up the left ladder and down the right. Continue to the right.
Climb down the ledges, watch the darts then drop down and quickly duck to avoid being hit. Make your way to the right, ducking every time a dart passes. Climb onto the block. Lara is safe from darts here. Watch the passageway to the right. The darts come two at a time but less often. As soon as a pair of darts strikes the block, hop down and run to the right. Climb up through the opening in the ceiling.
Stand on the pressure pad (P1) to reveal a ladder (L1) overhead. Climb up, shoot the dog and pick up the GOLDEN FANG (GF). Climb onto the step to the right. Place the dynamite near crumbling wall and quickly jump out of the way before it explodes. Behind the crumbling wall, you'll find a medikit.
Return down the ladder and hang from the ledge. Wait for a pair of darts to pass, drop down and run to the right. Jump the gap and grab the other side. (Or, if you fall into the pit, shoot the dog and jump up to grab the other edge.) Wait for more darts to pass, pull up and run off the edge to the right.
Climb down to a ledge above a spike pit. Jump to the block above the spikes, then to the other side of the pit. Continue to the left. There are 2 dogs in the passage below the movable blocks. Drop down and kill them, then go to the left and climb to the second ledge. The block above (B2) prevents you from going any further. So turn right and jump across the gap. Pull the movable block (i.e., the upper one of the two) once so it is positioned beneath the switch.
You don't need to do anything with the second movable block on the ledge below. So just return to the ledges on the left and drop all the way down to the floor. Make your way to the right and climb the ledges to the switch (S2). Climb on the block to reach it and use it to retract the block (B2) that was impeding your progress.
Climb back down to the floor, go to the left, climb back up the ledges and over the wall to the left. Then make your way down the ledges to the floor of the next room. Climb onto the pedestal and step on the pressure pad (P3) to extend a ladder (L3) from the floor to the ledge above. Climb to the top and pick up the GOLDEN BEETLE (GB).
Now you must move very carefully get past the 3 sets of retracting spikes. Stand at the left edge of the low ledge facing the spikes. When the first set of spikes retracts, jump forward (don't run). Then jump forward as the second set retracts. Then jump forward again as the third set of spikes retracts and quickly run to the exit.
Walkthrough text and diagrams copyright © 2008- Stellalune (). Feel free to copy or print this walkthrough for personal use. By all means, share it with friends, but please include this credit line so people can send me their feedback. No part of this walkthrough may be reproduced on another site without permission. Follow this link for details about this site's advertising and privacy policy.
WAS THIS WALKTHROUGH HELPFUL? If not, I apologize and invite you to contact me with any questions. If you need help right away, I recommend the r/TombRaider subreddit. Other fan-run forums are listed at tombraiders.net/stella/community.html. If this site was useful, please consider supporting it financially or in other ways. For details, visit tombraiders.net/stella/support.html. I also welcome any and all suggestions to improve things. Thank you!
Stella's Tomb Raider Site: tombraiders.net.