Stella's Tomb Raider Mobile/Cell Phone Game Walkthrough - Elixir of Life
 Level 3 – The Lobby (MP3636)
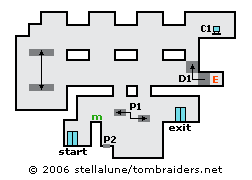
Climb onto the wall and get the medipack if you need it. Jump from the wall to grab the small platform above on the right. Pull up. Turn left and climb through the opening in the ceiling.
Go to the left to a room with a moving platform. When it descends, jump onto it. Stand at the right edge, ride the platform to the top and jump off. Cross the series of ledges to a computer terminal (C1). Use it to move the small floating platform (P1) in the room below and also open a door (D1) just below where Lara is standing and releasing a security robot. Jump back across the ledges to the left. (It's possible to drop down from the rightmost ledge, but Lara will lose health.) Jump back to the moving platform, ride it down and jump off on the right.
Shoot several times to the right to destroy the security droid. (You don't need to see it in order to hit it.) Go to the right, jumping two gaps in the floor. Hang from the right side of the right opening and drop onto the small platform (P1) you moved earlier. Jump from there to the exit.
(NOTE: If you didn't get the medipack on the wall near the entrance and want it now, stand on the pressure pad (P2) just below the medipack. This moves the hovering platform back to the left. Climb onto the wall, get the health, then retrace your steps up to the computer. Use it again to move the hovering platform. Then return to the exit.)
 Level 4 – The Kennels (MP6558)
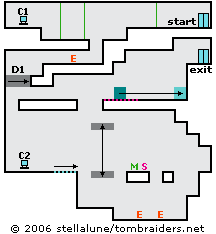
Go to the left. When Lara crosses the laser beam, an electrified floor is turned on elsewhere.
Continue to the left. Jump across the opening in the floor and then drop and hang from the left edge. When the Doberman in the hallway below moves off to the left, drop down, draw guns and shoot it. Then climb back up through the opening. Continue to the left to a computer terminal (C1). Use it to open a trapdoor (D1) below.
Using the computer also turns on 2 laser beams just to the right. These cycle on and off. Move past each one when it's off. If Lara touches either one, the door below closes and you have to use the computer again to re-open it.
Drop down into the hallway again and go all the way to the left. Drop down to the next level and go to the right. Jump across the gap but don't pull up onto the electrified floor. Instead, wait for the moving platform to come up beneath Lara and then drop onto it. Move to the right edge as you ride down. At the bottom, jump off on the right and get the medikit (GN9500). Avoid the steam jet. If Lara stands on it when it vents, she'll be burned. Wait for the moving platform to return and jump onto it.
Move to the left edge and when the platform moves down again, jump onto the conveyor belt on the left. Immediately jump again to get off the belt before it drops Lara off the ledge. If Lara does fall into the room below, go to the right, kill the 2 Dobermans and climb out on the right side. Jump back across the ledges to the left, avoiding the steam jet, and try again.
Beyond the conveyor belt is another computer terminal (C2). Use it to turn off the power to the electrified floor above.
Walk to the edge of the conveyor belt. Wait for the moving platform to come down. When it's almost at its lowest point, step onto the conveyor belt, ride it to the right and jump onto the platform. Ride the platform to the top and jump up to grab the opening in the floor. Now it's safe to pull up.
Push the movable box all the way to the right. Climb onto it to reach the exit.
 |
|
 Level 5 – The Museum (MP0671)
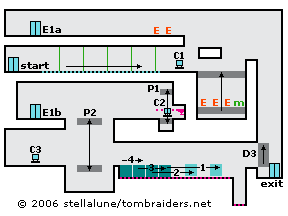
Step onto the conveyor belt and draw guns. When Lara moves past the laser tripwires, a platform moves up from a lower room just ahead. Two Dobermans and a security robot come up on the platform, so shoot them as quickly as you can. Use the medipack if you need it.
(NOTE: Alternatively, as you ride the conveyor belt to the right, walk to the left to keep Lara from running into each of the lasers. When each laser cycles off, stop walking and ride past it. If you manage to repeat this for all five lasers, the platform will never rise up.)
Use the computer (C1) to lower a small platform (P1) in the room below. Then climb up onto the ledge on the right. Turn around and jump to grab the edge of the ledge to the left. Pull up and shoot the dog and robot. Climb back down and use the medipack if you didn't before.)
Follow the upper hallway to the left end. Get in the elevator (E1a) and ride down two floors (to E1b). Immediately duck to avoid laser fire from the right. Work your way to the right, ducking each time a laser bolt sails overhead.
Use the computer (C2) to start the platform to the left moving up and down. Work your way back over to it, jump onto it, ride down and jump off on the right.
Move to the right side of the row of movable boxes. Pull the rightmost box four times. Pull the next box three times. Pull the next box twice and the leftmost box once. Now the boxes should be arranged with a block-wide gap between each one.
A door (D3) prevents you from reaching the exit to the right. So go to the left, past the pit below the moving platform, to find another computer (C3). Use it to raise that wall. Doing this also powers the electrified floor beneath the movable boxes.
Return there now. To reach the exit without getting electrocuted, jump across the boxes and grab the ledge beyond. Pull up and enter the elevator.
NOTE ON ITEM & MAP CODES: Each level and item has a code, which can be found on the map screen or item info screen. Once you have a code, you can enter it on a page at the Tomb Raider Mobile or Eidos Mobile UK web site to access a level map or detailed item information. My walkthroughs include all of the item info, as well as my own maps, which are a bit more detailed than the unlockable ones.
Copyright © 2006- Stellalune (). In-game item descriptions copyright © Eidos, Ltd. Feel free to copy or print this walkthrough for personal use. By all means, share it with friends, but please include this credit line so people can send me their feedback. No part of this walkthrough may be reproduced on another site without permission. Follow this link for details about this site's advertising and privacy policy.
WAS THIS WALKTHROUGH HELPFUL? If not, I apologize and invite you to contact me with any questions. If you need help right away, I recommend the r/TombRaider subreddit. Other fan-run forums are listed at tombraiders.net/stella/community.html. If this site was useful, please consider supporting it financially or in other ways. For details, visit tombraiders.net/stella/support.html. I also welcome any and all suggestions to improve things. Thank you!
Stella's Tomb Raider Site: tombraiders.net.