STELLA'S CLASSIC TOMB RAIDER 1 WALKTHROUGH
LEVEL 5: ST. FRANCIS' FOLLY - CLASSIC
Updated: 2/5/24(†)
Kills: 23 Items: 19, including 4 keys
Save Crystals: 5 (Saturn and PlayStation only) Secrets: 4
NOTE: One of the regular pickups here will be the SHOTGUN if you didn't get it in a previous level.
LEVEL MAP by VGCartography (used with permission)
St. Francis' Folly PS1 Video Walkthrough by Eldincy
First, a movie: Lara breaks into the Natla Technologies building in the middle of the night. Rifling through a filing cabinet, she locates a leather-bound book. In it, Lara reads of the tomb of Tihocan, one of the three legendary rulers of the lost continent Atlantis. According to the book, the tomb lies beneath the ruins of a monastery that the writer—presumably a monk—refers to as "St. Francis' Folly." The book also reveals that with Tihocan lies his piece of the Scion, a powerful object divided among the three rulers. (A transcript of the dialogue is included in a footnote. This cinematic, titled "Lift," is also available on my YouTube channel.)
Next, Lara travels to St. Francis' Folly, apparently somewhere in Mediterranean Europe. She scales a mountain to reach the building. Outside she finds a campsite. Picking up an empty can, she remarks, "Pierre, you litterbug."
OBJECTIVES: In the first part of the level, you need to find the switch that opens the way into the second area. In the new area you must locate four switches to open four doors. Behind each of these doors is a key. All four keys are needed to open the level exit.
Upon entering the level, draw weapons, since 2 lions charge from ahead near the square blocks. I like the shotgun here, but it takes several shots to bring down each beast, so you do need to start firing as soon as Lara gets a lock on the first lion. Or, you can jump up on either of the low platforms flanking the entrance and take out the lions from safety with your pistols.
Continue straight ahead and to the right. Beside the tall, tan blocks there's a movable block in a groove in the floor containing two squares marked with the Greek letter omega (W), which looks like a horseshoe. Slide (pull) the block once onto the nearest omega. You'll see a camera's-eye view of the door at the top of the balcony behind you. (You still need to pull a switch to open that door, but it won't work unless you've moved this block first.) Then push the block twice onto the other omega. This opens the door at the top of the landing ahead. Push the block once more to position it next to the tall, tan block on the left. (You'll be climbing up here later.)
GORILLA ROOM: Go to the door you just opened—at the far (west) end of the room on the low landing. Ready weapons and take just a step or two into the doorway. Don't go all the way in yet. Stepping on the pressure pad with the omega on it will close the door behind you. You'll hear gorilla sounds from within. You can probably kill the 2 gorillas from the doorway if you wait for them to come down the stairs. When they're dead enter the room. If you hop over the pressure pad, the door will remain open.
If you stepped on the pressure pad and the door closed, climb the stairs to the platform on the right. Throw the switch to open the door.
Pull the switch at the center of the lower level to open the door on the high ledge at the far end of the big room outside. This also causes another gorilla to appear out of nowhere on the landing above and to the left. Kill it as it comes down the stairs.
Now exit cautiously to the room with the blocks. Draw pistols and prepare to fire on Pierre DuPont, who'll be lurking among the blocks. You can't kill him at this stage of the game, but you do need to deal him a certain amount of damage before he'll disappear. To conserve Lara's health and ammo, use only pistols and try and use the door for cover, emerging every so often to get his attention. Or, if you prefer a direct approach, run right up to him and blast away. You may lose a little more health this way, but you'll drive him off more quickly. Just be sure to duck behind cover now and then to break line of sight, otherwise he won't disappear. You'll encounter Pierre several times over the next few levels. Then later, at the end of Level 9 (Tomb of Tihocan), you'll finally be able to finish him off.
When he's gone, go to the movable block and climb up on it. (First make sure you've pushed it as far as it goes toward the gorilla/switch room.) Take a standing jump to grab the taller stone block next to it and pull up. Turn left, walk to the edge, hop back once and take a running jump to grab the next pillar. Pull up. Walk to the far left corner and line Lara up facing the ledge in front of the doorway beyond (as shown in this screenshot). Hop back and take another running jump to the ledge.
NOTE: If you're missing any of these jumps, it may help to review the basic Controls, as well as the method for setting up jumps covered on my Strategy page. Once you've mastered these simple techniques, you'll almost never miss another jump.
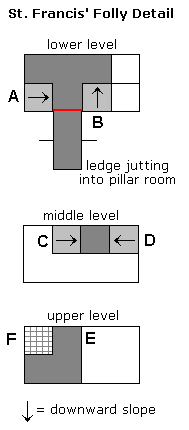 SECRET ROOM: Inside are several angled blocks with an opening above. You need to do a tricky jump combination to get up there. To make it easier, I've included a diagram (left) and a series of screenshots. I refer to areas marked with letters in the descriptions that follow.
Here's how: As you enter the room, there's an angled block that meets the floor on the left (A). Stand Lara in the doorway facing the angled block, with her left foot on the line of tiny triangles that spans the doorway. (This is the red line in the diagram.) Walk forward as far as possible toward the angled block. Hop back then press and hold Action. Press Jump + Forward, then release forward while holding both Action and Jump. Lara will jump forward onto the angled block (A), backflip off it onto the angled block behind her (B), automatically turn to face down the slope and jump to grab the ledge above. Continue holding Action as you release Jump and press Forward to pull up to the middle level.
Here you'll find 2 more angled blocks—a lower one on the left (C), a taller one on the right (D). Position Lara facing the middle of the lower block with her back against the higher block. Hold Action and press Jump + Forward. Release Forward while holding Jump and Action, and Lara will jump forward onto the first block (C), backflip onto the higher block (D), then jump forward to grab the ledge above (E). Pull up to the upper level.
This is SECRET #1, which includes a large medi pack and shotgun shells. Avoid the break-away tiles in the corner (F). To get down, safety drop from the ledge where you climbed up (E).
Exit to the ledge and take a running jump back to the nearest square pillar to the right. From there, turn right, walk to the edge and take a standing jump back to the next lower pillar. Turn left and walk to the edge of this pillar. (The movable block should be behind you now.) Take a standing jump to grab the taller pillar beyond. Pull up and pick up the large medi pack. Now take a running jump to the brownish-gold ledge against the wall.
Now use running jumps to make your way across the ledges on the long side of the room to the door on the balcony at the far end, which you opened earlier. Enter and follow the hall to a long slope.
NOTE: If the door here is not open, it means you missed something in the previous area. Drop down off the balcony and check that you've slid the movable block onto the tile with the omega symbol nearest this door, also that you have pulled the switch in the "gorilla room" at the far end of this area. Details appear above.
LONG SLIDE AND SECRET ROOM: At the bottom of the slide there's a secret room which can be a bit difficult to reach. Lara needs to slide down the long slope, drop onto a smaller slope below it and then jump across a gap to reach the secret area. If she misses the jump, she'll fall into the water below uninjured but will then be unable to get the secret. Since you only have one chance, I recommend saving your game here if you can. To reach the secret with minimal effort, slide down the slope facing uphill. Near the end, press and hold Action so Lara grabs the end of the slide. Pull up, wait a moment for Lara to slip off the edge and then press and hold the Jump button. Do not press Jump before she falls off the upper slope or she will jump from there and miss the opening to the secret. If you hold Jump as she falls onto the short slope below, she'll land there and immediately backflip to into the opening of the secret room. (This sequence is shown in a series of screenshots. Special thanks to Jimmii M. for suggesting this method.)
Pick up the small medi pack and shotgun shells, SECRET #2. (NOTE: If you don't already have the SHOTGUN, you'll find it here in place of the shells.)
Go to the small alcove ahead and drop down into the room below. Don't use that switch yet. (If you already did, pull it again to return it to the up position.) Move to the edge of the opening over the water and, if possible, shoot the crocodile below. You may have to take a dip to get its attention. Then climb out of the water to shoot. If you want to, you can wait to kill it, but then you'll have to outswim it to reach the next secret.
Jump in the water, turn around to face the switch and then swim down underneath the switch room and forward to a small opening in the ceiling (shown in this screenshot). Climb into the room above and pick up some shotgun shells. This is SECRET #3. (NOTE: If you don't already have the SHOTGUN, you'll get it here instead of the shells.)
Return underwater to the room with the switch. Use it to drain the water and drop down. Kill the crocodile now if you didn't do it earlier. It's faster on dry land but also easier to target. Head to the end of the now-dry passageway and go up the stairs on the right.
VERY TALL ROOM WITH CENTRAL STRUCTURE: You'll emerge at the top of a 6-story room with many ledges and landings. (Console players can save the game here with the save crystal.)
This section of the level is all about finding four switches to open four different doors—named after Thor, Atlas, Neptune and Damocles. (If you're not familiar with the myths involved, you might want to do a little research.) Behind each door is a trap or hazard, along with one of the four keys needed to open the exit.
In case you get disoriented or forget to throw a switch, you can always climb up and down between the different levels. Here's how the room is laid out: The switches are all on the central structure, the doors around the perimeter. Sixth (top) level = Neptune door. Fifth level = Thor switch. Fourth level = Damocles switch and Atlas door. Third level = Thor door. Second level = Neptune switch and Damocles door. First (bottom) level = Atlas switch and exit.
Take a running jump to the structure at the center, where you'll meet 3 bats. Kill them and cross to the other side. Drop down and find the THOR SWITCH at the center near the small square opening. Use the switch and then hop across the small square opening so you have a little more room to maneuver as you kill 2 more bats. Now hop back to the switch.
PRESSURE PAD & SECRET ROOM: On a ledge across the gap, is a gray pressure pad. (It's on the right when you're facing the THOR SWITCH.) Stepping on this pad opens a secret door on the bottom level. When Lara steps off the pad, a timer begins to count down. After about 18 seconds, the secret door closes. So you really need to choose the shortest route and go like mad to reach the door in time. (The path to the secret is shown in these screenshots.)
Take a running jump from the ledge near the THOR SWITCH to the pressure pad. Until she steps off the pad, the timer won't start. So take all the time you want to get her into position: Turn so the central structure is on Lara's left and her feet are on the back edge of the pad. Make sure her health bar is at least half full, since she'll lose some in the process, and save your game if you can. Now comes the speed run: Hold the Action key and take two hops back to drop and hang from the edge. Immediately let go and fall to the ledge below. As Lara falls, press and hold Roll, so that when she hits the ledge, she rolls and comes up facing in the opposite direction. Run forward and fall down to the next lower level. As Lara falls, again hold the Roll button so she lands and comes up facing the other way. Run forward along the long ledge. If you want to, you can draw pistols and kill the 2 bats that swoop in from the left. If this distracts you, don't worry about it. You can get the bats later. Just keep running off the edge and straight on through the timed door. (Don't jump off the ledge, since it will actually take longer to stand up and start running again than it would to just fall down and continue running.) Inside is SECRET #4, a large medi pack and magnum clips.
GROUND LEVEL: Exit the secret room (the door opens as Lara approaches). Kill those bats if you didn't do so earlier, and go around to the far side of the central structure to find the ATLAS SWITCH and pull it.
NOTE: PS1 users can find a save crystal on the ground level; however, you may want to wait to use it until just before you enter the DAMOCLES ROOM later.
Climb onto the ledge at the top of the steps. Go to the end, jump straight up to grab the ledge above and pull up. Walk to the end of this ledge. On the ledge across and to the right you should see some magnum clips. Ready weapons, jump across, roll and kill the bat that flies in. Then pick up the clips and jump back to the previous ledge.
Return to the far end of the ledge. From there take a running jump to grab the edge of central structure. Pull up, then go around the corner to the left to find and use the NEPTUNE SWITCH. (There's also a save crystal here in the PlayStation game.)
Turn around and walk to the outer corner of the central structure. Jump over to the ledge near the DAMOCLES DOOR (which is still closed). On the ledge above the door, where the word "Damocles" is carved, there's a large medi pack. Climb up and get it now, since later on when you return, Pierre will be lurking about. Hop down and go up the short flight of steps ahead. Turn to face the central structure. Walk to the edge and take a standing jump to grab the edge. Pull up.
You're now on the third level. Go to the far right side of the platform and take a running jump across to the ledge. Roll, drawing weapons, and kill 2 bats. Jump back to the central structure and go forward and to the right. Take a standing jump from the edge to grab the ledge opposite. Pull up, turn right and climb up on the next ledge. Kill 2 more bats and then jump back to the central structure.
You're now on the fourth level. Climb over the low block to the other side where you'll find the DAMOCLES SWITCH. Kill the bat that tries to mess with Lara's hairdo, then pull the switch. Turn left. Across the gap you'll see a small medi pack on a ledge. Jump over to get it then jump back to the switch. (There's also a save crystal on this level.)
Climb back onto the block next to the DAMOCLES SWITCH. Jump up to grab the edge of the opening in the central structure and pull up to the next level (the fifth) near the THOR SWITCH, which you should have used earlier. (If you didn't, pull it now to open the THOR DOOR.) From here take a running jump to the bottom of the L-shaped stairs below and to the left of the door through which you entered this area. (It's the brightly lit one high above on the east wall.) Kill another bat when you land, then go to the top of the stairs.
NEPTUNE ROOM: Across the way you'll see the NEPTUNE DOOR. Make your way over to it and go inside. (Save your game if you can.) Jump into the pool and swim downwards as the strong current carries you that way. When you reach the bottom, swim forward. There's a gate ahead, but don't go there yet. Instead, look for an opening on the left at the top of the passage. (It's shown in this screenshot.) In this alcove is a lever. Pull it to open the gate and shut off the current. If you have plenty of air, turn around and swim out of the tunnel with the lever then down and to the left. Grab the NEPTUNE KEY, turn around and swim forward along the bottom and then up the long shaft to the pool to surface. If you're low on air after pulling the lever, turn around and swim down and to the right, then up to the pool for air. Then dive down again, swim forward to get the key, then return to the top.
Exit the Neptune room, jump back to the central structure and drop down two levels. Now that you've started getting the keys, your favorite sniper, Pierre DuPont, will start to shoot at Lara as she makes her way from door to door. Try and stay under cover as best you can, and if you do shoot back, remember you still can't kill Pierre yet. So only use pistols so as not to waste ammo. There are also 2 lions roaming around down there with him, so avoid dropping down to the ground until after you've killed them.
ATLAS ROOM: Approach the ATLAS DOOR with weapon drawn. (The shotgun is a good choice here if you have shells for it.) Kill the gorilla lurking inside. Go to the far end of the room and step on the pressure pad to open the gate. When Lara steps through, the gate closes. Turn right and walk toward the base of the ramp. Before you reach it, the huge boulder at the top will start to roll down the ramp. Backflip three times to land in the shallow pit at the end of the hallway and quickly run forward to the front edge. The boulder will roll overhead and stop when it hits the wall. (If backflipping and running forward isn't working for you, try backflipping twice. Then immediately hop back, grab the edge, and drop into the pit.)
Once the boulder lands, the gate re-opens. Pick up the small medi pack on the floor, climb out of the pit and return to the ramp. Climb onto the ledge on the left. Pull up to the next ledge, go to the other end and pick up the ATLAS KEY. Drop down and exit the room.
THOR ROOM: Move out onto the central structure. Go to the left and drop down to the level below. (There's a save crystal here in the PlayStation version.) Enter the THOR DOOR. Proceed slowly down the steps until the disco ball on the ceiling begins to shoot bolts of lightning. To get through without taking any damage, walk to the right, staying close to the back wall. Then turn to so the lightning ball is ahead on the left. Walk slowly toward the gray floor tile ahead. Stop just before the seam in the floor so there's one regular floor tile between Lara and the gray tile (as shown in this screenshot). Now take a diving roll over the gray tile by holding Walk and pressing Jump + Forward. Quickly release walk and jump or run forward into the next room. (NOTE: The same technique also works on the left side of the room where the tiles are arranged similarly. Thanks to Ivans Chou for this tip.)
Now comes phase two. Above is an enormous hammer. On the floor is a pressure pad. Stand on the pad until you hear a crack, then hop back. The hammer will crash to the ground, along with a couple of large movable stone blocks. Go to the block near the hammer and push it over to the ledge so you can climb up. Pull the second movable block along the ledge three times. Then climb on top of it. From there, take a standing jump to grab the tall block in the corner. Pull up and get the small medi pack. Turn left and take a running jump to grab the ledge beyond. Pull up, enter the alcove and get the THOR KEY. Return to the ledge, jump back to the corner block, drop down to the lower ledge, then the floor.
Return to the room with the lightning trap. Step up into the doorway and walk forward carefully, stopping with one regular floor tile between Lara and the gray tile near the wall (as shown in this screenshot). Dive and roll over the gray tile as you did before (Walk + Jump + Forward). Run into the corner and then go up the steps and exit the room. (NOTE: This technique works on both the left and right side of the lightning room.)
DAMOCLES ROOM: Go back across the walkway to the central structure and drop down to the level below. Jump over to the steps near the DAMOCLES DOOR. If you didn't already get the large medi pack on the ledge above the door, you can climb up and grab it now. Just watch out for Pierre. If he starts shooting at Lara from below, run inside now get the medi pack on your way out.
The swords hanging from the ceiling of the Damocles room are not a hazard. . . yet. Pass through the outer room into the chamber beyond and take the DAMOCLES KEY. Climb onto the platform above and get the shotgun shells and small medi pack. Now drop down and walk very cautiously out through the sword room. If your console or video card displays the shadows of the swords on the floor, you can use them to help you navigate, but only up to a point. The swords don't always fall exactly where their shadows do. Use the Look button to check the ceiling, though some of the swords are concealed. Take a step at a time, listening for the telltale "swoosh" of the falling swords, and stay close to the walls and pillars, and you'll make it through.
When you emerge, Pierre will be ready for some action. Shoot at him with pistols, staying under cover as best you can, until he disappears. Then kill the 2 lions from above before dropping down. Use your 4 KEYS in the locks on the wall and exit the level.
†UPDATE HISTORY: 4/14/07 - First update since I began tracking page updates. Added various screenshots, including screens for all secrets. Revised several sections for clarity.
5/7/07 - Refined the strategies for fighting Pierre and for obtaining secret #4, thanks to suggestions from Black Tiger.
6/26/07 - Fixed incorrectly ordered screenshots. A big thank you to Luan for the heads-up.
8/1/09 - Fixed a mistake about how PS1 save crystals are used, thanks to a tip from Kyle W.
4/12/12 - Video transcripts and links to YouTube videos added.
9/23/16 - Added alt method for avoiding the rolling boulder in the Atlas Room, thanks to J.
2/5/24 - Added VGCartography's level maps, with permission. Follow them on Twitter/X, YouTube, and DeviantArt for more fantastic game maps.
CINEMATIC TRANSCRIPT: Lara reads from a journal she's found in Natla's office, which apparently belonged to a monk.
"Relocated now to St. Francis' Folly. New temptations torment me. . . " As she continues reading the entry, Lara's voice shifts to the voice of the monk in her mind. "Rumor amongst my fellow brothers is that entombed beneath our monastery is the body of Tihocan, one of the three legendary rulers of the lost continent, Atlantis, and that with him lies his piece of the Atlantean Scion, the pendant divided and shared between the three rulers, which curbs tremendous powers. Power beyond the creator himself."
As lara finishes reading, she closes the book. The words on the cover area bit difficult to make out, but it seems to say, "Brother Herbert Prayer Book 1573."
The scene shifts to the foot of a steep mountain with a building perched at its summit. The monk's voiceover continues as Lara makes the climb to the top. "My toes sweat at such possibilities lying so close to my mortal self. Each night I beat myself rid of these fantasies, but it is indeed a test."
As Lara reaches the entrance to the abandoned monastery, she finds the remains of a campfire and nearby an empty can of beans. "Pierre," she sighs, "You litterbug."
WAS THIS WALKTHROUGH HELPFUL? If not, I apologize and invite you to contact me with any questions. If you need help right away, I recommend the r/TombRaider subreddit. Other fan-run forums are listed at tombraiders.net/stella/community.html. If this site was useful, please consider supporting it financially or in other ways. For details, visit tombraiders.net/stella/support.html. As always, I welcome your corrections/suggestions. Thank you!
Copyright © 1998- - Stellalune (). Special thanks are given to the participants in the alt.games.tombraider newsgroup, without whom some parts of this walkthrough couldn't have been written, and to Ian T. for the locations of the save crystals in the console versions. Special thanks to Helena for finding the alternate weapon pickup points and Black Tiger for additional Pierre Dupont strategy. Diagrams made with the aid of GraphTablet freeware (http://www.graphtablet.com). All TR1 screenshots were made using Glidos and Fraps. Feel free to copy or print this walkthrough for personal use. By all means, share it with friends, but please include this credit line so people can send me their feedback. No part of this walkthrough may be reproduced on another site without permission. As an Amazon Associate I earn from qualifying purchases. Follow this link for details about this site's advertising and privacy policy.
Stella's Tomb Raider Site: tombraiders.net.