IMPORTANT NOTE ON SAVING & CHECKPOINTS: Checkpoints are the spots in each level where the game auto-saves. These are noted in blue and numbered in the walkthrough text to correspond with PC, Macintosh, PSP & Wii savegame files available for download. (Please note that the number and location of checkpoints vary slightly for the Nintendo Wii game.) Although it is also possible to save manually, the save system in Anniversary is very different from the older Tomb Raider games and differs in several ways from the TR Legend save system. Please see the Anniversary Controls page for details. This may save you a great deal of frustration as you make your way through Lara's latest adventure.
LEVEL 8: TOMB OF TIHOCAN | Updated: 9/5/11(†) |
PS5 Platinum Trophy Video Walkthrough by Eldincy‡
Kills: 8 Supplies: 13 Other: SCION OF TIHOCAN Artifacts: 2
Relics: 0 Rubbing Rewards: 0(*)
Time Trial: 13:20(**)
NOTE: If you didn't find the 50-CALIBER PISTOLS in the previous level, you'll get them at the end of this level.
UNDERWATER TUNNELS: CHECKPOINT 1 is actually in the MIDAS STATUE ROOM from the previous level. Jump into the square pool and swim to the bottom. Then turn around and follow the underwater tunnel forward, right, left, then right again until you come to a vertical shaft with light streaming down from above. Swim upward here to an air pocket where Lara can breathe. You'll definitely need to tap Interact as you go to make Lara swim faster or she'll drown before you reach the air pocket.
When Lara's air meter is full again, swim down then forward. Go past the tunnel from which you came, which is now on the left, and continue, following the tunnel to where it ends in another vertical shaft. Swim upward to the surface and CHECKPOINT 2.
NOTE: In the Wii game, the underwater tunnels are part of the previous level. The Tomb of Tihocan begins here.
Push the wooden crate through the doorway and shoot a rat in the room beyond. Move the crate beneath the switch and climb up to pull it. This opens the trapdoor in the corner.
In the Nintendo Wii game, there's another cryptex puzzle instead of the switch. The solution is hidden on a plaque above the small doorway. Push the crate next to the opening and climb up. Face the dust-covered carving and press Interact. Use the brush to clear the dust away and then make a rubbing of the clue: Sigma (S), Omega (W), Pi (P). Hop down, move the crate beneath the puzzle and climb back up. To solve the cryptex, turn the bottom cylinder once to the left. Then turn the middle cylinder twice to the right. The trapdoor on the other side of the room drops open.
Drop down through the opening, kill 2 more rats. If they take Lara by surprise, just crouch and for whatever strange reason, they won't do any damage. Once you've dealt with them, go through the doorway to CHECKPOINT 3.
NOTE: This area will look familiar to players of the original Tomb Raider. Here, in Anniversary, the Cistern and the Tomb of Tihocan have been merged into a single level.
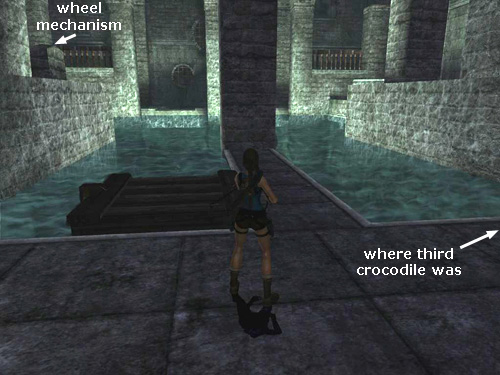
THE CISTERN – UPPER LEVEL: As you enter, Pierre's voice, commenting on how refreshing the water is, echoes off the stone walls. Ignore him and take a look around. There are three levels in this huge room: The UPPER LEVEL, where you are now, includes various alcoves, ledges, poles and hooks, as well as a large wheel mechanism in an alcove on the left wall. The EXIT FROM THE CISTERN is via the balcony on the right wall. Naturally you can't reach it yet. The MIDDLE LEVEL has more ledges and alcoves, a number of circular openings covered by metal grates and a second wheel mechanism. The LOWER LEVEL, currently flooded, has a couple of square trapdoors in the floor, one of which has something shiny inside. A pair of crocodiles swims in the pool far below.
As you'll guess if you played the original game, you'll be using the wheels to flood and drain this area in order to access different areas. This time it's not nearly as complicated, though. If you come to this walkthrough after flooding or draining part of the cistern too soon, don't worry. You can climb up and down between the different levels and use the wheel mechanisms as many times as you need to in order to get everything done. Also, there is no one correct order for doing things. I've presented what I hope is a path that gets every kill and pickup with minimal backtracking.
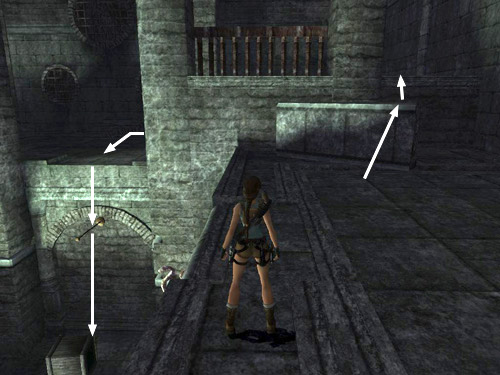
Leave the first wheel mechanism on the upper level alone and the middle level dry for now. (If you already turned the wheel and flooded the middle level, turn the wheel again to drain it.) From CHECKPOINT 3 in the entrance, turn right and take a running jump to grab the horizontal pole jutting out from the wall. Swing around, jump and grapple the metal hook on the wall above. Wall run and jump to grab a handhold above the rough alcove to the left.
Climb around to the left, drop into the alcove and pick up a set of 50-caliber clips. Climb the handholds on the right side of the alcove. Climb to the right and jump to grab onto the freestanding pillar. Climb on top of it and pick up your first mini SMG ammo. Take a running jump back to the handhold above the alcove (the same one you grabbed after the wall run). Climb around to the left and jump back to grab the handhold on the other side of the alcove. Climb to the left as far as you can, jump and grapple the hook above. Wall run and jump to the corner ledge on the left.
Follow this walkway, taking running jumps across the gaps, all the way to the next corner, where you'll find a box of shotgun ammo. Turn left and take a running jump to grab the horizontal pole. Swing and jump to the next pole, then to the ledge ahead. Push the wooden crate off the ledge. It falls to the level below, triggering CHECKPOINT 4.
Grab the handhold on the wall. Jump to grab the handhold above and climb to the left. Jump to grab the next pole, swing around and jump to the ledge beyond it. Cross this ledge and grab onto the handhold on the wall beyond. From there, jump to grab the next horizontal pole, swing and jump to the next pole, and finally to the long horizontal ledge on the far wall. Climb along this ledge to the left and around the corner into a small alcove. Jump back to grab the handhold on the opposite side of the alcove. Then continue climbing around to the left until you can pull up into a larger alcove with another wooden crate. Push this one off the edge as well.
The quickest way down to the middle level is by diving into the pool, but first you must take a running jump across the jagged gap in the walkway connecting this alcove and the long perpendicular walkway ahead. To make this jump, run forward, jump right at the edge and hold down the Jump key to keep Lara in the air longer. Otherwise, she'll fall short and plummet to the stones below. (Alternatively, you can return along the wall the way you came and climb down the handholds below the ledge from which you pushed the first crate.)
CISTERN – MIDDLE LEVEL: If you dive into the water from above, immediately swim away from the 2 crocodiles to the edge of the pool opposite the wooden fence with the metal bars (i.e., near where the second crate landed when you pushed it off the ledge above). The edge is low enough for Lara to climb out here. If one of the crocs manages to grab Lara, alternate tapping the Left and Right direction keys (or wiggle the left analog stick from side to side) to break loose. Then swim away, climb out of the water and shoot the crocs from dry land. Note that you can still hit them with pistols even if the targeting reticle is gray instead of red. It just takes a little longer. Using manual aim may help.
Now turn around so Lara's back is toward the pool and head for the dark corner ahead on the right, where you'll find a small medipack. Get it, then push the wooden crate off the ledge into the water.
Turn so the pool is on Lara's left and head toward the far wall (below where you entered the CISTERN). Use the low stone ramp to climb over the half-wall on the left. Turn the second wheel mechanism to drain the cistern completely and trigger CHECKPOINT 5.
Continue around the perimeter of the room. Pick up a large medipack beneath the pile of rocks in the next corner. Climb over the low wall to the double ramps behind the metal bars. Vault up onto the wall ahead and shoot the crocodile below before hopping down. Continue to the left, past the long ladder, to the spot where the first wooden crate landed when you pushed it off the ledge above. Push the crate off this ledge into the now-empty pool. (There's a gap in the lip surrounding the pool near the middle of this area.)
To get down safely, climb onto the fallen chunk of stone walkway, jump onto the wall ahead and drop down in the dark corner near where you picked up the small medipack earlier. (This screenshot shows the spot.) Head to the left to the first ledge above the empty pool (i.e., where you shot the crocodiles). Hang from the edge, drop to grab the horizontal pole sticking out of the wall below and then drop to the floor.
NOTE: If you have come to this walkthrough after climbing down to the bottom of the room but have not yet pushed the crates off the top level, don't worry. You're not stuck. To get back to the top of the room, first follow the instructions below for CLIMBING FROM THE LOWER TO THE MIDDLE LEVEL, use the wheel mechanism to flood the lower level. Then follow the path described a few paragraphs below that, in the section titled RETURNING TO THE UPPER LEVEL (which is further detailed on a separate page with screenshots). Once on the upper level, work your way around to each of the crates as described above under THE CISTERN – UPPER LEVEL.
CISTERN – LOWER LEVEL: Move each of the wooden crates onto one of the square pressure pads. One opens the grating above the wooden platform with the metal ring. Later, when you re-flood the cistern, this will float to the surface and you can use it as a stepping stone. The other pressure pad lowers the metal fence alongside the pool.
There's a shiny spearhead artifact and some ammo beneath the second square grate, but you can't reach it yet.
CLIMBING FROM THE LOWER TO THE MIDDLE LEVEL: Pick up the small medipack on the floor in the corner behind the heap of broken stonework. Then cross to the opposite corner (i.e., the one directly below the wheel mechanism on the middle level). Stand facing the stone ramp and run toward it. Just as Lara reaches the base of the ramp, jump onto it and quickly jump again. With careful timing, Lara will leap onto the ramp and instead of sliding back to the floor, she'll jump and grab onto the ledge above and behind. (These screenshots show the sequence.) Pull up and climb the ledges ahead to reach the wheel mechanism.
If you're having trouble with the double-jump technique, you can take a longer but easier way out: Climb onto the pile of stones in the same corner where you found the small medipack. Jump onto the ramp, slide, jump and grapple the hook above. Wall run across to the ledge in the corner to the left. Jump to grab the next handhold, climb around the corner to the left, jump to grab the higher handhold, and then jump back to grab the horizontal pole. Swing, jump and grab the next handhold. Climb all the way around to the left and jump to the next horizontal pole. From there, swing over to the next handhold and climb to the left until you can pull up onto another chunk of stonework in the next corner. Turn left, step forward, slide down the slope just a little and jump to grab or land on the ledge ahead. Pull up and climb the ledges ahead to reach the wheel mechanism.
CISTERN – MIDDLE LEVEL (again): Turn the wheel mechanism once more to flood the lower level and trigger CHECKPOINT 6.
Before climbing back to the UPPER LEVEL, return along the perimeter of the room (or swim across the pool) to the double ramps, which are now accessible since you lowered the fence using the pressure pad. Use the grapple to pull the small wooden raft to the top of either of the ramps (as shown in this screenshot). You may need to climb onto the wall when you first start pulling to get close enough to the raft. Then drop down and finish the job from the ledge at water level. Later, when you flood the middle level, the raft will float upward and you'll be able to use it to reach the balcony with the exit. Now return to the wheel mechanism.
NOTE: At this point you may want to turn the wheel again twice, draining the pool and refilling it, in order to use CHECKPOINT 6 again. Then, if Lara falls during the next climb, you won't have to repeat the business with the raft. Just be sure to fill the pool before climbing up.
RETURNING TO THE UPPER LEVEL: First climb onto the inverted stone archway near the wheel mechanism and jump from there to the wall ahead (as shown in the first in this series of screenshots). Then drop down on the other side, where you were before. Run up the long, stone ramp and grab the lowest handhold on the square pillar. Jump to grab the handhold above. Climb around to the left and jump straight up to grab the horizontal bar. Climb to the other side of the bar and face the corner ledge. Swing around, jump and grab onto it. Pull up and climb the handholds in the alcove to reach a small ledge overlooking the horizontal bar.
Take a running jump to grab onto the corner handhold on the square pillar. It's a long jump, so be sure to hold the Jump key down for a moment after takeoff. Then press Interact to keep Lara from slipping when she catches the handhold. Pull up, grab the next handhold and climb all the way around to the other side of the pillar. Jump up to the handhold above and pull up onto the walkway near the first wheel mechanism.
CISTERN – UPPER LEVEL (again): Turn the wheel mechanism again to fill the pool to the upper level. This triggers CHECKPOINT 7. Now you can either head straight for the exit on the far side of the pool (skip to that section below) or pick up a few more items, including the artifact you saw earlier.
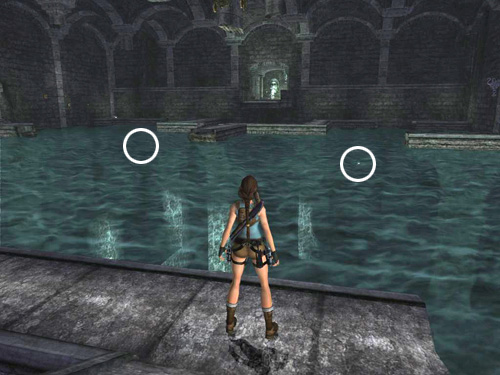
On this side of the pool, there's a circular opening on the wall between the alcove with the wheel mechanism and the alcove where the second wooden crate was. (Its location is circled in this screenshot.) Now that the water level has been raised, you can swim down to that opening and through the hole at the top of the grating. Get the large medipack inside and swim back to the surface.
Now face the opposite wall of the CISTERN. There are two pickups inside similar dead-end pipes on that side: shotgun ammo in the one between the far right corner and the balcony with the exit and a small medipack in the one just below and to the right of the left corner ledge. (This screenshot shows where the items are located.)
ARTIFACT #1: Swim to the square walkway surrounding the balcony with the exit. A straight section of walkway juts out from the square one toward the center of the pool. Swim down beneath this walkway to find a lever on the back of the square support column. (These screenshots show where it is.) Pull that lever to open the grating above ARTIFACT #1 (25/44). Then come to the surface. Swim out to the middle of the pool to spot the artifact on the bottom. Swim straight down to get it and the 50-caliber clips in the same compartment. Then return to the surface.
NOTE: You can, of course, drain part or all of the cistern before going after the artifact, but you'll have to refill it to reach the exit. The method I describe just saves time and effort.
CISTERN EXIT: To reach the exit, swim to the square walkway surrounding the balcony. It's too high for Lara to pull up, so swim through the gap in the walkway and climb out on the small wooden platform you moved earlier.
NOTE: If you did not free the wooden platform from the compartment at the bottom of the pool and move it into position before raising the water level, you won't be able to reach the exit. You'll need to go back and do that now. Follow the walkthrough above if necessary.
Hop onto the walkway and then grapple and pull the wooden platform closer to the balcony. Jump back onto the platform. From there, jump to grab the edge of the balcony and pull up near CHECKPOINT 8.
LONG AQUEDUCT: Jump into the pool below the spouting faces and swim to the bottom. A strong current pulls Lara through a long pipe and dumps her into a small pool in an underground cavern. Come to the surface near CHECKPOINT 9. Climb out on the small ledge and pick up some shotgun shells. Then jump back into the pool and swim downward and to the left. Swim through the tunnel to a larger pool where you can surface.
THE TOMB OF TIHOCAN: In the middle of the pool is a wide ledge with the tomb entrance. Swim all the way to the left to a smaller, rectangular ledge where you'll find more ammo for the shotgun and 50-caliber pistol.
ARTIFACT #2: Hop back into the pool and face the ledge where you just found the ammo so the tomb entrance is behind Lara. Swim down and to the right to find another underwater tunnel. It's probably a good idea to locate the tunnel first then swim to the surface to breathe. Position Lara on the surface just above the tunnel, then swim down and into the tunnel to get ARTIFACT #2 (26/44). There's no place to surface so quickly swim back to the big pool. (These screenshots show the location of the tunnel.)
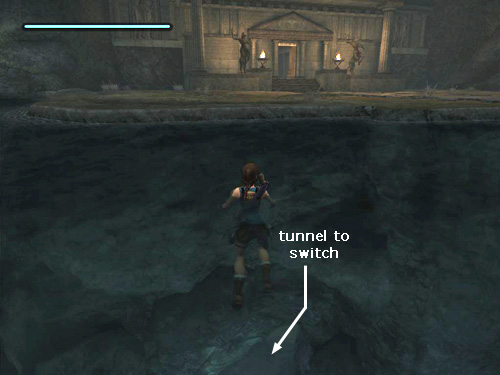
Now swim around to face the wide ledge with the tomb entrance. Below the left side of this ledge is another tunnel (shown in this screenshot). Swim down and follow it to the end. Climb out of the water in a small room and pull the switch to open the door to the tomb and trigger CHECKPOINT 10. Return through the flooded tunnel the way you came. Climb out on the wide ledge and enter the tomb, crossing CHECKPOINT 11. Approach the pedestal with the SCION OF TIHOCAN.
Cinematic: Lara reads the inscription on the crypt. "Here lies the God-King Tihocan, one of the Triumvirate, keepers of the three pieces of the Scion, leader of the chosen after the great betrayal caused Atlantis to be lost beneath the waves. . . . She slides the sarcophagus lid aside only to find the crypt empty, but before she can react, she feels a gun at the back of her head. Pierre DuPont gloats that following her instincts rather than watching her back has just cost her two pieces of the Scion. Lara says that's not a price she's willing to pay, and when Pierre asks if it's worth her life, she says it is.
Interactive cutscene: In order to survive the confrontation with Pierre, you must press the keys that correspond to the on-screen icons to duck and evade his fire then disarm him. The correct controls are as follows:
BUG NOTE: If you're having trouble with the interactive cutscene because the icons indicating which buttons to press don't appear, see the footnote at the end of the Lost Valley walkthrough for some possible solutions.
If you don't press the correct keys or are too slow, Lara dies and the game reloads at the beginning of this cutscene. If you succeed, Pierre runs out of the tomb, only to find that the centaur statues flanking the doorway are actually undead guardians charged with protecting the Scion. They animate and move in on the feeble human who has dared to steal it. Pierre, always good at thinking on his feet, tosses the Scion to Lara and attempts to escape. But it looks like Pierre's instincts aren't so hot either. The centaurs were not built to forgive; they trample poor Pierre and then turn their attention to Lara.
NOTE: If you didn't get the 50-CALIBER PISTOLS in the Coliseum, you'll obtain them from Pierre and they'll be available after this cutscene.
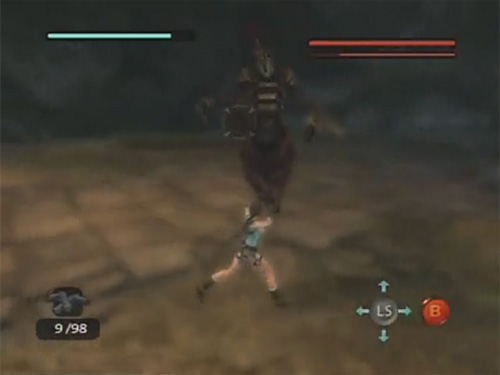
FIGHTING THE CENTAURS: CHECKPOINT 12 registers at the start of the battle. Defeating the 2 Atlantean centaurs requires a multi-part strategy. This entire sequence is shown in a video tutorial, as well as in the screenshots linked in the text below.
First, some defensive tactics:
You can't destroy the centaurs using gunfire alone. Instead, you need to provoke their attacks and turn these against them. Here's the basic offensive strategy you'll need, along with some optional tactics:
Additional notes:
If you're having trouble with the strategy above, or if you just want to try something different, here's an alternative to direct combat in which you trick the centaurs into killing themselves:
NOTE: As stated above, this exploit does not work in every version of the game. Some console players report that it works on the first centaur but not the second. That may still be enough. If you can get the first centaur's shield, you can use it against the second centaur. However, several Xbox 360 and PlayStation 2 users have reported that defeating one centaur this way can result in a bug in which the controls subsequently freeze up if Lara is hit by the petrification ray. The only solution for that is to quit and restart. If the cave strategy doesn't work for you, just reload your manual save at CHECKPOINT 12 and concentrate on beating the centaurs in the regular way (enrage, adrenaline dodge, etc.).
IMPORTANT BUG NOTES: Apparently there are several possible bugs here. Some players are unable to complete the adrenaline dodge maneuver despite using the correct controls and timing. Some are unable to grapple the rings on the backs of the shields. Others can grapple but not pick up the shields from the ground. So far I do not know of any definitive solutions to these problems, but I have included some possible fixes in a footnote.
When you've defeated both centaurs, the final cinematic for Greece begins. Lara takes the two pieces of the SCION and fits them together. Their mystical power evokes some kind of hallucination or out-of-body experience in which she falls through space and eventually comes to hover alongside three giant figures. As they speak, it becomes clear that these are the three erstwhile rulers of Atlantis. Tihocan, the male on the left, accuses the crouching female of tainting the power of the Scion and breaking the sacred triumvirate of Atlantis, as well as maiming Qualopec, her own brother and fellow king. Qualopec, the mutated figure on the right, says that although Tihocan has ended her treachery, it is his own face that will haunt her nightmares. Tihocan asks the woman if she has anything to say for herself, but before she can answer, Lara floats away. She has a brief vision of a third piece of the Scion moving toward what looks like an Egyptian-style doorway. Then she falls back to earth outside Tihocan's tomb. She pulls herself together and picks up the Scion once more.
Now it's just a quick motorcycle trip to the Egyptian desert. . . .
†UPDATE HISTORY: 6/23/07 - First draft of walkthrough posted online. Added additional info on the shield bugs during the centaur battle later that same day.
7/7/07 - Added missing checkpoint 7 and renumbered the remaining checkpoints. Added the alternate strategy for the centaur fight, involving hiding in the cave, thanks to tips from Jason K. and Robert B.
11/10/07 - Made a few minor corrections based on other players' input. Added a few extra screenshots and alternate strategies, including the shortcut out of the lower level of the cistern, thanks to Ivan B., Mr_J and Nocturnal.
2/8/08 - Added Nintendo Wii edition info, along with a few minor corrections and clarifications.
2/11/08 - Added additional Wii info. Changed the numbering system for artifacts, relics and rubbings, as explained in the note below.
2/16/08 - Added Xbox 360 and PSP interactive cutscene controls.
4/29/08 - Added Macintosh save files and info. Thanks to Andrew W. and Chris H.
11/7/08 - Added links to Wii and PSP save files.
12/30/08 - Updated centaur shield bug solution, thanks to the awesome Janine B.
10/25/09 - Updated centaur strategy and bug information and also added gameplay video.
9/5/11 - Added the note about the Midas-Tihocan level transition, which occurs a bit later in the Wii game. Thanks to Marjolein for the heads-up.
ACKNOWLEDGEMENTS: Special thanks to the players who provided the interactive cutscene controls for the systems I don't have: Tiri Li (PS2), Tiffany and James S. (Xbox 360) and Russell M. (PSP). Thanks also to Dave M. and his son Arron, Dj, DooM Droid, George H., Isaac P., Janine B., Jennifer G., Jason K., John T., Lori and her daughters, Lucien, pArTyb0y, Robert B., Samer, Scot H. and Stephen L. for tips used in beating the centaurs and avoiding the various glitches (several sent in the same ideas but I try to credit everyone). Thanks also to Andy M., Devon, Ivan B., Jeffrey B., Julien, Marjolein, Mr_J, Nocturnal and Paul K. for other suggestions used in this level.
*ABOUT ARTIFACTS, RELICS & RUBBING REWARDS: Finding artifacts and relics (formerly known as "secrets") unlocks various extras like outfits and concept art. The Nintendo Wii game also includes "rubbing rewards" in some levels. I have numbered each of these bonuses in the walkthrough. So, for example, "Artifact #2 (10/44)" means that this is the second artifact in this particular level and the 10th out of 44 artifacts in the whole game. Please see Anniversary Rewards page for more info on all of these.
**ABOUT TIME TRIALS: After completing a level, you will be able to replay it in Time Trial mode to unlock cheat codes. For more info, please see the Time Trials and Rewards pages. For help beating this level's time trial, see Eldin's Tomb of Tihocan - Time Trial Tips.
‡NOTE ON VIDEO GUIDES: Eldin's videos don't always follow the same strategies I use in my walkthroughs, but if you prefer that format, I think you'll find them very helpful.
POSSIBLE FIX FOR ADRENALINE DODGE GLITCH: If you're doing all the moves correctly but are not able to do the adrenaline dodge (i.e., the tutorial icons, shown here, and the two converging targeting reticles, shown here, never appear—not in the centaur battle and not in the fight with the T. rex), then I may have a solution. It requires some effort, though. You'll need to go way back to the beginning of the City of Vilcabamba level, where the player is first introduced to the adrenaline dodge in the tutorial with the bear. If you are able to complete this tutorial correctly and do the adrenaline dodge and play on from there, the adrenaline dodge should then work on the T. rex and, later, the centaurs. Many thanks to pArTyb0y and marcus4hire for this info. (As far as I know, this only applies to the Xbox 360 version, but if you try it in another version and it works, I'd love to hear about it.)
POSSIBLE FIXES FOR SHIELD BUGS: A number of players have encountered bugs in which they are unable to grapple or pick up the centaurs' shields. Perhaps this will addressed in a forthcoming patch, but in the mean time, here are a few suggestions other players have shared with me:
SHIELD BUG/LARA FREEZE-UP WORK-AROUND - UPDATED 12/30/08: Many players who have tried the alternate method, in which you swim into the tunnel beneath the combat area and wait for the centaurs to destroy themselves, have found that this causes yet another bug, in which Lara freezes and you are unable to control her at all, requiring you to restart the game.
Here is a new technique, which incorporates some of the above, along with a fresh strategy for preventing the Lara freeze-up bug. This comes from Janine B., who managed to beat the centaurs this way using the PlayStation 2 game. This may or may not work in other versions, but it's worth a try. I paraphrase what she wrote here:
IMPORTANT NOTE ABOUT SAVEGAME FILES: The PC save files linked to this walkthrough include instructions for use. Additional save files can be found on a separate Anniversary save page. Please note that my saves were made using the North American DVD version of the game. As far as I know, they are compatible with most other DVD versions and with the Direct2Drive download version. They will not work with certain unofficial versions, which use a different source code.
WAS THIS WALKTHROUGH HELPFUL? If not, I apologize and invite you to contact me with any questions. If you need help right away, I recommend the r/TombRaider subreddit. Other fan-run forums are listed at tombraiders.net/stella/community.html. If this site was useful, please consider supporting it financially or in other ways. For details, visit tombraiders.net/stella/support.html. As always, I welcome your corrections/suggestions. Thank you!
Copyright © 2007- - Stellalune (). All rights reserved. The screenshots and videos included here were made using Fraps. Feel free to copy or print this walkthrough for personal use. By all means, share it with friends, but please include this credit line so people can send me their feedback. No part of this walkthrough may be reproduced on another site without permission. Follow this link for details about this site's advertising and privacy policy.
Stella's Tomb Raider Site: tombraiders.net.