Shadow of the Tomb Raider - Cozumel Collectibles
Updated: 8/18/19(†)
This guide focuses on revisiting this level after you complete it. If you are playing through for the first time, you may want to follow the main walkthrough instead to avoid possible spoilers. Collectibles are numbered in the order they appear in the main walkthrough and on the annotated level map.
There are no base camps in Cozumel when you first pass through the level. Two camps appear after you've progressed a little farther in the game. You'll find them on the Cozumel section of the in-game map, just above the larger map of Peru. (If you're new to the series, the Peruvian Jungle walkthrough explains how to use the base camps for Fast Travel.) Once you've found the collectibles you need, use either of the base camps to travel back to wherever you left off. Some parts of the level, such as the TOWN SQUARE, DISASTER AREA, DIG SITE, etc., can't be revisited, but there are no major collectibles there.
Follow this link for a List of All Artifacts by Story/Dialect.
Treasure Chest · Relics · Document · Murals · Survival Caches · Explorer Backpack · Archivist Map · Artifacts & Photos · Challenge
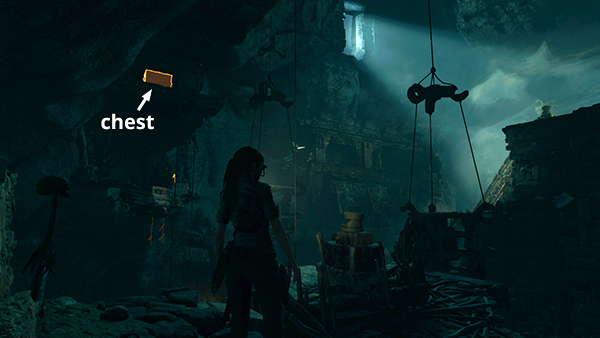
TREASURE CHEST
All treasure chests require the lock pick to open. Once you have acquired it, fast travel to the Tidal Caverns Base Camp. Then climb across the dangling bell platforms (you won't need to move the cart again) and use a series of rope lines to reach the chest, located on the high ledge on the east side of the cavern with the pyramid. The chest contains an Artifact (a Gold Mask, part of the Pantheon of Gods Story). The walkthrough includes details and screenshots. When you're done, climb back down to the base camp and fast travel out to wherever you left off. (Click screenshot to enlarge.)
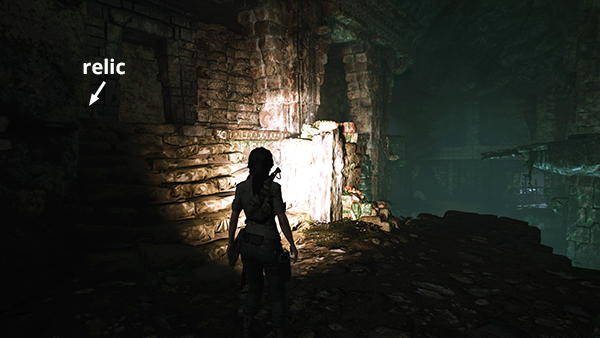
RELIC 1 - Ceramic Jar (Exodus Story)
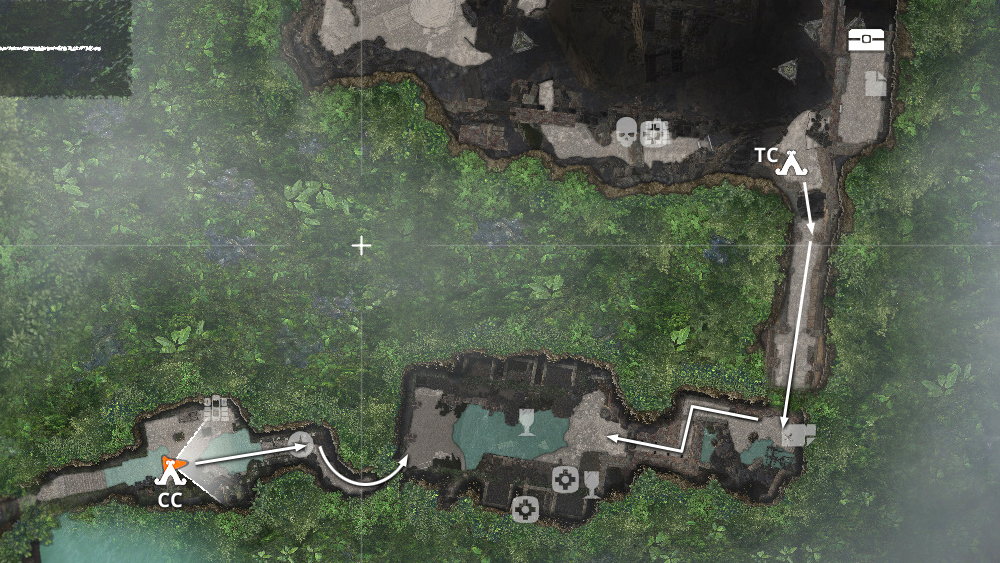
This relic is in the room with the pool between the entrance to the ruins and the Temple of the Moon. You can reach it from either base camp. If you have the reinforced knife upgrade, fast travel to the Tidal Caverns Base Camp. Follow the tunnel to the south. At the room with the small pool, turn right, cut down the braided rope barrier, pick up some jade, and cut down another barrier. The relic is just inside the next room on the left.
Or, if you don't have the reinforced knife, fast travel to the Cozumel Cliffs Base Camp and follow the passageway to the east to get to the room with the pool, where the relic is. Use either base camp to get back to where you left off. (Click screenshot or map to enlarge.)
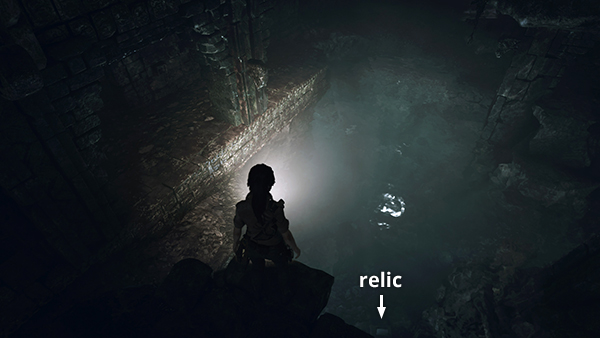
RELIC 2 - Carved Bowl (Exodus Story)
This is in the same area as the first relic, underwater on the north side of the pool. This screenshot is taken from the west side of the pool. Here's another view from the east side. (Click screenshot to enlarge.)

DOCUMENT 1 - Rearguard Report (Metamorphosis Story)
This document is in the huge cavern with the pyramid and dangling bell platforms. If you missed it the first time, fast travel to the Tidal Caverns Base Camp. Then climb/jump across the bell platforms (you won't need to move the cart again) to the ledge on the southeast side of the cavern. The walkthrough for the treasure chest includes details and screenshots. (Click screenshot to enlarge.)
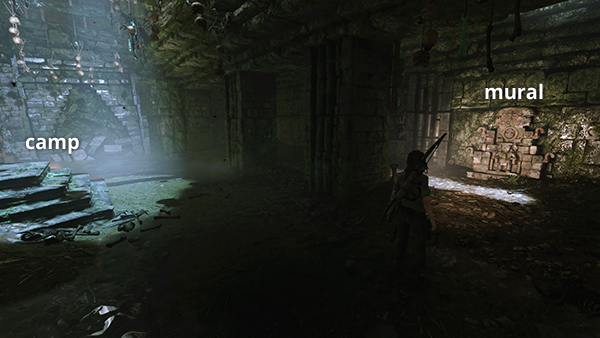
MURAL 1 - Heart of the Serpent (Exodus Story)
The first mural is in the room with the Cozumel Cliffs Base Camp, so just fast travel there and you'll find the mural in the northeast corner. (Click screenshot to enlarge.)
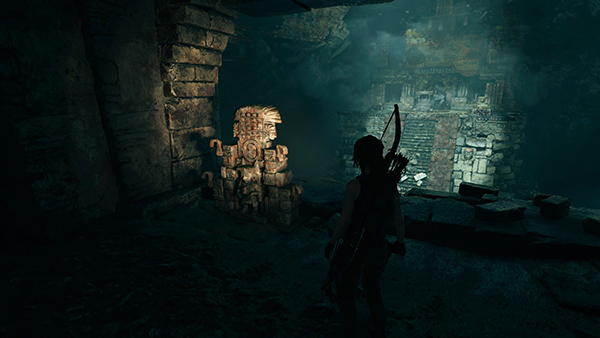
MURAL 2 - Temple of the Moon (Exodus Story)
This mural is in the huge cavern with the dangling bell platforms. To reach it, fast travel to the Tidal Caverns Base Camp. Then climb/jump across the platforms to reach the ledge on the east side of the cavern. From there, run a rope line up to the higher ledge on the north side. The mural is here. See the walkthrough for details. (Click screenshot to enlarge.)
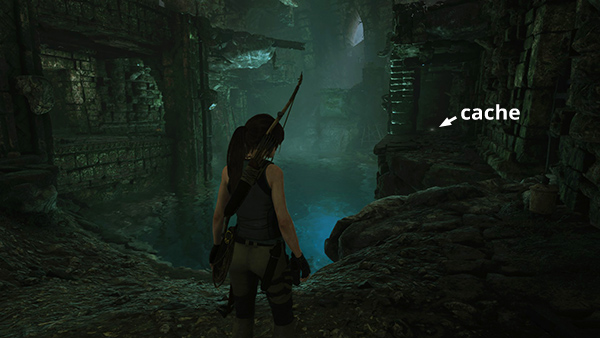
SURVIVAL CACHE 1
The first cache is in the room with the pool and ledges. Fast travel to the Cozumel Cliffs Base Camp and follow the passageway to the east. The cache is on one of the ledges on the south side of the pool. You can probably spot the flashing light where it's buried. Otherwise, check the walkthrough. (Click screenshot to enlarge.)
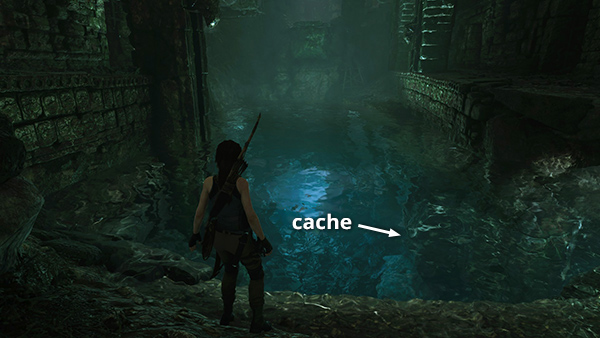
SURVIVAL CACHE 2
The second cache is in the same area as the first. From the Cozumel Cliffs Base Camp, follow the passageway to the east. Dive into the pool and swim down through the opening in the rocks about halfway along the south side to find the cache. The walkthrough has details. (Click screenshot to enlarge.)
SURVIVAL CACHE 3
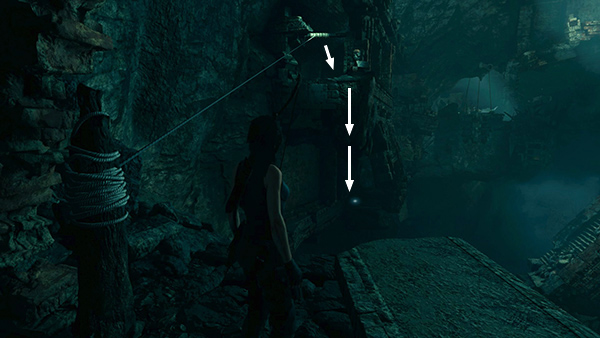
The last cache is in the huge cavern with the pyramid. Fast travel to the Tidal Caverns Base Camp. Then climb across the bell platforms to the ledge on the southeast side of the cavern. From there, run a rope line up to the higher ledge on the north side (where mural #2 is) and climb/rappel down to the ledge directly below to find the cache. The walkthrough includes details and screenshots. (Click screenshot to enlarge.)
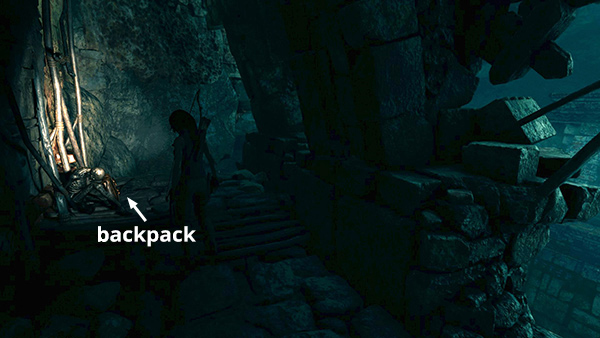
EXPLORER BACKPACK
There's only one backpack in this level. It is found on the same ledge as survival cache #3, above. Backpacks are not required for 100% completion, but finding them reveals the locations of other collectibles on your in-game map, so they can be useful. Examining this one reveals the locations of all 3 survival caches and the treasure chest on your in-game map. (Click screenshot to enlarge.)
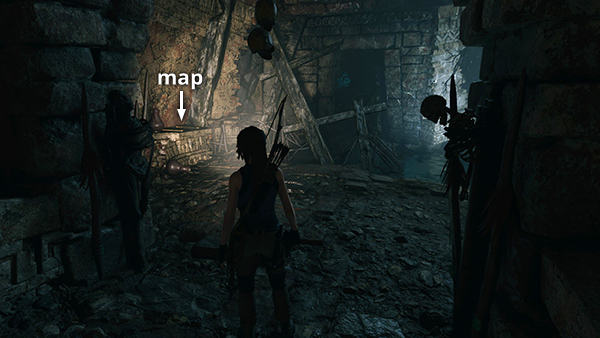
ARCHIVIST MAP
Archivist Maps are also not required for 100% completion, but examining them highlights other collectibles on your in-game map. This one is in the room at the southeast corner of the level map. It can be reached from either base camp, but it's a little closer to the Tidal Caverns camp. From that camp, follow the passageway to the south. When you come to the small room with the pool, the map is sitting on a shelf near the left (east) wall. Of course, it will be on the right if you're coming from the flooded tunnels to the south. Examining the map reveals both relics, both murals, and the document on your in-game map. (Click screenshot to enlarge.)
Other Artifacts
In addition to the collectible documents and relics listed above, certain artifacts and photos are added to Lara's collection automatically as you play through the game. These are mentioned at the relevant points in the main walkthrough and on the page with All Artifacts Listed by Story/Dialect.
Artifact: Trinity Badge (Lara's Notebook) - story progression
Photo: Hidden City Riddle (Path of the Stars) - story progression
Photo: Hydra Constellation (Path of the Stars) - story progression
Photo: Maya Date (Path of the Stars) - story progression
Photo: Jonah Maiava (Lara's Notebook) - story progression
Photo: Ix Chel and Chak Chel (Lara's Notebook) - story progression
Photo: Key of Chak Chel (Path of the Stars) - story progression
Artifact: Gold Mask (Pantheon of Gods 2) - inside the treasure chest
Challenge: Whistle in the Dark
The goal is to shoot down 5 green ceramic death whistles scattered throughout the level. These are noted in red in the main walkthrough and marked with yellow dots on the annotated level map. If you missed any of them the first time through, here's how to find them. (Note that once you unlock the Seeker skill Owl's Wisdom, Challenge objects will glow when you activate Survival Instinct, making them much easier to spot.)
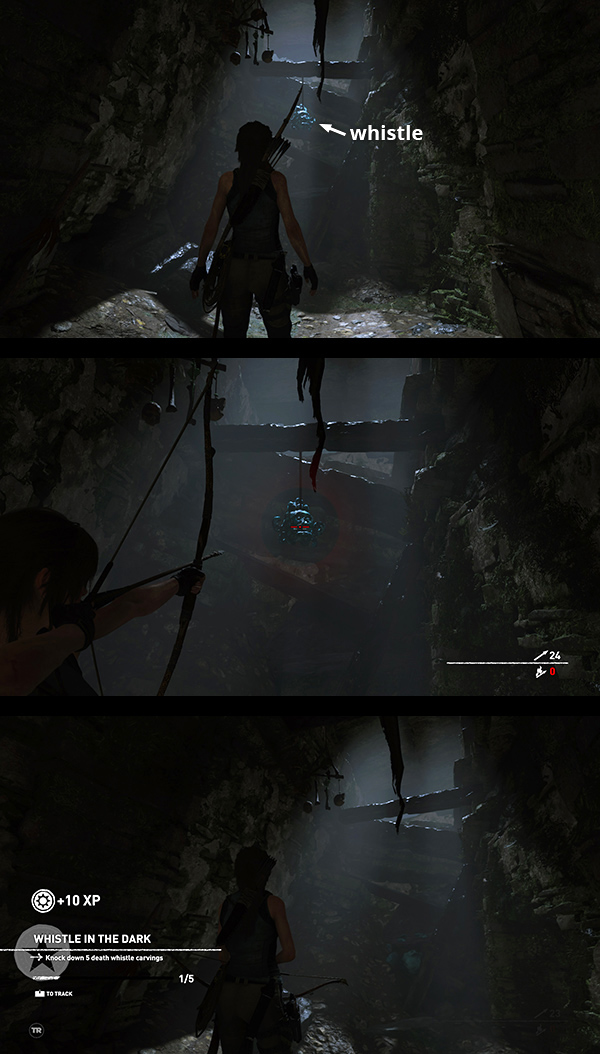
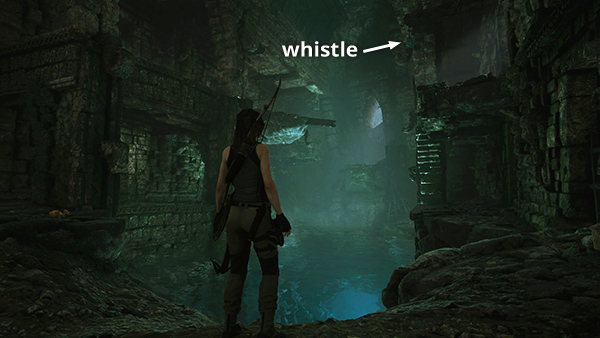
WHISTLE 1
From the Cozumel Cliffs Base Camp, enter the passageway to the east. The whistle is hanging from a beam just before the low tunnel leading to the next area. Shoot it down for the challenge. (Click image for more and larger screenshots.)
WHISTLE 2
From the Cozumel Cliffs Base Camp, follow the passageway to the east. Continue through the low tunnel to the room with the pool and ledges. The whistle is hanging high up on the right (south) side of the room. (Click screenshot to enlarge.)
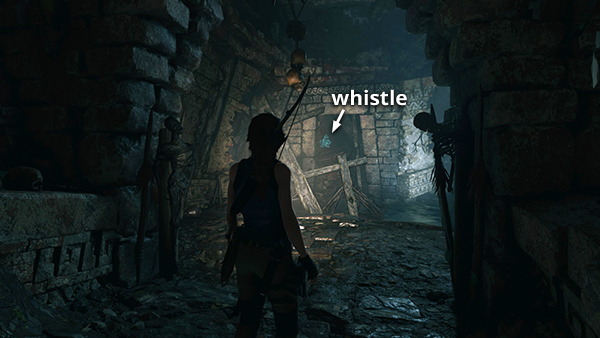
WHISTLE 3
This whistle is in the room at the southeast corner of the level map. It can be reached from either base camp, but it's a little closer to the Tidal Caverns camp. From that camp, follow the passageway to the south. When you come to the small room with the pool, you should see the whistle hanging directly ahead as you enter. (Click screenshot to enlarge.)
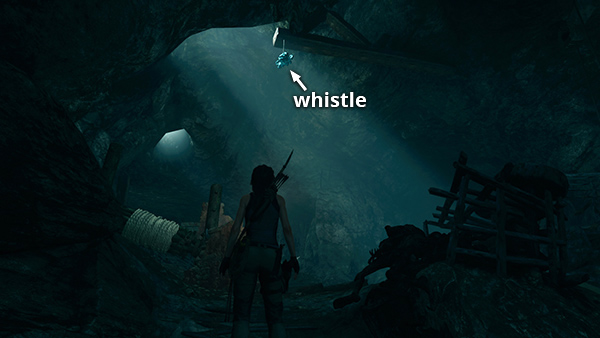
WHISTLE 4
This whistle is in the huge cavern with the pyramid and dangling bell platforms. From the Tidal Caverns camp climb/jump across the bell platforms until you have a good view of the ledge in the southeast corner of the cavern. The whistle is hanging almost directly ahead if Lara is standing on the fifth bell facing the ledge. (Click screenshot to enlarge.)

WHISTLE 5
The last whistle is also in the huge cavern with the pyramid and bell platforms. From the Tidal Caverns camp climb/jump across the first 5 bell platforms to the ledge in the southeast corner of the cavern. Run a rope line up to the ledge . The main walkthrough includes more details and screenshots. In order to get back, jump from the jutting ledge to the 6th bell then quickly jump back to the south ledge, as shown in this screenshot. Then retrace your route down to the base camp. (Click screenshot to enlarge.)
Top of Page | Walkthrough | Collectibles Guides | Main SOTTR Page
†UPDATE HISTORY: 6/2/19 - Page first posted online.
8/18/19 - Fixed details on Gold Mask artifact, which is actually part of the Pantheon of Gods story, not Pantheon of Gods 2. Thanks to SpirantCrayon22 for the heads-up.
WAS THIS WALKTHROUGH HELPFUL? If not, I apologize and invite you to contact me with any questions. If you need help right away, I recommend the r/TombRaider subreddit. Other fan-run forums are listed at tombraiders.net/stella/community.html. If this site was useful, please consider supporting it financially or in other ways. For details, visit tombraiders.net/stella/support.html. As always, I welcome your corrections/suggestions. Thank you!
Copyright © Stellalune (). All rights reserved. Feel free to copy or print this walkthrough for personal use. By all means, share it with friends, but please include this credit line so people can send me their feedback. No part of this walkthrough may be reproduced on another site without permission. Follow this link for details about this site's advertising and privacy policy.
Stella's Tomb Raider Site: tombraiders.net.