SAVING, CHECKPOINTS & TECH SUPPORT: This game incorporates autosave checkpoints. If you only rely on one save slot, you may run into trouble if you get stuck, encounter a bug, or if your autosave becomes corrupted. To avoid problems, I highly recommend changing your save slot in the pause menu at least once per level. If you encounter a serious bug, I encourage you to visit Crystal Dynamics Support and/or the r/TombRaider subreddit. I also have PC save files for download.
This guide is based on the Normal ("Rite of Passage") difficulty settings for Combat, Exploration, and Puzzles. I have attempted to provide useful strategy and cover all major collectibles with minimal backtracking, but I'm sure there are things that could be streamlined. There may be errors and less-than-optimal routes, etc. I hope you find it helpful and encourage you to check back for updates.
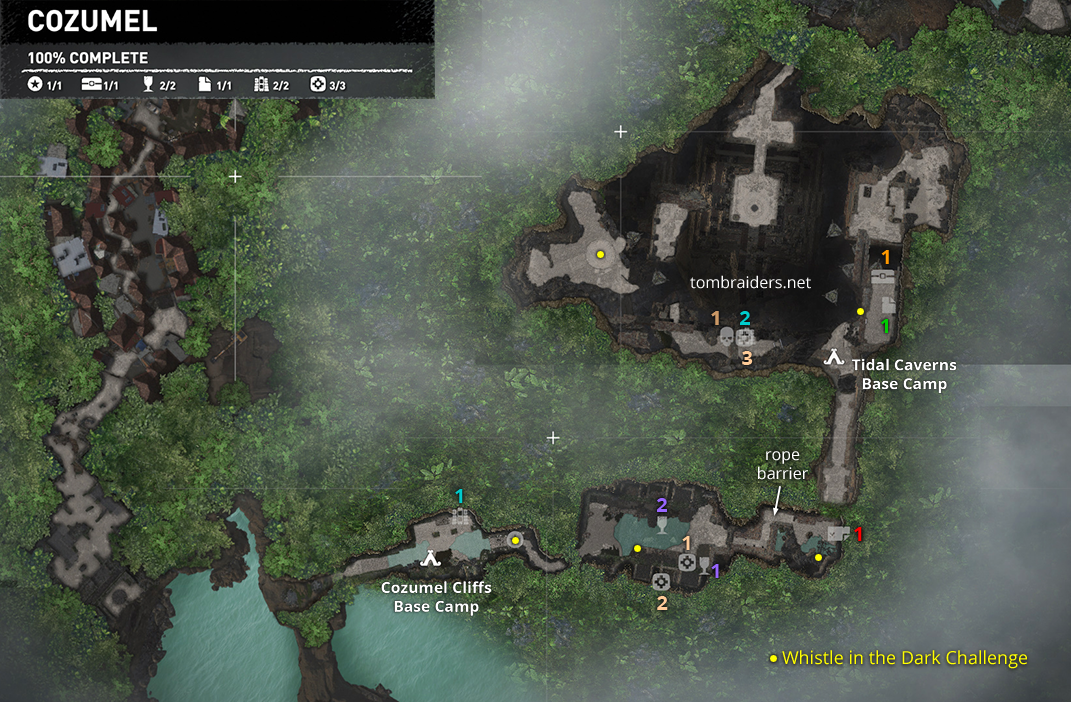
AREA 1: COZUMEL (includes COZUMEL CAVES)
Updated: 11/10/21(†)
Camps: 2 (Cozumel Cliffs, Tidal Caverns)* Weapons/Gear: Knife, Climbing Axes
Challenge Tombs: none Challenges: 1 Treasure Chests: 1 Crypts: none Relics: 2 Documents: 1 Murals: 2 Survival Caches: 3 Monoliths: none Archivist Maps: 1 Explorer Backpacks: 1
Annotated Level Map: Cozumel
*NOTE: The two base camps only appear after you unlock fast travel. If you've already completed Cozumel but missed a few collectibles, check out the section below on Revisiting This Level Later in the Game and the separate COZUMEL COLLECTIBLES GUIDE.
After an exciting introductory cinematic, in which Lara and Jonah become separated when their plane crashes in the Peruvian jungle, we flash back to Cozumel, Mexico, two days earlier. Lara is trapped by a cave-in.
COZUMEL CAVES*: Follow the on-screen button prompt and tap Interact (E on the keyboard, Square on PS4, X on Xbox) to use Lara's knife to pry a rock off her leg. (Note that there is now a setting in the Gameplay section of the Options menu to Hold rather than Tap the required button for repeated presses.) Then, once Lara is free, press/hold Up to climb out of the passageway.
Lara bandages her wound and retrieves a second climbing axe from a dead Trinity operative.
At this point, you also recover your first artifact: a Trinity Badge, part of the series Lara's Notebook. This happens automatically and is not counted as a relic in the total above. For more information, open the Artifacts menu by pressing Tab (PC), Touchpad (PS4), or View button (Xbox One) to access the Map. Then page twice to the right or select Artifacts, the chalice icon at the top left.
OBJECTIVE: Climb out of the Cave
Follow the on-screen prompts to move forward toward the climbable wall. As you go, Lara and Jonah speak over walkie-talkies. He tells her he's heard a rumor that a Dr. Dominguez will be in town for the Day of the Dead festivities. Continue following the prompts to latch onto the rough wall with your axes and climb up. At the gap, press Jump then latch onto the angled wall above. Continue following the prompts to Overhang Climb then, when you run out of wall, jump to grab the ledge above, then climb to the top.
As you progress, you'll earn Experience Points (XP) for your efforts. As you earn more points, the sun-shaped meter on the left side of the screen gradually fills. When it is full, you'll earn a Skill Point, which we'll cover a bit later. You also start the game with 2,000 gold pieces, which you can see at the top right when you pause the game. At this point, there's nothing to spend it on, but you will collect more and later encounter merchants with whom you can trade.
Follow the ledge around to the right, toward the area where the beam of light is pointing.
As you approach the ruins, a cutscene kicks in. Lara examines the pyramid-like structure in the middle of the cavern. As she approaches, we see an explosive device attached to the base of the platform. Lara doesn't notice this. Jonah arrives and they discuss the possible significance of the carvings on the pyramid as Lara takes photos. She reads the inscriptions: Constellations...pink fish...a silver-crowned mountain...and a date that Lara suspects may have been damaged intentionally. Lara steps back to get a better look and accidentally triggers the explosives. Jonah urges her to move, as she continues taking photos to document the find. Jonah drags her to the exit and they escape in the nick of time.
They regroup later that night in a cafe in Cozumel and watch as Dominguez arrives and takes a seat in the courtyard below. While they wait for him to make a move, they discuss the clues from the ruins. Lara pores over the photos and a map of the Amazon basin and decides the directions in the inscription lead to Peru. Soon, another man arrives and leads Dominguez away. Lara dons a skeleton mask and follows at a discreet distance.
OBJECTIVE: Find Dominguez
FESTIVE TOWN SQUARE IN COZUMEL: In addition to following Dominguez, there are a few minor pick-ups in this area if you want them. For example, after you descend the stairs, if you turn around there's a medkit. Approach it and press Interact to add it to your inventory. (screenshot) When you take this first item, the game prompts you to check the in-game Survival Guide, which is accessed from the Map screen. Press Tab (PC), Touchpad (PS4), or View button (Xbox One) to access the Map. Then select the first-aid book icon at the top left.
You may also notice that 3 photos have been added to the Artifacts menu, under Path of the Stars. They are: Hidden City Riddle, Hydra Constellation, and Maya Date.
There are more items to be found if you explore the courtyard, including a resource container (with random supplies inside) and a basket of medicinal herbs, both along the east wall; another basket of herbs in the northwest corner of the main courtyard; and resource boxes at the north end of the long alcove lined with candles on the west wall and behind the food vendors' stall just south of the fountain.
I will add more info and screenshots later, but you can use Survival Instinct (Q on the keyboard or Right Stick button on controllers), items you can pick up or interact with will glow. (screenshot) Pressing this button will also show where to go next to progress in the story. (screenshot) But feel free to explore the area before going after Dominguez. There are also NPCs you can talk to by approaching them and pressing the Melee button (F/Triangle/Y)
NOTE: You must have Survival Instincts: Beacons and Survival Instincts: Glow enabled (under Options > Gameplay) for these features to work.
When you have everything, approach Dr. Dominguez and his men at the gate in the southwest corner of the courtyard.
A brief cutscene shows Dominguez and his right-hand man leaving. Lara finds another way over the wall while Jonah creates a diversion.
OBJECTIVE: Follow Dominguez
After the cutscene, your goal is updated, and a photo of Jonah Maiava, is added to the Lara's Notebook series under Artifacts.
Continue through the crowd into the GRAVEYARD. After Lara squeezes between the townspeople and moves down the stairs, there's another basket of herbs on the left, and another basket near the big wooden doors on the east side.
As you proceed toward the exit, on the south side of the cemetery, Lara overhears Dominguez and his lieutenant talking and discovers that Dominguez is in fact the leader of Trinity, the sinister organization she's been pursuing for the past several years.
BACKSTREETS: Continue southward along the street and into a back alley. You can't get lost here. Just follow the path toward the objective. As you go, Lara overhears the second man identify himself over the radio as Rourke. He tells someone to be on the lookout for her. At the end of the alleyway approach the low, brick opening to go through. Lara then sees the men enter the dig site and secure the gate behind them.
OBJECTIVE: Find Another Way into the Dig site
Pick up some cloth lying on the ground to the left of the gate. (You'll find a use for this later. Just keep collecting any items you find.) Then continue along the deserted street to the south. When you reach the dead end, follow the on-screen prompt and press Jump twice to wall scramble over the wooden barrier.
Lara lands on the other side, ditches her disguise, and takes out her trusty bow. She examines a carved mural nearby, which depicts a pyramid inside a cave.
OBJECTIVE: Investigate the Area
WEEDY ROAD NEAR DIG SITE: Lara adopts a defensive crouch, indicating there are enemies nearby. Head down the hill and into the metal culvert near the truck. (screenshot) Lara spots some low-level Trinity thugs threatening a local archaeologist.
OBJECTIVE: Stop the Execution
Follow the on-screen prompts and approach the first man and press Melee (F/Triangle/Y) to kill the first one with a stealth takedown (for which you receive more XP). She then advances and takes cover behind the wall on the left. Follow the prompts to draw the bow (hold Right Mouse/LT) then use the mouse or right stick to aim the targeting reticle at the second enemy. When you have him in your sights, briefly hold the Fire button (Left Mouse/RT) to charge your shot in order to make it more powerful. Then release the Fire button to loose your arrow. If you hold too long, Lara's arms will tire and she'll let the arrow fly. If you change your mind, release the Aim button, rather than the Fire button, to cancel the shot. A body shot will bring this low-level enemy down, but you'll get more XP for a headshot.
Once the two enemies are dead, Lara speaks with the archaeologist they had been threatening. He tells her they've found the temple entrance but he can't show her where it is because he must go and warn his sister.
OBJECTIVE: Find the Temple Entrance
DIG SITE: Survival Instinct reveals more goodies hidden nearby, as well as the location of the temple entrance. (screenshot) If you turn around and head back toward the culvert where you came into this area, you can loot the body of the first dead enemy. Stand over it and press Interact to take what he's carrying (screenshot), including some ammunition, some other random supplies, and a few gold pieces.
Scour the area to turn up 2 boxes of supplies, 3 bushes with healing berries (red plants like this achiote can be used to restore Lara's health), and a box of salvage. (screenshot) The in-game Survival Guide explains that salvage is basically random bits and bobs used to create improvised explosives, upgrade weapons, and restore outfits. We'll cover this in detail later on and in the separate Crafting section (coming soon). The Survival Guide entries also show how many of each resource you have collected so far and how many Lara can carry at this time. For example, in this screenshot, Lara has 10 health items and can carry a maximum of 24. The Map screen also includes an abbreviated inventory box at the bottom left. Press the button indicated on screen to open a Legend showing what the various icons mean. (screenshot)
Approach the stone wall to the southeast and follow the on-screen prompts to scramble up.
Lara discovers a two-sided stone marker, one side depicting Ix Chel, the Maya goddess of the full moon; the other side Chak Chel, goddess of the new moon. She deciphers an inscription: "Chak Chel...the key lies beyond her gaze." Lara's attention is then drawn to a skull-shaped rock formation a little way offshore.
CLIFFS ABOVE THE OCEAN: A photo, Ix Chel and Chak Chel is added to the section Lara's Notebook in the Artifacts menu. Like the previous unmissable finds, this is not counted as a "mural" in the tally for this level.
OBJECTIVE: Climb Down the Cliff
When you move to the edge and face the climbable wall on the other side of the gap, the game prompts you to Axe Climb: Jump into the gap and press Interact to latch onto the craggy wall. Climb down as far as you can and you'll be prompted to Rappel. Hold either mouse or trigger button and press Down to begin descending with the grapple. Release the mouse/trigger button and continue pressing down to descend. When Lara is close to the ground, press Drop/Roll (C/Circle/B) to Drop from Rappel.
NOTE: I have not included screenshots here yet, since the game tells you what to do and you can't really get lost. If you're having trouble with any of this, feel free to give a shout. My contact info is below.
Follow the path forward and downward. Take a running jump across the gap to grab the narrow ledge running around the stone column ahead. Here Lara may momentarily lose her grip and you'll be prompted to press Interact to make a Saving Grab. Climb around to the left until Lara leans out toward the next rough wall. As you go, Lara overhears Commander Rourke over the radio directing his men to secure the site and wait for Dominguez. Hold Left to lean out, then Jump and press Interact to latch on. Again climb down, rappel down as far as you can, then drop to the ground. Lara staggers then takes a few steps back from the edge. Take a running jump across the next gap and latch onto the rough wall ahead. Climb up and around to the right until you can pull up onto the ledge above.
Run forward toward the next gap, jump toward the wall ahead, then press Jump twice to wall scramble to the top. If you miss, there's a handhold below for Lara to grab, but later you won't have this luxury. If Lara does fall to the lower handhold, just tap Jump twice to scramble up the wall and grab the ledge above.
Lara says something about having to hurry, but she's exaggerating. Take your time. The bad guys will wait for you. Move to the end of the ledge, jump forward and grab the narrow ledge, then traverse to the right as far as you can. Climb down the craggy wall and then rappel down to the barnacle-encrusted section of wall below. Lara briefly loses her footing. Just stay calm, don't press anything, and she'll get it together. The game now tutors you in Wall Running: Alternate pressing A and D or Left/Right on the analog stick to run back and forth along the wall while maintaining a grip on your cable. When you build up some momentum, run to the right, jump, and grab onto the narrow ledge on the perpendicular wall.
Climb to the right, then continue climbing downward and around to the right along the rough wall. Lara notices a cave below. Rappel down until Lara is dangling as low as she'll go. Hold either mouse or trigger button, then alternate pressing Forward and Back to swing back and forth to Rappel Swing and build up some momentum. As Lara swings forward, jump and grab the ledge in front of the opening. Pull up.
OBJECTIVE: Explore the Ruins
TEMPLE ENTRANCE: Climb into the opening and pick some orange fungi just inside on the right. (screenshot) If you check the Survival Guide, you'll learn these are Bolete mushrooms and will be useful later on for making Endurance Mixtures. In the same way that red vegetation is good for Health, orange ones are for Endurance. You won't unlock the skill that allows you to make these mixtures for a little while, but keep collecting ingredients.
Move forward and Lara will crawl through the narrow opening to emerge in a partially flooded cave adorned with ancient-looking skull totems. Wade through the shallow water. On the other side, Lara can examine the monolith ahead on the right, but this is just set dressing not an "official" collectible. Turn around to spot a container of random supplies. (screenshot)
Next to it is a bona fide mural (1/2). Move close and press Interact to examine it. When Lara reads an ancient mural, she gains experience points (XP) and improves her knowledge of one of several Ancient Mayan Dialects, in this case Mam. As you go, Lara will develop skill in three languages, enabling her to read more difficult ancient inscriptions. You can also learn a bit of lore that may help as the story unfolds. If you open the Artifacts menu now, you'll see that this mural, titled Heart of the Serpent, is part of the Exodus collection, or Story. (screenshot) Each story is made up of multiple collectibles, which may be scattered throughout the game. Finding all of the collectibles in a particular Story, earns bonus XP. Also note that if you pass close to a mural (or other collectible) without examining it, it will be marked with a white icon on the in-game map. (screenshot) Once you have examined it, you'll see a grayed-out icon, and the progress bar at the top left will indicate 1/2 murals found. (screenshot) Later you can unlock a skill that makes murals and other collectibles glow in Survival Instinct view.
Approach the door to the east for a tutorial on Rope Pulling. This will be familiar if you've played Tomb Raider (2013) or Rise of the Tomb Raider. (screenshot) Aim your bow at the rope-wrapped beam and the targeting reticle will turn red. Hold then release the Fire button to shoot a rope arrow and pull down the barrier. As long as you aim at the rope, Lara will fire a rope arrow and not a regular arrow. Rope pulling does not require or use up arrows.
Beyond the barrier is a narrow passageway with a spear trap. Approach the tripwire carefully and press Melee to cut the wire an disarm the trap. (screenshot) If you miss this and trigger the trap, it's not deadly. The spears pop out from the right, but they won't hit Lara. Later, of course, you'll need to be alert for more dangerous traps. Press Duck + Forward to scramble under the spears.
Just ahead look up and draw your bow to target the green ceramic whistle (1/5) hanging from the ceiling. Shoot it to initiate the first Challenge: Whistle in the Dark. (screenshot) Find and knock down 5 of these death whistle carvings to complete the challenge for bonus XP. Later you can unlock a skill that makes challenge items glow when you activate Survival Instinct. For now, if you have trouble spotting them, just check the screenshots and/or annotated level map, which has yellow dots marking the location of each whistle.
Go through the low opening on the right and follow the tunnel to the next area. You'll meet some squeaky little rats along the way, but unlike the past games, Lara can't hunt them for rat kebabs.
RUINS WITH POOL AND LEDGES: There are a few minor collectibles in this area: a supply canister just ahead on the right; 2 mushrooms, both on the left ledge; another supply canister in the cell on the left. Use Survival Instinct if you need help spotting them. There is also some stuff underwater, but you can wait to pick it up since we'll exit that way.
Survival Caches are harder to spot, but if you stand near the entrance and look to the east you'll notice a small, flashing light on the ground ahead. (screenshot) Approach it and you'll see an Interact prompt. (screenshot) Dig here to unearth the first survival cache (1/3). This will consist of some random supplies, possibly including some rare ones and a small XP award. (Again, open the Map screen and press the button indicated for Legend to see what you just got and see the grayed-out icon where the cache was.)
Somewhere in here you'll gain a Skill Point. (screenshot) We'll talk more about skills when we reach the first Base Camp.
Enter the cell near where you dug up the cache (southeast corner) and scramble up the left wall and climb onto the ledge above. (screenshot) Follow the passageway around to the left. There's a box containing a relic (1/2) sitting on the floor to the right. (screenshot) Again, if you pass by without noticing, it should be marked on your map with a chalice icon so you can find it later. (screenshot) Open the box to examine the relic, a Ceramic Jar, part of the Exodus Story. You can examine it further in the Artifacts menu to learn more. Lara also gains XP and a bit more skill in the Mam dialect.
Move to the end of the ledge where you found the relic until Lara is overlooking the entrance. Here you'll find another ceramic whistle (2/5). (screenshot) You may have already spotted it from below, but if not, shoot it now for the Challenge. Then jump across the water onto the beam protruding from the opposite ledge. (screenshot) Loot another canister ahead on the left. Move to the other end of the ledge, jump to grab the horizontal pole (which glows in Survival Instinct), and swing over to the ledge ahead. (screenshot) Pick some mushrooms here.
NOTE: All murals, documents, relics, survival caches, etc., are marked on the annotated level map. Each of the 5 whistles for the challenge are indicated with a star.
POOL AND FLOODED PASSAGEWAYS: Now jump in the water and follow the Swimming tutorial. Hold Jump to swim toward the surface, Duck/Drop to swim downward, and the direction keys or left stick to move around. Hold either mouse button or trigger button (or L3 button) to swim faster on the surface or underwater. Lara can hold her breath for quite a while, but she's not invincible, so don't stay under too long. There's no air meter, so use common sense, and if Lara starts showing signs of distress, head for the surface immediately. Later you'll unlock skills to improve your swimming.
There are a few pick-ups on the bottom that glow in Survival Instinct. The yellow plants are Senna. Later you'll unlock Scales of the Serpent, a skill that lets you use these herbs to brew Focus Mixtures. Again, a lesson for another day, so stay tuned....
There's a supply canister in the northeast corner and another survival cache (2/3) in a side cavern to the south. (screenshot) There's also a relic (2/2) on the bottom about halfway along the north side of the pool. If you face the trapezoidal doorway on the north wall and swim straight down, you'll find it. (screenshot) This is a Carved Bowl (Mam dialect/Exodus Story). Examine it closely in the Artifacts menu for a story-related clue.
When you're ready to move on, take a deep breath and follow the blue-lit tunnel to the south. (screenshot) Hold either mouse or trigger button (or L3) to swim faster. Approach the narrow opening and Lara will swim through. You'll meet a moray eel here, but there's no chance to fight it yet. A bit farther on you'll come to a pocket of Trapped Air, and the game will prompt you to press Interact to pop up and take a breath. (screenshot) Continue following the tunnel, past a couple more eels, into a tight crevice. Just keep moving forward and Lara will handle it. Near the end, she'll become trapped, and you'll need to tap Interact repeatedly to get free. (screenshot) Then continue upward to glorious air!
SECOND RUINED CHAMBER: When you catch your breath, loot another supply canister and take a look around. In the southeast corner is a ceramic whistle (3/5) that you can shoot down for the Challenge. (screenshot) In the northeast corner, sitting on a shelf, is an archivist map (1/1). (screenshot) Examine it to reveal the location of several undiscovered collectibles on your in-game map. If you played Rise of the Tomb Raider, you'll be familiar with these maps. They aren't required for 100% completion, but they can certainly help achieve it, since they reveal any nearby relics, murals, documents, and monoliths.
In the northwest corner is a braided rope barrier that you can't cut down yet. You'll need the REINFORCED KNIFE UPGRADE. (screenshot) You won't get it in this level, so make a note to return later. Or better yet, let me do it for you. See the section on REVISITING THIS LEVEL LATER IN THE GAME, below.
NOTE: In case you're concerned, the big, bold text that appears near this first map and barrier will not be present later in the game. This is still a tutorial level, after all.
Follow the passageway to the north slowly and carefully. Lara should turn her light on automatically so you can see the spear trap ahead. Cut the tripwire (screenshot) and duck under the spears. (Or, if you accidentally trigger them, quickly duck and scramble forward out of the way.) Continue to a ledge above a spike pit. Jump across and latch onto the climbable wall. Climb to the top (screenshot) and step forward for a view of an impressive underground temple.
As Lara and Jonah exchange info over the walkies, a shockwave set off by Trinity's blasting rocks the area.
OBJECTIVE: Get to the Top of the Pyramid
TEMPLE OF THE MOON: When you enter a new area where there are collectibles marked on your map, it's helpful to get a rough idea of where they are, since this can save backtracking. After reading the Archivist Map, we now have a mural and a document marked on our in-game map. Open it up and position the cursor over the document. Then press the button indicated on-screen for Toggle Waypoint. This marks the document with a blue circle. (screenshot) Now, when you close the map and activate Survival Instinct, you can see the document outlined in blue, high on a ledge above and to the right. (screenshot) You can't reach it yet, but this is helpful. If it were close by, you might have missed it in the dark. You can do the same with the mural, which is above on the left. Well reach both of them soon.
Now for our first big platforming puzzle: reaching the top of the pyramid. Move to the edge of the chasm and jump onto the nearest of several dangling platforms with gilded bells inside. Lara's weight carries the bell downward, simultaneously raising the second bell. Wait for the bells to settle. Then jump and grab onto the second bell and climb on top of it. Jump to grab the third bell, just to the left, and climb on top of it. From there, jump toward the light-colored wall and scramble up onto the ledge. Climb the steps on the right. Then move around to the left, behind the raised structure, picking up some hardwood (for making arrows), supplies and salvage on the way. Climb the stairs at the back of the raised structure. (screenshots)
Here we have a wooden barrier and a wooden cart. Even on the Medium Puzzle difficulty setting, you can tell it's possible to interact with these objects since they glow in Survival Instinct. Shoot a rope arrow at the rope-wrapped section of the barrier to pull it down. Then stand near the back of the cart and hold Interact + Forward to push it down the slope. It rolls down onto the third bell, lowering it and simultaneously raising the fourth, ahead on the right. You get a checkpoint here and XP for solving this first stage of the puzzle. (screenshots)
Climb the stairs to the ledge above and hop over to the ledge on the left to find some gold ore sitting in the corner near the shovel. Later, when you get back to civilization, you'll be able to sell it to merchants and use the proceeds to purchase useful items. Return to the previous ledge and jump from there onto the fourth bell (i.e., the one you just raised). You might notice a flashing light on the far side of the cavern. Yes, that's another Survival Cache. We'll reach it soon. (screenshots)
Now jump from the fourth bell to grab the fifth bell, ahead on the left. It's a long way so hold the Jump button for a bit of extra air time and be ready to press Interact if you see the prompt in order to hang on. When you climb on top of this bell, another one crashes down from above and tumbles into the chasm, prompting Lara to say a bad word. When you both calm down, take a moment to shoot the Challenge whistle (4/5) hanging near where the bell just dropped. Jump to grab the ladder dangling off the ledge ahead and climb up. The document (1/1) you've had your eye on is sitting on a shelf to the left. It is an account written in the Mam dialect called Rearguard Report, part of the Metamorphosis Story. Examine it for information and XP. (screenshots)
Continue to the far end of the ledge. Stand near the rope-wrapped post for a tutorial on Tethering. Aim for the rope-wrapped beam on the far side of the gap and shoot a rope arrow into it. As long as Lara is standing close enough to the post, she'll anchor the other end of the line there. You can then jump to grab the rope and use it to climb across. Keep climbing until you reach the far end. Then drop onto the ledge (C/Circle/B). As you climb, you'll catch another glimpse of the Survival Cache flashing below. (screenshots)
Before going after the cache, examine another mural (2/2) just ahead on the right. This one is also part of the Exodus Story. It tells about the Temple of the Moon and gives XP and additional proficiency in the Mam dialect. Now move back to the end of the ledge below the rope-wrapped beam. Instead of sliding down the rope, step (don't jump) off the edge and Lara will drop and hang. Traverse to the right and climb down the rough wall as far as you can. Then rappel down as far as Lara will go, swing back and forth, and jump to grab the ledge near the cache. Dig up the survival cache (3/3) Then approach the skeleton leaning against the wall ahead on the left. Examine the explorer backpack (1/1) the skeleton is clutching. This special item is similar to the Archivist Map you found earlier, but it shows any survival caches, treasure chests, and crypts nearby. If you have been following this walkthrough, you've already found the 3 survival caches, but if you hadn't they would now be marked on your map. The location of the treasure chest, on a ledge off to the east, is revealed. (screenshots)
To get back to where you left off, continue to the end of this ledge, jump toward the right side of the wall ahead, scramble up, and press Interact to latch onto the rough wall with your axes. Climb up to the left then scramble up onto the ledge above. This is the same ledge where you found the mural earlier. Just ahead is a spear trap. Do not try to disarm it from this side, or Lara will get skewered. Instead, hop over the tripwire, turn around and cut the wire to spring the trap. Loot the supply canister on this side of the spears. (screenshots)
Then, if you like, you can move back to the east end of the ledge, where you climbed the rope line earlier. If you missed the 4th whistle for the challenge, you can spot it from here. You won't be able to open the treasure chest yet, but if you want to check it out, shoot a rope arrow into the rope-wrapped beam above the post you used to anchor the first rope line. Jump up to grab the new rope line, climb across, and drop down in the doorway. Pick up some gold ore lying on the ground. Then examine the treasure chest. You'll learn about this new type of collectible, but you will not be able to open it until you find the LOCKPICK. Return to the rope line and climb back to the previous ledge. Move past the mural and scramble under the spears to reach the far end of this ledge so you can proceed. (screenshots)
Now you need to reach the west side of the cavern. Start by jumping onto the sixth bell. It begins to sink, causing the the seventh bell to rise, but before it can move all the way up, it gets stuck on a mass of debris jutting out from the ledge. Jump from the fifth bell to the craggy wall ahead. Climb to the top. As soon as you pull up onto the ledge, look up to spot the last whistle (5/5). Shoot it down to complete the Whistle In the Dark Challenge for an XP bonus. (screenshots)
Now for phase two of the puzzle: Move to the top of the slope, cracking open a salvage crate along the way. Stand next to the winch and press Interact to use your climbing axe as a handle. Rotate the left stick or press A/D to turn the winch, causing the wooden turntable below to rotate. You only need to rotate it a quarter turn, so the tracks along the middle line up left to right, as shown above. (screenshots)
NOTE: The Options > Gamepad menu also gives you the option to push the stick in a direction to crank wheels, rather than rotating the stick. (screenshot)
Release the winch and head up the slope to the left of the turntable to find another wooden cart. Approach the cart from behind, grab it, and push it forward down the slope. If you rotated the turntable correctly, the cart should roll onto it and stop in the middle. (If the cart does not roll onto the turntable, go back to the winch, adjust the turntable as needed, and then push the cart into position.) Return to the winch and rotate it a quarter-turn counterclockwise, so the rope-wrapped handle on the cart faces Lara. Let go of the winch and shoot a rope arrow into the handle of the cart. As long as Lara is standing close to the winch, she should anchor the other end of the rope to the winch's spool. Now crank the winch to pull the cart up the slope toward you. Let go of the winch, move close to the rope line, and press Melee to cut it, sending the cart barreling down the hill into the pile of debris. This frees the two bells so you can move forward. You also receive a nice XP award for solving the puzzle. (screenshots)
The sixth bell is now higher than the seventh one. So move up the slope on the right and jump onto the sixth bell. Quickly, before it can sink too far, jump to grab the ladder dangling from the ledge ahead. Climb to the top. Move forward, loot another supply canister, and climb the stairs to the right. Scramble up the stone slab and grab the handhold above. Climb around to the right. As Lara nears the gap in the ledge, a flock of bats flies out, causing her to lose her grip. Quickly press Interact to recover. Continue climbing to the right, then downward along the craggy wall. Rappel down toward the altar to trigger a cutscene. (screenshots)
BUG NOTE: Apparently in the PS4 version, the stone slab in the section above may be missing. In that case, you'll need to jump out and grapple the ledge above by pressing Square. Then climb up the cable to grab the ledge.
Lara raises Jonah on the radio and tells him about her find. She describes the mural above the dais: the Silver Box of Ix Chel...summoning the god Kukulkan...a series of cataclysms: tsunami, storm, earthquake, volcano. Lara then rotates the stone rings on the dais to correctly align the gems representing the stars of the Hydra constellation. The dais then rises, revealing a dagger and an inscription: "The key to Ix Chel's heart unlocks the cleansing." With Trinity about to arrive on the scene, Lara naturally ignores Jonah's advice and grabs the dagger. Whee...apocalypse inbound! Here we go!
OBJECTIVE: Exit the Temple
After the cutscene you have a new photo in the Artifacts menu: the Key of Chak Chel, another entry in the Path of the Stars Story. Follow the passageway forward. There are no splits or side passages so you can't get lost. There's another supply canister along the way. When you come to a dead end, you'll be prompted to press Interact repeatedly to break through the crumbling wall. (screenshot) Climb through the gap into the next area.
OBJECTIVE: Get through the Dig Site
TRINITY-INFESTED ARCHAEOLOGICAL SITE: As you enter the dig site, Lara conceals herself against a vine-covered wall and you get a brief tutorial on Vine Wall Movement. Wait for the Trinity lackey to approach. While he's looking at the broken water pump move along the wall toward him until you see the Melee prompt. Then press the Melee button to take him down stealthily. Press Interact to search his body for ammo, supplies, and money. Now you can move out of concealment and scramble up the wooden wall into the next area. (screenshots)
Lara spots some more Trinity operatives ahead. She slides down the embankment and takes cover behind a rock. If you press Survival Instinct now, you'll notice the bushes and vines where you can hide are highlighted in white. Move forward into the clump of ferns. Then advance to the vine-covered wall beyond. From there, advance to another clump of ferns near the closest enemy. (screenshots)
An on-screen tutorial explains how to use Survival Instinct to gauge enemy awareness. If you activate it now, you'll notice that the nearest enemy glows yellow, while the others glow red. Enemies highlighted in red are visible to other enemies. So if you were to shoot one of them, the others would be alerted. Enemies highlighted in yellow are isolated, so if you can kill them quietly, the others won't notice. Try that now: Lara remains in a defensive crouch as long as there are enemies around, so you don't need to press any particular button to sneak. Just move forward slowly and quietly and take cover against the vine-covered wall behind the nearest enemy. Move toward him until you see the Melee icon above his head. Press Melee to take him down with your axe and knife, then Interact to loot the body. (screenshots)
Next comes a tutorial about Distraction Objects. Sneak forward until Lara is crouching behind the supply crates. Press Interact to grab a bottle. Hold the Right Mouse or Left Trigger button and you'll see a white arc showing where the bottle is aimed. Adjust with the mouse or right stick to aim at the whitewashed stone wall beyond the 2 bad guys. Then press Left Mouse or Right Trigger to throw the bottle. (If you change your mind, hold C/Circle/B briefly to drop the bottle instead of throwing it.) The enemy on the left is alerted (notice the white symbol above his head) and goes to investigate. While they're both distracted, move to the vine-covered wall on the right and sidle up toward the enemy who stayed behind. Check his status by activating Survival Instinct just to make sure he's isolated (yellow). Then, when you're close enough to see the Melee icon, press the button for another stealth takedown. Then press Interact to search his body for supplies. If you remain hidden near the vine-covered wall, the third enemy should make his way back around to you. Now that he's on his own, just wait for the Melee prompt and do your thing. (screenshots)
Now that you've cleared the area, look around for supplies. Survival Instinct will help you locate some cloth (which you'll use later for crafting) and a box of supplies (screenshot), as well as highlight any un-looted corpses in case you missed something.
When you're ready to move on, scramble up the painted stone wall where you threw the bottle earlier, then another wall above. As she drops down into the next area, Lara spots 4 more enemies: 3 on the ground and one on the wall ahead and to the right. (screenshot) If you like a firefight, you can grab one of the bottles sitting on the boxes to the left and follow the tutorial that explains how to hold the Alternate Fire button (Middle Mouse/R1/RB) to combine the bottle with cloth from your inventory to Craft a Molotov. You can then throw it the same way you did the empty bottle to kill two of the enemies at once. Naturally the others will notice and you'll have a fight on your hands. If you're like me, you'd rather avoid combat as long as you can.
For a stealthy approach, as soon as Lara drops down, move forward into hiding behind the vine-covered wall. Sidle to the left end of the wall and wait for the first enemy to approach. When he's out of the others' view (yellow in Survival Instinct) and you see the Melee icon above him, press Melee for a stealth kill. Then loot the body for ammo, money, and supplies. Move back along the vine-covered wall toward the right. Then move quickly but quietly to the perpendicular wall, which is also covered in vines. Once Lara is hiding amid the leaves, step toward the left end of the wall. Wait here for the second enemy to approach. He'll be red in Survival Instinct view for a while as he wanders away from the other guy. So don't attack yet. When he's far enough away so the other men won't see (yellow glow) and the Melee icon appears above his head, press the button to kill him quietly. Press Interact to take his stuff. (screenshots)
Now move back to the first vine-covered wall. You don't have to take cover but walk along behind it. Then turn right and approach the third man from behind. You can either Melee kill him in the usual way or grab one of the bottles on the crate to the left. Don't make a Molotov with it though, instead stand behind the guy at the computer and press Interact to stab him with the bottle. Gross, I know, but it's useful to have options. (screenshots)
Turn around and pick up some supplies. Then move from the computer past the opening leading to the next area and scramble up the wall on the right. Don't pull all the way up onto the ledge, though. Check to make sure the fourth guy, standing above, is unobserved (yellow) and that the Melee icon is showing. Then press Melee to drag him off the wall and put him out of your misery. Lara should automatically frisk him as he falls, cause she's nimble that way. But if not, you can drop down and loot his body. (screenshots)
Now climb up onto the wall and collect some supplies there. Just take care to stay hidden so the men in the courtyard ahead don't notice. There's rifle ammo and a first aid kit behind the broken wall just ahead. Turn around to find a box of supplies and just around the corner some cloth lying on the floor. (screenshots)
The next 3 enemies are standing close together (all red in Survival Instinct), but you can separate and pick them off one by one. I'm sure you can figure out different ways of dealing with them, but here's one possibility: From the top of the wall, near where you found the first-aid kit, use your bow to kill one of the men with a headshot. Then move back and hide next to the vine-covered wall. The other men should come looking for you, hopefully one at a time. As the second man approaches, Melee kill him. Then repeat with the third man. (screenshots)
While you wait for them, assess your arsenal since you will soon have no choice but to fight. In addition to her bow, Lara has a shotgun, handgun, and rifle. To switch weapons use the numbers 1-4 on the keyboard, scrolling the Mouse Wheel, or using the D-pad on a controller. (1/Up = bow, 2/Down = handgun, 3/Right = rifle, 4/Left = shotgun). You have limited ammunition, but you've already picked up a bit of rifle ammo, and you can craft more arrows by selecting the bow, then without aiming, hold the Fire button (Left Mouse/Right Trigger). This uses wood and feathers from inventory. If Lara is injured in the upcoming firefight, you can heal by pressing F1 on the keyboard or holding L1/LB on the controller to bring up the Herbal Mixtures interface then press X/A to use medicine from inventory. (Manufactured first-aid kits and healing herbs are grouped together under Medicine in your inventory. This mechanic is slightly different than in the last two games, and healing no longer uses cloth.)
When you've taken care of those three, a cutscene shows a helicopter arriving with reinforcements.
There are 6 more men, but they arrive in pairs. You can fight them from on top of the wall where you've been hiding. Move out and take up a position behind the rubble where you found the ammo and health earlier. Wait for the first 2 enemies to approach the red barrels at the top of the steps (there's a single barrel on the right and a stack of them on the left). Shoot the barrels to cause an explosion. Then shoot any stragglers. Reload by continuing to hold Aim (Right Mouse/Left Trigger) and pressing R/Square/X. If Lara is injured, you'll see blood spatter on the screen and the view will shift to gray/sepia tones. This becomes more pronounced with more serious injuries. Again, to heal, release Aim so she'll duck down behind the rocks. Then press F1 (keyboard) or hold L1/LB and press X/A (controller). (screenshots)
You can continue shooting at the bad guys from here, or if things get too intense, drop down into the area behind the wall to hide and regroup. There's more rifle ammo behind the forklift and the crates off to the left if you're facing the gate where the enemies enter, as well as plenty of low walls, supply crates, etc., that you can use for cover. (screenshots)
If you're behind cover and have a bad angle, press Left Shift on the keyboard or click the left stick (L3) to shoulder swap. You can also zoom in while aiming by pressing Z on the keyboard or clicking the right stick (R3). (screenshots)
If enemies start throwing grenades or Molotovs, a red warning icon will alert you. Scramble away from the incoming explosive as fast as you can or Lara will take heavy damage. (screenshot)
If Lara gets killed and the game reloads, you'll start again in the middle of the area with the forklift and supply crates. Immediately run for cover. Do your best to kill the first 2 enemies from there. Then if you like, you can then retreat to the previous area. On the way, grab the rifle ammo behind the forklift if you didn't get it already. Run under the metal walkway into the area with the laptop, and take cover behind the vine-covered wall. You'll have a good view of the entrance and the wall where enemies might climb over. So you can shoot anyone who approaches. Just wait for them to come to you and pick them off. (screenshots)
You should be fine with these basics, but if you want to try something different—or see what still works from the previous games—here are a few alternatives:
In addition to making more regular, or "silent" arrows (above), you can craft fire arrows by selecting the bow (keyboard 1 or D-Pad Up) then without aiming, hold the Alternate Fire button (Middle Mouse/R1/RB). Lara then combines a regular arrow, cloth, and fat/oil from inventory to make a fire arrow. To use it, hold Aim (Right Mouse/Left Trigger), aim with the mouse or right stick, then hold Alt Fire (Middle Mouse/R1/RB) to charge your shot, and release to shoot. (screenshots)
Grab one of the empty tin cans and hold Alt Fire (Middle Mouse/R1/RB) to craft a shrapnel grenade using salvage from your inventory. Throw it just like you did the empty bottle: Hold Aim and you'll see a white arc, aim with the mouse or right stick, then press Left Mouse/Right Trigger to throw the can. The explosion should take out a weak enemy like one of these guys. (screenshots)
Or use an empty bottle the same way to craft a Molotov cocktail, as the tutorial explained earlier. (screenshots)
When you've killed the last enemy, Lara will say, "I hope that's all of them," and stand up straight to show the danger has passed. You'll also receive a big XP award. Before heading to the exit, scour the area for useful items. Be sure to loot all of the enemies' bodies. They carry ammunition, various supplies, and gold coins. Survival Instinct will also help you locate 2 boxes of rifle ammo (assuming you didn't pick it up during the fight), some cloth, a first-aid kit and a supply box on the raised platform in the northwest corner, and another box of supplies in the alcove just to the right of the ornate metal gate. When you have everything, pry open the gate (screenshot) to leave the area and trigger a cutscene.
Dominguez's men surround Lara and she's forced to surrender and give up the dagger. Dominguez admires the artifact, telling Lara he's sacrificed his life for the Key of Chak Chel. He then asks her where the Silver Box of Ix Chel is. Lara hesitates for a moment before bluffing, "It's in a safe place." Not the right answer. Apparently the inscription near the dagger was more than just a lot of superstitious hocus pocus. Apparently by taking the dagger without the box, Lara has triggered a "cleansing"—a series of disasters that will end with the death of the sun. Oops! Dominguez and his men retreat to a waiting helicopter and Lara is left alone in the street. Moments later the tsunami rolls in, as foretold.
OBJECTIVE: Get to Higher Ground
FLOODED STREETS: When you regain control of Lara, she's clinging to a post in the middle of the deluge. If you've played TOMB RAIDER (2013), you're familiar with this twisted brand of whitewater rafting. Move forward to let go of the post, then steer around the flaming mass of junk. You can go to the left or right (screenshot), but if you run into it, Lara will die. Regardless of whether you go left or right, the water will next carry Lara into a narrow alley with hazards on each side. Steer around them as the water carries Lara onward. (screenshot) You'll go over a small waterfall and under a bridge. Just keep steering around the obstacles as well as you can.
When Lara slams into a fallen tree, there's a brief cutscene where she grabs onto some wooden shutters and attempts to hang on. When you regain control, press Forward to grab onto the next shutter. (screenshot) After that the game takes over for a bit. A bell tower crashes into the water nearby and Lara is sucked underwater.
Once Lara frees herself from the rubble, swim toward the lighted doorway. (screenshot) The game reminds you that you can swim faster by holding either mouse button, either trigger button, or pressing in on the left stick (L3). Good idea! Next, head for the red "Exit/Salida" sign. Just before you reach it, there's an air pocket in the ceiling. Press Interact to take a breath, then continue to the door. (screenshot) Lara tries the door, then you'll need to mash Interact to pry it open. (screenshot) Or hold Interact if you've changed the settings in Options > Gameplay. (screenshot) Next swim toward the truck headlights and in through the broken window. (screenshot) At the back of the truck you'll need to press Melee repeatedly to smash the window so you can proceed. There's no need to mash the button here; just press it once each time the prompt appears. (screenshot)
Outside the window, the game takes over for a bit as Lara makes her way to the surface. Then you must steer around obstacles again. The first one is a big pile of flaming debris. Head to the right here to avoid it. (screenshot) A bit farther on, Lara runs into a low wall that stops her progress. Climb on top of it. (screenshot)
A short cutscene shows a boat barreling down toward you from upstream.
GETTING TO HIGHER GROUND: This section is pretty intuitive, but there are screenshots if you need them. When you regain control, start running and jump onto the slab of debris with white paint. Run to the end, jump, and grab the bent sign. Press Interact at the prompt to hang on. Then pull up on top of the sign. Turn left, scurry to the end of the sign, then jump onto the crane. Run up the crane arm and jump to grab the streetlamp, which swings around to the right, so you can jump onto the red-tiled roof. Slide down the roof onto another flat piece of wreckage. Run forward, jump to grab another streetlamp, swing forward, and jump onto a metal container that happens to be floating past. Before it can move too far downstream, run to the end and jump to grab the low wall ahead.
Pull up and run up the slope. Jump at the end and press Interact to latch onto the rough wall with your climbing axes. Climb up and around to the left as the building erupts in flames around you and the bottom of the wall crumbles away. When you can't climb any farther to the left, jump toward the painted scaffolding and scramble up to grab onto the top. Pull up, turn right, and walk toward the light blue wall. Scramble up it to grab a handhold above. Then start climbing to the right. Jump past a gap in the ledge to grab on the other side. As you continue around the corner, the wooden moulding sinks alarmingly but holds so you can keep going. (screenshots)
Continue climbing/jumping to the right. No matter how fast you go, there's nothing you can do to help the little boy. :'( So suck it up and jump past the big hole in the brickwork. Then scramble up the wall to grab a handhold above. Climb onto the roof to end the level. (screenshots)
An emotional cutscene follows in which Lara is focused on her mission, while Jonah tries to make her see reason. They agree to stay and help the residents before setting off in search of the Silver Box.
REVISITING THIS LEVEL LATER IN THE GAME: Even if you complete the Whistle In the Dark challenge and find every collectible the first time through the level, you will still be missing the Treasure Chest, which can only be opened with the LOCKPICK. So if you want 100% completion for this level, you'll need to return at some point. The section below explains how to reach the chest and return to wherever you left off. If you're missing other items, the COZUMEL COLLECTIBLES GUIDE can help.
When you unlock the ability to FAST TRAVEL, two base camps appear here in COZUMEL: The Cozumel Cliffs Base Camp is located near the eastern end of the ruins. You can return there if you're missing any of the collectibles from that area. The Tidal Caverns base camp is near the entrance to the huge cavern with the pyramid.
Any time after obtaining the LOCKPICK, in a later level, use fast travel to get to reach the Tidal Caverns Base Camp. By the time you get the LOCKPICK, you should also have the REINFORCED KNIFE UPGRADE. Both are available in the HIDDEN CITY. So if you like, you can follow the passageway to the south, jump over the pit onto the stairs below, and scramble under the spear trap to get back to the SECOND RUINED CHAMBER, where you found the Archivist Map earlier. On the right is the braided rope barrier you couldn't cut before. (screenshot) Cut it down now and follow the passageway to find some jade. If you're missing any items in the room to the west, you can cut down another braided rope barrier to get back inside. Otherwise, retrace your route back to the Tidal Caverns base camp.
To get the treasure chest (1/1), head toward the edge of the chasm and jump across the first 3 bell platforms, to reach the ledge on the northeast side. The third bell now has a mine cart on top of it, but you can still grab the edge of the platform, climb onto the cart, then jump to the ledge. From there, climb the stairs and jump to the fourth and fifth bells, then to the ladder on the ledge in the southeast corner. At the far end of that ledge, use a rope arrow to anchor a line so you can climb up to the ledge on the south side, where you found the second mural earlier. Turn around and shoot a rope arrow into the rope-wrapped beam above the post you used to anchor the first rope line. The new line will replace the old one. Climb across to find the treasure chest at the far end of that ledge. Stand near the chest and hold Interact to open it with the LOCKPICK. The Gold Mask inside boosts Lara's fluency in the Yucatec dialect. It doesn't count as an "official" relic, but it is automatically added to your Artifacts collection under the Pantheon of Gods Story. (screenshots)
To get back, move out to the corner of the ledge on the left side of the chest and jump down onto the -- bell. . Then jump across the bells and ledges to get back to the Tidal Caverns Base Camp. Use fast travel to return to wherever you left off. (screenshots)
The COZUMEL CAVES area, where you begin the game, the TOWN SQUARE, and the DISASTER AREA are not accessible later on. There are no major collectibles there, though, so there's no need to go back.
†UPDATE HISTORY: 9/12/18 - First draft of walkthrough posted online. Rough level map added and a few other minor tweaks made later the same day.
9/16/18 - Added note about missing stone slab in the area where you climb up before dropping down to the dais. Thanks to Briza for sharing this info. Also fixed a couple of left/right button mix-ups, thanks to Henry.
11/5/18 - Added link to the first Hidden City walkthrough from the section on "Revisiting this Level Later in the Game." More information about obtaining the LOCKPICK and REINFORCED KNIFE UPGRADE are included in walkthrough for that level.
1/24/19 - Updated annotated map. Edited and added screenshots for the treasure chest sequence and made a few other minor tweaks for clarity.
6/2/19 - Added quick collectibles guide and made a few minor tweaks in the process.
8/18/19 - Fixed details on Gold Mask artifact, which is actually part of the Pantheon of Gods story, not Pantheon of Gods 2. Thanks to SpirantCrayon22 for the heads-up.
8/20/21 - Very minor tweaks while working on Quick Collectibles Guides and Guide to 100% Completion.
11/20/21 - Added note about accessibility options for crank controls.
WAS THIS WALKTHROUGH HELPFUL? If not, I apologize and invite you to contact me with any questions. If you need help right away, I recommend the r/TombRaider subreddit. Other fan-run forums are listed at tombraiders.net/stella/community.html. If this site was useful, please consider supporting it financially or in other ways. For details, visit tombraiders.net/stella/support.html. As always, I welcome your corrections/suggestions. Thank you!
Copyright © Stellalune (). All rights reserved. Feel free to copy or print this walkthrough for personal use. By all means, share it with friends, but please include this credit line so people can send me their feedback. No part of this walkthrough may be reproduced on another site without permission. Follow this link for details about this site's advertising and privacy policy.
Stella's Tomb Raider Site: tombraiders.net.