Stella's Tomb Raider Chronicles Walkthrough - Windows, Mac, PlayStation, PSP, Vita & Dreamcast
LEVEL 9: LABYRINTH | Updated: 10/31/01 |
Kills: 0* Items: 6 plus Bone Dust, Bestiary and 3 Golden Rose Secrets**
CHAPEL: Turn around and approach the wrought iron gate behind the pew.
Cut scene: A skeleton in dark robes appears. It passes Lara and goes through the wrought iron gate, turns the jeweled newel on the back of the pew in the side chapel, then disappears through the wall.
Find the three carved square tiles at the front of the chapel. Press these in the order: middle, left, right.
Cut scene: The pews move aside and the wrought iron gate to the side chapel opens, revealing a skeleton with a sword lying in a niche in the wall.
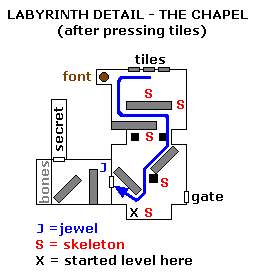
Cut scene: Lara twists off the newel and removes something from inside.
You now have a small sack of BONE DUST in your inventory. Return through the chapel, again avoiding the phantom skeletons, to the front where the carved tiles are. Approach the font on the left and use the BONE DUST there. A flame flares up in the container.
Cut scene: The phantom skeletons are destroyed.
Now the wrought iron gate at the back of the chapel stands open. Go through this gate, but before sliding down the ramp, climb onto the ledge ahead. (It's just above if the ramp is on Lara's left.) Pull the switch to open the wrought iron gate in the side chapel near the skeleton with the sword. Behind the gate you'll find a large medipack and a golden rose (secret #1, 22/36). Return to the top of the ramp and slide down.
SMALL ROOM WITH HOLE AND WOODEN BEAMS: Enter and dodge the bats. Through the wooden beams on one side of the room, you can see another SMALL room with coffins beyond. Safety drop through the hole in the floor into a small pool of stagnant water far below. (NOTE: Don't just step off the edge or Lara will take damage when she falls to one of the ledges below.) Climb out of the pool.
Cut scene: Lara looks up into the tower overhead and gasps. The hooded skeleton moves through the area above. It is showing Lara the way out. Notice he's coming through a doorway flanked by carved faces wearing ram helmets, crossing a platform with a book on it, and walking out through a doorway flanked by a triple-face symbol. (This all comes into play in the following sections.)
THREE-STORY PUZZLE WITH ROTATING BRIDGES: In this next area there are three rooms, one on top of the other. From bottom to top they are: LAVA POOL ROOM, GAS JET ROOM and SPIKED FLOOR ROOM. Each of these rooms has a rotating central structure with one or more bridges jutting out from it like spokes. Each has four doorways leading to each of four towers. The four doorways, and the towers they lead to, are marked with carvings: A face with a ram helmet, two figures fighting, a lone figure carrying a spear or a face with three noses (I refer to this as the "triple face"). The object of the puzzle is to use the switches to rotate the bridges so they meet the correct doors, enabling Lara to exit.
[NOTE: At first I experienced a bit of confusion with this puzzle since the cut scenes don't seem to match what actually happens. I'll try to explain step by step. It's easier than it seems, as long as you only pull the first switch, as I direct. If you use a switch by mistake, just use it again to return the bridge(s) to their original position.
If you're stuck here and don't have the patience to sort it all out, feel free to download a saved game. This Macintosh savegame places Lara at the BESTIARY (see walkthrough below). You'll need Stuffit Expander 5.1 or later to extract the save file. After extracting, place in your Save folder, but be sure to remove your own saves first and place them in a safe storage folder so they aren't overwritten. For Mac assistance, please visit MacRaider. Special thanks to Kerrie at MacRaider for this and other saves.
If you're playing on the PC, download this group of PC savegames and choose the save you want. For help with PC savegame and .zip files, see here.]
RAM-HELMET TOWER: The pool of stagnant water, where Lara begins, is at the bottom of the RAM-HELMET TOWER. Go up the spiraling wooden ramps to the first landing that has an open doorway. Enter here and follow the passage to a LARGE ROOM WITH A LAVA POOL below. Pick up a small medipack on the landing just before the LAVA ROOM.
Before crossing the bridge to the central structure, go after a secret. (This sequence is shown in the series of screenshots here.) Turn left to face the break in the railing just inside the entrance. From here, take a running jump across the lava pool to grab the ledge in the corner. Don't pull up into the alcove. Instead traverse around the corner to the right and pull up into the next alcove. Turn around to face the ledge extending from the triple-face doorway. Position Lara at the right side of the alcove, where the ceiling is higher, and take a running jump, pressing Action to lower Lara's arc a bit so she lands on the ledge. Go through the door and follow the passage to the golden rose (secret #2, 23/36).
Return to the ledge above the lava pool. Turn right take a running jump to grab the edge of the alcove, traverse back around the corner to the left and pull up into the other alcove. Turn around and take a running jump back to the bridge. Now follow the bridge to the central structure. Pull the switch once.
Cut scene: The central structure in the LAVA ROOM rotates one quarter turn counter-clockwise. Next, we see the central structure in another room rotate one quarter turn counter-clockwise. The pictures on the doorways shown in the cut scene don't match the state of things after the switch is used, but ignore that for now. (See the note at the bottom of the page for more info on this.)
Follow the bridge, now to the right of the switch, through the door into the TWO-FIGURES TOWER. Go up the spiraling wooden ramps to the first landing that has an open doorway. Enter here and follow the passage to a LARGE ROOM WITH GAS JETS below. (If Lara falls off the walkway, she'll slide onto the gas jets, which will then ignite.)
Cross the bridge to the central structure but don't pull the switch. Instead turn right, cross the other bridge and enter the SPEAR-CARRIER TOWER. Go up the spiraling wooden ramps to the very top. Here you'll find a crawlspace with a small medipack. Walk back down to the topmost landing with an open doorway.
(BUG NOTE: In the original Macintosh version of the game (v 1.0), pulling the switch in the gas-jet room can cause the game to crash. The simplest solution is just not to pull it. However, if you've played without saving for a while and your game crashes, you can download this Mac savegame to get you back where you started. Thanks to MacRaider for the save.)
Go through to a LARGE ROOM WITH A SPIKED FLOOR. (The spikes are retracted. All you see are star-shaped holes. But if Lara slides down, the spikes will come up and kill her.) The bridge should be in position so Lara can cross from the spear-carrier door to the central structure. Pick up the BESTIARY.
Take a running jump from the opening where you picked up the book to the ledge in front of the TRIPLE-FACE TOWER. Enter the tower. There's a large medipack on the floor at the bottom.
You can follow the dancing lights up to the top of the tower, but be sure to stop along the way for a secret. Climb or jump from the wooden step to the uneven corner ledge. Position Lara at the top edge of this ledge and angle her a bit to the left. Take a standing jump to grab the middle of the ceiling with slats. (See this screenshot if necessary to get oriented.) Traverse forward until Lara is hanging right against the wall facing the crawlspace. Let go and immediately press Action again to grab the edge of the opening. Pull up and crawl in. Crawl backwards into the spike pit, taking care not to let go and drop. Traverse around the rim of the pit and pull up into the crawlspace on the other side. Crawl on to get another golden rose (secret #3, 24/36). Crawl back out to the tower the way you came.
Climb back up to the top end of the wooden corner ledge. This time, instead of traversing to the crawlspace, take a standing jump to grab the flat wooden ledge to the left of the crawlspace (also shown, though not labeled, in the previous screenshot). Pull up. Turn around and jump to the next higher ledge. Follow the ramps to the top of the tower. Slide down the next ramp and follow the dancing lights to the surface.
THE MAZE: The next area is a labyrinth with various holes in the floor. When you enter a monster comes out of the passage on the left. The easiest way to get through this is to just follow the dancing lights, jumping over the holes as you go. If you fall into a hole by mistake, just follow the passage, always keeping the wall on either Lara's right or her left, and you'll eventually come to an opening low enough to grab. Climb out here to begin again at the beginning of the maze. The lights will be there again to guide you.
On the other side of the MAZE, slide down the ramp into the SMALL ROOM WITH COFFINS. (This is the room you saw through the beams from the top of the RAM-HELMET TOWER.) Pick up the large medipack in the depression on the floor. Approach the open coffin.
Cut scene: Lara goes through the coffin and tumbles down a ramp. She meets Father Patrick, whose hair has gone white. They converse briefly. She offers him the bestiary, but he declines and he tells her to stay where she is for now. She agrees. (A transcript of the conversation is included on the movie page.)
NOTE ON ROTATING-WALKWAY ROOM PUZZLE AND CUT SCENES: The cut scene after pulling the first switch (to the down position) shows the bridge rotating one quarter turn counter-clockwise, from the door with the two figures to the door with the spear carrier. In Lara's reality, the bridge does move a quarter turn counter-clockwise, but it goes from the door with the ram (where you entered) to the door with the two figures.
The second part of this same cut scene shows a single bridge rotating a quarter turn counter-clockwise in a room with gas jets on the floor. It is shown moving from a spear-carrier door to a triple-face door. In Lara's reality, the room with gas jets has two perpendicular bridges. These apparently don't move at all when you pull the first switch. They are pointing to the spear-carrier and two-figure doorways before and after the cut scene.
The third room, which has a spiked floor, can be accessed by going to the third floor of the ram-helmet tower (where you begin). At this point, you find the bridge in the spike room pointing toward the spear-carrier door, and you are unable to reach the switch in the center. After pulling the first switch, this walkway is still pointing toward the spear-carrier door. So, apparently this walkway also doesn't move when the first switch is pulled.
You don't need to pull the second switch (in the gas-jet room) to solve the puzzle, but if you do, the cut scene seems to reflect what actually happens.
So, the bottom line is that, regardless of what is shown in the cut scenes, each switch rotates only the tower to which it is attached. In order to solve the puzzle, you need only pull the first switch (in the lava room).
*Note on Kills: The labyrinth monster isn't technically a kill. I marked it in orange to distinguish it from the usual hazards, which are still in pink.
**Note on Secrets: There are 36 golden roses in the game. If you find them all, after the credits you'll be able to access "Special Features" from the options menu. This is a collection of storyboards, etc., created during the game design.
WAS THIS WALKTHROUGH HELPFUL? If not, I apologize and invite you to contact me with any questions. If you need help right away, I recommend the r/TombRaider subreddit. Other fan-run forums are listed at tombraiders.net/stella/community.html. If this site was useful, please consider supporting it financially or in other ways. For details, visit tombraiders.net/stella/support.html. As always, I welcome your corrections/suggestions. Thank you!
Copyright © 2000- - Stellalune (). Special thanks are given to the participants in the alt.games.tombraider newsgroup, without whom some parts of this walkthrough couldn't have been written, and to the many, many people who emailed me with suggestions and corrections. Special thanks to Hagix for his consultations on the rotating walkway areas (and other things). I'm sorry I can't thank the rest of you individually, but so many people submitted the same suggestions. Diagrams made with the aid of GraphTablet freeware (http://www.graphtablet.com). Feel free to copy or print this walkthrough for personal use. By all means, share it with friends, but please include this credit line so people can send me their feedback. No part of this walkthrough may be reproduced on another site without permission. As an Amazon Associate I earn from qualifying purchases. Follow this link for details about this site's advertising and privacy policy.
Stella's Tomb Raider Site: tombraiders.net.