IMPORTANT NOTE ON SAVING & CHECKPOINTS: Checkpoints are the spots in each level where the game auto-saves. These are noted in blue and numbered in the walkthrough text to correspond with PC, Macintosh, PSP & Wii savegame files available for download. (Please note that the number and location of checkpoints vary slightly for the Nintendo Wii game.) Although it is also possible to save manually, the save system in Anniversary is very different from the older Tomb Raider games and differs in several ways from the TR Legend save system. Please see the Anniversary Controls page for details. This may save you a great deal of frustration as you make your way through Lara's latest adventure.
LEVEL 11: SANCTUARY OF THE SCION | Updated: 7/17/12(†) |
PS5 Platinum Trophy Video Walkthrough by Eldincy‡
Kills: 24 Supplies: 10 Other: 2 ANKH KEYS, MINI SMGs
Artifacts: 2 Relics: 1 Rubbing Rewards: 1(*)
Time Trial: 28:50(**)
WIDE STAIRS & PUZZLE ROOM: From CHECKPOINT 1 at the start, go up the stairs. Two cat mummies wait on the first landing. If you jump back down the steps shooting as soon as you catch sight of them, you should be able to destroy them before they reach Lara. If you can run out into the open area before the mummies reach the bottom of the stairs, so that you're far enough away that the targeting reticles remain gray, rather than red, as you shoot, the mummies should not even follow Lara beyond the doorway.
Nintendo Wii version: You'll find a RUBBING REWARD (10/12), titled "Journey of Life," just inside the big doors on the right wall. Once you've obtained it, continue to the small room at the top of the stairs, where there's a sandbox puzzle similar to the one at the end of the TEMPLE OF KHAMOON. The clues to the puzzle are inscribed on the side walls. Take a rubbing of each cartouche. The one on the left wall shows an Eye of Horus carving above a hand-drawn circle with a horizontal line through it. The one on the right has a fish carving and the hand-drawn outline of a fish. Use the remote to draw these symbols into the corresponding sandboxes to solve the puzzle. (NOTE: The circle and line symbol is pretty straightforward, but on my less-than-high-res TV, the fish symbol is a bit vague. It's actually two separate curved lines, which are not connected at the fish's mouth.)
When you've drawn both symbols correctly, a square column will rise up in the middle of the room and CHECKPOINT 2 will register. (Skip down to the section titled, CLIMBING OUT OF THE PUZZLE ROOM.)
All other versions: The small room at the top of the stairs contains four small obelisks with painted bases, also similar to the ones in the last room of the TEMPLE OF KHAMOON. It's actually not too complicated if you know what's happening, but if you move the painted cylinders randomly before figuring it out, it can be difficult to get them oriented correctly. If you get mixed up, it's probably easiest to just save the game, reload and start at the beginning of the level again.
First note how the four obelisks form the corners of a square. The square shape is even inlaid on the floor. When you enter, the cylinders are oriented so the images on all four cylinders are oriented in the same direction (i.e., on all four cylinders, the picture of the person holding a round pot faces the entrance). The idea is to rotate the cylinders so the pictures facing each other along each side of the square match. Sounds simple enough except that turning one cylinder also causes the two adjacent cylinders to turn.
In order to solve the puzzle, you must choose two cylinders that are diagonally opposite each other and turn each one 180 degrees. So, for example, you could begin with the cylinder on the left side of the entrance, grasp one of its handles and turn it 180 degrees. It doesn't matter whether you turn clockwise or counterclockwise, since the adjacent cylinders (the one in the front right and back left corners) will both turn the same way. You'll hear a clinking sound and the cylinders will settle slightly after each 90-degree turn. After 180 degrees, the three cylinders that moved will still have the same picture (in this case, the one of the person holding the two tents) facing the entrance. The fourth cylinder will not have moved at all.
Now go to the cylinder that hasn't moved yet (in this example it's the back right cylinder) and turn it 180 degrees as well. Again, it doesn't matter which way you turn it as long as it moves 180 degrees. This will cause the adjacent cylinders (front right and back left) to turn as well. At this point, the four pictures facing each other along the sides of the square will match, and the puzzle will be solved. A square column will rise up in the middle of the room and CHECKPOINT 2 will register. (These screenshots show the process.)
NOTE: You could also solve the puzzle by turning the front right and back left cylinders. It doesn't matter which way or in which order you turn them, as long as you turn one, then the other, 180 degrees.
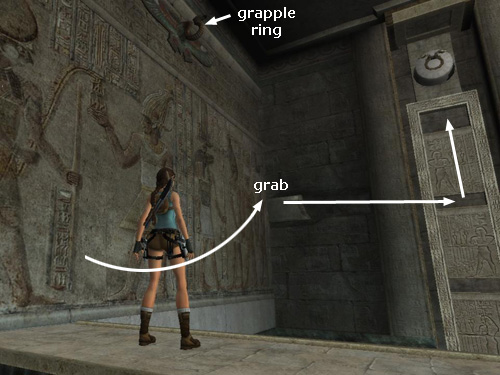
CLIMBING OUT OF THE PUZZLE ROOM: Pick up the small medipack and shotgun ammo at the back of the room. Then tackle the puzzle. Climb to the top of the square column. Jump to grab the nearest handhold on the side of the square shaft above. Then climb the handholds so Lara is hanging onto the top one with her back toward the ladder. Jump back to grab it. Climb to the top of the ladder and follow the hall to CHECKPOINT 3.
PIT WITH TRAPS: Ahead is a deep pit with a block trap set a few feet in. Stand Lara a few steps back from the edge, near the middle where the blocks come together, but facing the small, square ledge and the two handholds beyond it on the left wall. Just before the blocks begin to separate, take a running jump to the ledge and immediately jump again to grab the lower of the two handholds. Lara is safe from the blocks here. Jump up to the handhold above. Climb to the right and jump to grab the scarab switch. Immediately jump back to grab the second scarab switch on the other side of the pit and quickly jump to grab the handhold above. Climb to the left and wait for the second set of blocks to retract into the wall. Then jump past them to grab the handhold beyond. Climb to the left. Then jump back to the edge of the pit. Continue along the hallway to CHECKPOINT 4.
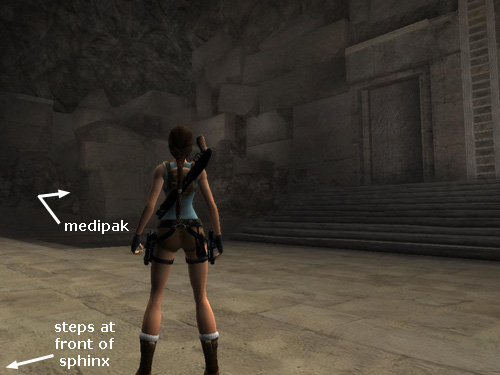
HUGE ROOM WITH SPHINX: You emerge on a ledge above and behind a gigantic stone sphinx. Ladders lead downward on both sides. Go to the left and either slide down the curved side of the sphinx or climb down the long ladder to the ledge running alongside the sphinx. Then climb down another shorter ladder or just drop to the floor. Pick up shotgun shells and 50-caliber ammo near the back wall. Then head toward the front of the sphinx.
A brief cutscene shows the door at the front of the sphinx, decorated with an image of the ancient Egyptian gods Horus and Anubis. (See the footnote below.) Flanking the door are two ankh-shaped receptacles.
After the cutscene, kill 2 rats on the stairs near the door that was just shown.
NOTE: Occasionally only one rat appears here, and sometimes no rats appear at all. Instead they come out later when you unlock the door in the sphinx. So if you don't see them at first, don't worry about it.
Face the ladder opposite the front of the sphinx and then head forward and to the left to the corner below the crumbling rock ledges. Here you'll find a large medipack tucked away in a shallow cave. (This screenshot shows the spot.)
CLIMBING THE LEFT SIDE OF THE SPHINX ROOM: Return to the ladder opposite the front of the sphinx and climb up. At the top you can go either to the left or the right. The path to the left is slightly shorter and easier, so we'll do that first. Jump from the top of the ladder to the handhold on the left. Climb to the left and jump to land on the broken stairs below. Take a running jump to grab the wider section of stairs ahead. Climb up to CHECKPOINT 5.
Climb the rocks on the right to reach the corner ledge. Turn left and step onto the slope. As Lara slides, jump to grab one of the handholds ahead. Climb onto the ledge above. Go up the ramp as far as you can. You can see a switch on the wall ahead, but the gap in the ramp is too wide to jump.
Instead turn left to face out toward the sphinx. Jump to grab the lowest horizontal crack on the nearest column. Jump up to grab the crevice above, climb around to the left and jump up once more. Then jump back to grab the second column. Climb around to the other side and jump back to grab the third column. Climb around to the left and jump up to grab the crevice above. From there, jump back to grab the lowest stone handhold on the wall behind Lara. Climb to the highest handhold and jump back to grab the ledge behind.
Pull up and immediately start shooting at the 2 flying mutants that approach from the ceiling above the sphinx. If possible, concentrate your fire on just one of them at first. If you can kill one mutant before it reaches the ledge, you'll only have to face the other in close combat. The regular or 50-caliber pistols are best for the long-range shooting, but you may want to change to the shotgun at close range.
These flyers are aggressive and employ several different attacks: They throw fireballs from a distance, which can knock Lara down or even push her off the ledge. Then, when they get close enough, they swoop in and claw at Lara, try to knock her off the ledge, and also grab onto her head with their hands and feet. If one of them gets her in its clutches, alternate tapping the Left and Right direction keys repeatedly (or jiggle the left stick from side to side on the PS2) to break free. When fighting them, either stay away from the edges of the ledge or quickly jump back to the handholds and climb down to a somewhat safer position.
When the coast is clear, go to the far end of the ledge from where you climbed up. Step onto the slope and as Lara starts to slide, jump to grab the first horizontal pole. Swing, jump and grab the second pole. Swing, jump and grab the handhold ahead. Climb all the way around to the left and jump to the ledge behind. Go to the other end of the ledge and take a running jump to grab one of the handholds above the switch. Drop to the floor.
In the Wii game, there's a cryptex puzzle here. The clue is inscribed on the wall to the right of the doorway. It shows three symbols: scarab, snake and reeds. Make a rubbing to refer to if you like. The puzzle itself is off to the left. To solve it, turn the bottom cylinder twice in either direction so the reeds show. Then turn the top cylinder twice to the right. When you solve the puzzle, a huge stone block rises up to your left connecting the broken stairs and CHECKPOINT 6 registers.
In other versions of the game, there's just a simple switch on the wall that does the same thing.
NOTE: You don't have to use this switch (or solve the puzzle in the Wii game). The checkpoint will still occur in the nearby doorway, but it can be convenient in case you forget something and want to come back this way later.
Go through the doorway near the switch. Climb the stairs and follow the hallway.
MORE PITS WITH BLOCK TRAPS: The first hazard you'll encounter in this hall is a deep pit with crushing blocks above it. Stand a few steps back from the first set of blocks, facing the gap between them. Take a running jump across the pit just as the first set of blocks starts to open and then keep running to clear the second set of blocks. Alternatively, swan dive over the pit and continue rolling past the second set of blocks.
Continue to the next trap: 3 sets of crushing blocks with a pit below each set and a narrow ledge in between. Stand a few steps back from the first set of blocks, facing the gap between them. Take a running jump across the pit just as the first set of blocks starts to open and then immediately duck to avoid being crushed as the blocks slam together above. As soon as they begin to separate, stand up, jump to the next ledge and duck again. Wait for the blocks to separate once more and immediately jump forward and run out of the way. Continue to CHECKPOINT 7.
FIRST ROOM WITH POOL AND PRISM OBELISKS: The switch straight ahead at the bottom of the stairs is not fully functional. It lowers an inverted obelisk from the ceiling but this doesn't do anything. . . yet. So ignore it for now.
From the entrance, turn left and take a running jump to grab the small stone handhold on the wall to the left. Jump to grab the next similar handhold and, from there, jump across the broken ladder to grab the other ladder beyond it. Climb down to the gap in the ladder and jump to the ladder on the left. Climb down to the next gap and jump back to the ladder on the right. (Or, if you're in a hurry, just climb down to the gap in the first ladder, let go and drop, then grab on again where the ladder continues below.) Climb down the ladder on the right until Lara is just slightly above the row of horizontal poles to the left.
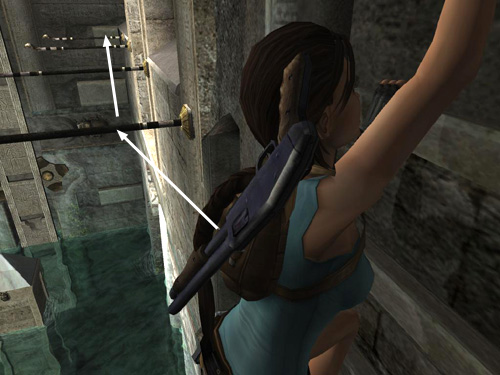
These 4 horizontal poles are the type that move downward under Lara's weight. To get across them, you'll need to jump from the ladder to the first pole and then make a smooth, fast series of jumps, without taking the time to swing around any of the poles, in order to reach one of the handholds on the far wall (as shown in this screenshot).
NOTE: If you grab the first pole and it lowers before you can jump off, don't let go. Instead, turn around, swing and jump back to the ladder—or to the handhold on the wall next to the ladder and from there to the ladder (as shown in this screenshot). Then try the poles again. If you make it only partway across or fall into the pool, don't worry. Just skip the section below about the first scarab mechanism and continue with the section where you pick up the small medipack on the bottom of the pool. The second, third and fourth scarab mechanisms described below will be the first, second and third for you, but they'll work exactly the same way. Another note below explains what to do after that.
Once you make it across the 4 poles, Lara will be hanging from the small stone handhold in the corner. Drop down to the one below so she is hanging just above the metal scarab. Climb to the left and jump to grab the ladder-like carved panel. (This screenshot shows the spot.) This panel is part of an intricate lock mechanism. Lara's weight causes the panel to descend. As it moves downward, jump up repeatedly, grabbing each crosspiece on the panel until you can't go any higher. When the panel descends all the way, the first scarab mechanism locks the panel in place. The purpose of this mechanism is to partially extend an elevated walkway across the middle of the room and raise the first obelisk (of four) out of the pool.
NOTE: The metal ring attached to the stone circle at the top of each carved panel can be pulled out using your grapple. This unlocks the scarab mechanism and returns the panel, as well as the corresponding obelisk and the elevated walkway, to its original position. If you follow this walkthrough, you shouldn't need to do that, but if you make a mistake or get disoriented, you can always unlock any of the mechanisms you've locked and start over.
When the first mechanism has locked into place, drop into the pool. Swim to across the pool diagonally to the opposite corner, where you'll find a small medipack on the bottom.
Climb out of the water on the corner ledge. Stand on the raised slab of stone and jump to grab the nearby carved panel. Like the first one, this panel lowers under Lara's weight. Quickly jump up until you reach the uppermost handhold. Wait for the panel to descend, raising the second obelisk behind you and further extending the elevated walkway.
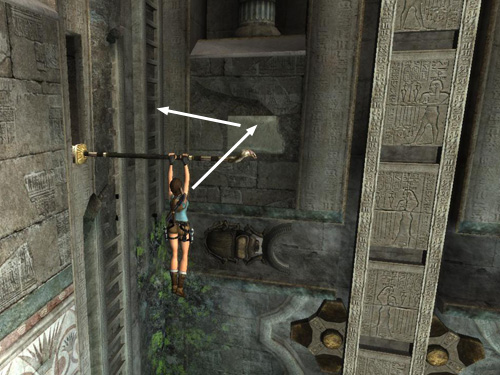
When the second scarab mechanism locks in place, drop down and climb the obelisk you just raised. (Or jump back off the panel to grab the obelisk and climb to the top.) When Lara is hanging from the top edge of the obelisk, jump back to grab the small, jutting ledge above the carved panel. Pull up. Turn right and take a running jump to grab the handhold on the wall ahead. Climb to the right and jump to grab the next carved panel (as shown in these screenshots). Jump up as it descends, raising the third obelisk from the water and extending the elevated walkway again.
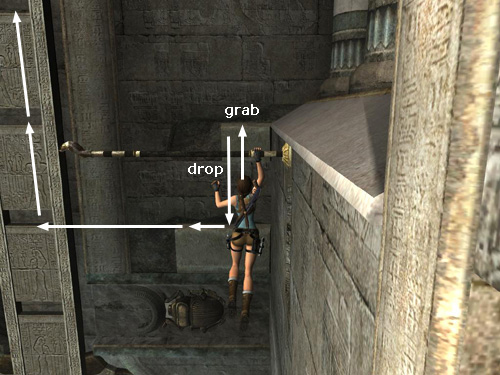
After the third scarab mechanism locks in place, jump back off the panel to grab the obelisk behind you and climb to the top. Climb around to either side and jump to grab the elevated walkway. Pull up. Now use the metal ring above on the left to wall run, jump and grab the small corner handhold ahead (shown in this screenshot). Jump from there to the fourth carved panel. As it descends, quickly jump up to the top. When the fourth scarab mechanism locks into place, the fourth obelisk is raised and the elevated walkway extends all the way across the room. The camera pans to the inverted obelisk and the switch above.
NOTE: If you fell into the pool earlier when attempting to cross the 4 horizontal poles and have only locked three scarab mechanisms in place so far, you'll need to do the fourth now. Drop into the water, swim to the corner ledge and climb out. Climb the obelisk and jump back to grab the small ledge above the carved panel (shown in this screenshot). Pull up and turn left. Take a running jump to grab the handhold on the wall on the right. Jump from there to the ladder. Now follow the walkthrough above if necessary to get across the four horizontal poles and reach the first carved panel (your fourth).
From the top of whichever carved panel you activate last—where here Lara should be hanging after the brief cutscene—jump back to grab the obelisk behind her. Climb around to either side and jump to grab the elevated walkway. Pull up. Move to the end of the walkway near the ladders where you climbed down from the entrance.
Now, take a running jump to grab the first horizontal pole on the right. Immediately, without swinging around, jump forward to grab the second pole. Then immediately jump forward to grab the ladder. If the second pole sinks before you can jump off, swing and jump to grab the handhold on the wall ahead and jump from there to the ladder. Alternatively, if you have trouble with the poles, jump to grab the side of the obelisk (not the edge nearest the walkway, which is not grabbable), climb around the obelisk and jump back to grab the small, jutting ledge above the carved panel. From there, jump to grab the handhold on the wall, then the ladder. (Both paths from walkway to ladders are shown in this screenshot.) If you miss, climb the obelisk nearest the ladders, jump back to the walkway to try again.
Climb the ladder as high as you can. Jump to the ladder on the left and continue climbing. When it ends, jump back to the ladder on the right. Climb to the top and jump to grab the handhold to the left. Jump to the next handhold and from there to the ledge near the entrance. Go down the stairs to the switch and use it to lower the inverted obelisk on the ceiling.
The light from the window slit above passes through the prisms at the ends of all five obelisks, forming a pyramid of light beams. Then the carved door at the end of the elevated walkway opens.
CHECKPOINT 8 is activated after the cutscene. At this point you can either safety drop off the ledge onto the elevated walkway, losing about a quarter of Lara's health in the process, or jump into the water and climb from the corner ledge to the walkway.
FIRST ANKH KEY: From the walkway, you can see the ANKH KEY on the pedestal inside the dimly lit room. Once you step inside, the door will close, trapping Lara inside with a cranky cat mummy. To prevent that from happening, approach the doorway cautiously, get a target lock on the mummy and then back out onto the walkway shooting. You may have to dodge the occasional fireball if the mummy is in a particularly hostile mood, but if you can kill it from a distance, Lara should take little or no damage. After the fight, enter, letting the door close behind you. When you take the key from the pedestal, the door re-opens, along with the gate down below, and CHECKPOINT 9 registers.
Exit the Ankh room, cross the walkway and drop down near the doorway that had been barred. Follow the hallway back to the base of the sphinx. The gate here is now open as well.
If you didn't pick them up before, you'll find shotgun shells and 50-caliber ammo in the corner to the right.
HUGE ROOM WITH SPHINX (again): Head for the front of the sphinx and get ready for another fight. A centaur approaches from the other side of the room. Dodge its fireballs and try to stay out of its way as you pump it full of lead. If you can run out into the open area in front of the sphinx and keep moving as you shoot, you may be able to use the adrenaline dodge and headshot combo to take the centaur down quickly using your basic pistols.
Alternatively, head to the right as you exit the hallway, climb the short ladder and follow the ledge that runs along the side of the sphinx toward its paw. Where the ledge becomes too narrow, hang and traverse to the left. Then pull up and continue along the ledge to the front of the sphinx. The centaur should notice Lara and come up the steps. Drop and hang from the ledge again so it can't reach her. Traverse back to the right and pull up where the ledge is too narrow for the centaur. It should then come around to stand below Lara. Now you can shoot it from above without taking any damage. If it wanders off, just hang from the ledge again to get its attention.
CLIMBING THE RIGHT SIDE OF THE SPHINX ROOM: When the centaur is dead, climb the ladder opposite the front of the sphinx once more. At the top of the ladder, jump and grab the handhold on the right. Climb to the right and then swing across the poles to the stairs beyond. CHECKPOINT 10 is at the top of the stairs.
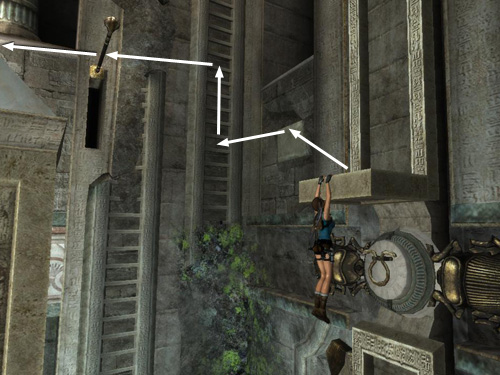
The gap in the ramp to the right is too wide to jump, so you'll have to go up and around. Start by climbing the ladder near the checkpoint. At the top, climb onto the stone ledge on the left and pick up some shotgun ammo. Vault onto the ledge above for a large medipack. Return to the top of the ladder. Turn right and approach the gap in the ledge. Take a running jump to grab the lower handhold on the wall to the left and then jump to the one above. Climb to the right and jump to grab the next ledge. Pull up. Cross this ledge and drop down near the two tall columns.
Now you're on the other side of the gap you couldn't jump earlier. Hop up onto the pile of rubble at the base of the nearest column (the one on the right when facing out toward the sphinx). Jump up to grab the lowest crevice on the column and then jump up twice more. Climb around to the right and jump up to grab the crevice above. Climb around to the right again so the sphinx is ahead on Lara's right. Jump up to grab the broken top of the column, pull up and vault up onto the ledge ahead. (These screenshots show where to climb.)
Immediately take aim at the 2 winged mutants approaching from above the sphinx. As with the last pair of flyers, dodge their fireballs as well as you can without accidentally jumping off the ledge, and try to shoot one of them out of the air before it reaches you. Then you'll only have one to fight up close. At that point, you may want to switch to the shotgun. A few blasts at close range should bring the mutant down. Again, if it grabs onto Lara's head, tap the Left and Right direction keys and wiggle the left control stick from side to side to break loose. Then finish it off.
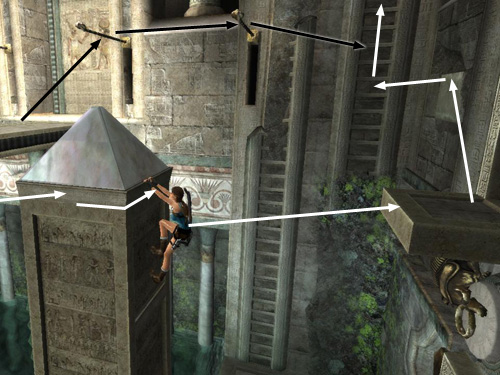
MINI SUBMACHINEGUNS: If you stand at the corner of the ledge nearest the sphinx and look out toward it, you'll see something shiny on top of its head. These are the DUAL MINI SMGs you've been waiting for. To get there, take a running jump from the corner of the ledge, grapple the metal ring on the ceiling and swing over to the top of the sphinx. The secret chime sounds when you land near the guns. (These screenshots show how to get there.)
NOTE: Just to clarify, you're aiming for the ring on the ceiling between the outer left corner of the ledge and the sphinx's head, not the other ring, above the gap in the right side of the ledge. As far as I can tell, this ring serves no purpose.
The return trip is a little more difficult. You want to grapple the same metal ring again, but for some reason you need to be much more precise with the controls—at least in the PC version of the game. Line Lara up facing the corner of the ledge where you fought the flying mutants. Run toward the edge and just before Lara reaches the sloping part of the sphinx's headdress, jump forward into the air. Quickly release the Forward and Jump keys before pressing Grapple. Then Lara should catch the ring as she falls. Adjust the length of the cable if necessary and swing back to the ledge.
If you are unable to swing back using the grapple, even using the tips above, try this alternate method (also shown in a series of screenshots). While standing on top of the sphinx's head, step out onto the snake-shaped crown to get a panoramic view of the area. This will help clarify where you're going next, since it's a little difficult to see from above. If Lara's health is low, use a medipack or two before continuing so she doesn't die from the fall. Move to the side of the sphinx's head near where you'd normally take the running jump to grapple the ring on the ceiling. Stand above the sloping side of its headdress. Then step forward and slide down the headdress onto the sphinx's right shoulder. Turn left and slide down the onto its arm. Then drop to the floor and repeat the climb to the high ledge where you fought the flying mutants. (Special thanks to Talmida, Bj, Anders and Chris B. for sharing this strategy.)
If Lara falls and dies during the trip to or from the top of the sphinx, the game will reload at CHECKPOINT 10, and you'll need to replay the fight with the mutants and swing back over to the sphinx. (Here's another spot that would surely have benefited from an additional checkpoint.)
NOTE: Unlike your other weapons so far, the SMGs are capable of sustained fire when you hold down the fire button. This is convenient when fighting powerful enemies, but it runs through ammo very quickly. So you will probably want to save these for later encounters when you're up against tougher foes and have had a chance to collect more SMG rounds.
From the ledge where you fought the flying mutants, jump to the horizontal pole and swing across to the next ledge. Pull up, cross that ledge and jump to grab the upper handhold on the wall near the corner. Drop down and use the switch to raise a huge stone block connecting the broken stairs behind you. This also triggers CHECKPOINT 11.
In the Wii game, this is another cryptex puzzle. The clue, on the wall to the left of the doorway, shows the snake, scarab and eye symbols. Make a rubbing of the cartouche if you like. Then use the clue to solve the puzzle, located to the right of the doorway. Turn the middle cylinder once to the right, the top cylinder once to the left, and the bottom cylinder once to the right to solve the puzzle and raise the block to complete the staircase.
NOTE: Again, if you're in a hurry, you don't have to use the switch (or solve the cryptex puzzle). The checkpoint will still occur in the doorway, but it can be convenient in case you miss something and want to come back this way later.
Go through the door beneath the ledge you just crossed (i.e., on the left when Lara is facing the switch). Climb the stairs and follow the hallway.
ANOTHER PIT WITH BLOCK TRAPS: Above the deep pit ahead there's a set of pounding blocks, a horizontal pole that extends and retracts at regular intervals, another set of blocks, a stationary bar and beyond that, the far edge of the pit. To get across, watch the retracting pole. When it extends, wait until the first set of blocks is just about to part and then take a running jump to grab the pole. Swing around only once then jump to grab the stationary bar. Immediately, without swinging around even once, jump to grab the edge of the pit before the second set of blocks closes in. If you miss and Lara falls but doesn't die, you can move carefully past the blocks to the side of the pit where you started, climb out and try again. When you reach the far side of the pit, pull up and continue to the next room and CHECKPOINT 12.
SECOND ROOM WITH POOL AND PRISM OBELISKS: As in the first obelisk room, the switch at the bottom of the stairs will not do anything useful yet. So leave it for now. From the entrance, turn right and take a running jump to grab the nearest handhold on the wall. Jump to grab the next handhold. Then jump across the broken ladder to the one beyond. Climb down to the gap in the ladder and then jump to the ladder on the right. Climb to the bottom and jump to grab the stone handhold on the left. Drop down once to the middle handhold of the three.
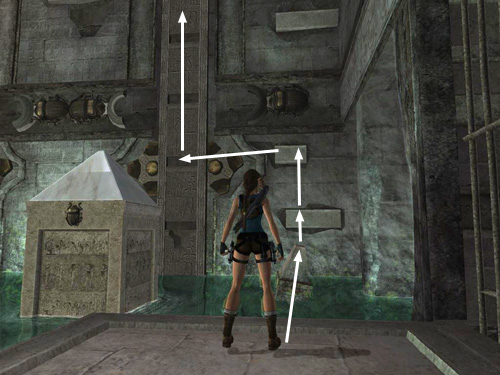
Jump to the left to grab onto the first of 4 carved panels that operate the 4 scarab mechanisms. If you start from the middle handhold near the corner, Lara should grab the topmost rung of the panel, but if not, jump upward as the panel descends until Lara can't go any higher. When the panel descends all the way, the scarab mechanism locks into place, the first obelisk is raised out of the pool and the elevated walkway extends a quarter of the way across the room.
Jump off the carved panel to grab the obelisk behind you. Climb to the top and then jump back to grab the small ledge above the scarab clamp. From there, take a running jump to grab the handhold near the corner to the right. Jump up to the middle handhold (where you were before). Jump back to grab the first of 4 horizontal poles behind you and quickly, before each pole can sink to its lowered position, jump across all four to the handhold on the opposite wall.
NOTE: If you miss and fall into the pool, either save your game, reload at CHECKPOINT 12 and try again, or follow the alternate sequence described on this page of screenshots. As in the previous obelisk room, you can grapple the metal ring at the top of any carved panel to release the scarab lock and return the panel, obelisk and elevated walkway to their original positions. If you follow this walkthrough, you shouldn't need to do that, but if you make a mistake or get disoriented, you can always unlock any of the mechanisms you've locked and start over.
From the handhold beyond the 4 poles, jump to the right to grab the second carved panel. Jump up to the top and wait for the scarab mechanism to lock in place. Then drop into the pool and swim to the ledge near the barred doorway.
Turn left and take a running jump to perch on the pointed post sticking out of the water near the corner (shown in this screenshot). Jump to grab the handhold ahead and press Interact if necessary to make a saving grab. Jump up to the handhold above and from there jump to the left to the third carved panel. Jump up to the top and wait for the scarab mechanism to lock. When it does, jump back to grab the obelisk behind you and climb to the top. Climb around to either side, jump to grab the elevated walkway and pull up.
Take a few steps to the left, so Lara is standing near where the walkway emerges from the wall. You should now be facing the corner of the room with the fourth obelisk, which has not yet been raised. Take a running jump from the walkway to grab the horizontal pole. Swing around and jump to grab the handhold near the corner. Climb to the right then jump to grab the fourth carved panel. Jump up to the top as it descends. When the final scarab mechanism locks into place, the fourth obelisk is raised and the elevated walkway extends all the way across the room. The camera pans to the inverted obelisk and the switch above.
From the carved panel where Lara is hanging when the cutscene ends, jump back to grab the obelisk. Climb around to either side, jump to grab the walkway and pull up.
From the walkway you have a clear view of the first artifact on the ledge above and to the right of the carved door. You could go after it now, but if you climb to the top of the room and use the switch first, it will save a little bit of backtracking.
To reach the top of the room, first go to the end of the walkway near the carved door (as shown in this screenshot). Turn left and take a running jump to grab the nearest horizontal pole. Without swinging around, quickly jump to the next pole then to one of the handholds on the wall ahead. If you move too slowly, the poles will sink and you'll have drop into the water, climb out on the ledge near the barred doorway and make your way back up to the walkway to try again.
Once you make it to the lowest handhold beyond the two poles, climb to the top handhold and then climb sideways into the corner. Jump back (not to the right) to grab the ladder. Climb as high as you can then jump to the ladder on the left. Climb to the top and jump to grab the handhold on the right, then the next handhold, then jump once more to land on the ledge near the entrance. Go down the stairs and use the switch to extend the fifth obelisk from the ceiling.
The prism on the end of the obelisk refracts the sunlight, causing it to pass through the prisms on the other obelisks, forming a pyramid of light. The carved door at the end of the elevated walkway opens.
CHECKPOINT 13 registers after the cutscene. Now, if you don't want that artifact, you can skip the next section. Instead drop from the ledge onto the walkway below, losing some health in the process. Or, drop into the pool, climb out on the ledge near the barred doorway and climb up to the walkway. Then skip the next paragraph.
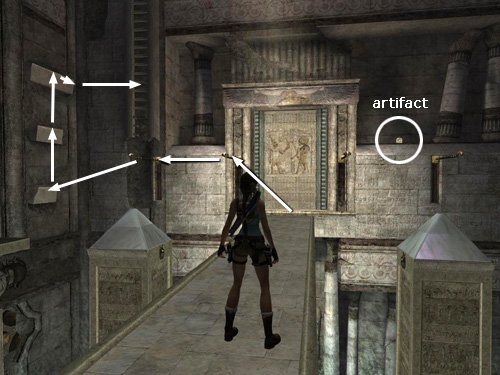
ARTIFACT #1: To get the artifact, starting from CHECKPOINT 13 near the switch, go back up the stairs to the entrance, crossing CHECKPOINT 12 again near the entrance. Jump to the handhold on the wall to the left, then to the next handhold, then to the ladder. Climb down to the gap in the ladder and then jump to the ladder on the right. Climb down to the bottom of the ladder and jump to the right to grab the lintel above the carved door. Traverse all the way to the right around the corner and drop onto the ledge with ARTIFACT #1 (34/44). Be careful not to drop too soon or Lara will hit the sloping side of the ledge instead of the flat top and slide into the pool. (These screenshots show the path from the ladder to the artifact.) Once you have the artifact, grab onto the lintel again and climb around to the left until Lara is hanging in front of the open door. Drop onto the walkway.
SECOND ANKH KEY: As in the FIRST ROOM WITH POOL AND PRISM OBELISKS, there's a cat mummy guarding the key, and once you step into the room, the door closes, trapping you with the cat. However, you should be able to target it from the doorway without actually going inside. When you've destroyed the mummy, enter, let the door close, and take the ANKH KEY from the pedestal to re-open it. This also opens the gate below and triggers CHECKPOINT 14.
Cross the walkway to the far end, drop onto into the ledge near the exit and then follow the hallway back to the sphinx. The gate here is now open as well.
NOTE: There is a potential glitch here in some versions of the game. I've had reports about the Xbox 360, PSP and PS3 Trilogy versions but you may want to follow this advice in any case. Save your game manually before encountering the next pair of enemies. Once you meet the centaurs, if you move back round the corner you came from, the game can freeze and crash completely, forcing you to reload from your last save. This may set you back quite a bit if you haven't saved recently.
HUGE ROOM WITH SPHINX (again): This time there are 2 centaurs waiting near the front of the sphinx. If you can run out into the open area in front of the sphinx and keep moving, you may be able to use the adrenaline dodge and headshot combo to take each of them down quickly with your basic pistols. Otherwise, just try and stay out of their way as you blast them until they fall.
If you prefer a less confrontational approach, head to the left as you exit the hallway, climb the short ladder and follow the ledge that runs along the side of the sphinx toward its paw. Where the ledge becomes too narrow, hang and traverse to the right. Then pull up and continue along the ledge to the front of the sphinx. The centaurs should notice Lara and start up the steps. Fire off a few shots and then drop and hang from the ledge again so the centaurs can't reach her. Traverse back to the left, past the narrowest section of the ledge, and pull up where it is wide enough for Lara to stand. One or both centaurs may make their way onto the ledge, but they won't be able to get past the narrow part to reach Lara, so you can shoot them from safety. More often, they'll come around to the side of the sphinx and stand below Lara. You can then kill them from above without taking any damage. (These screenshots show the technique in action.)
Now head up the steps to the door at the front of the sphinx. Use the 2 ANKH KEYS you've collected in the receptacles on either side of the door to open it. CHECKPOINTS 15 & 16 register as each ankh is used.
NOTE: If you didn't encounter 2 rats on these steps earlier, they should scurry out as you unlock the door. If not, you'll meet them along with the other rats as you head down the passageway.
BENEATH THE SPHINX: As you descend the series of ramps leading down into the area beneath the sphinx, you'll encounter 7 more rats. Just inside the door is a carved stone sphere near the entrance which you can push down the slope toward the rats. It will crush any rats in its path, but these won't count as official kills. It's probably just easier to use pistols. I could not discover another use for the stone ball. Also, on one of the lower landings, there's a box of shotgun shells.
SUBTERRANEAN POOL WITH GIANT STATUES: CHECKPOINT 17 registers on the ledge above this large cavern. Pick up the small medipack on the left side of the ledge before jumping into the pool. Swim forward and downward between the two statues—Anubis, the jackal-headed figure on the left, and Horus, the falcon-headed figure on the right. (See the footnote below.) On the wall between the two statues, just above the bottom of the pool, there's a lever (it's circled in this screenshot). Pull it to lower the water level, exposing most of the two statues.
The entire sequence, from entering this room to leaving with the RELIC, is shown in this video walkthrough.
CLIMBING ANUBIS: Swim to the surface and then head toward the front of the statues. Climb out of the water on the base of the statue of Anubis (on the right when Lara's back is toward the underwater lever). Go between the Anubis's feet and jump to grab the ledge on the right. Pull up, climb the two handholds above and jump back to grab the horizontal pole behind. Quickly jump to grab the narrow stone band around the statue's other leg before the pole moves downward. Climb around to the other side of the leg and as far to the right as you can go. Jump to the right and grapple the metal ring on the side of the statue. Wall run to the right, jump and grab the narrow ledge ahead. Pull up.
Climb to the top of the ladder. This next jump is a little buggy. If you can't see the handhold Lara is aiming for, she'll miss it and fall to the ledge below. So move the camera to the right so it's pointing straight at the nearest handhold on the side of the Anubis statue, which is just behind Lara and to her left. Press Jump alone (no need to press any direction key or move the analog stick) to leap off the ladder and grab the handhold. From there, jump up to grab the handhold above, climb to the left and then jump to grab the next handhold. Jump up to the handhold above, climb around to the front of the statue and drop down onto its lap.
FIRST METAL SCARAB PUZZLE: This puzzle is fairly straightforward. Use manual aim mode with regular pistols to shoot each of the 4 metal scarabs on the wall until it is pointing in the same direction as the corresponding scarab carved on the floor. That is, the top left scarab's head should point to the left, the top right scarab's head should point downward, the bottom right scarab to the right, and the bottom left scarab upward (as shown in these screenshots). When all four are oriented correctly, the gate above will open.
What to do next depends on whether or not you want this level's only relic. If you do, then follow the path described here, beginning with the section JUMPING FROM ANUBIS TO HORUS. If you're playing a time trial and want to get through this room quickly, or if you just don't care about the relic, take the faster path to the exit described in a footnote at the end of this walkthrough. (Again, the entire relic sequence is shown in a video, as well as the various screnshot series linked here.)
JUMPING FROM ANUBIS TO HORUS: Once you've opened the gate, do not climb up into the alcove and use the switch to raise the water level. Instead, head directly to the other giant statue to unlock the room with this level's only relic. Climb the ladder to the right of the alcove in the Anubis statue's chest. At the top of the ladder, jump to the right to grab the band on Anubis's upper arm. Climb around to the right and jump up to grab the handhold above. Now Lara should be hanging from the highest of the horizontal bands on Anubis's arm. Notice that this curved band is actually made up of several flat segments. Position Lara so she's holding onto the second segment from the left. Lean away from the wall and move the camera if necessary to see the statue of Horus behind you. Jump back to land on Horus's forearm. (These screenshots show exactly how to set up this jump.)
NOTE: If you have already used this switch to raise the water level and triggered CHECKPOINT 18, you can either: (1) follow the longer ALTERNATE PATH TO THE RELIC for this area, (2) reload an earlier save from CHECKPOINT 17 or (3) swim back down to the lever between the statues and pull it to lower the water level again. Then make your way back up to Anubis's lap as you did before.
SECOND METAL SCARAB PUZZLE: When you've reached the Horus statue's lap, you'll see another metal scarab puzzle. To find the solution to the puzzle, climb down inside the statue through the square opening below the scarabs. If you drop down onto the light-colored ledges and from there into the room below, Lara will take no damage. Here you'll find another set of four carved scarabs, which show the solution to the puzzle above. Use the handholds to climb back out of this room.
Now face the metal scarab puzzle across the opening in the floor. Again, use manual aim and pistols with unlimited ammo to shoot the 4 metal scarabs until each one points in the same direction as its carved counterpart in the room below. The upper left scarab points upward, the upper right scarab points left, the lower right scarab points down, and the lower left scarab points right (it is already in the correct position). When all four are oriented correctly, the gate above opens. Again, do not climb up and use the switch at this time.
NOTE: If you have already used this switch to raise the water level, you can still get the relic. You'll just need to swim down to the lever between the two statues and use it again to lower the water level. Then climb up onto the Anubis statue and follow the walkthrough above, beginning with the section titled JUMPING FROM ANUBIS TO HORUS.
Also, I discovered a potentially useful bug in the Nintendo Wii game. When I used the switch in the alcove above the second metal scarab puzzle, the water level did not rise. I was then able to proceed to the switch that opens the gate to the relic room with no problem. Then, when I climbed the Anubis statue again and used the switch above the first metal scarab puzzle, the water level rose to where it would normally be after pulling both switches. I then climbed out of the water inside the Anubis statue at CHECKPOINT 19. This saved me a trip back to the Horus statue. I don't know if it works every time, but it might be worth a try.
OPENING THE GATE TO THE RELIC ROOM: After opening the gate above the second scarab puzzle, turn around to face out over the pool. Hop down onto the narrow ledge between Horus's knees. There's a movable carved block here, but you don't need to do anything with it. Just leave it alone. Drop and hang from this ledge. Traverse all the way to the right edge and then drop and grab the curved band running around the front of Horus's leg. Traverse around to the right and then jump to grab the gold switch on the wall. Lara's weight pulls the switch down, opening a gate above Horus's left shoulder. This is where the relic is hidden. (In case you need visuals, the gate-opening sequence is shown in these screenshots and the previously mentioned video).
Let go of the switch to drop onto Horus's foot, taking no damage. Jump or swim back over to the Anubis statue and climb up to the FIRST METAL SCARAB PUZZLE just as you did before. Climb into the alcove above the metal scarabs. Now you can pull that switch to raise the water level and trigger CHECKPOINT 18.
You can't reach the ledge above the switch yet. So hop down and once again climb the ladder beside the alcove. Again, jump to grab the band on Anubis's upper arm. Climb around to the right and jump up to grab the handhold above. From there, jump across the gap to land on the other statue's arm. (Do all of this just as you did last time, referring to the screenshots if necessary.)
Climb into the alcove above the SECOND METAL SCARAB PUZZLE and pull the switch there to raise the water level further, flooding the alcove where Lara is now. When you regain control of her, swim out into the pool and back to the Anubis statue. You can surface for air on the way if necessary or just swim directly into the alcove in Anubis's chest, which is now flooded. Climb out of the water in a small room inside the statue. This is the ledge above the first scarab puzzle which you couldn't reach before. CHECKPOINT 19 registers here.
CLIMBING TO THE TOP OF THE STATUES: Go to the right wall, jump up to grab the scarab switch and immediately jump to grab the handhold above before the scarab descends. Jump back to grab the first of 2 horizontal poles. Quickly jump from the first pole to the next before the first pole descends. Once you reach the second pole, you can take your time. Even if it descends, you can still swing and jump to grab the narrow ledge on the wall ahead. Climb around to the left and pull up into an opening on Anubis's shoulder. Turn right and climb the handholds to the high ledge behind the statue's head.
NOTE: If you're not interested in getting the relic, just skip the next paragraph and proceed to the exit from this area.
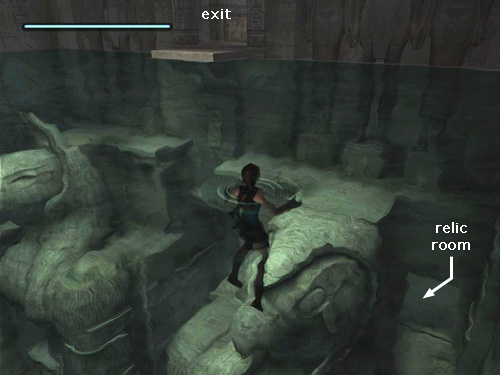
To reach the room with the relic, cross the ledge and jump the gap between the two statues. Ignore the golden switch on the wall for now. Continue along the ledge behind Horus's head to the end. Jump to grab one of the handholds on the wall ahead and climb down to the gate you opened earlier. (See these screenshots and/or this video if you need visuals.) Drop down into the room behind Horus to find a RELIC (6/8), Horus Idol. To get out of this room, climb the rocks below the doorway, grab the narrow stone ledge and climb to the right until you can pull up in the doorway. Climb back up the handholds to the ledge above.
EXIT FROM THE AREA WITH POOL & STATUES: Cross the ledge behind the statue and jump to grab the gold switch between the two statues. This raises the water to its highest level.
NOTE: If you raise the water level before getting the relic, it's not a problem. As long as you've opened the gate to the relic room (as described above), you can swim in and get the relic rather than climbing down into the room. If you're a good swimmer, this way is probably faster. The location of the gate is shown in this screenshot.
Swim to the surface and climb out of the water on the ledge above and between the two statues. Follow the long hallway to CHECKPOINT 20.
ANTEROOM WITH PAINTED COLUMNS: At the far end of this room you can see a barred doorway behind which the third piece of the SCION sits upon a pedestal. Naturally such a treasure would not be left unprotected.
The guardians, 2 centaurs and 2 cat mummies, attack as soon as you enter the room. It's difficult to dodge the hurled fireballs and charges among the columns, but do your best. Remember to use health packs as you fight, either by pausing the game (by pressing Tab on the PC or Select on the PS2) and selecting what you want from the inventory screen or by using the hotkeys for small or large medipacks (V and B on the PC, D-Pad Up and Down on the PS2).
Alternatively, you can retreat back down the hallway while firing at the enemies in pursuit. Switch targets to whichever enemy is nearest and using the adrenaline headshot maneuver, dodging backwards, to take each of them down fairly quickly. Or, if you haven't fully mastered the headshot, run back along the passage as fast as you can and jump into the pool. (FYI: The fastest way to cover ground in this game is the running swan dive, Forward + Jump + Crouch.) With luck, only one enemy will follow. You can then climb out of the water and kill it. Then return to the room and repeat the process. This way you only have to fight one or two enemies at a time.
When the creatures have all been destroyed, it's time to get what you came for. In order to open the gate keeping you from the SCION, you must reach the locks on the high ledges on each side. Ancient tomb builders never include conveniently placed ladders, so you'll need to make a series of leaps across the painted columns to get there.
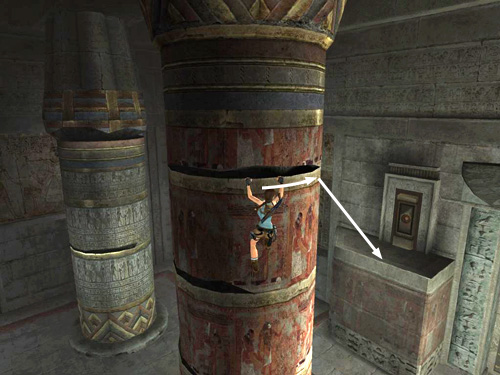
REACHING THE LOCK ON THE RIGHT: Return to the entrance and turn to face the SCION ROOM gate. Grab onto the lowest horizontal crevice on the first painted column on the right side of the center aisle. Climb around to the left as far as you can go. Jump up three times, climb around to the left a bit more and then drop down once. Climb to the left until Lara's back is toward the second red column from the entrance. Jump back to grab one of the cracks on that column.
Jump up to grab the crevice above. Climb around to the right about 90 degrees and jump back to grab one of the crevices on the second blue column. Jump up to grab the crevice above and climb around to the right as far as you can. When you reach the end of the crevice, keep pressing the right direction key (or press the control stick to the right) and Lara will lean out, giving you a view of the metal ring on the wall above and behind her. Jump from the column and grapple that ring.
Adjust the length of the cable so Lara's feet are about halfway between the bottom of the painted panel and the floor. Then wall run back and forth to build up momentum. When Lara reaches the peak of her swing to the left, jump back to grab onto the fourth blue pillar (as shown in this screenshot). (The third blue pillar is next to the metal ring, so you end up skipping it entirely.)
Once Lara is hanging on the fourth blue pillar, climb around to the right so her back is toward the fifth blue pillar. Jump back to grab it. Climb to the right, jump to grab the crevice above and then continue climbing around to the right as far as you can go. Then jump to grab the highest crevice on this column, just below where the top of the column flares out. Climb to the right until Lara leans out toward the fifth red pillar. Jump to grab it.
The fifth red pillar is the one nearest the ledge with the lock mechanism on the right side of the barred door. From the lowest crevice on this pillar, climb to the left a little and jump up twice. Climb to the left along the highest crevice until it ends. Then drop to grab the one below. Climb to the left until Lara's back is toward the ledge. Jump back to grab it and pull up.
Use the SCION OF TIHOCAN to activate the locking mechanism and retract half of the bars protecting the SCION ROOM. Doing this also triggers CHECKPOINT 21. Drop down and return to the entrance. Note that the SCION piece remains in your inventory after unlocking the door.
REACHING THE LOCK ON THE LEFT & ARTIFACT #2: The path to the artifact, and to the second lock, begins with the first two red columns on the right again. Grab onto the lowest horizontal crevice on the first painted column on the right side of the center aisle. Climb around to the left as far as you can go. Jump up three times, climb around to the left a bit more and then drop down once. Climb to the left until Lara's back is toward the second red column from the entrance. Jump back to grab the lower crack on that column, just as you did before.
Now, instead of heading for the blue columns, jump up to the second higher crevice, and climb around to the right as far as you can. Lara will lean out toward the middle of the room, giving you a good view of the metal ring on the ceiling between the fourth red columns on either side of the center aisle. Jump to the left and grapple the ring. (See these screenshots if you need a visual.)
While hanging, adjust the length of the cable and turn left or right if necessary so Lara is squarely facing the fourth red column on the left side of the aisle. Then swing, jump and grab onto it. If Lara grabs the lower crevice, jump up to the middle one. Climb around the column to the left until the fifth red column on the left side of the aisle is directly behind Lara. Jump back to grab onto it. Jump up twice.
NOTE: If you want to get the artifact in the raised alcove in the corner ahead, continue with the walkthrough as written. If not, skip the next 2 paragraphs and proceed to the lock from here.
Climb around to the left side of the fifth red column as far as you can go. Jump to the left to grab the fifth blue column. Climb around to the left and jump up to grab the crevice above. Position Lara so her back is squarely facing the alcove and jump back to grab the edge (as shown in this screenshot). Pull up and claim ARTIFACT #2 (35/44).
To get to the lock from here without having to climb across the columns from the entrance, move to the back of the alcove, carefully position Lara so she's facing the nearest blue column and take a running jump to grab onto it. Jump up to the highest crevice, just below where the top of the column widens. Climb around to the left and jump to grab the fifth red column. Climb around to the right and jump up to the crevice above.
Finally, climb around the uppermost crevice on the fifth red column until Lara leans out to the right toward the ledge with the lock (as shown in this screenshot). Jump to the right, holding the jump key for the longest possible air time. When Lara grabs onto the ledge, press Interact to do a saving grab if necessary. Then pull up.
Use the SCION OF QUALOPEC to activate the lock mechanism, removing the remaining bars. Doing this also triggers CHECKPOINT 22. Lara keeps the SCION piece after unlocking the door. Drop down and enter the SCION ROOM.
As Lara approaches the pedestal, a cinematic sequence begins: She takes the third piece of the SCION from the pedestal. As the chamber begins to quake, she makes a dash for the exit. (Perhaps you wondered, like I did, why she didn't just come in this way and avoid all the hassle.) Once she's safely outside, Lara fits the three pieces of the SCION together and receives another vision. (To save space, an account of this sequence is included in a footnote at the end of the walkthrough.)
Now comes another interactive cutscene: First Kold attempts to skewer Lara with his knife. Press the control indicated on-screen to get away. The Kid whips out the SMGs he's stolen from you and starts firing. Use the correct control to leap out of harm's way and kick him in the face. Larson then closes in, ready to smack Lara with the butt of his shotgun. Again, follow the on-screen prompts to duck and bowl him over. The correct controls for each system are:
BUG NOTE: If you're having trouble with the interactive cutscene because the icons indicating which buttons to press don't appear, see the footnote at the end of the Lost Valley walkthrough for some possible solutions.
When you've successfully evaded all three henchmen, Lara makes a run for the cliff's edge and dives into the water below. Natla and her men give up and motor off in their boat, but Lara is not willing to give up so easily. She retrieves her motorcycle and pursues along a winding road that follows the coastline to a jutting spit of land. She guns the motor, takes off into the air and splashes down near the boat. Then she grapples a railing on the stern of the boat, hauls herself on board and stows away in a compartment below deck.
†UPDATE HISTORY: 7/5/07 - First draft of walkthrough posted online.
12/31/07 - Added various alternate strategies, some of which were sent in by other players, including sliding down from the top of the sphinx and jumping directly from the Anubis to Horus in the area with the pool and giant statues. Added numerous additional screenshots and made other minor adjustments to the text for clarity.
2/11/08 - Added Nintendo Wii edition info, along with a few minor corrections and clarifications. Also changed the numbering system for artifacts, relics and rubbings, as explained in the note below.
4/29/08 - Added Macintosh save files and info. Thanks to Andrew W. and Chris H.
10/11/09 - Added videos for all relics.
10/18/09 - Added checkpoints 21 and 22 at Scion locks. (They're sort of obvious but should be included for the sake of completeness.)
6/30/12 - Noted PSP bug before second centaur encounter. Thanks to Doncho for the heads-up. Also added additional strategies for fighting the enemies in the Anteroom with Painted Columns near the end. Thanks to Joshua, Marie and Sam for their suggestions.
7/17/12 - Noted that the PSP bug added in the last update can also affect the PS3 Trilogy version. Thanks to Charles for this info.
*ABOUT ARTIFACTS, RELICS & RUBBING REWARDS: Finding artifacts and relics (formerly known as "secrets") unlocks various extras like outfits and concept art. The Nintendo Wii game also includes "rubbing rewards" in some levels. I have numbered each of these bonuses in the walkthrough. So, for example, "Artifact #2 (10/44)" means that this is the second artifact in this particular level and the 10th out of 44 artifacts in the whole game. Please see Anniversary Rewards page for more info on all of these.
**ABOUT TIME TRIALS: After completing a level, you will be able to replay it in Time Trial mode to unlock cheat codes. For more info, please see the Time Trials and Rewards pages. For help beating this level's time trial, see Eldin's Sanctuary of the Scion - Time Trial Tips.
‡NOTE ON VIDEO GUIDES: Eldin's videos don't always follow the same strategies I use in my walkthroughs, but if you prefer that format, I think you'll find them very helpful.
ACKNOWLEDGEMENTS: Special thanks to Tiri Li for the PS2 interactive cutscene controls and to both Tiffany and James S. for the Xbox 360 info. Thanks also to the following players for various contributions for this level: Anders, Bj, Bruce H., Chris O., two different Gregs, Jolin, Peacemonger07, Reaan, Sami, Sharon, Talmida.
SET OR ANUBIS?: In the original Tomb Raider, this level's symbolism juxtaposed two god who I assumed were Horus and his brother/enemy Set (alternatively spelled Seth). These gods also played parts in the storyline of Tomb Raider: The Last Revelation (TR4). Here, in Tomb Raider: Anniversary, Set's distinctive curved snout and square ears are replaced by the jackal head associated with the god Anubis, guide and guardian of the dead. I'm not sure what the significance of this substitution is. To me, the theme of brothers turned rivals would make more sense in light of the conflict between the siblings Tihocan, Qualopec and Natla. For more information on these and other ancient Egyptian deities, Wikipedia is a good place to start.
FASTER PATH TO THE EXIT FROM THE AREA WITH THE POOL AND GIANT STATUES: After solving the FIRST METAL SCARAB PUZZLE and opening the gate above, climb up and pull the switch. The water level rises to about the statues' knees, and CHECKPOINT 18 registers.
Climb the ladder to the right of the alcove in the Anubis statue's chest. At the top of the ladder, jump to the right to grab the band on Anubis's upper arm. Climb around to the right and jump up to grab the handhold above. Now Lara should be hanging from the highest of the horizontal bands on Anubis's arm. Notice that this curved band is actually made up of several flat segments. Position Lara so she's holding onto the second segment from the left. Lean away from the wall and move the camera if necessary to see the statue of Horus behind you. Jump back to land on Horus's forearm. (This sequence is shown in a series of screenshots. The only difference is that, since you used the switch, the water level will be higher than it is shown in the second screenshot in that series.)
When you've reached the Horus statue's lap, you'll see another metal scarab puzzle. To find the solution to the puzzle, drop down into the square opening below the scarabs and swim down into the room below. Here you'll find another set of four carved scarabs, which show the solution to the puzzle above. Return to the surface and climb back up to the puzzle.
Again, use manual aim and pistols with unlimited ammo to shoot the 4 metal scarabs until each one points in the same direction as its carved counterpart in the room below. The upper left scarab points upward, the upper right scarab points left, the lower right scarab points down, and the lower left scarab points right (it is already in the correct position). When all four are oriented correctly, the gate above opens.
Climb up and use the switch to raise the water level further, flooding the alcove where Lara is now. When you regain control of her, swim out into the pool and back to the Anubis statue. You can surface for air on the way if necessary or just swim directly into the alcove in Anubis's chest, which is now flooded. Climb out of the water in a small room inside the statue. This is the ledge above the first scarab puzzle which you couldn't reach before. CHECKPOINT 19 registers here. Now pick up the main walkthrough above at the section titled CLIMBING TO THE TOP OF THE STATUES.
CINEMATIC AT END OF LEVEL: Lara assembles the three parts of the Scion and receives another mystic vision. She travels through time and space to appear atop a Meso-American pyramid. The three Atlantean rulers continue their previous conversation. The woman on trial seems to have only contempt for the charges against her. Now is the time for action, she asserts. Atlantis is in ruin and only its destruction can bring about the Seventh Age.
Tihocan continues unswayed. "For your treachery, for using the knowledge of the Scion to unleash our armies against us, I expel you forever from the sacred order of the three and condemn you to shame in the frozen limbo of eternity."
As he begins an incantation in an ancient language, the accused raises her head, and we realize—if we haven't already done so—that Lara's employer, Jacqueline Natla, is the erstwhile queen of Atlantis.
"It cannot be stopped. The wheels of Kathar are already in motion. Doom will find you both while I rise from the dust of your bones to finish what I've started. . . !"
Natla's threats are cut short as Tihocan creates an impenetrable crystal shell around her.
Lara's Scion-induced vision subsides and she once again finds herself on a cliff side in Egypt. The real, modern-day Natla stands before her. As Natla takes the Scion, one of her goons, a mountain of a man named Kold, grabs Lara from behind. Larson and the Kid stand by.
Lara asks Natla about the Scion and its powers. Natla admits that the artifact holds more than just the history of Atlantis; it contains all the knowledge of the Ancients. Lara wants to know what the Seventh Age is, but Natla answers questions with questions.
"How far are you willing to go to find out, Lara?" But that's as much as Natla will reveal. She turns away, telling the henchmen to deal with their captive.
WAS THIS WALKTHROUGH HELPFUL? If not, I apologize and invite you to contact me with any questions. If you need help right away, I recommend the r/TombRaider subreddit. Other fan-run forums are listed at tombraiders.net/stella/community.html. If this site was useful, please consider supporting it financially or in other ways. For details, visit tombraiders.net/stella/support.html. As always, I welcome your corrections/suggestions. Thank you!
Copyright © 2007- - Stellalune (). All rights reserved. The screenshots and videos included here were made using Fraps. Feel free to copy or print this walkthrough for personal use. By all means, share it with friends, but please include this credit line so people can send me their feedback. No part of this walkthrough may be reproduced on another site without permission. Follow this link for details about this site's advertising and privacy policy.
Stella's Tomb Raider Site: tombraiders.net.