IMPORTANT NOTE ON SAVING & CHECKPOINTS: Checkpoints are the spots in each level where the game auto-saves. These are noted in blue and numbered in the walkthrough text to correspond with PC, Macintosh, PSP & Wii savegame files available for download. (Please note that the number and location of checkpoints vary slightly for the Nintendo Wii game.) Although it is also possible to save manually, the save system in Anniversary is very different from the older Tomb Raider games and differs in several ways from the TR Legend save system. Please see the Anniversary Controls page for details. This may save you a great deal of frustration as you make your way through Lara's latest adventure.
LEVEL 10: OBELISK OF KHAMOON | Updated: 4/2/19(†) |
PS5 Platinum Trophy Video Walkthrough by Eldincy‡
Kills: 7 Supplies: 22 (23)* Other: SEAL OF
ANUBIS, EYE OF HORUS, ANKH OF ISIS and SCARAB OF OSIRIS (also 4 COGS - Wii version only)
Artifacts: 4 Relics: 0 Rubbing Rewards: 1(**)
Time Trial: 18:15(***)
THE OBELISK – EYE OF HORUS SWITCH & ARTIFACT: From CHECKPOINT 1 at the base of the ramp, head up to the sunny courtyard. At the center of this open area stands a tall, square obelisk. Go to the right, pick up a small medipack behind the column nearest the switch and then use the switch to drop one of the four bridges leading from the side areas to the obelisk. This also triggers CHECKPOINT 2.
In the Wii game this is a gear puzzle. The missing COG is lying on the floor nearby. Place it in the gear panel and rearrange the gears so the mechanism works again. Then pull the switch to lower the bridge.
Walk out onto the bridge and take the EYE OF HORUS off the obelisk. CHECKPOINT 3 registers when you do.
There are three similar artifacts on the remaining faces of the obelisk. Getting the rest of them will be a little more complicated than this. You don't have to explore the side areas in any particular order. This walkthrough describes just one possible sequence.
Drop off the bridge into the pool below. Climb out of the water on the ledge with the ladder. (This leads back up to the entrance, but don't climb up yet.) Pick up some 50-caliber clips near one of the columns on this side of the pool. Swim across to the other side to find a small medipack behind another column. There's an alcove with a switch off to one side, but the sturdy bars prevent you from reaching it. Instead go through the doorway flanked by Ankh symbols just above the waterline on the opposite side of the pool.
TRAPPED HALLWAY: Follow the hall to CHECKPOINT 4. To get past the block trap ahead, stand a few steps from the stone doors. Then when they close completely, run toward them, and Lara should pass through safely as they start to open. Continue through a small room to another block trap. Pass through the same way you did before and continue to the double block trap beyond. To get past this one, stand close and run through just as the first set of blocks begins to open. CHECKPOINT 5 registers as you enter the next room.
RUINED THRONE ROOM: This tall room has numerous ledges high above. You're headed for the very top. But first, a little business. Cross the room to the dais with the golden ankh switch behind it. In the Nintendo Wii game, on the wall to the left of the throne, you'll find a RUBBING REWARD (9/12) called "The Harvest." In all versions of the game, there's a box of shotgun ammo on the floor behind the dais.
When you're ready to move on, climb the dais and jump to grab the switch. Lara's weight pulls it down, activating a mechanism that lowers a square column on the other side of the room. When you regain control of Lara, jump back off the switch to land on the dais, run across the room and jump on top of the column. You must go quickly before it ascends again. Ride it upward as far as it goes.
Turn left and take a running jump to grab the horizontal pole. Swing around, jump and grab a handhold on the wall ahead. Jump up twice to reach the highest of the three handholds. Jump back to grab the retracting ledge behind Lara. Quickly pull up, jump across the two sections of this ledge before it slides into the wall and then jump to the corner ledge ahead.
Turn right and take a running jump to grab the broken ledge that spans the middle of the room. This jump can be a bit difficult to nail on the first try. It helps to back up from the edge a bit, run and jump right at the edge, then hold the Jump key for the longest possible airtime. Pull up and repeat the same kind of jump to the ledge against the far wall.
NOTE: The artifact at the top of this room is one of the silver tablets you can collect to unlock bonus content in the game, not one of the four special artifacts required to complete this level (i.e., the SEAL OF ANUBIS, EYE OF HORUS, ANKH OF ISIS and SCARAB OF OSIRIS). If you are not interested in obtaining the bonuses, there's no need to hurry as you climb to the top of the room.
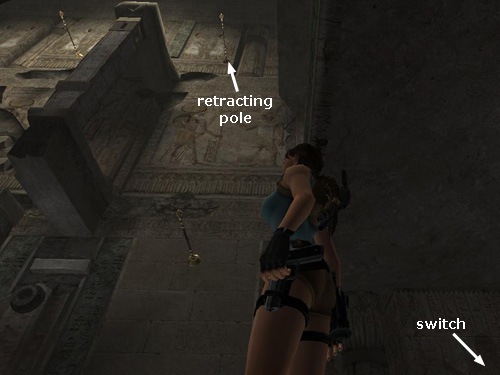
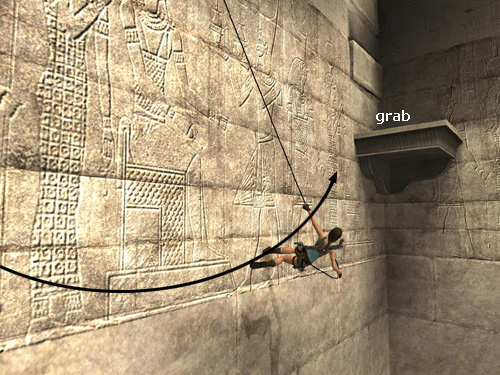
TIMED RUN FOR ARTIFACT #1: Go around the pile of rubble and use the switch to extend a horizontal pole high above. (It's one of three you'll use during your climb, all of which are shown in this screenshot.) This pole retracts into the wall after about a minute and a half (1:40 including the cutscene showing the location of the pole). In order to reach the artifact on the very top level before the pole retracts, you'll need to hustle. You may want to do a few practice runs at an easy pace first. When you're actually doing the timed run, try not to hesitate and be sure to tap Interact to climb faster whenever Lara is hanging onto a ledge and climbing laterally.
Here's the procedure (with screenshots in case you need them): Pull the switch, wait for the cutscene to finish, then run to the opposite side this ledge. Keep running as you veer to the right, jump off the ledge and grab the left side of the long, broken ledge in the middle of the room. Pull up, grab the lower handhold on the square pillar ahead then jump to grab the higher handhold. Climb around to the right and jump backward across the gap to grab the top of the broken square pillar behind. Climb all the way around to the other side and jump backward again to grab a handhold on the next square pillar, which has an angled top. Climb around to the right and then jump up to grab the top of the angled pillar. Climb then jump to the right to grab the horizontal stone handhold on the wall. (It's just above the round dart pipe.) Swing and jump to the long ledge ahead. You don't actually need to swing all the way around the pole. It's quicker to just grab it and then press Jump again to leap off the pole before Lara swings all the way around it.
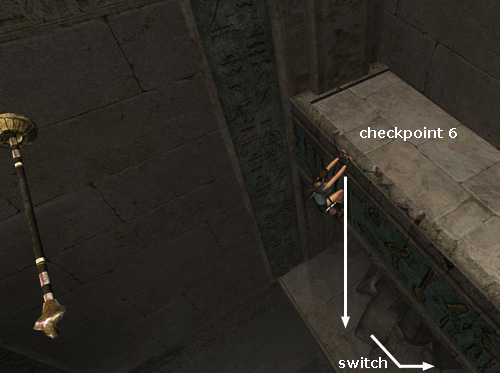
When you land on the ledge, CHECKPOINT 6 registers. If you've made it this far without too much hesitation, turn right and run along the ledge toward the far corner.
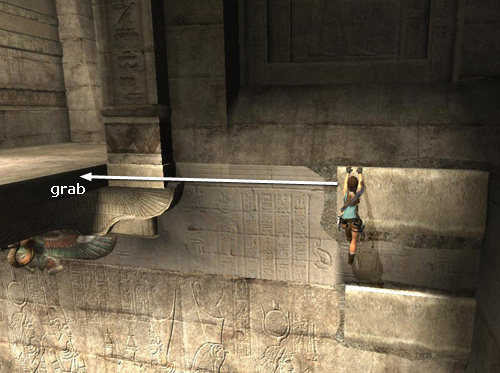
IMPORTANT: If Lara dies during the second phase of the run, the game will reload at CHECKPOINT 6; however, the pole above will have retracted into the wall. If this happens, just hang from the edge of the long ledge with the checkpoint, drop down to the ledge with the switch (as shown in this screenshot) and try again.
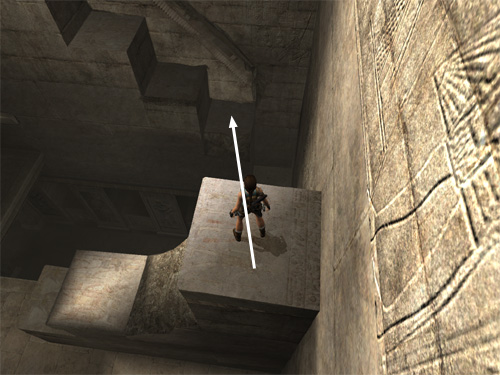
As you run from CHECKPOINT 6 to the opposite end of the long ledge, jump to grab the lower of the two handholds. Jump up to the higher one and then jump back to grab the retracting ledge behind you.
Pull up, run across the ledge as it retracts into the wall, and jump to grab the narrow ledge spanning the middle of the room. Try to aim for the narrow bit of the ledge just in front of the square column. If you aim to the left of the column, Lara may land on the ledge instead of grabbing it, and you'll have to take an extra second to drop back and hang. Traverse to the right and pull up next to the column. Then run off the other side and grab the edge as Lara falls.
After grabbing the edge of this ledge, the big, colorful mural on the wall will be behind Lara and the alcove with the switch is ahead and below. Climb to the left (i.e., continue toward the center of the room). When you reach the end of the ledge, jump up to grab the handhold above. Jump straight up again as if you were trying to grab the handhold above. Lara cannot reach it and will drop back down to the handhold where you started.
IMPORTANT: Jumping up toward a handhold you can't grab seems to be a useless maneuver, but for some reason it enables you to do the next move with nearly 100% success. If you try to jump back and grapple the ring without first jumping up toward the higher handhold, often the grapple won't catch. Try it if you don't believe me. Here I offer the highest praise and gratitude to both Jason G. and Invader, who brought this move to my attention.
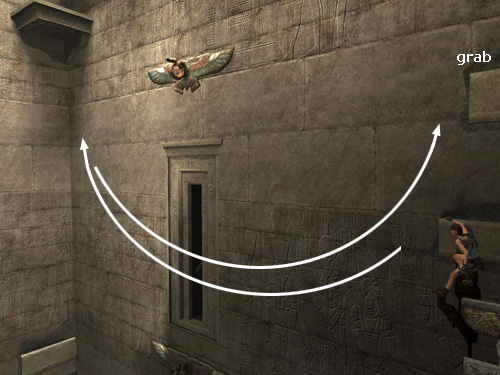
Now, lean away from the column toward the painted wall behind Lara. Jump back and quickly press Grapple to snag the metal ring on the wall above the mural. She'll end up hanging from the grapple cable with her feet a little below the bottom edge of the mural. Adjust the length of the cable so her feet are at the bottom of the central painted figure's kilt or a little lower. (Again, check the screenshots if you need visuals.) Wall run back and forth a few times to build up momentum. Then jump to the left to grab the handhold near the corner. (NOTE: When wall running, it may help to keep the camera perpendicular to the wall and directly behind Lara. Then pressing Left + Jump will make her jump that way, instead of back.)
Climb away from the corner along this handhold, tapping Interact all the way to go faster. At the end, lean out and jump to grab the next handhold, just a little higher up on the same wall. Quickly climb to the left until Lara is hanging below the dart pipe. Jump back to grab the top of the square pillar behind. Do not drop down. If you do, Lara won't be able to make the next grab. Do not climb on top of the pillar or Lara will be in the path of the darts. Instead climb around to the other side of the pillar and jump back to grab the lower handhold on the next square pillar. Climb around to the right so Lara is on the side of the pillar out of the path of the flying darts. Jump up three times until she's standing on top of the pillar.
Now turn left and look ahead. If you're trying to reach the artifact and the horizontal pole to the right has already retracted into the wall, don't go any further. Instead save the game manually (or kill Lara), reload at CHECKPOINT 6 and drop down onto the ledge with the switch (as shown in this screenshot). Then you can try again.
If you are not trying to get the artifact, then go ahead and jump to the stone ledge, pull up, turn left and swing across to the ledge near the exit.
If the pole is still extended, take a running jump to grab the stone ledge ahead, pull up, turn right and take another running jump to grab the pole. Swing and jump to the ledge ahead. Now you're high above the switch where you started. ARTIFACT #1 (30/44) is near the middle of the ledge behind a pile of small, dark-colored rocks. (In the Wii game the artifact is hidden behind a wall. Use the pickaxe to break it down and claim your prize.) Taking it triggers CHECKPOINT 7. At this point the horizontal pole remains extended. So you don't have to hurry. Return to the end of the ledge, jump to grab the pole and swing back over to the stone ledge.
NOTE: I encountered a potentially useful bug in the Wii game. When making the timed run, I was too slow and the pole retracted. Thinking I'd come back later to try again, I continued to the next checkpoint, saved the game and quit. When I started the game again, the horizontal pole was extended and I was able to swing across to the artifact without making the timed run. I have no idea if this works all the time, but it may be worth trying if you're having trouble here.
From the stone ledge between the two horizontal poles, take a running jump to grab the pole nearer the ledge with the wide staircase. Swing and jump over to that ledge. This is CHECKPOINT 8. Before going up the stairs, pick up a large medipack on the far side of the ledge. Climb the stairs and get ready for a fight.
DUSTY ROOM LINED WITH COLUMNS: A cat mummy lurks in the room ahead. Keep moving and shooting, and try not to let it knock Lara down. Its death triggers CHECKPOINT 9.
HALLWAY WITH TRICKY PIT & TRAPS: Continue out the other side of this room. Just ahead is a shallow pit. Drop down and go to the far end of the pit to get a small medipack and shotgun shells. Return to the end where you dropped down and climb the ladder to the rim. The 2 horizontal poles above the pit begin to move downward as soon as Lara grabs them. To get across you must jump to grab the first pole then immediately—before swinging around even once—jump to grab the second pole. Then immediately jump again to grab the scarab switch on the wall of the pit. Then immediately jump up to grab the handhold above. If you hesitate, you'll have to drop down, climb back to the beginning and try again. It helps to hold Forward the entire time and tap Jump quickly and repeatedly as you leap from pole to pole to switch to ledge. Once you make it to the handhold, climb around to the left and jump to the stairs.
Continue to a double block trap similar to the one you encountered earlier. Stand close to the first set of blocks and run through just as they begin to part. Next comes a new twist on the same trap—blocks that open and close vertically. Here you must take a running jump through the opening as the blocks begin to separate. Don't just run through or Lara will fall into the little pit where the lower block goes and get stuck. Ouch! Continue to the end of the hallway and CHECKPOINT 10.
THE OBELISK – ANKH BRIDGE SWITCH: You emerge on a ledge overlooking the obelisk and the pool below. Grab onto the short stone handhold on the left side of the door when facing it. Jump up, then left to the next handhold. The right section of the handhold below is weak and will crumble under Lara's weight. So climb all the way to the left along the upper handhold and then drop to grab the lower one where it's safe. From there, jump back to grab the horizontal pole. Swing and jump to the next ledge.
Use the switch to lower the bridge leading to the ANKH OF ISIS, some distance below. This also opens the gate on the opposite side of this area, on the same level where you are now, and it triggers CHECKPOINT 11.
In the Nintendo Wii version, the switch is instead a gear puzzle. Pick up the COG from the floor, insert it into the panel and rearrange the cogs to complete the mechanism. Then pull the switch to lower the bridge.
Jump back to the pole, swing over to the handholds and return to the doorway where you entered this area. Now take a running jump to grab the handhold on the other side of that door. Climb all the way around to the doorway, tapping Interact to speedily clear the crumbling sections of the ledge.
HALLWAY WITH SPINNING BLADE TRAPS: Follow the hallway to a whirling blade trap. Run or roll between the two blades as they retract into the walls. Next is a shallow pit with a horizontal bar across the middle and another set of whirling blades. Take a running jump to grab the bar as the blades start to retract into the walls. Don't swing all the way around, just grab then immediately jump again to release the pole and grab the opposite side of the pit. Pull up and continue along the hallway to CHECKPOINT 12.
SLOPE-TO-STEPS ROOM: The metal ring on the wall ahead is retracted, so you can't grapple it yet. Slide down the long slope to land on the shorter one below. Slide to the floor and immediately take aim at the cat mummy standing to the right. If you circle around to the left, shooting constantly, you can probably take it down before it reaches Lara. Pick up the shotgun shells on the floor and 2 small medipacks—one in the small alcove with two entrances, one in the leftmost of the three raised alcoves. (There's an additional small medipak in the Wii game on the floor in plain sight.)
Climb into the raised alcove on the right and use the switch to change the slope into block steps, open the two barred doorways and extend the metal grappling ring on the wall near the entrance. CHECKPOINT 13 registers after these changes occur.
Pull the movable block out of the little alcove and go in behind the block to find another small medipack. Climb onto the block and jump to grab the handhold above. Jump to the handhold above and then, jump to the left and grapple the metal ring above. Wall run back and forth and jump to the left to grab the handhold in the corner. If you grab the scarab switch below instead, quickly jump up to the handhold before the switch descends too far. Climb to the left and jump to the ledge.
Climb onto the stepped blocks to get the SMG clips and small medipack. The very top step is too high to reach, so hop down and go to the far right corner of the ledge.
WALL RUNS PAST SPINNING BLADES: Climb the handholds and press the Back button (or Down on the analog stick) to lean out toward the middle of the room. This will enable you to see the spinning blade on the wall behind Lara and the metal hook above. Jump and grapple the hook just as the blade retracts. If possible, wall run to the left past the blade and, without swinging back to the right, jump to grab the scarab switch on the wall. Immediately jump up to grab the handhold above. (If you jump and grapple just as the blade starts to retract, you will have enough time to wall run to the left, right, then left again before the blade re-extends. But naturally it's safer if you can do it in one pass.)
You can't reach the higher corner handhold from here. So you must swing past another spinning blade in order to get to it. This involves the same basic tactic as before. Lean out to the left and watch the blade. When it retracts, jump to the left and grapple the metal hook above. Wall run to the left, then back to the right and jump to grab the handhold above the one where you started (as shown in this screenshot). If you miss, Lara should grab the handhold where you started, so you can try again. Just don't attempt to run back and forth more than once or the blade will extend, cutting Lara's run (and life) short.
Once you've reached the corner handhold above the one where you started, jump to grab the one above. Lean back to take a look behind Lara. This wall has 2 spinning blades and a metal hook. Wait for the first blade to retract into the wall, then jump back, grapple the hook, swing to the right and immediately jump to grab the handhold beyond the second blade. Do not attempt to swing back to where you started, or the blades will cut the cable and Lara will fall.
Climb to the right, pull up onto the step and then climb onto the step above on the left to trigger CHECKPOINT 14. Whew! Good work!
ARTIFACT #2: (The following sequence is illustrated in a series of screenshots.) From these steps, which used to be the slope where you entered this room, you can see the artifact at the top of the broken flight of steps below the second metal ring. That's where you're headed. Hop down to the second step from the top and take a running jump to grapple the first ring, above on the left. Adjust the cable length if necessary so Lara's feet are just above the line between the carved and plain sections of the wall. Wall run back and forth until Lara is running nearly all the way to the far corner. Then, the next time she swings that way briefly release the direction controls, then jump back off the wall and quickly grapple the second ring on the underside of the ledge behind her. If you're doing a time trial or just don't want the artifact, don't drop down. Instead just swing to the right, jump and grab the corner ledge. To get the artifact, slow your swing until Lara is hanging by the cable above the step with the artifact. Swing just a tiny bit to the right, so she's directly above the step, and press Crouch to drop down. Collect ARTIFACT #2 (31/44).
NOTES: If you're having trouble jumping off the wall perpendicular to the direction Lara is swinging, you may want to review those sections in the Croft Manor and St. Francis Folly levels. They include step-by-step instructions with more detailed screenshots. If Lara dies after reaching the artifact but before the next checkpoint, the game will reload at CHECKPOINT 14, and you should have the artifact. Just repeat the two wall-run sequences without dropping onto the step where the artifact was.
After getting the artifact, turn to face the block steps below the entrance and the first metal ring. Take a long running jump to land on the next-to-lowest step (not the one in the corner but the next one up, shown in this screenshot). Be sure to give Lara a good run-up and hold the Jump key while she's in the air or she won't make it.
Climb to the second step from the top. Now repeat the running jump, grapple, wall run and lateral jump to grapple the second ring. This time, instead of dropping onto the step where the artifact was, do a wall run along this wall and jump to grab the corner ledge to the right. (This screenshot shows the spot.) Pull up, climb the handholds and jump to grab the doorsill to the left, just above the second grappling ring (shown in this screenshot). Pull up.
NOTE: Several players have reported having trouble grabbing the doorsill here. I'm not positive, but I think this may be the same issue that occurs inside the temple in the Vilcabamba level. If that's true, then the solutions should be the same. See the footnote below for details.
There's another grappling ring on the ceiling in the middle of this room. Ignore it. You'll be taking a different route out of this area.
SEAL OF ANUBIS BRIDGE SWITCH: Follow the long hallway from the doorway to a small room overlooking the obelisk. Use the switch to lower the bridge to the SEAL OF ANUBIS and trigger CHECKPOINT 15.
In the Wii game this is another gear puzzle. You'll find the missing COG outside on the landing overlooking the pool. Fit it into the gearbox and rearrange the various cogs to repair the mechanism. Then pull the switch to lower the bridge.
Hang from one of the outer corners of the ledge overlooking the obelisk and drop into the pool far below. Climb out of the pool on the ledge with the ladder and use it to climb up to the entrance, on the left, and CHECKPOINT 16 (close to the same spot as CHECKPOINT 2).
SEAL OF ANUBIS & ANKH OF ISIS: Run out onto the bridge that led to the EYE OF HORUS and jump over to the bridge on the right (i.e., one of the two you just lowered). Pick up the small medipack in the doorway and take the SEAL OF ANUBIS from its receptacle on the obelisk, triggering CHECKPOINT 17. Jump back to the EYE OF HORUS bridge and from there to the third bridge. Take the ANKH OF ISIS off the obelisk, triggering CHECKPOINT 18.
The fourth bridge leading to the SCARAB OF OSIRIS is still retracted, so now you'll need to find the switch to lower it. Continue across the bridge leading from the ANKH OF ISIS to the nearest doorway. Cross CHECKPOINT 19, take the small medipack and enter the hallway beyond.
ANOTHER TRAPPED HALLWAY: Cross the bridge and follow the hallway to another gauntlet of traps. The first is a pair of whirling blades. You can either move forward crouching to pass beneath them, or stand to one side, and follow the nearest blade as it moves away, then when it reaches the end of its track, move to the other side and continue forward. The next trap is a simple pit with a wooden post. Jump to perch on the post. Then jump to grab the far edge of the pit and pull up. Jump through the block trap as the blocks open. There's a safe spot between this trap and the next, so there's no need to hurry. Jump to the next post just as the blocks are about to open. Then quickly jump to the ledge ahead. Continue to CHECKPOINT 20.
ROOM WITH MUMMIES & SARCOPHAGUS: Whatever happens, no matter how lovely and golden it is, no matter how it may call to you, do not allow yourself to be seduced by the shiny switch on the left wall. Using it does nothing useful. It only extends a bunch of spinning blades that will drastically impede your progress through this room.
Instead, jump down to the small, square ledge below the second step to the left. Drop and hang from the far edge of this ledge and climb down the handholds to the small, L-shaped ledge in the corner. Turn so the wall is on Lara's left and she's facing out into the room. Do not slide down the slope below, or the 3 cat mummies lurking below will be on her in a flash. Instead, use the metal ring above to wall run over to the ledge in the opposite corner.
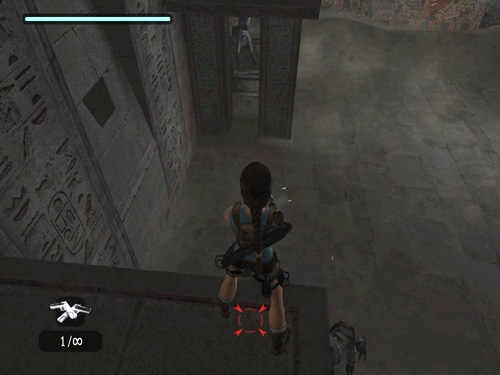
You should be able to kill all 3 mummies from here using just the regular pistols, though you may have to change position on the ledge a few times. If the mummies move in very close to the wall and you can't target them just by shooting, press and hold target lock. Then fire. Lara should be able to shoot them even if you can't see them. (This screenshot shows that technique in action.) In the Wii game, just hold the camera control (C) and use the remote without Target Lock to aim.
From this ledge you can see an artifact in an alcove above. You'll have to take a roundabout route to get it. Drop to the floor, cross the room to the side opposite the sarcophagus with the carved jackal. Climb the handholds to the doorway. This is CHECKPOINT 21.
YES, YOU GUESSED IT, ANOTHER TRAPPED HALLWAY: Follow the hallway to a double spinning blade trap. Make sure Lara has at least half her health before going through, just in case. Fortunately this trap isn't lethal unless you just stand in it doing nothing. To get through, wait at the bend in the hall, a few steps before the blades. Wait for the higher blades to approach then run and roll under them. When Lara stands, immediately take a running jump over the low blades and keep going.
Around the next corner is a deep pit with spinning blades and three wooden posts with crushing blocks above them. Position Lara at the middle of the pit a few steps back from the edge. Tap the HUD key to move the camera behind her and if she's not squarely facing the first post, adjust her position and try again. If she's lined up squarely with the post, she'll be less likely to lose her balance when she lands. Since you won't have time to press the Interact key to steady her before each jump, this is crucial. Take a running jump from the edge to the first post just as the first set of blocks begins to separate. Immediately jump to the second post, then the third, then immediately jump forward to grab the handhold below the whirling blade. Climb to either side, wait for the blade to move to the other side of the ledge, jump up to grab the rim and then quickly pull up.
Continue along the hallway to a small room. Beyond the barred opening you can see the pool at the base of the obelisk. Pull the switch to lower the bridge to the SCARAB OF OSIRIS and trigger CHECKPOINT 22.
In the Nintendo Wii game, this is another gear puzzle. The missing COG is lying nearby. Pick it up and use it to repair the mechanism. Then rearrange the cogs and pull the switch to lower the bridge to the SCARAB.
Return past the gauntlet of traps to the ROOM WITH MUMMIES & SARCOPHAGUS. CHECKPOINT 23 registers in the doorway (in the same spot as CHECKPOINT 21).
NOTE: Now you can decide whether to go after the remaining kills and pickups in this area, including the third and fourth artifacts, or head directly to the exit. Skip down to the section titled EXITING THE MUMMY ROOM if that's what you want to do.
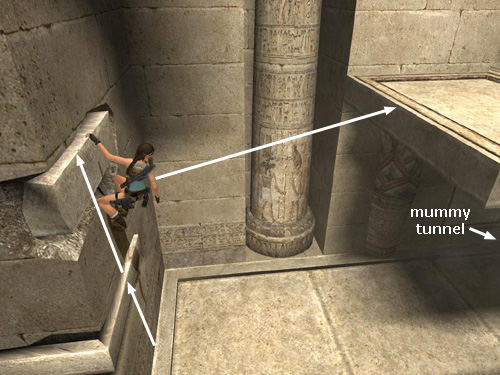
ARTIFACT #3: From the doorway with CHECKPOINT 23, turn right and take a running jump to the square ledge in the corner. Grab the handhold on the wall above and climb to the left. Drop to grab the handhold below, climb to the left past the broken section of the upper handhold. Then jump up to grab the solid section of the upper handhold. Continue climbing to the left around the corner. When you reach the end of this ledge, lean out to spot the handhold you're aiming for. It's quite a distance below and to the left. Jump to the left, grab and then press Interact so Lara doesn't fall. Climb around the corner to the left and pull up into the alcove and take ARTIFACT #3 (32/44). (This set of screenshots shows the path from the doorway to the artifact.) Drop to the floor.
Climb back up to the doorway opposite the sarcophagus. Turn left and once again jump to the corner ledge. Repeat the climb along the wall to the next corner. This time, instead of going all the way around the corner, as you did when you found the artifact, pull up onto the ledge above. Climb onto the low, square step and grab the handhold above. Climb all the way to the left and then jump to grab the next handhold. Climb to the left and pull up onto the ledge. Climb the handholds on the right to the ledge above (as shown in these screenshots).
Follow the hallway to the left. Round the corner at the top, turn around and re-enter the hall. Another cat mummy appears out of nowhere near the bottom of the ramp. Kill it now so it doesn't ambush you on the way back later on. Then return to the upper opening, climb the handholds on the wall ahead and jump back to grab the square ledge behind (shown in this screenshot). Pull up.
Now face out across the room with the wall on Lara's left. Take a running jump off the ledge and grapple the metal ring above. Wall run back and forth and jump to the ledge on the right, where you can pick up a large medipack and shotgun shells.
ARTIFACT #4: The fourth artifact is on the high ledge on the far side of the room above the handholds you climbed just after killing that last mummy. (These screenshots show its location and additional details on how to get there.) First, jump and grapple the metal ring again. Now retract the cable so Lara's feet are just below the knees of the painted figures in the wall mural. Practice running back and forth to test out the arc. You want to make sure Lara can reach the very top of the gray carved panel to the left of the mural. You'll need to run back and forth several times to get enough momentum to do this. If Lara doesn't reach that point when running as high as she can, stop running, adjust the length of the cable and try again. When she's able to run all the way to the top of the carved panel, leap off the wall and grab the ledge behind. Pull up and turn right. Do not try to jump and grab the horizontal pole directly; it's too far. Instead jump to grab the handhold on the wall between the ledge and the pole. Climb to the right and then jump to grab the pole. It slides downward along a track in the wall, but don't worry. There's no need to hurry. Just wait until it stops moving, swing around and jump to the ledge with ARTIFACT #4 (33/44) and some 50-caliber pistol ammo.
NOTE: If you're having trouble with the wall run and lateral jump, there are additional details on the screenshot page. Also, if you find this is taking several tries, you may want to skip killing the mummy and picking up the items on the ledge beyond the grappling ring. Just remember them on the way back down.
After picking up the artifact and clips, turn right and jump down to the ledge below. Drop down and re-enter the hallway ahead. You'll need to kill that cat mummy now if you didn't do so before. Continue to the bottom of the ramp. Turn right and climb down the handholds to the ledge below. This ledge is a little buggy. Sometimes you'll try to drop off it only to have Lara stutter-step for a minute before falling to her death. Most of the time you can avoid this bug by running off the ledge close to the wall (as shown in these screenshots) and grabbing the edge.
Once Lara is hanging from the problematic ledge, climb to the right. Jump to grab the next handhold and climb over to the ledge with the square step. Drop and hang from the edge, climb to the right and drop to grab the next lower handhold. Climb to the right until you reach the broken section. Drop to grab the handhold below and then drop down to the floor. Alternatively, to avoid the problem ledge altogether, turn around and take a long running jump down to the corner ledge where you stood and killed the mummies earlier. Lara loses about 1/4 of her health doing this, though, so be sure you've got enough to spare so she isn't killed in the fall.
NOTE: If Lara does fall and die here, you should still have both artifacts, since these are recorded in your profile, rather than the individual save files. To check, press Escape/Start then choose Level Statistics from the menu. However, if you want all the kills and supplies, you'll have to replay everything from CHECKPOINT 23.
EXITING THE MUMMY ROOM: To reach the entrance, climb onto the corner block where you stood when killing the 3 mummies earlier. Use the grapple to wall run across to the L-shaped ledge on the left. Climb the handholds to the ledge above. Take a running jump to grab the lowest step on the right. Pull up and cross CHECKPOINT 24 (same as 20).
Return along the hallway past the various traps to CHECKPOINT 25 (same as 19) near the side of the obelisk where you got the ANKH.
SCARAB OF OSIRIS: Take a running jump to the bridge on the left and remove the SCARAB OF OSIRIS from its place on the obelisk. This opens the underwater gate at the base of the obelisk and triggers CHECKPOINT 26. Cross the SCARAB bridge to the ledge and pick up a box of shotgun shells and a small medipack near two of the columns.
Drop into the pool and swim through the gate you just opened. Swim down then forward along a straight passage with alcoves along both sides. At the end of the passage, swim upward to a small room where you can surface. Climb out on the ledge, pick up a small medipack and mini SMG ammo. Then pull the switch to open the trapdoor above, which is actually the base of one of the pharaoh statues in the TEMPLE OF KHAMOON. This is CHECKPOINT 27.
Climb the ladder and go to the right between the statues then through the doorway on the left. Follow the hallway back to the OPEN AREA WITH TWO SPHINXES.
A centaur is waiting for you outside on the right. Don't worry; this one is much easier to kill than its badass buddies guarding the Tomb of Tihocan. It does hurl fireballs, though, so watch out for those. When it's dead, go to the obelisk and place each of the four artifacts—the SEAL OF ANUBIS, EYE OF HORUS, ANKH OF ISIS and SCARAB OF OSIRIS—in its proper place to open the exit and end the level.
†UPDATE HISTORY: 6/25/07 - First draft of walkthrough posted online.
6/26/07 - Added save file for checkpoint 22 and noted two medipacks that I'd found in the game but neglected to include in the walkthrough. Oops!
11/26/07 - Incorporated various shortcuts and other suggestions sent in by other players, including dropping down directly from the ANUBIS SWITCH to the SEAL OF ANUBIS and ANKH OF ISIS, which resulted in renumbering the checkpoints from 16 on. Thanks to Mal, Sami and Wiek for that tip. Other contributions are credited below. Also included a couple of additional screenshots and clarifications for various sections, as well as the bug fix below.
2/11/08 - Added Nintendo Wii edition info and made a few other minor changes for clarity. Also changed the numbering system for artifacts, relics and rubbings, as explained in the note below.
2/16/08 - Fixed left/right mix-up following checkpoint 23, thanks to Jeffrey.
4/29/08 - Added Macintosh save files and info. Thanks to Andrew W. and Chris H.
11/6/08 - Revised the second item in the bug fix below, regarding enabling Full-Screen Effects. Thanks to Nico for this suggestion.
11/10/08 - Added the brilliant shortcut in the timed run for the first artifact, thanks to independent tips from both Jason G. and Invader.
4/22/09 - Added link to TRA Flight patch in bug solution below.
4/2/19 - Added bug fix #3, enabling V-sync, thanks to a tip from zegzav on YouTube, sent in by Marc O.
ACKNOWLEDGEMENTS: Thanks to Bobly, Invader, Jane S., Jason G., Jeffrey, Mal, Robert S., Rowan, Sami and Wiek for their help with this level.
*NOTE ON ITEM COUNT: There is an additional medipak in the SLOPE-TO-STEPS ROOM in the Nintendo Wii game.
**ABOUT ARTIFACTS, RELICS & RUBBING REWARDS: Finding artifacts and relics (formerly known as "secrets") unlocks various extras like outfits and concept art. The Nintendo Wii game also includes "rubbing rewards" in some levels. I have numbered each of these bonuses in the walkthrough. So, for example, "Artifact #2 (10/44)" means that this is the second artifact in this particular level and the 10th out of 44 artifacts in the whole game. Please see Anniversary Rewards page for more info on all of these.
***ABOUT TIME TRIALS: After completing a level, you will be able to replay it in Time Trial mode to unlock cheat codes. For more info, please see the Time Trials and Rewards pages. For help beating this level's time trial, see Eldin's Obelisk of Khamoon - Time Trial Tips.
‡NOTE ON VIDEO GUIDES: Eldin's videos don't always follow the same strategies I use in my walkthroughs, but if you prefer that format, I think you'll find them very helpful.
POSSIBLE FIXES FOR GRAB BUG AT TOP OF SLOPE-TO-STEPS ROOM: If you encounter the bug in which Lara will not grab the ledge below the doorway when jumping from the corner ledge (as shown in this screenshot). Assuming this is the same bug found in the Vilcabamba level, here are some possible solutions:
IMPORTANT NOTE ABOUT SAVEGAME FILES: The PC save files linked to this walkthrough include instructions for use. Additional save files can be found on a separate Anniversary save page. Please note that my saves were made using the North American DVD version of the game. As far as I know, they are compatible with most other DVD versions and with the Direct2Drive download version. They will not work with certain unofficial versions, which use a different source code.
WAS THIS WALKTHROUGH HELPFUL? If not, I apologize and invite you to contact me with any questions. If you need help right away, I recommend the r/TombRaider subreddit. Other fan-run forums are listed at tombraiders.net/stella/community.html. If this site was useful, please consider supporting it financially or in other ways. For details, visit tombraiders.net/stella/support.html. As always, I welcome your corrections/suggestions. Thank you!
Copyright © 2007- - Stellalune (). All rights reserved. The screenshots and videos included here were made using Fraps. Feel free to copy or print this walkthrough for personal use. By all means, share it with friends, but please include this credit line so people can send me their feedback. No part of this walkthrough may be reproduced on another site without permission. Follow this link for details about this site's advertising and privacy policy.
Stella's Tomb Raider Site: tombraiders.net.