SAVING YOUR GAME IN CROFT MANOR: There are numerous CHECKPOINTS throughout the level, which I have not noted in the walkthrough. Each time Lara crosses a checkpoint, the game auto-saves. The PlayStation game also allows you to save your progress manually so you can quit and resume later where you left off. Just press Start, then follow the instructions in the menu. The PC game is supposed to do the same but can be buggy and may not save your progress correctly. Consequently, PC players may want to complete the whole level in one session. See the WARNING following the walkthrough for more info.
DESIGNERS' COMMENTARY: The commentary tracks are unlocked after completing each chapter (i.e., Croft Manor, Peru, Greece, Egypt and Lost Island). For details, see the Rewards page. You'll also find full transcripts of the commentaries here. (Many thanks to Treeble for these.)
TRAINING LEVEL: CROFT MANOR | Updated: 1/19/13(†)/ |
PS5 Platinum Trophy Video Walkthrough by Eldincy‡
Starting inventory: 1 large and 1 small medipack
Kills: 0 Supplies: 4 Artifacts: 8 Relics: 0 Rubbing Rewards: 0(*)
Other: Dual pistols (unlimited ammo), grapple, Lara's journal, maze map, 7 puzzle items
Time Trial: 19:00(**)
GENERAL NOTES: Lara's home is accessed from the game's Main Menu. You can play it at any time before, during or after completing the other levels. The 8 artifacts in the manor can be retrieved in any order; however, you do need certain equipment (i.e., guns, grapple, other found objects) to obtain certain ones. So I have suggested one possible sequence here.
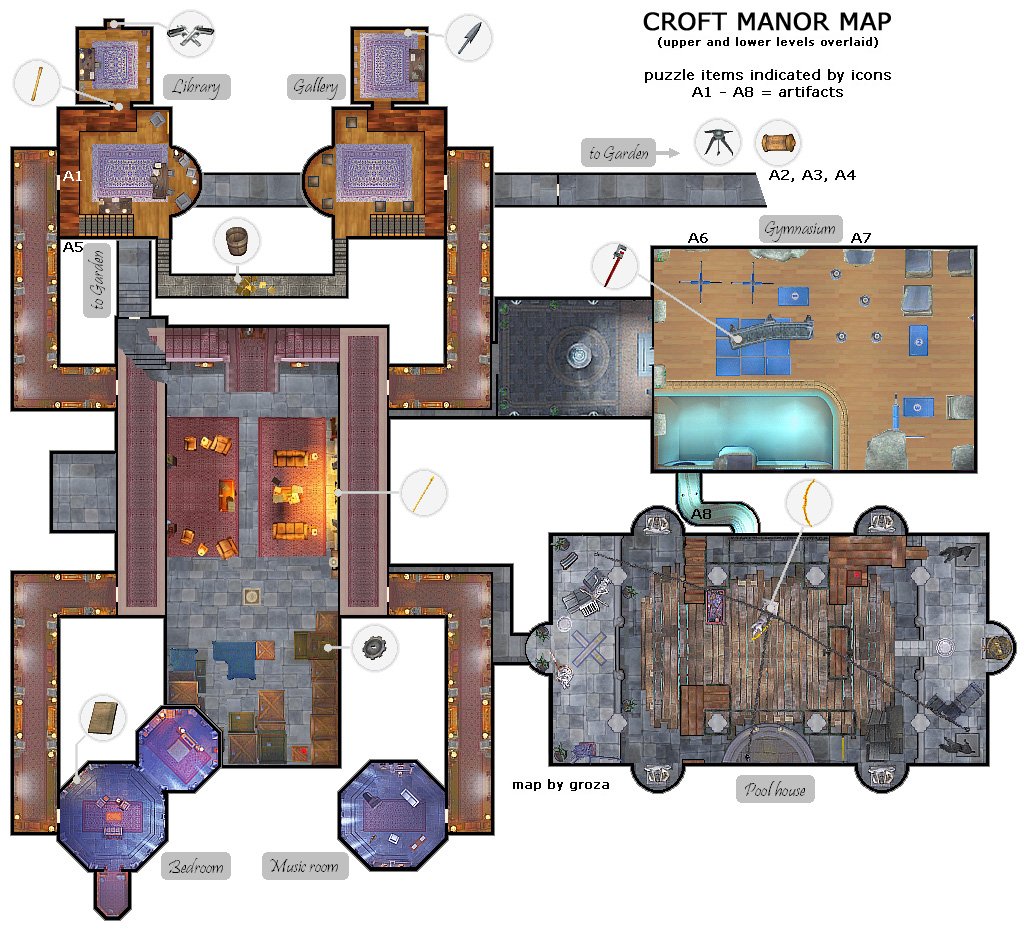
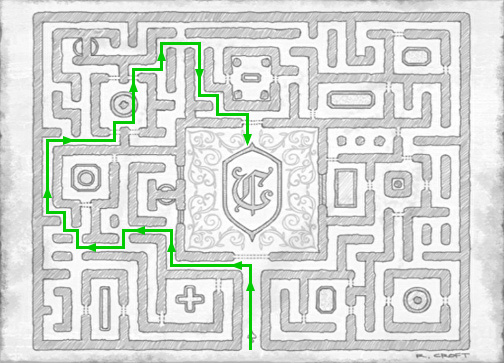
For a full-color map showing the layout of the manor and the locations of all major items click here.
The level begins with a cutscene. Lara arrives home and reads a note from her faithful manservant, Winston. He informs her that some artifacts have been delivered but he was unable to store them due to a malfunction with the alarm system resulting in the gallery being locked from inside. Workers have shut off the water supply in order to work on the swimming pool, and he's found her missing journal and replaced it in its hiding place in Lara's room.
You begin in the MAIN HALL. Here and throughout the mansion are a number of open books which Lara can read by standing close and pressing Interact. Most of these are just historical notes or references to Lara's past adventures. A few offer clues to one of the mansion's puzzles. Once Lara has read a book, if you try and re-read it, she'll say, "I've already read this one," or something similar unless that book contains a clue. Then she'll reread it so you can review the clue. For example, the book on the coffee table in the seating arrangement near the main entrance reads, ". . . Gilead gathered his remaining strength and drew back his BOW. –The Trials of Gilead, Volume I." As you'd imagine, the word in all capitals is important.
Turn to face the stack of wooden crates at one end of the room. Climb up the crates on the right side of the pile. From the uppermost crate, jump to grab the top of the gilt picture frame. Climb to the left and jump to the uppermost crate on that side. Turn around to face back toward the fireplace and stairs. Then climb over to the stacked crates ahead. On top you'll find a glowing object. Press Interact to pick up the SCULPTURE GEAR.
Climb down between the crates to find one crate marked "Fragile". Stand near it and press Interact to grab onto it. Use the direction keys to maneuver the crate out into the room and onto the carved stone pressure pad on the floor. This opens a secret panel at the back of the fireplace, revealing a golden arrow. For now, the fire prevents you from getting the arrow.
MAIN STAIRCASE: This wide staircase leads up to a landing. From there, two staircases lead up to the left and right. To the left is a balcony with doors leading to the LIBRARY and BEDROOM. To the right is another balcony with doors leading to the GALLERY and MUSIC ROOM. Due to the alarm system malfunction, you won't be able to get into the GALLERY or MUSIC ROOM yet. So head up the stairs to the left. Pass by the first wooden door and go through the second. Follow the corridor, stopping on the way to read the books if you like, to another door and go in.
BEDROOM: The main room here is Lara's sitting room. To the right is her dressing room, where you can change into any outfits you've unlocked so far. (See the Bonus Content page for more info.)
Use the two dagger-like switches (by pressing Interact) on one wall of the sitting room to open the Medusa-head plaque and find LARA'S JOURNAL. The on-screen instructions explain how to use it, but the only clue in there at the moment is a note on how frightful Medusa was.
The open book to the right of the Medusa plaque is a clue to a puzzle: "And Gilead knew the GEARS of his heart would never turn again. . . . –The Trials of Gilead, Volume III." The emphasized word refers to something you've already found if you followed this walkthrough.
Lara's bedroom is at the top of the low steps. There's not much there to interact with, just a few books. Exit the way you came, follow the corridor back to the balcony overlooking the MAIN HALL, return to the first wooden door on this side of the room and go in. Follow the corridor—there are more books to read on the way—to a second door and go in.
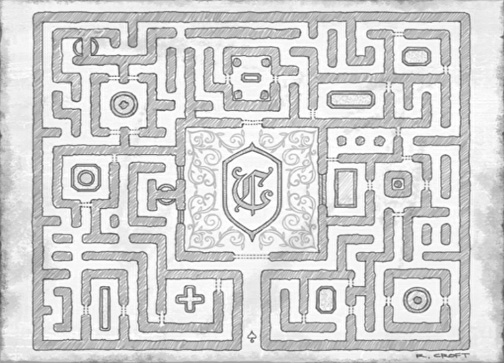
LIBRARY: The door closes behind you and locks. You'll need to find another way out. First, go to the bookshelves on the left and press the protruding book to open a secret compartment to the left. Inside is the MAZE MAP.
NOTE: To study the map, press Escape/Start to go to the menu ring. Press Down to go to the items section. Press Left/Right if necessary to select the map. Then press the buttons indicated on-screen to look at it then exit the inventory. See the section on the hedge maze, below, for printable versions.
Climb the stairs to the upper level. Notice the elephant statuette in the glass case. You can't get it yet, but you'll be back. Enter the reading room ahead and press the 2 protruding books to open the secret panel between them. Inside you'll find the PISTOLS. Now all you need is something to shoot. ;)
One of the books on the stands to the right is a clue to a puzzle: ". . . Gilead removed the poison ARROW from its quiver. –The Trials of Gilead, volume II." Again, the emphasized word is significant.
Exit this room and return along the balcony to the glass case with the silver elephant. Shoot the glass and take the statuette, which is ARTIFACT #1 (1/44).
Return to the end of the balcony near the door to the reading room. There's a break in the railing ahead and a framed painting on the wall. Concealed behind this painting is a bull's eye-like button which you must reveal and then quickly shoot. Take a running jump to grab the top of the picture frame. Lara's weight begins to pull it down. Wait for the painting to descend all the way. Then, while still hanging from the frame, lean away from the painting and jump to land on the balcony behind you. Quickly turn and shoot the button before the painting moves back into place. Here it may help to tap the center camera button to quickly move the camera behind Lara so you can see the target, but even if you can't see it, as long as Lara is facing it, she should hit it when you fire. If you don't make it in time, jump back to the painting and try again. When you succeed, a concealed door opens near the bottom of the stairs. (This sequence is shown in a series of screenshots.)
SECRET PASSAGE BETWEEN LIBRARY AND GALLERY: Go through the door you just opened and follow the passage down the stairs and on to a pile of wooden crates. Pick up the EMPTY BUCKET on the shelf to the left. Now climb over the crates or shoot them (using manual aim to hit the lower ones) to break them up and continue along the passageway. At the top, press the button on the left to open the concealed door ahead, which leads into the GALLERY.
GALLERY: Here is where Lara plans to store the treasures she's collected. If you return after playing part or all of the main game, any RELICS you've found will be displayed in these glass cases. (See Bonus Content.) Go upstairs into the small side room. Shoot the glass case on the far right and take the SUNDIAL GNOMON. You can shoot the other cases if you're feeling especially destructive, but there's nothing you can use inside. On the left side of the room are three book stands. The rightmost book contains another clue: a series of numbers written near a reading about sundials. Make a note of those numbers: 11, 2, 7.
Return downstairs and use the keypad to the left of the door. This deactivates the alarm system, making it possible to open this door, as well as the LIBRARY door later on. Exit, follow the corridor to the next door and go through it to emerge back at the MAIN HALL.
Don't bother going to the second upper-level door on this side yet. It leads to the MUSIC ROOM but you'll need something else before you can get in. Instead, head down the main stairs. At the bottom, turn right and go through the door in the corner up the short flight of stone steps. Follow the passageway to another door that leads out into the garden.
BASEMENT TROPHY ROOM (Wii Edition Only): In the Nintendo Wii game, there's a side passage leading off from the corridor connecting the MAIN HALL and the GARDEN. It leads down to a basement room where the RUBBING REWARDS are displayed, along with various other trophies you've found so far in this adventure. This is similar to the GALLERY upstairs where you can view the RELICS you've collected.
GARDEN – SUNDIAL: Head out into the center of the garden, where you'll find a huge sundial missing a piece. Stand on the small circle on the ground depicting an arrow (the gnomon) and press Interact. Choose the SUNDIAL GNOMON from inventory and press the buttons indicated on-screen to put it in place. Now the sundial is functional. You'll need to manipulate it using the clues from the book in the GALLERY. Or, if you missed those, you can infer the correct positions from the plaque to the right of the gate, which reads, "The garden is open from 11 to 7" (eleven, two, seven).
Grab onto the sundial and turn it (using direction keys or analog stick) so the gnomon points to 11:00. When you do, the block on the floor with the numeral XI raises up slightly. Point the gnomon toward 2:00 (II) and the same thing happens again. Finally, point the gnomon toward 7:00 (VII). When the VII block rises, the gates to the HEDGE MAZE open.
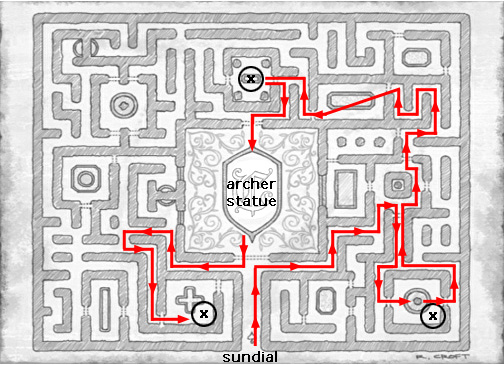
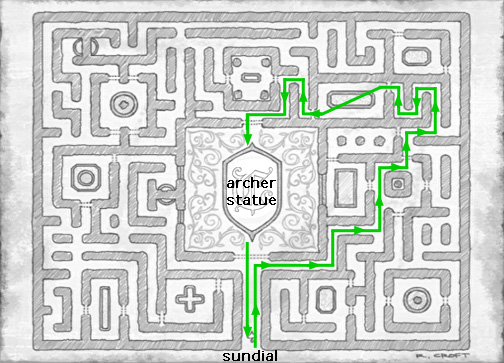
GARDEN – HEDGE MAZE: Enter the maze and approach the inner gate. The camera shifts to an object on the edge of the dry fountain. This is the GRAPPLE, which you'll need to complete your explorations. To navigate the maze, refer to the MAZE MAP in your inventory or, if you prefer, click these links to view printable maps:
Explore the maze, picking up silver elephants—ARTIFACTS #2, 3 and 4 (2-4/44). On the way, or after obtaining the artifacts, make your way to the center of the maze, which can only be reached through the archway near the top of the map. Pick up the GRAPPLE from the rim of the fountain.
Examine the statue in the center of the fountain. It's missing a few parts. The mosaics on the statue's base are clues, as are the emphasized words in the Trials of Gilead books. You can't do anything else here now. So use the grapple to open the gate. (Face the gate and press the Grapple key to attach the grapple to the lock, press Interact to pull on the cable, opening the gate, and then press Grapple again to release the cable.) Return past the sundial and head to the right to re-enter the mansion.
LIBRARY (again): Back inside, return up the stairs to the balcony on the left. Go through the first door and follow the corridor back to the library. Enter and use the grapple to pull down the chandelier above the worktable on the lower floor. This opens a secret panel in the corner to the left of the entrance, when facing it, where you'll find ARTIFACT #5 (5/44).
NOTE: If you're having trouble making Lara hit the chandelier with the grapple, use manual aim, as described on the Controls page.
Then return to the MAIN HALL, go downstairs and through the wooden door to the left of the fireplace. Continue through a corridor, then a small courtyard, to Lara's workout room.
GYMNASIUM: Here you'll have a chance to practice Lara's moves while picking up a few artifacts and other useful items.
Small medipack and first button: First, approach the blue wedge-shaped mat with the number 1 on it. Run up the ramp and jump to grab the horizontal bar ahead. The armature of which it is a part turns 90 degrees so Lara is now facing the wall. Move the camera behind Lara if necessary, swing around the bar and jump to grab the metal handhold directly ahead. Climb to the left and jump to grab the next metal handhold. Jump back to grab one of the horizontal bars on the armature behind. Again, Lara's weight turns the device 90 degrees. Now you're facing the wall with the entrance. Swing around the bar, jump and grab the metal handhold. Climb to the right and jump to grab the green handholds on the climbing wall in the corner. Climb up as far as you can. Then press Jump to leap off the climbing wall and grab the ledge behind. (See these screenshots if you need a visual.) Pull up and get the small medipack. Then press the button in the alcove to raise a series of pedestals out of the floor. To get down, jump back to the green handholds, climb down and drop to the floor.
Wii version: Instead of the rotating armatures, there are two padded vertical columns. Run up the wedge-shaped mat and jump to grab onto the first column. Climb as high as you can and then jump to the nearest metal handhold. (It may help if you first climb around the pole so Lara's back is toward the handhold before making the jump.) From there, jump to the next handhold, then to the second padded vertical column. Jump from the column to the handhold on the end wall. (Again, it may help to position Lara so her back is facing the handhold before jumping.) The rest of this sequence works as described above.
ARTIFACT #6: Next, go to the blue wedge-shaped mat with the number 2 on it. Run up the ramp and jump to grab the horizontal crevice in the freestanding climbing rock ahead. Jump straight up to grab the crevice above. Climb around to the left. Move the camera behind Lara if necessary and then jump back to land on the first narrow pedestal and perch there. If Lara starts to lose her balance, press Interact briefly to right her. Jump from the first perch to the second and, from there, jump to grab the metal handhold on the wall ahead. Climb around onto the vertical column of rock to the left. Jump straight up to grab the crevice above. Then climb all the way around to the other side of the column. Climb as close to the wall as Lara will go. Then jump back to grab the edge of the alcove with the silver elephant. Pull up and take it. This is ARTIFACT #6 (6/44). (This series of screenshots depicts the climb.) To get down drop and hang from the edge of the alcove, drop to grab the metal handhold below, then drop to the floor.
Second button: Next, head for the blue wedge-shaped mat with the number 3 on it. Run up the ramp and jump to grab the horizontal crevice in the rock column ahead. Jump straight up to grab the crevice above. Climb around to the left and jump straight up once more. While hanging onto this crevice climb as close to the wall as Lara will go. Jump back and quickly press the Grapple key to hook the metal ring on the wall above. While hanging from the cable, Lara can do a wall run à la Prince of Persia: Move the camera to the side so it's pointing more or less directly at the wall. (As you get better at this technique, you'll be able to do it instinctively without much fiddling with the camera.) Alternate pressing the Left and Right keys to make Lara run back and forth along the wall. Once she gets going, you can release the camera control and let it follow along behind Lara. Each time she runs left or right, she'll go a little higher, until finally she's tracing out a long arc. (The marks on the wall indicate where she may have done this before.) When the left end of the arc is nearly as high as the stone ledge in the corner, press Left + Jump and she'll retract the cable and jump to grab that ledge.
Traverse around the corner to the left. Drop to grab the metal handhold below. Climb to the right and jump into the alcove. (These screenshots show the whole sequence.) Press button to move the L-shaped bar that will enable you to get the next artifact. Slide down the ramp to the floor.
ARTIFACT #7: Next, a tricky series of jumps to get the artifact in the alcove near the lower pair of perching pedestals. Follow the same steps as in the previous section to get from ramp #3 to the wall run. This time, once you get Lara hanging from the grapple cable, climb up the cable a little bit (hold Interact and press Up) so Lara's feet are just above the wear marks on the wall. (Refer to these screenshots if necessary.) Start wall running from side to side. Then, when Lara is running in a sufficiently long arc, instead of jumping to the left as you did the last time, jump back to land on the slope on top of the free-standing rock column. Slide briefly and quickly jump to the slope ahead. Slide again and quickly jump to grab the L-shaped bar, which pivots 90 degrees to the left. (If the bar is set at the wrong angle to swing into the alcove, you missed something. Redo the section above where you wall run to the corner alcove and press the button.) While hanging from the bar, turn around, swing and jump into the alcove. Pick up the silver elephant, ARTIFACT #7 (7/44). Slide down the ramp to the floor.
(NOTE: If you're having difficulty nailing the perpendicular jump from the wall to the first column, it may help to move the camera as far as possible to the right, toward the wall, so you're looking at Lara almost side-on. (Check the third screenshot in the series if you need a visual.) When she runs all the way toward the corner, release the direction controls for a moment, then press Left + Jump to make her spring off the wall and land on top of the column. Or, alternatively, move the camera behind Lara as she runs back and forth along the wall. Then, when she runs all the way to the left, briefly release the direction controls, then press Back + Jump to make her jump to the column.)
Large medipack and third button: Return once more to wedge-shaped mat #3. Jump to grab the horizontal crevice in the rock column ahead. Jump straight up to grab the crevice above. This time climb around to the right and jump straight up once more. Jump back to grab the rock in the corner. Climb around to the right onto the metal handhold. From there, jump to grab the next metal handhold to the right. Drop and grab the metal handhold below. Then climb to the right all the way around to the other side of the stone column. Climb all the way to the wall and then jump back and grapple the metal ring above. Use the grapple to wall run back and forth until Lara is running high enough to jump and grab the horizontal crevice on the rock column ahead (above the ramp). Climb to the right all the way around the column and on to the right as far as Lara will go. At the end of this crevice, she'll bring her feet up onto the rock below. Now you can jump back and grab the L-shaped bar. It swings around toward the alcove with the large medipack. Swing around the bar and jump to the alcove. Pick up the medipack and press the button to rearrange another L-shaped bar above mat #3. To get down, jump to the rock column with the green handholds, which is on the left when facing away from the button. Climb down and drop to the floor. (Again, there are screenshots if you need them.)
Wrench: Repeat the same process described in the sequence above to get from mat #3, to the corner ledge, to the second metal handhold. But this time, instead of dropping to the metal handhold below, jump back to grab the horizontal bar behind. Lara should now be facing out into the room and directly toward the L-shaped metal bar you moved using the third button. Swing around and jump to grab that bar. Adjust Lara's position left to right if necessary and then swing, jump and grab the blue padded column ahead. Climb up as high as you can and then jump to grab the second blue padded column, which is off to the left. (You can either keep the camera behind Lara and jump to the left, or turn her on the first column so she's facing the second column, move the camera behind her and then jump forward to grab the second column.) Climb up as far as you can and then jump to the nearest perching pedestal. From there, jump to the next pedestal and then to the metal platform ahead. Pick up the WRENCH. To get down, take a running jump to grab the green handholds on the stone column just to the right of the empty pool. Climb down and drop to the floor. (Again, there are screenshots showing this whole sequence.)
Return through the courtyard with the fountain to the MAIN HALL.
IMPORTANT: Once you have the wrench, it's possible to restore the water supply to the mansion, thus filling the swimming pool. However, I highly recommend completing the swimming pool section before turning on the water. Doing it the other way around could result in a bug that prevents you from completing the level. Details appear in the relevant section below.
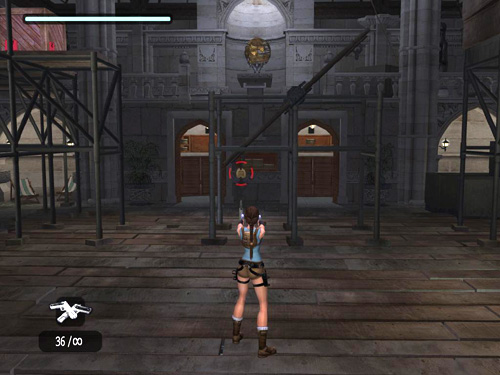
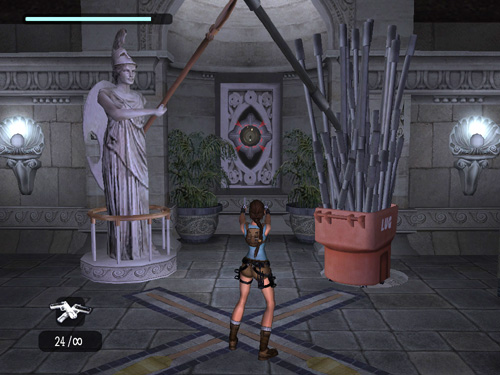
POOL HOUSE: From the MAIN HALL, go through the wooden door to the right of the fireplace. Follow the corridor to the swimming pool, which, as Winston mentioned in his note, is under construction. First, just inside the room, turn right to face the statue of Athena holding a spear. Grapple the metal decoration hanging from the spear and pull the spear down into a horizontal position (as shown in this screenshot). Next, move the big red trash bin so it is about halfway between the two sets of scaffolding (as shown in this screenshot). Then head toward the back of the room and shoot the pulley anchoring the angled scaffolding planks to the floor (as shown in this screenshot). This releases the planks above so they'll pivot up and down. You'll be using the spear, trash bin and seesaw shortly. Arranging them ahead of time will save time.
Balcony with Athena statue: Go to the far right corner of the room and climb on the stacked wooden crates. Turn back toward the entrance and jump to grab the black-and-yellow striped bar. Swing around and jump to grab the curved balcony. Traverse around the balcony to the right as far as Lara will go. Then jump back to grab boards covering the stone support column. (This sequence is shown in a series of screenshots.)
Climb all the way around to the right so Lara's back is toward the statue with the spear. Jump back to grab the statue's spear, which you lowered earlier with the grapple. Swing around the spear and jump to grab the edge of the balcony ahead. Pull up.
Once Lara is on the balcony, grab the handle of the small red trash cart marked "LUG". Push it toward the middle of the balcony and position it on the circular pressure pad to the left of the alcove. Rotate both the trash cart and the statue of Athena so the metal bar and the spear Athena is holding point toward each other, following the lines marked by the X in the mosaic on the floor. (This screenshot shows the correct arrangement.) The panel in the alcove rotates, revealing a button. Shoot it to open a circular grate down in the swimming pool.
Before dropping down, cross to the far side of the balcony, pick up the large medipack and shoot the pulley holding one of the ropes attached to the dangling archer statue. This is one of three ropes that hold the statue suspended above the boarded-up swimming pool. (If you're having difficulty targeting the pulley use manual aim.)
Crossing the scaffolding: Return to the other end of the balcony, where you first pulled up. Jump from the edge to grab Athena's spear. Swing around and jump to grab the wooden plank covering the stone column. Basically retracing the same route you took to get to the balcony. Climb around to the left and jump back to grab the scaffolding behind (as shown in this screenshot). If you miss or drop down by mistake, climb the crates at the back of the room and make your way toward the Athena statue, as you did before. But instead of jumping to grab the spear, jump back to grab the scaffolding.
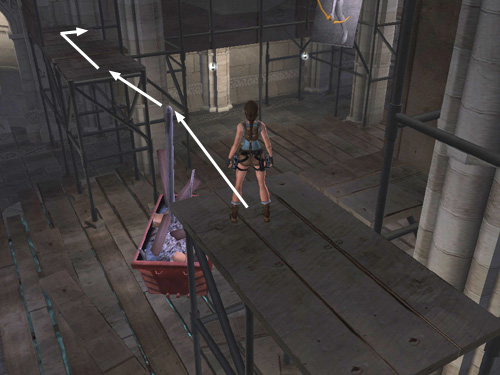
Cross the platform and jump to perch on the steel bar protruding from the red trash bin you moved earlier. Jump to the next set of scaffolding. (These jumps are illustrated in another screenshot.)
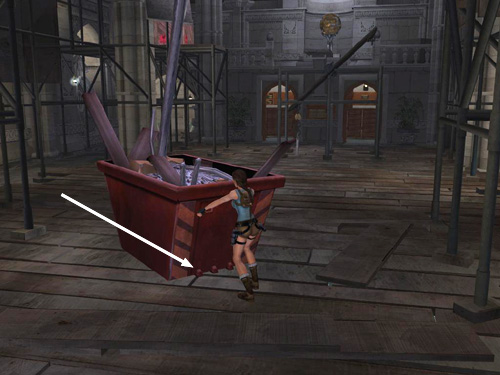
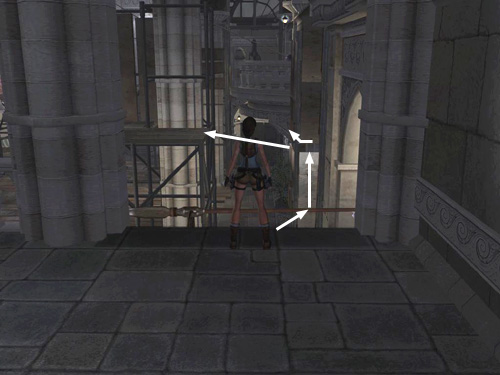
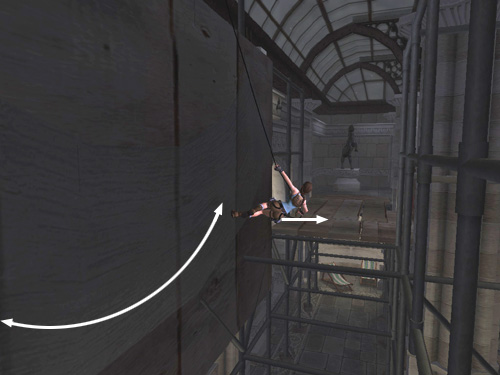
Go forward and around to the right. Then use the grapple to wall run across to the next set of scaffolding (as shown in this screenshot). If you're having trouble with the wall run, review the basics in the GYMNASIUM section, above. Note that when making this particular run, it may help to swing forward only once before jumping, rather than running forward, back and forward again. If you swing too many times, Lara may overshoot the platform and land next to it instead of on top. On this next section of scaffolding you'll find a movable crate marked "Fragile". Push it off the edge. (I hope Lara's insurance policy covers whatever was inside.) Don't drop down yet. Instead continue across the planks onto the balcony with the statue of Atlas.
Balcony with Atlas statue: Grapple the metal ring on the statue's base and pull to bend the statue over so Atlas drops the globe he's holding. It then rolls onto the circular pressure pad on the floor, opening the second circular grating in the swimming pool below.
Climb over the boxes on the far side of the balcony to get a small medipack. Shoot the pulley to release another of the ropes securing the dangling archer statue. Then drop down from the balcony to the floor.
Climbing to the small curved balcony: Go to the wooden crate you pushed off the scaffolding earlier and use it use it to climb up onto the scaffolding on the right, where the crate originally was. (The following sequence is also shown in a set of screenshots.) Take a running jump onto the seesaw planks (which you released earlier by shooting the pulley that anchored them to the floor). As the planks start to tip, run up the slope and jump to grab the boards attached to the scaffolding ahead. Climb around the corner to the right. Jump back to grab the boards attached to the scaffolding behind and to the left. (These boards face the curved balcony.) Climb to the left a bit and then jump backward to reach the balcony. Shoot the pulley holding the third rope supporting the archer statue. The statue crashes through the floor into the pool below. Drop down off the balcony.
IMPORTANT: Hopefully at this point you have not yet turned on the water to fill the pool. If you came to this walkthrough after doing that, be warned about a potential bug in this area. If you pick up the statue's golden BOW from the bottom of the pool and Lara subsequently drowns, the bow will disappear from both your inventory and the bottom of the pool. Then you'll have to replay Croft Manor from the beginning in order to complete it. (Press Escape/Start and choose "Restart Croft Manor" from the menu.)
If you have already filled the pool, to be absolutely safe, swim down and get the BOW but do not go into the underwater tunnel. Immediately return to the surface and climb out of the water. Complete the sections involving the WATER PUMP and the HEDGE MAZE (as described below) and then return to the pool for ARTIFACT #8 after you've used the BOW.
The Archer Statue's Bow: Drop down into the dry swimming pool. Retrieve the statue's golden BOW. Then go through the circular tunnel (provided you opened both grates, as described above) to find ARTIFACT #8 (8/44). Without water in the tunnel, you can't reach the lever above. It opens the circular hatch at the other end of the tunnel, connecting the main pool to the smaller pool in the GYMNASIUM. If you want to, you can come back later after filling the pool with water and do this, but it's not necessary.
Return through the corridor to the MAIN HALL. Cross the room and exit through the door to the left of the stairs. Follow the hallway back to the GARDEN.
GARDEN – WATER PUMP: This time, instead of heading for the sundial and maze, make a right after exiting the manor and follow the colonnaded walkway to the end. Continue forward, enter the fenced-in area and go to the right side of the pump. Use the WRENCH to attach it to the valve. Then press Interact to grab the wrench and move Lara to the left to turn the valve. The water comes back on, feeding all the fountains in the estate.
Exit the fenced-in area and approach the nearby fountain. Press Interact, select the EMPTY BUCKET and use it to fill it with water. Return inside to the MAIN HALL.
MAIN HALL (again): Now that you have a BUCKET OF WATER, use it at the fireplace to extinguish the flames. If you didn't already move the crate onto the pressure pad, as described above in the first section on the MAIN HALL, do so now. With the fire out, Lara can grab the golden ARROW.
You should now have everything you need to complete the puzzle in the maze. If you're missing the SCULPTURE GEAR, BOW or ARROW, check the walkthrough above for more info. Once you have all three, go through the door to the left of the main staircase to get back to the garden.
GARDEN – HEDGE MAZE (again): Enter the maze. This time, with the inner gate open, you can go straight to the sculpture. Use the grapple to open the compartment on the front of the sculpture. Place the SCULPTURE GEAR inside to repair the mechanism. Climb up near the archer. Stand on the small circular mosaic depicting a bow and use the BOW there. Repeat the process with the ARROW on the other side of the statue. Then hop down to the ground and pull the lever in front of the sculpture to activate it. The statue with the bow shoots the statue with the club and shield. The club then breaks and part of it falls to the ground. Go and pick this up. It is actually a MUSIC BOX CYLINDER.
Return inside to the MAIN HALL. If you didn't get ARTIFACT #8 in the swimming pool before, you can do that now. Go back to the MAIN HALL afterward.
MUSIC ROOM: Climb the stairs to the balcony on the right. Follow the balcony to the second door and enter. Continue along the corridor to a locked door. Use the MUSIC BOX CYLINDER in the lock to the left of the door and then go in. The level statistics are displayed, but you can continue to play afterward.
Here in Lara's music room, you can read a few more books, tinker with the musical instruments and use the stereo to play any music tracks you've unlocked while playing the main game. Completing Croft Manor unlocks the Croft Manor theme. As far as I know, there are no puzzles to be solved in here, but if you discover anything, please let me know.
When you're ready to LEAVE CROFT MANOR to play the main adventure, either return downstairs to the MAIN HALL and exit through the front door, which is opposite the fireplace. Or, quit the level by pressing Escape/Start and choosing Quit from the menu.
Well done!
†UPDATE HISTORY: 6/1/07 - First draft of walkthrough posted online.
6/4/07 - Added info on the golden bow bug, thanks to the mum-and-daughter raiding team of Sue and Lucy P.
6/11/07 - Added info on saving progress in PS2 and PC games, with help from Rai and Tony.
6/14/07 - Attempted to clarify the tricky wall run required to get artifact #7.
7/11/07 - Fixed a typo in the sundial section, thanks to Sarah W.'s eagle eye.
8/29/07 - Added level map, thanks to groza. Updated warning about PC save bugs. Quicker method for shooting button in Library, thanks to Hanna, Rachel and Jarod. Added additional clue in sundial section, thanks to Andrew. Modified annotated maps with help from Jim. Revised sequence in pool house, thanks to Teri and Hanna, and added some screenshots there. Made a few other minor changes for clarity and flow.
1/8/08 - Fixed mixed up screenshot in swimming pool area. Thanks to Naomi for pointing that out.
2/11/08 - Changed the numbering system for artifacts, relics and rubbings, as explained in the note below.
2/19/08 - Added Nintendo Wii information, plus a few minor clarifications.
4/29/08 - Added Macintosh save files and info. Thanks to Andrew W. and Chris H.
12/11/12 - Added additional tips to the section on wall running in the gym, thanks to info from Duncan.
1/19/13 - Replaced one screenshot and clarified the section about shooting the target behind the painting in the library.
ACKNOWLEDGEMENTS: Thanks to the following people for help with this level: Andrew, David, Hanna, Henry, Isaac, Jim, Kevin G., Rachel & Jarod, Naomi, Rai, Rebecca, Sarah W., sf, Teri and Tony.
*ABOUT ARTIFACTS, RELICS & RUBBING REWARDS: Finding artifacts and relics (formerly known as "secrets") unlocks various extras like outfits and concept art. The Nintendo Wii game also includes "rubbing rewards" in some levels. I have numbered each of these bonuses in the walkthrough. So, for example, "Artifact #2 (10/44)" means that this is the second artifact in this particular level and the 10th out of 44 artifacts in the whole game. Please see Anniversary Rewards page for more info on all of these.
**ABOUT TIME TRIALS: After completing a level, you will be able to replay it in Time Trial mode to unlock cheat codes. For more info, please see the Time Trials and Rewards pages. For help beating this level's time trial, see Eldin's Croft Manor - Time Trial Tips.
‡NOTE ON VIDEO GUIDES: Eldin's videos don't always follow the same strategies I use in my walkthroughs, but if you prefer that format, I think you'll find them very helpful.
IMPORTANT WARNING ABOUT PC SAVE BUGS IN CROFT MANOR: If you have the Windows PC version of the game, beware of possible save bugs in this level. If you exit Croft Manor before completing the level, the game will usually remember which artifacts you've found, but may place Lara at a different checkpoint, or even at the beginning of the level. You may also be missing some necessary items, such as the pistols, grapple and various puzzle objects, and will have to replay most of the level in order to obtain them. Also, if Lara drowns and the game reloads, you may lose one of the necessary puzzle items. (Suggestions for avoiding this are included in the walkthrough, above.) As a result of these potential bugs, PC players may want to complete the whole level in one session.
PC SAVE BUGS ADDENDUM: Creating a new profile when starting the game (rather than using the default profile) may help prevent some of these problems, but doesn't work in every case. I still advise caution.
WAS THIS WALKTHROUGH HELPFUL? If not, I apologize and invite you to contact me with any questions. If you need help right away, I recommend the r/TombRaider subreddit. Other fan-run forums are listed at tombraiders.net/stella/community.html. If this site was useful, please consider supporting it financially or in other ways. For details, visit tombraiders.net/stella/support.html. As always, I welcome your corrections/suggestions. Thank you!
Copyright © 2007- - Stellalune (). All rights reserved. The screenshots and videos included here were made using Fraps. Feel free to copy or print this walkthrough for personal use. By all means, share it with friends, but please include this credit line so people can send me their feedback. No part of this walkthrough may be reproduced on another site without permission. Follow this link for details about this site's advertising and privacy policy.
Stella's Tomb Raider Site: tombraiders.net.