TOMB RAIDER GBC: TREASURE CHAMBERS C
NOTE: Letter designations for switches (S#), doors (D#), save crystals (C#), etc., in the text refer to labels on the corresponding level maps. The switches are numbered to match their corresponding doors (e.g., switch 1 opens door 1, switch 3 extends ledge 3, etc.). All pickups are marked on the map (I hope). Enemies and hazards are noted in the walkthrough but not on the maps.
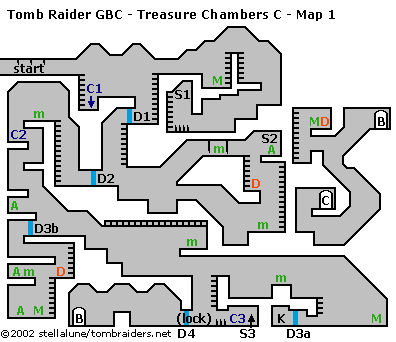
Treasure Chambers C - Map 1 (click for printable map/map key)
You begin the level near the top left of the map. The slicing blades don't begin to work until you've passed them, so just head to the right. Climb down the ladder to the save crystal (C1).
Continue to the right past some dart traps to another ladder near a closed blue door (D1). Use the ladders to climb over the wall ahead. You'll encounter 3 bats and pick up a large medipak. Climb down to the room below, killing a couple of mercenaries as you go. Go to the left and take a running jump over the retracting spikes to land in the safe spot at the base of the ladder. Climb up and shoot the ceiling switch (S1). Climb back down until Lara is just above the spikes and backflip to clear them.
Climb back up the ledges and ladder to the right and return to the left to the blue door (D1), which is now open.
Go through the door and climb down the ladder past some dart traps. The blue door (D2) doesn't open yet, so go to the right. Slide down the ramp into a pit, quickly run to the left wall and shoot the 2 snakes from there. Climb out of the pit on the right and pick up a small medipak.
Climb the ladder and jump to the ledge with the dynamite. Climb the next ladder and jump to the ledge with the heavy bullets and red switch (S2). Use the switch to open a door elsewhere. Jump back to the ledge with the slicing blades and small medipak. Slide down the ramp beyond the blades and backtrack to the left to the blue door (D2) you just opened.
Go through and climb the ladder to the top. Shoot the scorpion and pick up the small medipak. Safety drop to the ledge below on the left and immediately step off the edge. Then you can shoot the scorpion from below before climbing back up to use the save crystal (C2). Climb down three more levels past some dart traps, killing a third scorpion and picking up some heavy bullets on the way. The blue door (D3b) on the left doesn't open yet, so continue to the right.
Hop down one level and shoot a mercenary on the level below. Switch to heavy or rapid bullets and confront a second merc just to the right. Climb back up on the left and use the monkey bars to swing across the room to the ledge with the small medipak. Drop down from this ledge and take a running jump across the gap to the right.
Climb down the ladder. The locked blue door (D4) at the bottom needs a key to open, so for now, jump over the retracting spikes and use the red switch (S3) to open 2 other blue doors—one on the other side of the wall to the right (D3a), the other back toward the left side of the map (D3b). Use the save crystal (C3) and then return past the spikes and up the ladder.
If you want all the pickups, return to the left to the secret area you just opened: Jump the gap to the left and continue left, up three ledges to the open blue door (D3b). Drop into the room below, shoot a scorpion and pick up dynamite below on the right and a small medipak and heavy bullets on the left. Climb the ladder to the bottom, duck to avoid the dart traps and pick up a large medipak and rapid bullets. Climb out the way you came and return to the right, jumping the gap above the locked blue door (D4) and save crystal (C3).
Continue to the right, get a small medipak, kill a snake and hop down into the room with the huge pile of gold. Shoot another mercenary and grab the large medipak. (Watch out for the darts coming from the ceiling.) The blue door (D3a) will be open if you used the red switch in the room to the left. Roll into the small room to the left to get the DOOR KEY (K).
Climb back up out of this room, return to the left and down the ladder to the locked blue door (D4). Use the DOOR KEY to open it.
Enter, climb onto the low wall and shoot the mercenary on the other side. Go through the carved green doorway to emerge near the top right of the same area (both connecting doorways are marked "B" on the map).
Slide down the slope and jump to grab the ledge with the pink column and gold decoration. Pull up and climb onto the ledge above, where you'll find a large medipak and dynamite. Slide the rest of the way down the ramps. Climb up and left to the carved green doorway (marked "C" on the map). Go through to a new area.
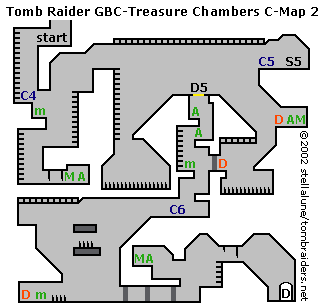
Treasure Chambers C - Map 2 (click for printable map/map key)
You start at the top left corner of the map. Take a running jump to grab the ladder on the left wall and climb down past the dart traps to the save crystal (C4). Hop down to the ledge with the small medipak and then safety drop to the ledge below. Take a running jump to grab the ladder on the left wall and climb to the bottom. Beyond the slicing blades you'll find a large medipak, rapid bullets and heavy bullets. Climb back up the ladder, backflip to the ledge and then climb the ladder to the right.
At the top, there's another ladder leading down and rungs on the ceiling. Below the ladder there's only a huge spike pit, so jump to grab the rungs and monkey swing across to the right. Drop onto the ledge with the save crystal (C5) and immediately draw guns to kill the mercenary.
If you don't want all the pickups, you can use the red switch (S5) to open the gold trapdoor (D5) below. This isn't necessary if you plan to take the route past all the items. Monkey swing back to the left until Lara is at the left edge of the rectangular gold part of the design on the wall. Then let go to land next to the gold trapdoor (D5). (If Lara falls all the way down the shaft below the trapdoor, she'll take more damage.)
If you don't want all pickups, climb down the shaft below the trapdoor (picking up rapid and heavy bullets, plus a small medipak) to the save crystal (C6). Skip the next paragraph.
Or, to get all pickups slide down the ramp to the left of the trapdoor and jump at the end to grab the edge of the ledge ahead. Pull up and pick up dynamite, rapid bullets and a large medipak. Step off the edge so Lara lands on the next slope facing left. Jump to grab the ceiling rungs (otherwise Lara will slide into the spike pit below) and monkey swing to the left. Let go to land on a ledge with a gray door (and more dynamite if you missed the other). Use the dynamite to blow up the door. Jump to the ledge on the left with the small medipak. Climb up to the ledges above for heavy and rapid bullets. Climb down to the lowest ledge to find a save crystal (C6).
Save and then slide down the ramp to the left. Jump at the end to land on a small ledge with spikes. Climb onto the small ledge above the spiked one. Use the monkey bars on the ceiling to swing across to the left. Drop down and shoot the mercenary. Then slide down the slope.
Take a running jump over the retracting spikes to the left and pick up a small medipak and dynamite. Jump back over the spikes and continue to the right to a series of three gray doors. Destroy each door, returning to the left corner to get more dynamite as needed.
In the room behind the gray doors, climb up on the left (past some dart traps) to get heavy bullets and a large medipak. Then climb the ladder on the right. Go past the slicing blades and slide down the slope. Move off the dart traps and go through the carved green doorway (marked "D" on the map) to a new area.
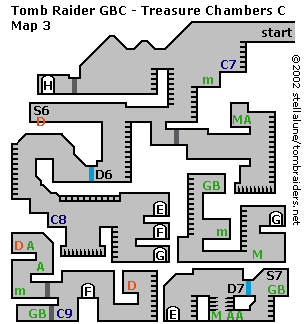
Treasure Chambers C - Map 3 (click for printable map/map key)
You enter this area at the top right of the map. Go left and climb down to a save crystal (C7). Hop down another level, pick up a small medipak and then climb down another ladder.
Ignore the ladder ahead for now. Continue to the left, jumping across two gaps. Shoot the mercenary on the other side of the second gap. Go to the left end of the hallway, pick up some dynamite and use the red switch (S6) to open a blue door (D6) below. Go back to the right, jumping across the two gaps.
Drop down and use dynamite to destroy the gray door. Kill another mercenary in the next room and then take a running jump to grab the ladder on the right wall. There are dart traps above and spikes below. Climb up and jump to the ledge with the heavy bullets and large medipak. Drop back down and return to the left to the shaft with the ladder on the right and dart traps on the left side.
Climb down past the dart traps to the blue door (D6) you opened earlier. Kill the 2 snakes and take a running jump to grab the ladder on the left wall. Climb down the ladder and two ledges to a save crystal (C8). Use the rungs on the ceiling to monkey swing over the spike pit. Drop onto the ledge with the snake. Kill it and climb down the ladder.
The 3 stacked doorways lead to different areas on this same map. You can explore them in any order. There is a GOLD BAR to be found in each of the three areas.
The top doorway leads to the area at the bottom right of the map. (Both connecting doors are marked "E" on the map.) Go through and climb the ladder. Shoot the snake on the ledge beyond the pit lined with retracting spikes. Drop into the pit when the spikes retract. Duck to avoid the spikes and pick up the large medipak plus rapid and heavy bullets. Roll to the right and climb the next ladder. Move quickly to avoid the darts as you pick up the FIRST GOLD BAR and shoot the ceiling switch (S7). This opens the blue door (D7) to the left. Jump over to the door and then take a running jump across the spike pit. Climb down and exit back to the 3 stacked doors.
The middle doorway leads to the area at the bottom left of the map. (Both connecting doors are marked "F".) Most of this next area is lined with dart traps so move quickly. First go to the right, climb the ladder and jump to a ledge with dynamite. (Obviously, you can skip this if you already have dynamite.) Then climb over the wall to get to the left side of the room, where you'll find a save crystal (C9) and 2 gray doors. Destroy the lower door with dynamite. Pick up the SECOND GOLD BAR (GB). Then, if you want all pickups, return to the ledge on the right to get more dynamite. Blow up the second gray door and go in to retrieve a small medipak, plus heavy bullets, rapid bullets and more dynamite on the ledges above. Exit back to the 3 stacked doors.
The bottom doorway leads to the area at the middle right of the map. (Both connecting doors are marked "G".) Go through and take a running jump to grab the ladder to the left. Climb down, shoot the mercenary from the ladder and then drop down near a large medipak. Roll through the low passage lined with dart traps. Climb onto the ledge with the snake and small medipak and then jump to grab the ladder to the left. Climb to the top and jump over to the ledge with the THIRD GOLD BAR (GB). Climb back down, roll back to the right, climb the other ladder and exit back to the 3 stacked doors.
When you have all THREE GOLD BARS, head for the top left corner of the map: Climb the ladder to the left of the stacked doors and monkey swing across the spike pit to the save crystal (C8). Climb the ledges and ladder on the left wall. Backflip to the ledge at the top. Climb down to the right and go through the blue door (D6) to the next ladder. Climb to the top and go to the right. Jump the gap and then climb the ladder above on the left.
Climb partway down the ladder on the other (left) side of the wall. Shoot the mercenary from the ladder and then continue to the left past two big gold statues and a gold wall decoration. Use dynamite to destroy the gray door. (If you don't have any, you can get it at the left end of the hallway below, near switch S6.)
Go through the carved green doorway (marked "H" on the map) to a new area.
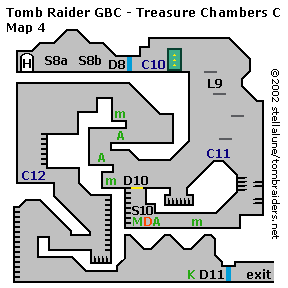
Treasure Chambers C - Map 4 (click for printable map/map key)
You enter this area at the top left corner through the doorway marked "H" on the map. Go to the right and use the red switches (S8a and b) in the gold circles to open the blue door (D8) to the right. Watch out for the dart traps. Beyond the blue door is a save crystal (C10). Stand in front of the panel with the three gold bars and press A to place the THREE GOLD BARS at the base of the panel. This extends a set of ledges (L9) to the right.
(NOTE: If you don't have all three gold bars, you'll need to return through doorway "H" to the previous area and get them.)
Climb down the ledges, avoiding the darts as much as possible. Safety drop from the lowest ledge onto the apex of a two-sided slope, where you'll find another save crystal (C11). Slide down the slope on the right side, past some retracting spikes. Shoot 2 mercenaries on the next level down and pick up a small medipak, heavy bullets, dynamite and a large medipak. Shoot the ceiling switch (S10) to open the gold trapdoor (D10) above. Climb up through it.
To the right is a spike pit. Go to the left to find another small medipak. Climb onto the ledge above. Pick up heavy bullets, shoot the mercenary on the ledge above and climb up to get rapid bullets. Climb onto the next ledge for a small medipak and then climb up once more. Climb down the other side, shoot another merc from above and then continue down/left to the next save crystal (C12).
Slide down the ramp and jump at the end to grab the ladder. If you miss, Lara falls into the spike pit below. Climb down and backflip to the ledge with the two pink columns. Go left and take a running jump to grab the ladder on the left wall. (The ceiling here is lined with dart traps.) Climb down and go to the right. Shoot a snake. Roll under an overhang lined with dart traps. Shoot a mercenary and another snake. Pick up the DOOR KEY (K) and use it to unlock the blue door (D11) nearby. Go through to the right to end the level.
WAS THIS WALKTHROUGH HELPFUL? If not, I apologize and invite you to contact me with any questions. If you need help right away, I recommend the r/TombRaider subreddit. Other fan-run forums are listed at tombraiders.net/stella/community.html. If this site was useful, please consider supporting it financially or in other ways. For details, visit tombraiders.net/stella/support.html. As always, I welcome your corrections/suggestions. Thank you!
Walkthrough and maps copyright © 2004- Stellalune (). All rights reserved. Feel free to copy or print this walkthrough for personal use. By all means, share it with friends, but please include this credit line so people can send me their feedback. No part of this walkthrough may be reproduced on another site without permission. Follow this link for details about this site's advertising and privacy policy.
Stella's Tomb Raider Site: tombraiders.net.