STELLA'S TOMB RAIDER 1 REMASTERED WALKTHROUGH
Tomb Raider Remastered updates are in progress. For the guides that have not yet been updated, I will continue to link to the ORIGINAL WALKTHROUGHS, which cover all the basics. Please check the introductory notes at the start of the first level for info on my process, modern vs. classic tank controls, etc. This guide covers most but not all possible achievements/trophies. Follow this link for the archived classic Colosseum walkthrough.
LEVEL 6: COLOSSEUM (Remaster)
Updated: 3/20/24(†)
Secrets: 3 Pickups: 14, including Magnums and 1 Key Kills: 27*
Save Crystals: 4 (New Game+ only)
*NOTE: The first major patch, released 3/12/24, fixed an issue with one bat not spawning, increasing the kill count from 26 to 27. Details below.
LEVEL MAP by VGCartography (used with permission)
Colosseum Video Walkthrough by Eldincy‡
OBJECTIVES: In the first stage, you need to get inside the Colosseum proper. Once you do, you must then find the switches to open each of the corner rooms, in turn, until you obtain the key to unlock the exit, inside the emperor's box (the room with the furniture and balcony above the arena).
LEVEL ENTRANCE: Follow the passage until it opens into a cave with a pool. Shoot the crocodile (1) from the edge. It won't come out of the water. (screenshot) Then jump in and swim around to the far left side of the L-shaped pool. Surface in a large cave with a building, presumably the entrance to the Colosseum.
COLOSSEUM EXTERIOR: A lion (2) emerges from the building. If it's close to the edge of the water, wait for it to move away before climbing out, then kill it as it charges. (screenshot) The shotgun works well at close range, but you can also use pistols and run/jump away, or even hop back into the water if the lion gets too close. When it's dead, head toward the left side of the building and kill another lion (3). For this one, it's easy enough to lock on with pistols, then backflip away firing. (screenshot)
If you don't care about getting all the kills, there's no need to enter the building. Skip to the next paragraph. Otherwise, come back around to the front and go inside. The stairs on the right lead to a dead end. When you start up the stairs on the left, a third lion (4) charges down, so lock on with pistols and backflip away shooting. (screenshots)
NOTE: The gate at the top of the stairs opens from the other side (screenshot). If you miss this kill or the first secret, you'll be able to re-enter this area later.
Exit the building and go around to the right side (left when facing it) and into the. In that dark back corner, where the second lion came from, there's a pile of rocks. Climb up twice, turn right, and jump onto the ledge that runs around the building. Climb over the low block. Then follow the lower ledge all the way around the front of the building. At the far end, pick up a large medi pack (1). (screenshots)
Return along the ledge to the rear of the building. Climb on the low block, turn around, and jump straight up to grab the higher ledge. Pull up and follow that ledge around to the front. Take a running jump across the gap in the ledge and continue to the end. Then jump diagonally to the flat spot ahead and to the right. Notice the well-lit cave opening below. (It's much more obvious in classic view.) If you don't mind missing a secret, head that way now (and pick up the walkthrough below at the CROCODILE PIT). Otherwise continue for a secret. (screenshots)
SECRET CAVE: Turn so the building is behind Lara and to her right and the exit from this area is below and to her left. That rectangular cave opening on the far wall, between the jumble of rocks and the pool, is where you're headed. Step off the edge and slide down the slope onto a dark, flattish block. Walk forward across the next angled block and step down onto the flat block beyond. Position Lara at the corner of this block closest to the secret cave, facing in that direction. Hop back then take a running jump over the steeply angled block ahead to land on the flattish block beyond. From there, it's a simple jump over to the angled block in front of the cave opening. Enter and pick up some shotgun shells (2), SECRET #1. (screenshots)
Return to the cave opening and walk out onto the block in front of the door. Take a standing jump from the middle of this block to the flat block ahead on the right (i.e., back the same way you came). Walk to the higher, outer corner of this block and take a standing jump (or hop back and take a carefully angled running jump) to the flat ledge between the higher blocks ahead. Jump up onto the next taller, angled block. Walk up the dark-colored slope. Then jump through the V shaped opening on the right to land in the cave. (screenshots)
NOTE: If you miss a jump and slide down the rocks, climb onto the building again at the back left corner and follow the upper ledge around to the end. Jump across the gap and drop down into the cave.
CROCODILE PIT - SECOND SECRET: Enter the cave and approach the pit ahead. Stand at the edge and shoot the 2 crocodiles (5-6) from above. Then drop down into the pit to get the small medi pack (3). Use the low block on one side of the pit for a boost to climb out. On the wall above that block there's a horizontal crevice that runs all the way across the pit. Stand facing the wall with Lara's chest against it. Jump straight up and grab the crevice, then traverse to the right. About halfway across the pit, pull up into a cave. This is SECRET #2, the reward is more shotgun shells (4). Return to the opening, turn around, drop back, and grab the edge. Continue traversing to the right and drop down on the far side of the pit. (screenshots)
Follow the ramp up to a short, dead-end passageway. Drop through the hole in the floor to re-enter the Colosseum. You're now on the other side of the gate you came up against at the beginning of the level. (screenshot) If you didn't kill the lion (4) inside the building earlier and want to, pull that switch to open the gate, and the lion will charge out. You can also return to the start if you missed anything there.
ENTERING THE ARENA: Go up the stairs, turn left, and get ready for another confrontation with Pierre DuPont. As in the previous fights with him, use pistols only, since you can't kill him yet and don't want to waste ammo. Approach to get a lock on him. Then backflip away firing. If you like, you can jump from side to side while shooting. This minimizes the damage he does to Lara. Just be careful not to jump off the ledge into the arena below. Once Pierre has lost around half of his health, he may run into the stairwell or start running away toward the far end of the arena. Move back from the doorway (or just turn around) to break line of sight, and he'll disappear. (screenshots)
NOTES: The "Kong's Fate" and "Ave, Lara!" achievements/trophies involve killing the animals in the arena in specific ways. "Ave, Lara!" requires you to kill 10 animals from the EMPEROR'S BOX. These 10 animals are marked with asterisks (*) in the walkthrough. Be sure to spare them until you reach the EMPEROR'S BOX. For "Kong's Fate," you'll need to lure a gorilla to a specific spot before killing it. If you want both achievements, you'll have to unlock one, reload an earlier save and then do the other. I have included notes as we go, with more info in a footnote.
New players may want to save here, play through the level once for all kills, secrets, and pickups, without the stress of achievement-hunting, save again, then reload the earlier save and go for the achievements.
When you've driven Pierre off, look down into the arena. You should be able to pick off the gorilla (7)* and 2 lions (8-9)* from above before you descend. If they won't come close enough to target, try using Lara as bait by hanging from the edge of the arena wall and then pulling up when the creatures approach.
NOTE: If you're going for a speedy finish and don't mind missing a few kills and one pickup, you can skip the next two areas: the LION CAGES and ROOM WITH TIMED GATES & PRESSURE PADS. Pick up the walkthrough at the section titled "SHORTCUT."
LION CAGES: If you want all kills and pick-ups, drop down to the floor of the arena and head for the northeast corner, where you'll find a doorway leading to a ramp. Ready weapons, slide down and kill the 2 lions (10-11) at the bottom. Pull the 2 switches. One opens the exit from this room, the other a gate in the southeast corner of the arena. Follow the passageway to a pit inside the arena. (There's a save crystal here in New Game+.) (screenshots)
Three more lions (12-14)* will have been released above. If you want to, you can kill them from the safety of the pit by waiting for them to approach. If necessary, climb out to lure them near, fire a few rounds then jump back down to safety. Or, jump straight up and down to get a pistol lock on one of them and continue jumping and firing until it's dead. When the coast is clear, climb out of the pit. (screenshots)
Cross to the brown rock pile in the southeast corner. Another lion (15)* will charge. Take it out, then go between the rocks where it came from. There you'll find the gate you just opened using one of the switches in the LION CAGES. (screenshot)
NOTE: Read ahead now in order to decide whether you want to take the easy or difficult way through the next area. Once you slide down into the next room you must complete the timed run to get out. To avoid it, missing one pickup, a small medipack, use the SHORTCUT below.
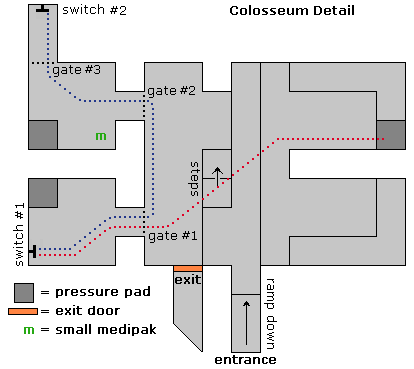 ROOM WITH TIMED GATES & PRESSURE PADS: Enter and slide down a ramp into a room with three gates and a door. (The third gate is inside the room behind the left outer gate.) These gates can be opened using pressure pads and switches, but they are timed to close after a short while. So, in order to exit, you'll need to race against the clock.
First, head for the second alcove on the right side of the room and stand on the pressure pad at the back. This opens both outer gates. When Lara steps off the pad, the timer starts and you have about 20 seconds before both gates close. (screenshots)
Position Lara on the front edge of the pressure pad facing the wall with the two gates. When you're ready, cross the room to the gate on the left using two running jumps. (Running jumps are faster than just running, as long as you don't hit anything.) Run through the left gate and jump to land near the first switch. Use it to open the third gate (inside the other room). You now have about 10 seconds to get there before that gate closes. Immediately roll and run out of the room. Turn left, run and jump forward, then veer left again through the second gate. Keep running through the third gate into the dead-end passageway. Once you make it past the third gate, you can relax and take your time. Pull the second switch to open the exit, out in the other room. (screenshots)
NOTES: The path from the pressure pad to the first switch is marked with red dots on the diagram above. The path from the first switch to the second switch is marked in blue. If you make a mistake and the outer gates close, trapping you in either of the side rooms, there's a pressure pad in each room to open the gate so you can get out and try again.
Pick up the small medi pack (5) on the floor next to the outer gate. Then step on the pressure pad to open the gate and return to the outer room. Exit through the door you just opened and follow the passage to a spike pit. (screenshots)
SHORTCUT: Instead of sliding down into the LION CAGES or the ROOM WITH TIMED GATES & PRESSURE PADS, head for the spike pit in the southwest corner of the arena. Go to the far (south) side of the pit and hang from the edge above the spikes. Traverse to the left. Lara will get about halfway across but won't be able to go any farther because of the rocks. (screenshots) Let go. She'll lose a small amount of health from the fall, but won't be impaled. (Thanks to Dracman for this tip.)
Walk carefully through or around the spikes. (New Game+ players will find a save crystal here.) Enter the tunnel on the left (or straight ahead if you dropped down from above) and follow it to a series of stepped blocks. Climb up through the tunnel onto a rocky outcrop overlooking the arena.
NOTE: If you have avoided killing the arena animals so far, there should be a gorilla and 6 lions down there now. If you like, you can save the game and unlock the "Kong's Fate" achievement/trophy, as described in the footnote. As long as you reload after killing the gorilla this way, you will still be able to unlock "Ave, Lara!"
ROCK PILE: Turn around and make your way up the rock pile to the back right, where you'll find a box of shotgun shells (6). (screenshots) Climb back down and go to the front of the rock pile, where one flat block juts out over the arena. Take a running jump over to the separate pile of rocks ahead on the right. Walk up to the flat rock at the corner of the building and take a running jump from there to grab the edge of the balcony. (Both jumps are shown in this screenshot.) Pull up and ready weapons.
EMPEROR'S BOX: Kill the 2 gorillas (16-17) inside. They will occasionally come up onto the ledge at the edge of the balcony, but most of the time Lara is safe if she stands there. Note the locked gate on the right (screenshot), and the steps down to closed double doors at the rear. You can't open either yet, but you'll be back later. (NG+ players will also find a save crystal here.) Near the back of the room on the left is a gray, movable block. Pull it out twice, pick up the small medi pack (7) behind it and throw the switch. (screenshots) This opens a door in the room in the southwest corner of the arena. Return to the balcony. Walk to the left edge and take a standing jump back down to the rock pile. Slide down to the ground. (screenshot)
NOTE: If you are attempting the "Ave, Lara!" achievement/trophy, and haven't killed any arena animals yet, shoot the gorilla and 6 lions from the balcony before climbing down. You don't have to kill all 10 animals at once for the achievement/trophy to unlock. Seven now, three later is fine.
SOUTHWEST CORNER ROOM - BOULDER TRAP: Go to the southwest corner of the arena and use the stone block to climb up to the spectator area. Climb the block steps to the corner room. Kill 3 bats (18-20) in the anteroom. Step through the door you opened earlier and advance cautiously. As soon as Lara moves past the corner, a gate slams shut behind her, and the boulder at the top of the ramp starts to roll. Immediately run forward into the pit, and the boulder will pass safely overhead. Climb out, turn around, walk to the edge of the pit, and take a standing jump to grab the opposite edge. Pull up and follow the ramp to the room at the top. Throw the switch to open the door in the room at the northwest corner of the arena. Then slide down the next, shorter ramp to land safely back in the anteroom below. (screenshots)
NOTE: Prior to the first major patch, released 3/12/24, the third bat in the southwest corner room would not animate and could not be killed. This is now fixed, bringing the total kills for the level to 27. I'm not sure how this affects the "Leave Them Sucking Wind" (all kills) achievement/trophy for people who finished this level before the patch was released. Patch notes are on the official Tomb Raider website.
Exit the room and get ready for another shoot-out with Pierre. He emerges from the stairway on the west (left) side, where you first entered the arena. This time he's got a lion (21) with him, though it may not approach until after you've dealt with the man. (screenshots) Go after Pierre the same way you did before. Shoot him a bit and he should run back down the stairway. If he doesn't, or if he runs off toward the far corner of the arena, run after him (without getting too close), shoot him a bit more, then break line of sight by turning around or hiding behind something, and he should disappear. When he's gone, take care of the lion. Then proceed to the northwest corner room, near the collapsed seating area.
NORTHWEST CORNER ROOM - TALL PEDESTALS & THIRD SECRET: Kill 2 more bats (22-23) in the anteroom, then enter the inner room. At the top, behind a timed door, is a secret. It's another tricky series of jumps to get there, but a good setup (detailed in these screenshots and video) will make it much easier.
First, make sure the volume is up so you can hear the door open and close above (not essential but helpful). Position Lara next to the tallest pillar, squarely facing the right side of the low block ahead, with her left foot just touching the back right corner of the the pillar's base. Hop back once. (The timer will start, and the door will soon close, but that's OK.) Save the game if you like.
Now, take a running jump, passing over the tile that opens the door, to land on the near right corner of the low block. While Lara is in the air, release Forward, but continue holding Jump. As she lands on the low block, immediately press Right to side flip onto the next pillar, then Back, then Left, then Forward (while holding Jump the whole time). If you've lined it up correctly she'll do a fluid series of jumps, ending up on the ledge in front of the secret door. It should still be open, so you can run on through. This is SECRET #3, which consists of the MAGNUMS (8), 2 large medi packs (9-10), and some Uzi ammo (11). Take everything and exit. (The door opens automatically.) (Again, screenshots and video.)
NOTE: If you're struggling with this secret using modern controls, check out MortyMcFlurry's video on the r/TombRaider subreddit.
Before descending, take a running jump to the ledge on the left. Use the switch to open a door in the northeast corner of the arena. To get down, safety drop to the platform below. Then hop down to the floor.
NORTHEAST CORNER ROOM: Head for the northeast corner of the arena (on the left as you exit the room with the columns and timed door). Enter the anteroom (no bats this time) and climb up through the now open door. Use the switch here to open the door at the back of the EMPEROR'S BOX. Jump into the pool beside the switch and follow the flooded passage until you can surface in a small room. Climb out and pick up a small medi pack (12). Find the movable block and push it twice. Go around to the right side and pull it once to open up an alcove. Inside is a RUSTY KEY (13). The key looks like it's sitting on a pressure pad but, this one appears to be decorative and doesn't actually do anything. Take the key, swim back to the previous room, then return to the arena. (screenshots)
There's now another gorilla (24)* down on the arena floor. If you're going for the achievements/trophies, leave it alive for now. Otherwise, shoot it from above.
Now make your way back to the EMPEROR'S BOX. You can take a shortcut using a carefully angled running jump from the seating area to grab the edge of the balcony. (This page with screenshots shows how.)
NOTES: If you're having trouble with this jump, or you're a fan of Newtonian physics and don't believe in curving your jumps, take the long route. Drop down into the arena and head for the spike pit in the southwest corner. Drop into the pit using the safe SHORTCUT described above. Or, head for the rock pile in the southeast corner, go through the ROOM WITH TIMED GATES & PRESSURE PADS. (If you've already done the timed run, you won't need to do it again.) Then retrace the same route—past the spikes and through the tunnel to the top of the rock pile—that you used to reach the EMPEROR'S BOX the first time. (screenshot)
EMPEROR'S BOX (AGAIN) & LEVEL EXIT: Head for the back of the room. Go through the tall door you opened earlier using the switch in the northeast corner room. Here you'll find another small medi pack (14) (and a save crystal if you're playing New Game+). Return to the balcony. There are now 2 more gorillas (25-26)* running around down in the arena. (screenshots)
NOTES: If you've already unlocked "Kong's Fate" and just need "Ave, Lara!," go ahead and shoot the last 3 gorillas from the balcony. Assuming you already killed seven arena animals on your first visit to the EMPEROR'S BOX (above), that will make 10, and the achievement should unlock. If you haven't unlocked "Kong's Fate" yet, shoot two gorillas from the balcony, leaving one alive, then save the game. Lure the gorilla to the high point and kill it, as described in the footnote. Then reload the save you just made and kill the last gorilla from the balcony to unlock "Ave, Lara!"
When you're ready to move on to the next level, use the RUSTY KEY in the keyhole to open the gate (on the right side of the room if Lara's back is to the balcony). Jump into the water and swim straight down, then forward. Just ahead, the tunnel widens, and there are square metal grates on each side. Between them is a small, square opening in the ceiling, where you can climb out of the water. Go quickly to avoid the crocodile (27), which you can then kill from inside this small room if you want to. You may need to take a swim to draw it closer, or just jump over the opening a few times to get its attention. Pull the switch to open the gate at the south end of the flooded tunnel. Face the switch, jump in the water, and swim through to exit the level. (screenshots)
NOTE: For more information about the carved relief featuring Greek wrestlers in this level, and other real-world items and locations featured in the games, check out the Arte-Factual series from Tomb Raider Horizons.
†UPDATE HISTORY: 3/10/24 - First major update for the Remastered version. Updates made prior to the Tomb Raider I-III Remastered release, including credit for tips sent in by other players, are tracked in the original guide.
3/13/24 - Yesterday's patch fixed the broken bat in the southwest corner room, bringing the kill count up from 26 to 27. Details above.
3/20/24 - Added a link to MortyMcFlurry's video showing secret #3 with modern controls.
‡NOTE ON VIDEO GUIDES: Eldin's videos don't always follow the same strategies I use in my walkthroughs, but if you prefer that format, I think you'll find them very helpful.
DARK MODE: I plan to add optional dark mode for these pages, but my current priority is updating the walkthroughs. Meanwhile, may I suggest a reputable dark mode browser extension, such as Dark Reader? (Download only from trusted sites, like darkreader.org or your browser's official add-on/extension site.)
ARENA ACHIEVEMENTS/TROPHIES: "Ave, Lara!" ("stand in the emperor's box and sentence 10 animals in the arena to death") can be challenging, especially if you decide to play through the level just once. You'll need to avoid killing the animals that roam the floor of the arena until you reach the EMPEROR'S BOX, then shoot them from the balcony. The 10 animals are marked with asterisks (*) in the walkthrough. Fortunately you don't have to keep all 10 alive until the end of the level. I have tried to lay out a strategy (above) that gets it done without too much fuss.
"Kong's Fate" ("Make the gorilla from the arena die at the highest point possible") is fairly straightforward, but it helps if you only have one gorilla chasing you when you attempt it. Any gorilla will do, but I found it easiest with either the first or last gorilla (especially if you're doing the "Ave, Lara!" in the same run). The "highest point possible" is actually the third highest ledge in the dark area to the right of the EMPEROR'S BOX. Gorillas can climb, so all you need to do is get a gorilla's attention, climb up to that step, and wait for the gorilla to follow. When it's standing on that step with Lara, shoot it once with the shotgun to kill it, and the achievement/trophy should unlock. (screenshots)
WAS THIS WALKTHROUGH HELPFUL? If not, I apologize and invite you to contact me with any questions. If you need help right away, I recommend the r/TombRaider subreddit. Other fan-run forums are listed at tombraiders.net/stella/community.html. If this site was useful, please consider supporting it financially or in other ways. For details, visit tombraiders.net/stella/support.html. As always, I welcome your corrections/suggestions. Thank you!
Walkthrough text and diagrams copyright © - Stellalune (). The full-color level maps belong to VGCartography and are used with permission. Follow them on Twitter/X, YouTube, and DeviantArt for more fantastic game maps. Feel free to copy or print this walkthrough for personal use. By all means, share it with friends, but please include this credit line so people can send me their feedback. No part of this walkthrough may be reproduced on another site without permission.
Stella's Tomb Raider Site: tombraiders.net.