Stella's Classic Tomb Raider 3 Walkthrough
NOTES ON THE REMASTER: This guide has not yet been updated for the remastered game. Revisions are in progress but will take time. I hope this version, based on the classic game, will still be helpful. Thanks for your patience.
LONDON LEVEL 3: LUD'S GATE
Updated: 5/3/24(†)
Secrets: 6 Pickups: 57(59), including 1 key and Embalming Fluid Kills: 17(20) Save/power-up Crystals: 11
NOTE: Numbers are approximate and depend on which route you take. 20 is the maximum number of kills, including the 3 gang members. Although the remastered game's stats screen shows 59 possible pickups, 57 is the maximum without using glitches. There are two extra rockets that bring the count to 59. One is located in the SPHINX ROOM and is easily obtained using the corner bug (as described here). One is trickier, but you can get using the flying UPV glitch. (Details are below and shown in this excellent video by Footi.) Note that the pickups in this level will include the ROCKET LAUNCHER, SHOTGUN, and HARPOON GUN if you didn't get them earlier. Be sure to find all the secrets so you can access the bonus level at the end of the game.
LEVEL MAP by VGCartography (used with permission)
Lud's Gate Video Walkthroughby Eldincy‡
Objectives: Sneak into the Natural History Museum and steal some embalming fluid for your immortal friends. This will grant you access to the second part of the level. Here you'll need to navigate a series of flooded areas and ultimately reach the building where Sophia Leigh has her offices.
IMPORTANT: In case it isn't obvious from the previous cutscene, the Damned are now your friends. As long as you don't fire weapons in this area, they won't harm you. You can kill them if you like but they don't drop any items.
THE LAIR OF THE DAMNED: Follow the gang member with the torch down the plank walkways to a room with several shallow pools. You'll pass 2 more thugs in alcoves along the way. Exit through the doorway on the left. If you take the doorway in the middle of the room, you'll end up in the same place eventually, but you'll miss a secret. (screenshots)
Follow the passageway, slide down the ramp into the room below, and quickly pull up into the opening on the right before the spiked ceiling descends and crushes Lara. If you move quickly and crouch while pulling up into the doorway, you can avoid taking any damage. Lara will then slide down another ramp into a small room. (screenshots)
Press the button on the right to open the trapdoor above, but don't go there yet. First, go through the doorway opposite the button and hop down onto the white stone ledge. Go to the right end of the rocks and step down onto the small brick ledge. Safety drop into a clear area in the barbed wire below. Walk through the wire to the other of the trench and climb into the crevice. Drop into the little room on the right to find a large medi pack and flares (1-2)—SECRET #1. (screenshots)
To get back to the room with the button and trapdoor, pull up onto the ledge above where you got the flares. Then climb onto the next ledge, above on the right. Turn around and take a carefully angled standing jump to grab the edge of the opening, pull up, and slide down to the white rocks where you started. Or, take a running jump from the ledge to land on the slope and slide down onto the white rocks. (screenshots)
DUCTS LEADING INTO THE NATURAL HISTORY MUSEUM: Go back into the little room on the right. Press the button to open the trapdoor if you didn't do so earlier. Climb onto the brown ledge above and to the right of the doorway. Then scale the climbable grating until the ledge with the barbed wire is just below on Lara's left. Backflip into the passage behind you, turn around, and pick up a large medi pack (3). (This passage leads back to the gang's lair. There's no need to return there now.) (screenshots)
Jump back to the grating. Climb up and over to the left side, taking care not to drop into the barbed wire. Continue climbing upward until Lara is hanging next to the opening with the purplish-red light. Position Lara's hands on the grate roughly level with the bottom edge of the purple-lit opening. Continue to hold Action to maintain Lara's grip. Press and hold the Roll button, and then briefly press Jump to spring off the wall, twist in mid-air, and grab the grating behind you. Release Roll but continue holding Action to hang on. Climb up to the little alcove with the blue lights. To get into it, briefly release and re-press Action so Lara is hanging from the edge of the opening with her feet dangling below. Then quickly press Forward to pull up. Inside the crawlspace is SECRET #2—a rocket (4). (screenshots)
NOTE: If you don't already have the ROCKET LAUNCHER, you'll get it here instead of the rocket.
Back out of the opening and climb down the grate a little, so Lara is hanging just above the wooden slope. Now jump back to the opposite wall just like you did before: Hold Action and Roll, then briefly press Jump to leap, twist, and grab. Release Roll but continue holding Action to hang on. Climb up farther until Lara is hanging next to the opening with the green light. Position her feet level with the top edge of the green-lit opening. Then press Jump to backflip into the opening behind you. (There's no need to roll this time.) If you miss this jump and land on the slope in the opening, Lara will slide forward. Hold Action to grab onto the grating and then climb up a bit and try again. Once Lara lands in the alcove, pick up a save/power-up crystal (1) and shotgun shells (5). Slide down the slope and jump to grab the grating on the opposite wall of the shaft. Climb all the way to the opening at the top right. (screenshots)
NOTE: if you don't already have the SHOTGUN, you'll get it here instead of the shells.
CRAWLSPACE AND OFFICE ABOVE THE SPHINX EXHIBIT: Go through the crawlspace to the end. You'll find more shotgun shells (6) in an opening on the right. Don't linger here, since there's a museum guard (1) patrolling the hallway ahead. Just pick up the shells, turn around, and crawl back the way you came to the point about halfway along the crawlspace where you can stand up. Climb into the duct above on the left, pick up a small medi pack (7), and drop down into an OFFICE. Kill a second guard (2) here. Press the button to open the door. Then kill the first guard (1) who rushes in from the hallway. Pull/push the carved block onto the gray tile. This will cause the tall pillar blocking the door to the next room to slide away. Go into the hall and take the first right to enter this area. (screenshots)
EGYPTIAN EXHIBIT WITH PAINTED MURALS AND CARVED LEDGES: Go around to the back of the room to get a small medi pack (8) sitting on a ledge. Then climb the stepped blocks in the middle of the room. Notice the doorway with the wooden ladders above and below it. Climb up into this opening. Enter the little room on the left. Go behind the carved block and push it onto the gray tile in front of the doorway. This will return the tall pillar outside to its original position near the entrance. Climb into the crawlspace above the movable block and drop down on the other side. (screenshots)
Move into the doorway overlooking the open room. Drop down onto the ledge below. Walk out onto the top step and turn left. Take a standing jump to grab the wooden slats on the ceiling. Monkey swing forward and around to the left until you can't go any farther. Then drop and grab the edge of the alcove, pull up, and get the save/power-up crystal (2). Lara won't grab the ceiling again from here, so safety drop to the floor. (screenshots)
Climb back up the stepped blocks and jump to grab the slats on the ceiling again. This time monkey swing around to the alcove on the right. Drop, grab the edge, pull up, and crawl into the alcove. Use the switch to open a door high above. Then crawl backwards to the edge and drop to the floor once more. (screenshots)
Now climb onto the tall pillar blocking the entrance. Pull up onto the ledge above and go through the crawlspace on the right. Follow the metal duct to a hole in the floor. Drop down into the hallway and return to the OFFICE with the movable block. Pull the block off the gray tile to slide the tall pillar away from the doorway once more. Go back into the hallway and turn right into the EXHIBIT ROOM. (screenshots)
This time, climb onto the tall pillar, which is now close to the stepped blocks. Walk to the left edge and pull up onto the thin ledge above. Turn right and take a standing jump with Action to land on the L-shaped corner ledge. Pull the switch to close the door below, creating a climbable ladder. Turn around so the switch is behind Lara, walk to the edge, and jump around to the left to land on the carved block steps below. (Or jump back to the thin ledge opposite the switch and drop down onto the pillar.) Now climb all the way up the ladder to the ledge above on the left. (screenshots)
Turn around, step to the outer corner of the ledge, and take a standing jump to grab the jutting block ahead on the left. Pull up and either take a standing jump with Action or run carefully across the gap at the left corner to get into the doorway ahead. Take care not to run off the far edge. It's a long way down. Use the same technique to run or jump into the alcove ahead on the left, where you'll find shotgun shells and flares (9-10). Once you have the goodies, climb back into the opening, jump across the gap to the alcove directly opposite, and vault up onto the sloping ledge ahead. Turn right and walk to the edge. Save the game here if you can. (screenshots)
Slide down the ramp, jump at the end, and grab the ledge on the other side of the gap. (Or, slide down backwards, grab the edge, pull up and do a jump-twist—Jump + Roll + Action—to catch the ledge behind. Or, walk to the edge of the slope, take one step back, jump forward and immediately jump again without sliding, then grab.) Pull up, follow the ledge to the end, and climb up on the right. (screenshots)
NOTE: If you reach this point and the door ahead is closed (screenshot), then you missed a switch. Turn right and jump down to the ledge below. Pull the gold switch to re-open the door in the middle of the ladder. Then follow the walkthrough from the beginning of the EGYPTIAN EXHIBIT section, above, to open the door and work your way back up to this point.
Ahead is another ramp, this time above a deep shaft. The EMBALMING FLUID (11) you promised to retrieve for Geordie Bob is sitting on the far side. Slide down the ramp to land on the break-away tiles. Immediately jump forward and grab the ledge between the sarcophagi. Pull up and take the vial. (screenshots)
NOTE: There is a rocket on a ledge partway down the ventilation shaft. It's not difficult to get, but you'll need to take a shortcut and miss a lot of action and two secrets, preventing you from accessing the bonus level at the end of the game. Also, your new friends will never get their precious embalming fluid. If that's OK, turn around and jump to the remaining break-away tiles on the left. Fall through and hold Action to grab the lowest slope. Traverse to the left and drop to a flat spot near the rocket. (screenshot) Then fall down the hole into the water. Pick up the walkthrough at the AREA WITH GUARD AND FROGMAN, below. If you must have that rocket, you can use the PC flight patch (for the classic game) or flying UPV glitch (classic or remaster) to get it.
After getting the EMBALMING FLUID, crawl through the metal duct, picking up some Uzi clips (12) on the way. Back out into the hallway. Immediately roll and kill the guard (3) who approaches from the side hallway. Then go through the crawlspace at floor level just ahead. Kill another guard (4) in the next room. Press the button to open the doors and get a rocket (13). Then go around the stone blocks and drop down onto a ledge high above the huge SPHINX. Step carefully; it's a long way down. (screenshots)
SPHINX ROOM: Take a standing jump from the edge to grab the ceiling grates. Monkey swing across to the other side and drop onto the ledge with the save/power-up crystal (3). Turn around, move to the left side of the ledge, and take a standing jump without grabbing to land on the sphinx's head. (screenshots)
NOTE: Now you have a choice of pickups. There is a rocket on a ledge on the front of the sphinx. This will be the ROCKET LAUNCHER if you don't have it already. Secret #3 is on the long ledge with the save/power-up crystal. Normally it is not possible to get both the single rocket/rocket launcher and Secret #3. Since the secret includes 2 rockets, and you'll have other chances to get the launcher, I recommend going for the secret. If you must have both, there are several ways to do it: (1) get the rocket/launcher first and use the corner bug to climb back up for the secret, as shown in this short video walkthrough or use the flight patch (PC only) to get the rocket/launcher, then get the secret and continue normally.
To skip the single rocket/rocket launcher and go directly for the secret, after jumping down onto the sphinx, turn about 45 degrees to the right and walk to the corner of the flat tile on the top of the sphinx's head. Carefully position Lara so the point sticking down from the ceiling lines up with her left shoulder. Then take a standing jump with Action to land on a hidden ledge at the back corner of the sphinx's head. Pick up a small medi pack (14). Walk to the edge and take a standing jump to the tall, square pillar. Turn left and take a running jump to grab the back of the angled, white ledge. Pull up, slide just briefly, and jump onto the long ledge ahead. Go to the other end of the ledge for SECRET #3—a save/power-up crystal (4) and 2 rockets (15-16). Now return to the middle of the long ledge and take a running jump onto the sphinx's shoulder. Slide back and grab/release to drop to the floor. (screenshots)
If you want all the kills, take a brief detour over the sphinx's front right paw. When you slide down to the floor, a guard (5) appears in the back left corner (when facing the sphinx) and makes his way toward you. Take care of him. Then go all the way around to the other side of the sphinx. A second guard (6) opens fire from the stairway about halfway along the right wall. Kill him and grab his small medi pack (17). (If you didn't kill the previous guard but did trigger his appearance by climbing over the sphinx's paw, he'll sneak up on you now, so watch out.) Before climbing the stairs, head for the back right corner of the big room (when facing the sphinx) to find some shotgun shells (18). (screenshots)
Now go to the top of the stairs and pull up onto the ledge above. Turn around so the block with the metal coils is on Lara's right, step to the edge, and jump forward to grab the blue-lit opening. Pull up into the crawlspace and get a rocket and large medi pack (19-20)—SECRET #4. (screenshots)
Drop down to the floor and climb onto the ledge again. Pull the movable block with the metal coils once. Drop back and grab the edge. Traverse to the left and use the block and the grating above as a ladder to climb up to the alcove on the right. Climb into the passageway above. Follow it to the end and drop down. There are 2 blocks with metal coils here. The one under the blue light is the same one you moved earlier. Push it once. Then pull the other block twice. Hang from the ledge, traverse to the right, and climb back up the first block and grating to the alcove on the right. Once again, climb up and follow the passageway until you can drop down behind the movable blocks to emerge near the level start. (screenshots)
BACK IN THE LAIR OF THE DAMNED: Hop down into the room with the shallow pools and follow the passageway on the right to the room where you met Geordie Bob earlier. You'll encounter the same 3 gang members again. They won't harm Lara as long as she doesn't fire weapons. Place the EMBALMING FLUID in the lighted alcove on the right to open the exit. (screenshots)
VERTICAL SHAFT AND FLOODED TUNNEL: When you're ready to move on, go through the door that opened when you placed the EMBALMING FLUID. (It's just to the right of the red cab seat "throne.") Fall through the trapdoor, down a long shaft, and into a pool. Swim down into the room below to find a new ride: the underwater propulsion vehicle (UPV). Surface for a deep breath. Then grab the UPV and drive it through the tunnel into the large cavern ahead. (screenshots)
NOTES: The basic UPV controls are the same as for other vehicles. Press Action to grab on and Roll to let go. Press Jump to move forward and steer with the arrow keys or D-pad. Once you're holding on to the vehicle, press Action to fire harpoons. The on-screen display shows the number of harpoons remaining. You'll encounter several crocodiles and scuba divers in the areas ahead. I found it easier to let go of the UPV and kill them with the handheld harpoon gun. If you don't already have this weapon, you'll have to make do with the one on the UPV or avoid the crocs.
It's possible to complete the next section without the UPV if you prefer, but if you leave it behind in the room where you find it, you can't change your mind and go back for it. The strong current prevents you from re-entering that room. However, you will get another UPV later when you need it.
FLOODED CAVERN: As you enter the cavern, a crocodile (7) swims toward you from the far right corner. Kill it and quickly head for the first opening on the right wall (i.e., the small, rectangular hole with the wooden crate set into the wall above it). If you've brought the UPV, leave it outside the opening and swim through. Inside there's an air hole in the ceiling where you can breathe. (screenshots)
Do not go into the wide, brick-lined tunnel in the far left corner until you're finished here. The current will sweep Lara into the next room, and you won't be able to get back. (screenshot)
Scour the area for goodies, but be careful; another crocodile (8) comes out when you pick up the 2 bundles of harpoons (21-22) on the square concrete block. Kill the croc. Then head back to the air hole so Lara doesn't drown. Now you can explore freely. Just watch your air supply and return to the room with the air pocket as needed. In all, you'll find Uzi clips (23) in the room next to the one with the air; a small medi pack (24) on the bottom near the concrete block; a save/power-up crystal (5) and 2 bunches of harpoons (25-26) in the room opposite the one with the air space; a large medi pack and 2 more bunches of harpoons (27-29) in the room to the right of the one with the crystal; and another bundle of harpoons (30) hidden behind a block near the brick wall to the right of the exit. (screenshots)
When you have everything, swim or drive the UPV through the wide, brick-lined tunnel in the far left corner of the cavern. Leave the UPV behind and climb out on a wide ledge with 2 bundles of harpoons (31-32). (screenshots)
IMPORTANT: SAVE YOUR GAME HERE AND DO NOT OVERWRITE THIS SAVE UNTIL YOU HAVE OBTAINED SECRET #6! There is a potential bug in this area, in which saving and reloading may result in invisible walls blocking the passageway into the large room and/or the smaller room with the sixth secret. See the accompanying screenshots and video walkthrough for details. I initially thought this bug only occurred in the PC and Mac versions of the game, but apparently it can happen on PlayStation as well.
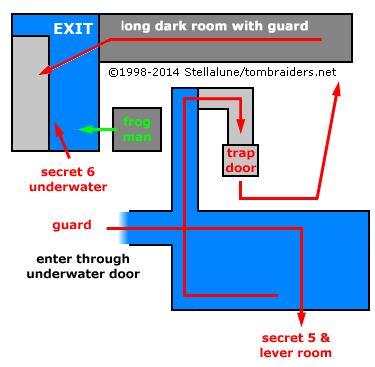
AREA WITH GUARD AND FROGMAN: After picking up the harpoons and saving in a new slot, jump into the water on the other side of the ledge from the pool where you left the UPV. Swim to the right along the brick passage. You'll pass a small, wooden door on the right wall and a trapdoor in the ceiling on the left. At the end of the passageway, swim around the corner to the right, into to a room with a glass ceiling where you can surface for air. (You can also see another UPV and some goodies in an adjacent room. This is SECRET #6. You'll get to it soon.) Pull the underwater lever to open the trapdoor you passed a moment ago. Swim back around the corner and climb up through the trapdoor. (screenshots)
When you pull up onto the ledge near the window, a brief cutscene shows a guard and frogman (counted below) in the next room. Do not fire weapons here, or you'll attract their attention. An alarm will sound and a door will close, preventing you from getting secret #6. You will then have to reload and try again if you want the secret. (screenshots)
The next bit is rather complicated, but it will enable you to get one of the more difficult secrets in the game. Ostensibly the object is to kill the frogman before he can get away and close the door to the underwater room containing the 6th secret. The catch is that you can't shoot him on land. The frogman on top of the crates is just set dressing. He can't react to Lara, and she simply won't target him. You do want to avoid attracting the attention of the guard, though. This is actually what sounds the alarm and closes off the secret. You may want to skim the main and alternate strategies below and watch this short video walkthrough before attempting this tricky sequence.
Press the button near the window to open the other small door in the underwater passage. (You passed it on your way here.) Swim through the door you just opened into the area with the guard and the frogman. If you save and reload after using the lever and button but before swimming into the big room, you may run into an invisible wall in the connecting passageway. If this happens, reload your earlier save and try again. When you exit the tunnel, stay close to the bottom as you swim to the far right corner of the room. This area has a wooden floor and 2 small openings below the waterline. You can surface here and not be seen by the guard above. (screenshots)
Swim down into the left opening for SECRET #5—Desert Eagle clips (33). (If you don't hear the chime, just check the stopwatch in your inventory. The secret should have registered.) Then go into the right opening. Pick up the small medi pack (34) in the corner. Roll and pull the lever on the opposite wall to open a concealed trapdoor on the other side of the pool. (screenshots)
Swim out of the lever room and take a breath if necessary. Just don't let the guard see you. Then swim along the bottom back toward the guard and frogman, then around to the right past the tunnel where you came in. (The door inside the tunnel is now closed, so you can't return to the previous area.) Follow the straight channel with the metal sides to the end. Surface and climb out on the right. Pull up onto the walkway above. Then crawl forward and around to the right so the guard doesn't see Lara. Crawl backwards to the hole in the floor and drop into the water below. (This is the trapdoor you just opened with the lever.) Roll, swim through the save/power-up crystal (6), and climb out of the water. Crawl across the metal ledge and around to the left, behind the tall, white rocks, where it's safe to stand. (screenshots)
NOTE: It may be possible to save here behind the white rocks, reload, and still get the secret. Just be sure to use a new slot rather than overwriting your previous save, in case it doesn't work and you need to reload. Do not save in the hole with the crystal or in the dark passageway with the guard (coming up). If you reload these saves, you may encounter the invisible wall blocking the entrance to the secret.
Now head to the back right corner. Jump up the small slope and pull up into the doorway. Follow the dark passageway to the left. There's another guard (9) lurking at the far end. As soon as he sees Lara, alarms start blaring, but don't worry you can still get the secret. Kill the guard or just run past him. Then jump from the left side of the opening, across a water-filled channel, onto the metal ledge below. The frogman (10) will have jumped down into the water and begun shooting harpoons at Lara. Kill him before he does too much damage. (screenshots)
Kill the first guard (11), who'll be firing at you from the open area ahead. Then jump into the water where you killed the frogman to claim SECRET #6—4 bunches of harpoons, a large medi pack (35-39), a save/power-up crystal (7) and a second UPV. (screenshots)
Pick up ALL the items and drive the UPV out of the secret room before saving again. If you save and reload, the invisible wall may prevent you from getting back into the secret room. If you already did this and the UPV is stuck inside, don't worry; there's another one coming up.
SECRET #6 ALTERNATIVE STRATEGY: This sequence was discovered by über-raider Jeff Reid. It requires the rocket or grenade launcher and a little patience, but it's actually much quicker than the more elaborate strategy described above. It is shown in part 2 of the video walkthrough.
Start by following the strategy above, just to the point where you swim into the room with the guard and frogman. Then, instead of heading to the right toward secret #5, turn left, follow the straight channel to the end, and climb out of the water on the small ledge to the right. Turn around and jump across the water to the corner ledge. Turn left and jump over the slope onto the white rocks behind the frogman. Pick up the harpoons (45) now if you like or return for them later. Grab the right side of the ledge on which the frogman is crouching but don't pull up right away. Instead, while holding Action, press and hold Duck to pull up directly into a crouching position. The frogman will take no notice of Lara, and as long as she remains crouched, the guard can't see her either. (screenshots)
Continue holding Crouch as you press Look and use the direction buttons to scope out the guard. Watch him carefully and you'll see his head turn back and forth. When he looks away, quickly stand up, draw the rocket or grenade launcher, and blast him. You need to be fast or he'll sound the alarm and you won't be able to get the secret in the room with the UPV. If he does set off the alarm, reload your save from before pulling the lever and try again. (screenshots)
Once the guard is dead, the frogman will just continue to sit there. You can't shoot him, so you'll be short one kill for the level, but don't touch him or Lara will die. You should now have no trouble getting the secret in the underwater room, as long as you don't save and reload beforehand.
AFTER OBTAINING SECRET #6: Now you can save your game normally and take your time scouring the area for goodies. Most important is the BOILER ROOM KEY (40), which the first guard drops. There are also 3 bundles of harpoons (41-43) together behind the crates near the window and silver door (one of these will be the HARPOON GUN if you missed it earlier); 3 separate bundles of harpoons (44-46)—one on the crates where the frogman was crouching, one on the white rocks just behind it, and one on the long ledge above the flashing red light; a large medi pack (47) in the pit behind the crates above and to the right of secret #5; a small medi pack (48) in a hole above where you climbed out of the water (you have to pull up onto the ledge and then crawl backwards to the hole); flares (49) and a save/power-up crystal (8) in a small room inside the dark passageway with the second guard. (After climbing inside, look up in the right corner and you'll see a crawlspace. The items are inside.) You can also kill the other guard here now if you didn't do so before. If you used the alternative strategy for secret #6, don't forget to get secret #5 (above) and the small medi pack (34) in the underwater room to the right of it as well. (screenshots)
NOTE: If you want that elusive rocket in the ventilation shaft (above), you can use the flying UPV glitch now to get it. Footi's excellent video guide shows how.
When you've collected everything, return to the pool where you got secret #6 and either swim or drive the UPV down the long tunnel toward the next area.
LARGE UNDERWATER ROOM WITH DIAMOND-SHAPED OPENINGS: Another diver (12) lies in wait about halfway along the tunnel, and there's a crocodile (13) in the next room. You can use the UPV to harpoon both, but I found it easier to swim into the tunnel, kill the diver with the handheld harpoon gun, and return to the previous room for air. Then drive the UPV all the way into the next room—a large, flooded room with four diamond-shaped openings on each wall—drive up to the top left opening on the right wall, where you'll find an air pocket, let go of the UPV, take a breath, and then deal with the croc. (screenshots)
Alternatively, swim into the tunnel to get the diver's attention, lure him back to the ledge where you started, climb out of the water, and shoot him with pistols from above. Then repeat the same process with the crocodile. This is especially helpful if you don't have many harpoons.
UPV NOTES: If you missed Secret #6 and didn't get the second UPV, just swim through the diamond-shaped tunnel to the next area, where you'll find a third UPV in the upper right alcove on the right wall, along with a mysterious, dead scuba diver. (screenshot) Also, you may be able to take advantage of a minor glitch to extend Lara's air supply. If you drive the UPV along the ceilings—especially the peaked ceilings in the diamond-shaped tunnels—you'll hear Lara gasp for breath as her head pokes out of the water-filled area. This is tricky, but it may help you survive a little longer.
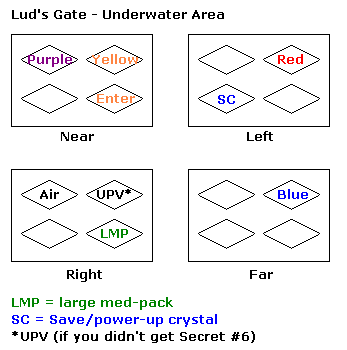
This area is illustrated in the diagram at right. The wall where you enter is labeled "Near," and the others "Left," "Right" and "Far" relative to that. Click each wall in the diagram for a screenshot.
First, pick up a few things: a large medi pack (50) in the lower right opening on the same wall as the air space and a save/power-up crystal (9) in the lower left opening on the opposite wall. (screenshots)
Now comes a series of underwater levers and doors. You'll need to go back for air between each action so Lara doesn't drown. The UPV can be difficult to maneuver in the tight spaces inside some of the side rooms. It may help to leave it behind for the first few side trips or park it outside each tunnel, swim in and pull the lever, then return to the UPV and speed back to the air hole. Here's the sequence:
Swim into the opening to the left of the entrance (when facing it). Around the corner to the right is the first lever. Pull it to open a door in the yellow tunnel. Return to the air pocket to breathe. (screenshots)
Swim into the yellow tunnel (just above the entrance). Follow the tunnel around to the left, then down a vertical shaft to the door you opened using the previous lever. Pick up a small medi pack (51) and pull a second lever. This opens a door in the red tunnel. Return to the air pocket the way you came. (screenshots)
Now swim into the red tunnel (directly opposite the one with the air pocket). Follow the tunnel to the end. Go through the door you opened with the second lever and around to the left, picking up a save/power-up crystal (10) on the way. Pull the third lever to open a trapdoor in the blue tunnel. This also lets in 2 more scuba divers (14-15). I recommend rushing back to the air hole then using the handheld harpoon gun to kill them. If you're out of harpoons, you can try to avoid them and continue on, but you will need to return here later. (screenshots)
BOILER ROOM: For this next sequence you definitely want to take the UPV. You'll need it here and in the next underwater sequence. From the air pocket, drive down into the big room and immediately turn right into the blue tunnel. Follow the passageway to the right, then down through the trapdoor in the floor, which you opened using the lever in the red tunnel. Then continue forward and up a long, vertical passage to surface near the BOILER ROOM. (screenshots)
Leave the UPV here for now and climb out of the water on the metal ledge near the burners. Jump into the pool below the burners. Grab the harpoons (52) on the bottom and pull the lever on the wall below the ledge to turn off the flames. Climb out of the water and onto the ledge above on the right. Jump across the now unlit burners, stopping to pick up a large medi pack and Uzi clips (53-54) on the slope to the left of the second burner. Then slide back down to the burner and take a running jump to the ledge near the galvanized steel duct. (screenshots)
Follow the duct around the corner to to a corridor with 3 pounding pistons. To pass each one safely, watch its shadow on the floor. Stand close to the tile with the shadow but not too close, and run under each piston as it starts to rise. Climb up onto the ledge ahead. You're now just above the pool where you left the UPV. Take a running jump from the left side of the ledge to grab the grate on the ceiling. Ignore the small opening on the left for now. Instead monkey swing all the way across the room and drop down on the ledge in the right corner. The galvanized steel duct directly ahead leads to a long air shaft, but there are no ledges or openings close enough to reach. So don't bother going that way. Rather, turn around and hop down in the area next to the pool, where you'll find Desert Eagle clips and flares (55-56). (screenshots)
Climb back onto the ledge near the galvanized duct, grab the ceiling grates again, and monkey swing over to the small opening in the wall near the waterfall. Position Lara's chest against the wall, drop, and grab the opening. Pull up into the crawlspace, turn around, and drop into the small room below. Now use the BOILER ROOM KEY in the lock to open the door. Get the save/power-up crystal (11) and press the button to open another door back in the purple passageway off the UNDERWATER ROOM WITH DIAMOND-SHAPED OPENINGS. (screenshots)
NOTES: If you missed the BOILER ROOM KEY, you'll need to go back for it now. Climb back over the ledge and drop into the pool. Drive the UPV down the long vertical shaft and through the tunnel back to the UNDERWATER ROOM WITH DIAMOND-SHAPED OPENINGS. Go into the opening on the left to get air. Then drive down to the opposite corner of the room and follow the tunnel back to the AREA WITH THE GUARD AND FROGMAN. The BOILER ROOM KEY should be sitting on the ground in the open area near the dead guard's body. Get it and return to the boiler room the way you came. Unlock the door and press the button.
LARGE UNDERWATER ROOM WITH DIAMOND-SHAPED OPENINGS (again): Climb back through the crawlspace and drop into the water. Drive the UPV back down the long, vertical passage to the bottom. Go up through the trapdoor in the ceiling and follow the blue tunnel back to the big room. There's another crocodile (16) waiting down here. Harpoon it or just drive past it. The air pocket is now gone, so you may want to kill the croc and then return to the BOILER ROOM area to breathe. Then drive back down to the big underwater room and directly across into the purple tunnel. At the end of that tunnel, turn left through the door you opened with the button, and continue up another long, vertical passage until you can surface. (screenshots)
MACHINE ROOM & LONG SHAFT: Climb out of the water on the ledge with the large medi pack (57). Then cross to the other ledge. Step to the edge facing the platform with the swinging steel gizmo. Walk two steps back then do a standing jump over the pool of oil to grab the edge of the platform. Traverse to the left (so Lara is touching the wall) and pull up. Walk across the platform to the other edge. (Or, if you're having trouble walking past the machines without taking damage, stand with Lara's shoulder against the wall and roll.) Take another standing jump to grab the next platform. Again, pull up next to the wall where it's safe. Walk to the far edge and take another standing jump to grab the last platform. Pull up. Then jump into the doorway. (screenshots)
Follow the passage to the corner and kill the guard (17) who approaches. Now backtrack toward the machine room and climb onto the ledge above on the right. Follow the duct to a doorway overlooking a wide ventilation shaft. Take a running jump to grab the higher of the two small, rectangular openings across the way. Drop and grab the opening below. Pull up and crawl through the duct to another ledge overlooking the open shaft. Again, take a running jump to grab the opening opposite. Pull up and crawl through the ducts to the end of the level. (screenshots)
A cutscene ensues: Lara confronts Sophia Leigh in her office. Sophia is unwilling to part with her artifact and flees. Lara, naturally, won't take "No" for an answer. The dialogue is included on the cutscene transcripts page. You can also re-watch the movie on my YouTube channel.
†UPDATE HISTORY: 9/1/14 - First major update since this walkthrough was created in 1998. This revision includes many new screenshots as well as various other corrections and clarifications.
12/23/15 - Removed a separate page with suggestions for obtaining the extra rockets after it became clear that it did not work as intended. Also adjusted the item count accordingly. I apologize to anyone who tried this and got stuck, and I thank Zak for bringing it to my attention.
12/2/17 - Updated secret #6 bug note, as I have been informed by several players that this issue can occur in the PlayStation version as well.
2/5/24 - Added VGCartography's level maps, with permission. Visit VGCartography on DeviantArt for high-res versions, and follow on Twitter/X and YouTube for more fantastic game maps.
5/3/24 - Added kill and item counts, and fleshed out the notes on obtaining the two extra rockets. (Actual remastered updates coming eventually, but this should help.)
ACKNOWLEDGEMENTS: Special thanks to the participants in the alt.games.tombraider newsgroup, without whom some parts of this walkthrough could not have been written. Thanks also to Cadfael, Dennis, John G., Gus, Hank, Haydon, Helena, John M., José, Kathy, Lindsey, Megan, Mike B., Paul, Peder, and Terry, who sent in contributions for this level. Special thanks to Sugarmama, Jeff Reid, Megan, and Jack for refinements to the secret #6 bug avoidance strategy, and to Footi for much help with useful glitches and 100% completion over the years.
‡NOTE ON VIDEO GUIDES: Eldin's videos don't always follow the same strategies I use in my walkthroughs, but if you prefer that format, I think you'll find them very useful.
WAS THIS WALKTHROUGH HELPFUL? If not, I apologize and invite you to contact me with any questions. If you need help right away, I recommend the r/TombRaider subreddit. Other fan-run forums are listed at tombraiders.net/stella/community.html. If this site was useful, please consider supporting it financially or in other ways. For details, visit tombraiders.net/stella/support.html. As always, I welcome your corrections/suggestions. Thank you!
Copyright © 1998- - Stellalune (). Feel free to copy or print this walkthrough for personal use. By all means, share it with friends, but please include this credit line so people can send me their feedback. No part of this walkthrough may be reproduced on another site without permission. Follow this link for details about this site's advertising and privacy policy.
Stella's Tomb Raider Site: tombraiders.net.