Stella's Classic Tomb Raider 3 Walkthrough
NOTES ON THE REMASTER: This guide has not yet been updated for the remastered game. Revisions are in progress but will take time. I hope this version, based on the classic game, will still be helpful. Thanks for your patience.
LONDON LEVEL 2: ALDWYCH
Updated: 11/17/25(†)
Secrets: 5 Pickups: 50, including 3 keys, Old Penny, Ticket, Masonic Mallet, Ornate Star, and UZIS Kills: 29 Save/power-up Crystals: 9
Be sure to find all the secrets so you can access the bonus level at the end of the game. Note that the pickups in this level will include the SHOTGUN, MP5 SUBMACHINE GUN, and ROCKET LAUNCHER if you didn't get them earlier.
LEVEL MAP by VGCartography (used with permission)
Aldwych Video Walkthroughby Eldincy‡
Objectives: Make your way through an abandoned tube station to the secret lair of a mysterio us brotherhood known as the Damned. First, find the maintenance key, which will help you get some money. Locate a hidden Masonic temple and two keys, which unlock a door within the temple so you can get the Masonic mallet. Buy a ticket with the coin you found earlier and use it to gain access to another area, where you can use the mallet to (indirectly) reach the level exit. In the process, you may discover some additional items and secrets, and you'll find out more about the ageless Miss Sophia Leigh.
The level begins with Lara falling down a hole from the bell tower above. Hold Action to grab the end of the first slope. Release the Action button briefly then hold it again to drop onto the slope below, slide forward, and grab the opening opposite. (There's no need to jump.) Pull up and claim a box of shotgun shells (1). (screenshots)
NOTE: if you don't already have the SHOTGUN, you'll get it here instead of the shells.
Drop into the pool below, climb out on the wide ledge, and go up the stairs. Just before the top of the stairs there's a square vent on the right. Shoot it and drop into the alcove to get a save/power-up crystal (1). Then climb the grating ladders to the room above. (screenshots)
NOTE: If you miss the vent and continue to the top of the stairs, you'll emerge in a ROOM WITH TICKET MACHINES. A thug with a flaming club will attack Lara. (Normally you'd meet this enemy a little later.) Kill him, grab the small medi pack he drops, then return to the vent, shoot it, get the crystal, and climb the ladders.
ROOM WITH LOW CEILING AND RED METAL GIRDERS: Circle around the barrier on the left side of the room, avoiding the hole in the floor for now. Kill the gang member (1) lurking in the far left corner. Then pick up a bunch of goodies—Uzi clips, shotgun shells, and flares (2-4)—lined up between the girders along the opposite wall. Return to the opening in the corner where you climbed up. Just across from it is a movable block with metal coils on its side. Pull this block once. Then go around to the right and drop down through the hole in the floor onto one of the ticket machines in the room below. (screenshots)
NOTE: Again, if you don't already have the SHOTGUN, you'll get it in the red-girder room instead of the shells.
ROOM WITH TICKET MACHINES: Shoot another thug (2) from above. If he runs off before you kill him, either hang from the edge of the machine to get his attention, then pull up and shoot him; or drop down and finish him, then climb back onto the machine; or just let him go and deal with him later. Hop over to the top of the next machine (i.e., the one closest to the glass-windowed ticket office) and jump up to grab the block with the metal coils you moved earlier. Climb into the passageway above. Drop down through the other opening. (You'll land on the other side of the movable block.) Then climb down into the ticket office, where you'll find a large medi pack (5) and the MAINTENANCE KEY (6). Press the button to open the doors so you can get out. Finish off that thug (2) if you didn't do so before and loot a small medi pack (7) off his body. (screenshots)
As you've probably surmised, you're now inside the abandoned Aldwych tube station. In the far corner of the room, beyond the row of tall floor lamps, is a closed door (you'll return here later) and just beyond it is the stairway leading back down to the pool at the start. (screenshot) On the other side of the ticket machines are four doorways. Beyond them are two sets of escalators leading down to the train platforms. (screenshot)
RIGHT SIDE ESCALATORS AND MAINTENANCE ROOM: Go through one of the two doorways on the right and down either escalator, but mind the gap! To cross the dirt-rimmed pit, take a running jump on the right side, just beyond the bottom of the escalator, and aim straight for the opposite edge of the pit. If you try to jump across the left side of the pit, Lara will bang her head on the low ceiling. If you land too far to the right on the brown slope, Lara will slide back into the pit. (screenshots)
NOTE: If you fall onto the tracks below, it's probably better to reload your last save. You can reach the next area from there, but you'll be missing an important item and have to backtrack later.
As you move through the doorway onto the train platform ahead, draw weapons, turn right and kill another masked thug (3) with a flaming club and his mangy dog (4). If you like, you can jump down onto the tracks and shoot from there. Neither enemy will follow. Just don't go too far along the tracks or Lara will be run over by a speeding train. Use the key in the lock at the end of the platform to open the MAINTENANCE ROOM. Press the button inside to turn on the lights and pick up Uzi clips and a small medi pack (8-9). Exit and go to the other end of the platform, where you'll find an OLD PENNY (10) near the illuminated candy machine. (screenshots)
RED-LIT ROOM WITH STACKED WOODEN CRATES: Go back to the dirt-rimmed pit at the bottom of the escalators. Safety drop into the pit and follow the train tracks to the right (i.e., into the tunnel below the room with the "Westbound Trains" signs). Run or sprint along the tracks into the doorway on the right to avoid an oncoming train. Inside is a room with numerous wooden crates and 2 angry gang members (5-6). (screenshots)
Once you've dealt with the thugs, go up the ramp into the room and pick up the small medi pack (11) behind the crates on the left. Then turn around and climb over the crates above the entrance to find a save/power-up crystal (2) in the corner. When you climb back out of the depression where you found the crystal, there's a dog (7) waiting just below. Shoot it before hopping down. (screenshots)
Now take a running jump from the medium-sized crate near the wall to grab the top edge of the tall stack in the corner with the pink metal block above. Pull up, turn around, and step to the outer corner of the tall stack. Take a standing jump to grab the left side of the thick, brown ledge above. Pull up and claim the long-awaited UZIS (12)! Then safety drop to the floor. (screenshots)
NOTE: If you already have the guns, you'll get Uzi ammo here instead.
Climb onto the crates above the entrance ramp, back up to the wall, and and take a running jump to grab the tall stack of crates in the middle of the room. Pull up. (There's a button down in the empty space behind these crates. It doesn't do anything except sound an alarm, so I recommend not pressing it.) To reach the level above, stand in the middle of the crate that's two to the left of the slope, facing out over the open room. Side flip to the right to land on the slope and immediately jump forward to grab the grating above. Climb up until Lara's hands are on or around the second horizontal, metal band from the top. Then backflip onto the ledge behind. (screenshots)
Turn so the metal grating is on Lara's left. Then sidestep to the right to spot another gang member (8) lurking on the ledge above. If you draw the Desert Eagle, you can jump in place and kill him with one round. Pistols work fine too. Just roll so Lara's back is toward the wall when he climbs down next to you. Otherwise, he might push Lara off the edge. When he's dead, relieve him of his small medi pack (13). (screenshots)
Now move to the edge of the crate facing the climbable grate. Take a standing jump forward to grab the grating on the ceiling. Monkey swing forward and around the corner to the right. At the end of the grating, drop onto the ledge behind the purple railing. Slide down the short ramp and climb into the doorway on the right. Turn around and jump to grab the slightly higher ledge, where you'll find a rocket (14). Hop down and climb back up into the doorway near the huge drill. (screenshots)
DRILL ROOM: Make sure your health bar is at least half full and save your game, since you'll probably need to try the next sequence a few times and you'll lose about a third of your health in the process. Check the screenshots or this short video walkthrough if necessary.
Turn around, slide backwards down the slope, and grab the end. As soon as you do, the huge drill begins to descend from the top of the shaft. Let go and drop onto the break-away tiles. Immediately side flip onto the slope to the left. Let Lara slide just a bit, then jump forward and grab the horizontal crevice on the opposite wall. Traverse to the right and drop onto more break-away tiles. As soon as you land, roll so Lara comes up facing away from the wall. Then when the tiles break, she'll drop onto the slope below facing downhill. Slide and jump forward to land on the opposite slope facing uphill. Slide back and grab the end of the slope. (At this point, there's no need to hurry; you're safe from the drill.) Drop and grab three more times to descend a series of ledges. Then pull up into the alcove with the save/power-up crystal (3) and MP5 clips (15). This is SECRET #1. (screenshots)
NOTE: The secret area will contain the MP5 SUBMACHINE GUN itself if you don't already have it.
Safety drop to the bottom of the drill shaft and pick up the large medi pack (16) on the low ledge. Then follow the ramp up to the next landing. Step down into the slightly lower area. Climb into the alcove on the left, turn around, and take a standing jump to grab the ledge above the next ramp. Pull up into a small room with a gray tile floor. Then climb through the hole in the ceiling into a tall room with brick walls and a small pool. (screenshots)
BUG NOTE: It is crucial that Lara steps on the tile between the opening in the floor and the doorway overlooking the drill room. If she pulls up at the right edge of the opening instead, this will cause problems later when you return to the drill room. For details, see the previous set of screenshots and this separate page with notes about the dropped drill bug.
TALL, BRICK ROOM WITH FLAME TRAPS: Grab the save/power-up crystal (4) in the corner behind the grating ladder. Then climb the grating onto a ledge with flames billowing across it. Be sure to stand at the edge to avoid catching fire. When the flames cycle off, take a standing jump onto the ledge ahead on the right. When you do, the flames go out. Climb onto the ledge ahead for a small medi pack (17). Vault onto the sloped ledge on the left, move to the other end, then take a diagonal standing jump to grab the next section of climbable grating. Climb up until Lara's feet are on the first silver stripe and backflip into the alcove behind. Press the button to open a trapdoor back in the WOODEN CRATE ROOM. This also turns on another flame at the top of the grating ladder. Jump from the edge of the alcove to grab the grating and then climb to the top. Crawl across the ledge beneath the flames to get the Uzi clips (18). Wait for the flames to cycle off, then stand up and step off the other edge. (screenshots)
RETURNING TO THE TOP OF THE DRILL ROOM: Head to the left and climb a few steps and ledges into a low, dark room above the tracks. Watch out for the hole in the grating floor as you explore. At the far end of the room there's a rat (9) guarding a large medi pack and some shotgun shells (19-20) in an alcove. Get the goodies, then safety drop through the hole in the grating onto the platform below. (screenshots)
Move to the edge of the dirt-rimmed pit, turn around, and safety drop onto the tracks below. Head forward down the tracks to the doorway on the right and re-enter the WOODEN CRATE ROOM. Climb the crates and vertical grating. Then use the grating on the ceiling to monkey swing across the room to the ledge near the DRILL ROOM, just as you did before. Walk over the drill and climb into the red-and-pink, metal duct, where you'll find the FIRST SOLOMON'S KEY (21). (screenshots)
BUG NOTE: There is a potentially game-killing bug in this area. If you missed a particular trigger earlier in the level, you may return to this area only to find the drill sitting far below the doorway, making it impossible for you to reach the key and continue the level. Follow this link for notes about the dropped drill bug, as well as PC and Macintosh save files with the drill in its proper position.
RETURNING TO THE STACKED CRATE ROOM: After getting the key, you'll need to take the long way back: Climb up into the red-and-pink duct and follow the slope to the top. Safety drop into the dark room above the tracks, where you killed the rat earlier. Drop through the hole in the grating into the room below. Then drop into the dirt-rimmed pit to land on the tracks below. Head forward down the tracks to the doorway on the right and re-enter the WOODEN CRATE ROOM. Climb the crates and vertical grating again. This time, instead of monkey swinging across to the drill, climb up to the trapdoor in the corner of the ceiling. It will be open if you pressed the button in the BRICK SHAFT WITH FLAME TRAPS. (screenshots)
NOTE: If you missed the button and the trapdoor is still closed, you'll need to open it now. Directions are included on a separate page to save space.
ROOM WITH ROLL-DOWN DOORS: Climb through the trapdoor into the room above. Go around the corner to the left and take out the thug and his dog (10-11) in the next room. This guy doesn't have a burning club, so it's not as crucial to kill him quickly. You can probably take him out with pistols then jump up on the ledge and deal with the dog from there. (screenshots)
Get the shotgun shells (22) on the ledge above the trapdoor where you came in. The closed door near the trapdoor contains the final secret of the game. You'll be back to get it later. There's also another closed door on the opposite side of the room, which you'll open from the other side in a bit. The roll-down doors at the top of the stairs don't open. (screenshots)
For now, pick up the MP5 clips (23) in the little room between the two flights of stairs. Fall through the break-away tile in the corner and pull the movable box with metal coils once, so the trapdoor above it falls open. Climb out of the hole and drop through the trapdoor. Follow the passageway around to a crawlspace, crawl through until Lara can stand, then pull up on the right and follow the brick hallway to the end. (If you go to the left end of this hallway, after climbing out of the tunnel, you'll end up back at the ROOM WITH THE ROLL-DOWN DOORS.) Just around the corner, the passage widens. On the left is a sloping passageway with metal walls. Ignore it for now; it's the exit from the area ahead. On the right is a green alcove with 2 buttons. These control a set of 3 timed doors in the next room. (screenshots)
THREE TIMED DOORS: If you like you can press both buttons to see which doors they open. You may also want to scout ahead to check the layout of the room you'll need to run through. Then return to the buttons and save your game before starting the first timed run. The sequence is shown in a series of screenshots as well as a short video walkthrough.
RIGHT TIMED DOOR: Press the right button. You now have about 15 seconds to make it through the farthest (i.e., rightmost) timed door before it closes. Immediately roll and run up the hallway to the room with the doors. Use sprint on the straight-aways but release it for more control as you round the corners. Run around the left side of the pool then straight on past the middle door and into the farthest door. (It is possible to run through the shallow corner of the pool or jump over it, but more often than not you end up falling in. So you may just want to avoid it.) Once you manage to get inside the first room, press the button to open a trapdoor in the middle room. (You can see it through the grate opposite the button.) Slide down the chute and follow the corridor back to the buttons, picking up some flares (24) on the way. (screenshots)
MIDDLE TIMED DOOR: Press the right button again. Repeat the same run but this time go through the middle door. Once inside, climb up through the trapdoor, which you just opened using the button in the first room. When you pull up into the passageway, the trapdoor closes behind you. Press the button to raise a metal grate just ahead. This grate actually forms part of the ceiling in the leftmost room, which is now below you. Move over the grate, follow the passageway to the end, and drop down near the pair of buttons. (screenshots)
IMPORTANT: Make sure you press the button in the passageway above the middle room. Do not drop through the open grate into the left room. With the grate still open, you will not be able to swing across the ceiling to get the second Solomon's Key. You can go through the doorway in the corner of the third room to get back to the buttons that control the timed doors, but the button that opens the trapdoor in the middle room will not work again. So you'll be stuck and have to reload.
LEFT TIMED DOOR: Press the left button. The timer here is even faster, but if you immediately roll, then run through the hallway, sprinting on the straight parts and releasing the Sprint button while turning corners, you can then sprint straight on through the left door before it closes. Inside, climb onto the metal ledge and use the ceiling grates to monkey swing across the pool. (This is only possible if you raised the grate by pressing the button in the passageway above the middle room.) When you reach the end of the ceiling grates, drop and grab the ledge below. Pull up into the alcove and get shotgun shells (25), a save/power-up crystal (5), and the SECOND SOLOMON'S KEY (26). Once you have the key, drop into the pool and follow the underwater tunnel to emerge back in the ticket area. (screenshots)
NOTE: If you're unable to complete the timed run, and you're playing on the PC or Mac, don't despair. Download a save file with Lara inside the left door.
ROOM WITH TICKET MACHINES (again): Kill the gang member (12) lurking just inside on the right. Then use the OLD PENNY you found earlier in the fourth machine from the ticket window to buy yourself a TICKET (27). Note that each kiosk houses two ticket machines, so the fourth machine is on the right side of the second kiosk. (screenshot) Also, don't forget to pick up the ticket when it drops out of the machine onto the floor.
NOTE: If you missed the OLD PENNY earlier, you can easily backtrack for it now. Directions are on a separate page.
LEFT SIDE ESCALATORS: This time, exit through either of the doorways near the ticket window and go down the escalators to another train platform with a huge pile of dirt. When you step up onto the pile, another thug (13) with a flaming club emerges from between the square columns on the left. Take him out and continue forward. At the far end of the room shoot out the vent to access SECRET #2—a pit containing shotgun shells (28). (screenshots)
When you have the secret climb back up through the vent and head to the right, onto the train platform. Shoot the 2 rats (14-15) on the tracks. Then, if you like, you can run up the stairs and kill a rabid dog (16) so he won't surprise you later when you re-enter this area from the other side. Do not bother exploring the room ahead. You're still missing an item you'll need there. Instead, return downstairs to the train platform. (screenshots)
Hop down onto the tracks and go to the right, toward the purple lights. As you approach the first little door on the right side of the tunnel, a thug (17) comes out and runs along ahead of you into another doorway. The door he came from of closes behind him. So follow him quickly through the second door so as not to be hit by an oncoming train. Kill the thug. Then press the button to open two doors outside. The one you passed a moment ago contains a save/power-up crystal (6); the one farther down the tracks is where you're headed next. (screenshots)
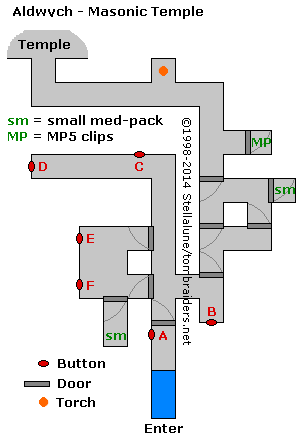
MASONIC TEMPLE: The area leading to the temple is a maze of passages, doors, and buttons. Use the map at right and these screenshots to help navigate. You may also want to save your game at the entrance in case you get mixed up or press the wrong buttons. It's easier to reload than to bumble around trying to undo what you've done.
Start by slogging through the pool and pressing the first button (A on the map) to open the door. Enter and take the first right, then turn right again. Press the button here (B). Turn around turn left, then turn right, and then follow the long corridor away from the entrance. At the end, just to the left, is another button (C); press it but don't press the button at the end of this hall (D). Turn around and follow the long corridor back toward the entrance. The doors on the right are now open. Go inside and pick up a small medi pack (29) in the dark alcove. Now press the left button (F), but not the one on the right (E). After pressing button F, turn around and run straight across the hallway to the wall. Turn right to face the first button you pressed after entering the maze (B). Press it again (it should turn from green back to red). Turn around and go forward then to the right into a newly opened passageway. Follow it, passing two alcoves containing another small medi pack and MP5 clips (30-31). Continue past the alcove with the burning torch to the inner sanctum of the Masonic temple.
Enter the temple, taking care to avoid the break-away floor tiles with spikes below. Go around the fenced-in area to the right side of the room. Here you'll find 2 receptacles where you can use the SOLOMON'S KEYS. Doing so opens three doors: one just behind you to the left, another on the far right side of the room (when facing the keyholes), and a third door inside an underwater passage you will explore shortly. Go around the corner to the right and pick up a save/power-up crystal (7) and Uzi clips (32) near the railing surrounding the rotating moon sculpture. (screenshots)
NOTES: If you are missing either of the Solomon's keys, you'll need to backtrack for it now. Directions to each key are included on a separate page. If you missed the UZIS in the ROOM WITH THE STACKED CRATES, you'll get the weapons here instead of ammo.
Now head for the back of the room, carefully avoiding the break-away tiles with spikes below. Run up the small, stone ramp, over the tile concealing another spike pit, and into the little room you just opened. Grab the MASONIC MALLET (33). Turn around, walk to the edge and take a standing jump over the spikes onto the ramp. Immediately draw weapons and kill the dog (18) that charges from the left. (screenshots)
Turn around so the alcove where you found the mallet is on Lara's right. Ahead is a floor-length purple curtain with a break-away tile in front of it. Run across the tile—don't worry; there are no spikes below this time—and through the curtain into a little alcove, where you'll find an ORNATE STAR and some MP5 clips (34-35). The two items overlap, so it's difficult to see the clips, but you'll get both items at the same time. Turn around, walk to the edge, and then jump back through the curtain. (screenshots)
Exit the temple through the small door in the opposite corner, which also opened when you used the Solomon's keys. Pick up a small medi pack and flares (36-37). (screenshot) Then follow the flooded passage to the end, where you can surface.
FLOODED ROOM WITH UNEVEN CONCRETE LEDGES: Climb out of the water onto the low, concrete ledge. Then pull up onto the ledge above. There's a doorway above this ledge, but you don't need to go there now. Instead turn around to face away from this doorway and take a running jump to grab the sloping shelf on the other side of the room. Pull up onto the shelf, crawl through to the right, back up to the edge, and drop onto the ledge with the railing. Turn around, pull up onto the higher ledge, and step to the right corner (i.e., the one closest to the crawlspace at the top of the wall). Take a standing jump from the corner to grab the ceiling grate. Monkey swing forward as far as you can. Then drop and grab the edge of the crawlspace. Pull up and crawl through. (screenshots)
TURNSTILE AND SECOND TICKET OFFICE: Shoot the 2 rats (19-20) on the steps beyond the turnstile. Then stand facing the panel in the middle of the turnstile and use the TICKET you bought earlier to gain access to the next room. (screenshots)
NOTE: If you don't yet have the ticket, you'll need to backtrack for it now. Directions are included on a separate page.
Go through the turnstile and up the steps into the next room. Immediately turn left and take out another club-toting goon (21) as he comes around a crate toward you. Confiscate the goon's small medi pack (38). Then go around the left side of the long row of turnstiles and use the ORNATE STAR to unlock the room with the campfire inside. Another thug (22) with a flaming club rushes out. Backflip away while shooting or hop back and pop him once with the Desert Eagle before he flambées Lara. (screenshots)
NOTES: If you're having difficulty using the ORNATE STAR, try standing in the middle of the door, rather than facing the lock. If you missed the ORNATE STAR, you can go back for it. Again, directions are included on a separate page.
Enter the office for SECRET #3. The secret registers as soon as you step inside. The reward is a save/power-up crystal (8), but you need to do a little climbing to get it. If you're playing the PC or Mac version and you don't need a health boost, you can skip it and just continue with the next paragraph. If you've got the PlayStation version, you'll probably want that crystal. So climb up through the hole in the ceiling directly opposite the entrance and follow the rusty passageway until you can drop down into the room with the crystal. The exit opens automatically, and you're back at the landing above the pool. Kill that nasty dog (16, above) on the stairway to the right if you didn't do so earlier. Then return to the FLOODED ROOM WITH UNEVEN CONCRETE LEDGES at the top of the stairs and climb back up to the TURNSTILE room the same way you did before. (screenshots)
FROM THE TURNSTILE ROOM TO THE TRAIN CAR: This time go to the right, down the escalator. Use the MASONIC MALLET to open the door at the bottom. (Again, face the middle of the door and not the lock to open it.) Enter and press the button to open a trapdoor in a nearby TRAIN CAR. Then turn around and pull up into the crawlspace opposite the button to find a rocket (39). This is SECRET #4. (screenshots)
NOTE: If you don't have the MASONIC MALLET, you must go back and get it, since this item is not optional. Follow the same directions as for the ORNATE STAR on this separate page.
Exit the room with the button and drop down into the hole on the left. When you step on the light gray tile, the door on the right opens and a thug (23) comes out to pound on Lara. If you jump over the hole in the floor you can then turn around shoot him. He won't follow. When he falls, jump back over the hole and relieve him of a small medi pack (40). The ENCLOSED WALKWAY he came from leads down to the train platform below the RIGHT SIDE ESCALATORS, but don't go that way yet. Instead hop back over the hole and continue along the passageway. Kill another dog (24) just around the corner. Then continue down the stairs to another train platform. (screenshots)
Shoot the gang member (25) with the flaming club at the end of the platform before he gets too close. He'll drop another small medi pack (41). There's also a save/power-up crystal (9) in one of the alcoves; a large medi pack and shotgun shells (42-43) in a hole in the mud-filled, bat-infested tunnel beyond the campfire; and flares (44) on top of the TRAIN CAR. (screenshots)
TRAIN CAR AND TILED HALLWAY BEYOND: You can't get into the car from here, so return up the stairs and follow the passageway back to the hole in the floor. Drop into the hole. Then crawl under the overhang below the yellow light. Pull up through the trapdoor into the TRAIN CAR. (screenshots)
The trapdoor then closes behind you. Press the button to move the train car to another location and open a second trapdoor beside the button. Drop through the opening and then crawl through the low tunnel to a hallway with alcoves along the right side. Proceed forward, but do not shoot the gang member (26) with the flaming club who dashes out of one of the alcoves. Instead, wait for him to go around the corner and let him open a door for you. He'll return with a buddy (27). Now you can kill them both. (screenshots)
IMPORTANT: If you kill the first man before he opens the door, you will not be able to obtain the final secret. If you don't care about the getting everything and just want to finish, turn into the first alcove on the right, pick up the small medi pack, and slide down the ramp to end the level.
Go around the corner and follow the hallway to the metal door the thug opened. Do not slide down the ramp or you'll end the level prematurely. Inside the small room, pick up a rocket (45) and press the 2 buttons. One re-opens the first trapdoor back in the TRAIN CAR; the other opens a small door back in the ROOM WITH THE ROLL-DOWN DOORS. (screenshots)
BACKTRACKING FOR SECRET #5: Exit the little room with the buttons, turn left, and follow the tiled hallway past the alcoves, picking up a small medi pack (46) in the last one. (You can also get it later when you return to finish the level.) Continue to the end of the tiled hallway, turn right, and climb up through the trapdoor into the TRAIN CAR. Press the button again to move the car back to its original location. Drop through the trapdoor near the button. Follow the tunnel around the corner and under the first trapdoor. Crawl up the tiled slope and pull up onto the block below the hole in the ceiling. Climb out of the hole on the right side. (screenshots)
Go forward, then left into the ENCLOSED WALKWAY, which crosses over the tracks then leads down a series of brown-tiled ramps to the train platform at the bottom of the RIGHT-SIDE ESCALATORS. Move to the edge of the dirt-lined pit, safety drop onto the tracks below, and follow them down to the WOODEN CRATE ROOM. Climb to the top of the crates and up through the trapdoor into the ROOM WITH the ROLL-DOWN DOORS. The newly opened door on the right contains SECRET #5. Light a flare and throw it in ahead of you. Then enter and go around to the left with weapons drawn. Kill another bad guy (28) and pick up a huge cache of goodies: MP5 clips, Desert Eagle clips, and a rocket, plus a large medi pack (47-50) the thug drops. Now, wasn't that worth the walk? ;-) (screenshots)
NOTE: If you didn't find the ROCKET LAUNCHER earlier, you'll get it here instead of the rocket.
Before leaving this room, be sure to press the button to re-open the trapdoor into the TRAIN CAR, so you can get back to the end of the level. Then exit the secret room, draw weapons, and cross the big room toward the small, metal door directly opposite. Shoot another thug (29) who comes at you from the stairs near the second roll-down door. (screenshots)
NOTES: Unless you step on the tile directly opposite the button inside the secret room (screenshot), the last thug will not appear. You may do this anyway if the previous enemy falls there and you pick up his health pack, but it's easy to miss it. If you don't care about getting all the kills, just don't step on that square or don't go over to the far side of the room. If the small, metal door is still closed, don't worry about it. It opens from the other side but only leads back to the area with the THREE TIMED DOORS, and there's no need to return there now.
RETURN TO THE LEVEL EXIT: Drop through the trapdoor in the corner to the right of the secret room, where you climbed up earlier. Now you're back in the WOODEN CRATE ROOM. Climb over to the next crate and then take a standing jump forward to grab the ceiling grates. Monkey swing over to the DRILL, like you did before. Cross over the drill and pull up into the red-and-pink metal duct where you found one of the SOLOMON'S KEYS. Follow the duct to the upper end and drop down into the dark room above the tracks, where you killed the rat earlier. Drop through the hole in the grating into the room below. Now, turn so the dirt-rimmed pit is behind Lara and you'll see the corridor with the brown-tiled ramp ahead on the left. Follow it up and across the ENCLOSED WALKWAY. Then turn right, drop down into the hole, go through the crawlspace beneath the yellow light, and then climb up through the trapdoor into the TRAIN CAR. Press the button to move the car and open the other trapdoor. Drop down and crawl through into the hallway where you killed the 2 guys who opened the door for you. (screenshots)
Turn into the first alcove on the right. Pick up the small medi pack (46) if you didn't get it before. Then finish the level by dropping into the dark shaft at the end of the ramp.
A cutscene follows: Lara falls into the lair of the Damned and finds herself before their leader. He correctly guesses that she's looking for Miss Leigh. Since he and his gang wear masks, Lara does not immediately understand their predicament. She soon learns that after taking part in Sophia Leigh's failed experiments to discover the secret of eternal beauty, he and the others ended up faceless monstrosities. The supreme irony, he explains, is that when he tried to take his own life, he was unable to do so. He then strikes a deal with Lara: If she brings him some embalming fluid from the natural history museum, he and his friends will help her get to Sophia Leigh. The dialogue is included on the cutscene transcripts page. You can also re-watch the movie on my YouTube channel.
†UPDATE HISTORY: 7/12/14 - First major update since this walkthrough was created in 1998. This revision includes many new screenshots as well as various other corrections and clarifications.
9/18/14 - Added note about triggering the last enemy near secret #5, thanks to a tip from Shy74.
2/5/24 - Added VGCartography's level maps, with permission. Visit VGCartography on DeviantArt for high-res versions, and follow on Twitter/X and YouTube for more fantastic game maps.
5/3/24 - Added kill and item counts. (Actual remastered updates coming eventually, but this should help.)
11/17/25 - Fixed an error in the sequential kill count, thanks to a correction from Zak.
ACKNOWLEDGEMENTS: Special thanks to the participants in the alt.games.tombraider newsgroup, without whom some parts of this walkthrough could not have been written. Thanks also to Chris E. for his excellent detective work pinning down the cause of the dropped-drill bug; to Peder, who sent me one of the timed-door saves I'd been missing; and to Andy D., David M., Guillermo, Judith, Scot, and Vesa for other help with this level.
‡NOTE ON VIDEO GUIDES: Eldin's videos don't always follow the same strategies I use in my walkthroughs, but if you prefer that format, I think you'll find them very useful.
WAS THIS WALKTHROUGH HELPFUL? If not, I apologize and invite you to contact me with any questions. If you need help right away, I recommend the r/TombRaider subreddit. Other fan-run forums are listed at tombraiders.net/stella/community.html. If this site was useful, please consider supporting it financially or in other ways. For details, visit tombraiders.net/stella/support.html. As always, I welcome your corrections/suggestions. Thank you!
Copyright © 1998- - Stellalune (). Feel free to copy or print this walkthrough for personal use. By all means, share it with friends, but please include this credit line so people can send me their feedback. No part of this walkthrough may be reproduced on another site without permission. Follow this link for details about this site's advertising and privacy policy.
Stella's Tomb Raider Site: tombraiders.net.