IMPORTANT NOTE ON SAVING & CHECKPOINTS: Checkpoints are the spots in each level where the game auto-saves. These are noted in blue and numbered in the walkthrough text to correspond with PC, Macintosh, PSP & Wii savegame files available for download. (Please note that the number and location of checkpoints vary slightly for the Nintendo Wii game.) Although it is also possible to save manually, the save system in Anniversary is very different from the older Tomb Raider games and differs in several ways from the TR Legend save system. Please see the Anniversary Controls page for details. This may save you a great deal of frustration as you make your way through Lara's latest adventure.
DESIGNERS' COMMENTARY: The commentary tracks are unlocked after completing each chapter (i.e., Croft Manor, Peru, Greece, Egypt and Lost Island). For details, see the Rewards page. You'll also find full transcripts of the commentaries here. (Many thanks to Treeble for these.)
LEVEL 5: ST. FRANCIS FOLLY | Updated: 12/11/12(†) |
PS5 Platinum Trophy Video Walkthrough by Eldincy‡
Kills: 11 Supplies: 16 Other: HEPHAESTUS KEY, POSEIDON KEY, ATLAS KEY, DAMOCLES KEY
Artifacts: 6 Relics: 0 Rubbing Rewards: 0(*)
Time Trial: 34:00(**)
Introductory Cinematic: Over an exterior view of the ruined monastery that has come to be known as St. Francis Folly, we hear another excerpt from Sir Richard Croft's diary. He speaks of the Scion as being a repository of knowledge to rival the ancient library at Alexandria. It may, he speculates, even be able to explain his wife Amelia's disappearance. (Gamers who've completed Tomb Raider: Legend will notice the allusion to the storyline from that game.)
We then see Lara reaching the summit upon which the building is perched. She stumbles upon some discarded tin cans and comments, "Pierre, you litterbug."
LONG ENTRANCE HALL WITH BROKEN COLUMNS: The level begins just inside the monastery at CHECKPOINT 1. Advance cautiously to meet 2 lions that charge out from behind the columns ahead. If you move quickly, jumping and/or rolling forward, you may be able to make it to the first column on the left and climb up before the first lion reaches Lara. Then you can shoot the cats safely from above. I found it easier to just keep moving and stay near the middle of the room so the lions don't corner Lara and maul her. Once you've killed them, another movie plays.
Cinematic: Lara and Pierre play hide-and-seek among the columns. After an exchange of banter, they decide they'll each go after the next piece of the Scion, and may the best man—or woman—win.
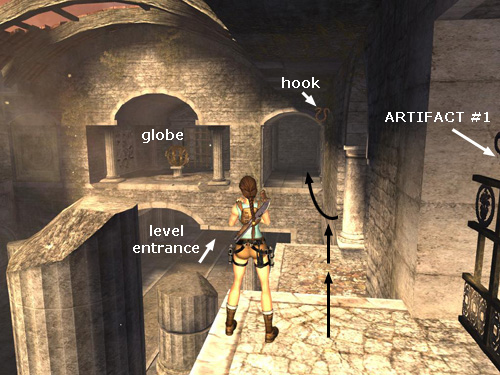
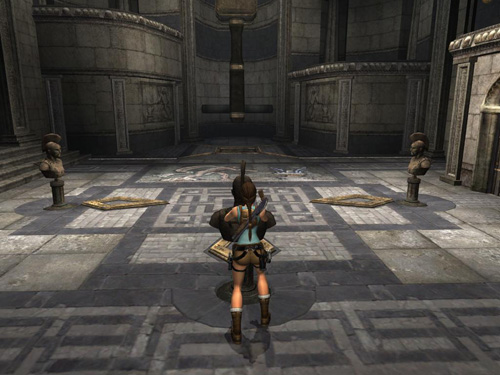
CHECKPOINT 2 follows this cutscene. Now check out the room. There's a circular pressure pad on the floor near the center. This opens the gate on the high balcony at the far end of the room, but it must remain depressed for the gate to stay open. On the balcony above the entrance is a large bronze globe, which looks like it just might fit on that pad.
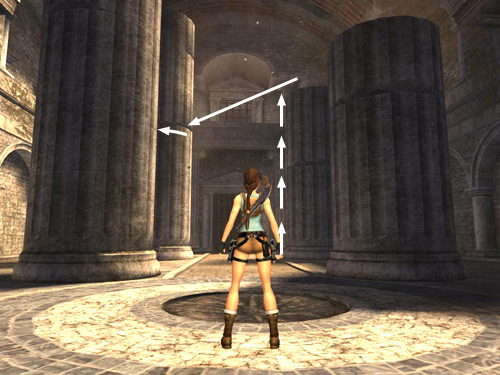
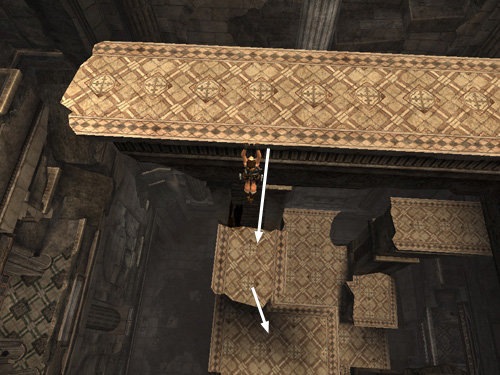
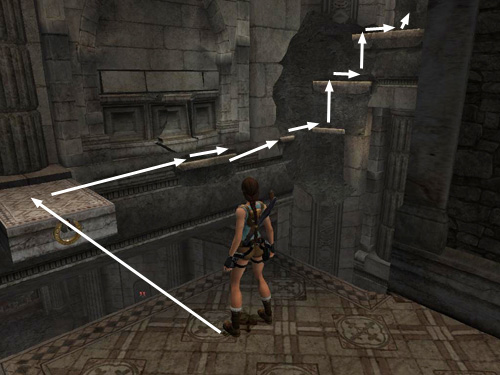
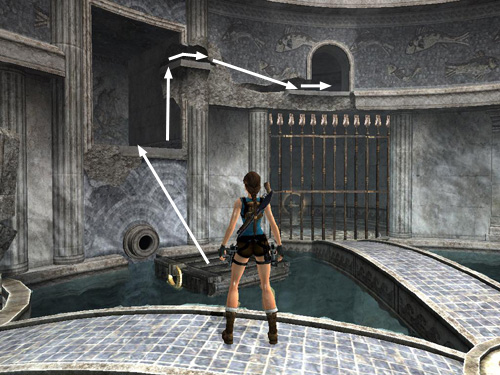
Head for the end of the room farthest from the entrance and climb the column on the right. If you climb up its left side (i.e., the one nearest the neighboring column), you can climb straight to the top without having to circle around it (as shown in this screenshot). Once on top of the column, turn around so the exit is on Lara's right. Then take a running jump toward the next column (the tallest one). It's a long jump, so run and hold the jump key down as Lara flies through the air. When she grabs onto the crack in the column, you may need to press Interact to perform a saving grab so she doesn't fall. Make your way around to the left and upward to reach the top of the column. Turn so the exit is behind Lara and take a running jump to land on the corner of the rectangular ledge jutting out from the wall (as shown in this screenshot).
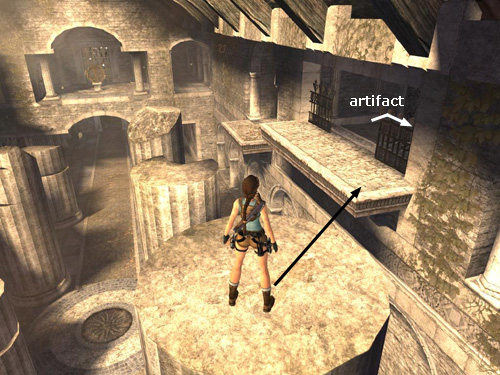
In the alcove is a closed gate, behind which you can glimpse a glowing spearhead. You'll be back for this artifact soon. Stand on the ledge facing the end of the room with the globe. Jump down to the smaller ledge just ahead. Take a running jump off this ledge, grapple the metal hook above and wall run across to the room ahead. (This screenshot shows the path from the column to the upper room.)
NOTE: It may be possible to obtain ARTIFACT #1 without actually opening the gate. Several players have told me they were able to get it by positioning Lara right up against the gate—one suggested drawing pistols, the other did it without—and then moving from side to side until the Interact icon appears. (You'll need to have Hint Icons enabled under Display in the Options menu). When it does, you may be able to pick up the artifact through the bars. I tried several times and was able to see the icon but not take the item. Maybe this works better on the PS2 version than on the PC.
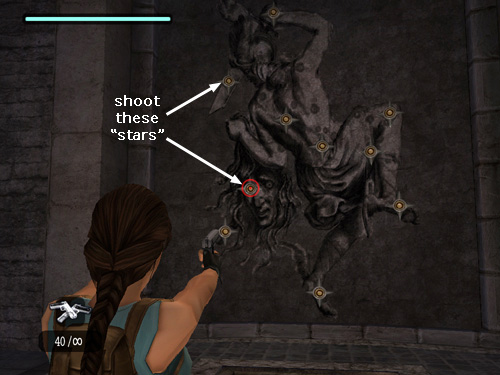
PERSEUS CONSTELLATION PUZZLE: After making the wall run to the upper room, head forward and then left. A gate separates Lara from the globe for now. On the rear wall is a painting depicting the constellation Perseus. The warrior holds a sword in one hand and the severed head of Medusa in the other. The jewels representing the stars in the constellation are lit up from behind.
Pass by the painting, triggering CHECKPOINT 3, and continue around the corner. Here a wall with another image of Perseus blocks the exit. Notice that certain stars in this picture—Medusa's eye and Perseus's sword—are actual gems. Return to the picture with the lit-up stars. Step on and then off the pressure pad in front of the picture to reset the puzzle, putting out the lights. Now draw pistols, switch to manual aim mode and shoot the two stars representing Medusa's eye and Perseus's sword (as shown in this screenshot). Doing this opens the door where you saw the image with the gems, and CHECKPOINT 4 registers.
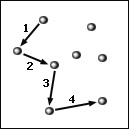
In the Nintendo Wii game, the constellation puzzles are a little different. The clues are still in the same places, but the "stars" painting are arranged differently. Instead of shooting the stars, you'll use the Wii remote to connect the dots on the puzzle panel. For the first challenge, check the door to see the clue. Five of the stars are lit and connected by straight lines. Return to the puzzle, step on the pressure pad and press Interact. Then hold the A button and aim the Wii remote to "draw" lines of light connecting those five stars. (One possible solution is shown in this diagram.) When you do, the door opens.
NOTE: In all versions of the game, you can take a shortcut here by immediately resetting the puzzle and opening the gate in front of the globe. Then reset the puzzle again and open the way to the artifact. See the relevant sections below for the correct combinations of stars. That way you can deal with the globe, get the artifact, then proceed directly to the exit. If you're playing a time-trial, you can skip the artifact altogether. Of course, if you prefer, you can play through to discover the clues yourself.
OPENING THE GATE TO THE GLOBE: Return to the doorway that had been blocked by the wall with the second Perseus image. Take a running jump off the edge and grapple the hook high on the side wall and then wall run to the small ledge ahead. Take a running jump to grab the higher ledge and pull up. In this alcove is another picture of Perseus with different stars lit up—this time his sword hand, lower back and two feet. Exit the alcove, jump back down to the lower ledge and wall run back to the puzzle room. Reset the puzzle by stepping on then off the pressure pad. Then use manual aim to shoot the stars indicated in the previous painting. This opens the gate behind you, so you can reach the bronze globe, and triggers CHECKPOINT 5.
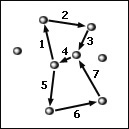
In the Nintendo Wii game the second constellation clue, in the side alcove that you reach by wall running, is obscured by a layer of dust. Face the inscription, press Interact, and then use the Wii remote, while holding down the A button, to brush away the dust. The panel shows a pattern of connected stars that sort of resembles an hourglass. Return to the puzzle and use the Wii remote to connect the stars in the pattern you just saw. This is a little challenging because you can't cross over lines you've already drawn and you have to work fairly quickly before the first lines you draw fade away. (One possible solution is shown in this diagram.) When you draw the pattern correctly, the door to the globe room opens.
Use the grapple to pull off the metal rings at each end of the globe. The pin running through the axis slips out, and the globe rolls off its stand. CHECKPOINT 6 registers at this point. Push the globe off the ledge. (Or shoot it with pistols to roll it along.) Then either drop down after it, losing a little health in the process, or jump down to one of the broken columns and drop from there to the floor.
Roll the globe (by hand or using pistols to shoot it) onto the circular pressure pad in the middle of the hall. This opens the exit gate, above on the far wall, and holds it open. It also triggers CHECKPOINT 7.
Go to the far end of the room (nearest the exit) and once again climb to the top of the column on the right. Take a running jump to grab the column on the left. Climb to the top and this time, instead of jumping to the balcony along the side wall, jump to the one with the gate you just opened.
DARK ANTEROOM: Enter the dimly lit room ahead. Go to the left side of the ledge. Take a running jump off the ledge and use the grapple to snag the metal hook on the wall above. Adjust the length of the cable if necessary (Interact + Up/Down) and wall run to the small alcove on the left, just below the ledge where you started the wall run. Pick up a large medipack and drop down to the floor.
Notice another circular pressure pad on the floor. Depressing it opens the gate at the top of the stairs (and triggers CHECKPOINT 8), but you'll need to retrieve the globe to hold it down.
In all versions of the game except the Wii, a simple switch opens the door leading back to the LONG ENTRANCE HALL WITH BROKEN COLUMNS (and triggers CHECKPOINT 9).
In the Nintendo Wii game, there's an extra small puzzle here. Instead of the switch, there's a cryptex lock to the right of the door. To find the symbols needed to solve the cryptex, climb the stairs to the closed gate, turn left and continue to the next landing. Approach the crumbling stone wall and press Interact. Use the trowel tool to pry off the loose stone, revealing three carved Greek letters: Sigma (S), Psi (Y) and Omega (W). Use the paper and charcoal to make a rubbing of the symbols if you like. Then return to the lock beside the door. Press Interact to activate it. Then arrange the carved tumblers so the Sigma, Psi and Omega symbols are displayed from top to bottom. The door opens. (NOTE: If you're playing a time trial, there's no need to actually unearth the symbols before solving this or any other puzzle.)
Now get ready to fight 2 more lions that appear in the LONG ENTRANCE HALL WITH BROKEN COLUMNS. This time you can run forward to get their attention and then retreat into the DARK ANTEROOM shooting. If you jump back onto the stairs, the lions won't follow and you can kill them from above.
ARTIFACT #1: Now go back for the artifact if you like. First take note of the picture of Perseus on the ceiling above the door in the DARK ANTEROOM. This one shows 7 stars lit: Medusa's eye, Perseus's sword, his sword hand, lower back, knee and both feet (shown in this screenshot). This is the pattern needed to open the gate in front of the artifact. (Again, in the Wii game, the pattern is slightly different. See the Wii solution below.)
Return to the LONG ENTRANCE HALL. (You may want to run forward to the globe to trigger CHECKPOINT 7 again. Then if Lara falls while climbing back to the constellation puzzle, you won't have to fight the lions again.) Climb to the top of the first column on the left (i.e., on the left as you exit the DARK ANTEROOM). From there, you can jump to grab the column on the right (the tallest one). Climb to the top and take a running jump to the ledge in front of the alcove with the artifact. Jump down to the smaller ledge ahead, use the grapple to wall run across to the puzzle room. (As you approach the constellation puzzle CHECKPOINT 3 registers again.) Step on and off the pressure pad to reset the constellation puzzle. Then use pistols with manual aim to shoot the 7 stars pictured on the ceiling of the DARK ANTEROOM. This opens the gate in front of the artifact (and triggers CHECKPOINT 10, also in the same spot as 3).
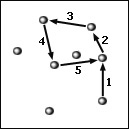
The Nintendo Wii version of this puzzle is similar to the previous two. Return to the puzzle room, as described in the previous paragraph. Interact with the puzzle and use the Wii remote to draw the pattern (as shown in this diagram) and open the gate.
Wall run back to the small ledge, jump to grab the higher one, then go into the alcove and claim ARTIFACT #1 (17/44). Jump onto the nearest column and climb down to the floor.
EXIT THROUGH DARK ANTEROOM: Return to the bronze globe (CHECKPOINT 7 again) and push it all the way into the DARK ANTEROOM and onto the second circular pressure pad. This holds open the gate at the top of the stairs (and triggers CHECKPOINT 11, same as 8). Exit through that gate and descend a long spiral staircase to emerge on a wide ledge overlooking the next area.
VERY TALL ROOM WITH CENTRAL STRUCTURE: CHECKPOINT 12 registers as you enter. The goal in this area is to use four switches to open four different doors—named after Hephaestus, Poseidon, Atlas, and Damocles from Greek mythology. Behind each door you'll find one of the four keys needed to open the level exit, located on the ground floor.
NOTE: The Anniversary edition employs the symbolism of Greek gods and heroes exclusively, which the original game did not. If you're not familiar with the legends involved, you might want to do a little research. Mythweb.com and the Wikipedia entry on Greek mythology are good places to start.
You need not explore the side areas in any particular order. I have suggested one possible sequence, which I hope minimizes backtracking. But in case you get disoriented or forget to throw a switch, you can climb up and down between the different levels. Here's how the tall room is laid out: 6th (top) level = POSEIDON SWITCH and HEPHAESTUS SWITCH, 5th level = HEPHAESTUS DOOR, 4th level = ATLAS DOOR, 3rd level = POSEIDON DOOR, 2nd level = DAMOCLES SWITCH and DAMOCLES DOOR, 1st (ground) floor = ATLAS SWITCH and LEVEL EXIT.
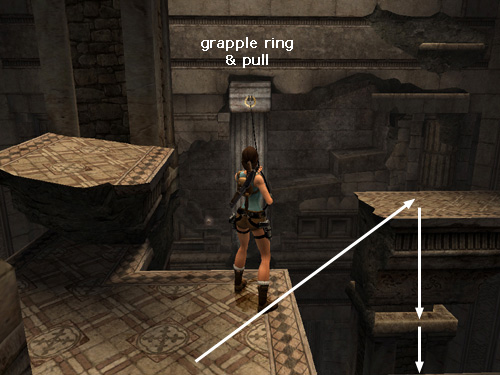
POSEIDON SWITCH: From the entrance and CHECKPOINT 12 take a running jump across the gap to the top of the central structure. This walkway is roughly U shaped. Go to the right end. Grapple the ring on the wall ahead and pull to extend a small ledge. Take a running jump to land there. Turn left and jump to the next ledge, which also has a metal ring and is already extended. Jump from there to the rough alcove ahead on the right. Then take another running jump to grab the horizontal pole in the corner. Swing and jump over to the next ledge. Go up the steps and pull the switch to open the POSEIDON DOOR, which is below on the third level. A ledge extends in front of the switch toward the center of the room, and CHECKPOINT 13 registers.
Two bats fly out when the POSEIDON DOOR opens, but it takes them a little while to reach you. If they get stuck underneath the ledge as it extends, go down the steps on either side of the switch to get a clear shot at them. Then return to the ledge in front of the switch and take a running jump back to the central structure.
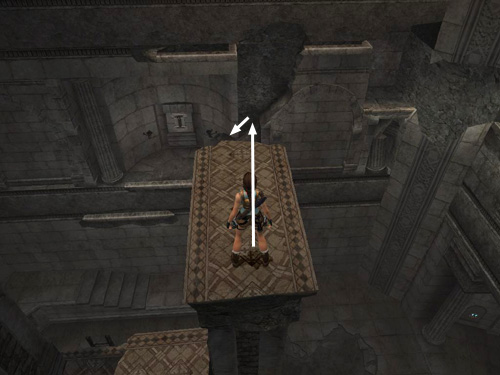
Return almost to the end of the U-shaped ledge near where you used your grapple to extend the small ledge. Hang from the inner edge and drop to the level below to land on a raised chunk of broken walkway. (This screenshot shows the spot.) Turn around and step down onto the ledge just below.
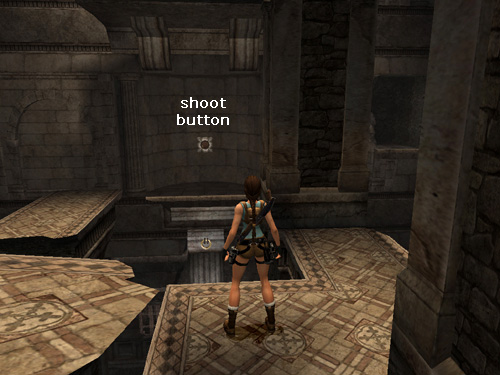
This is the FIFTH LEVEL. Turn to face the HEPHAESTUS DOOR (still closed). Then turn left and shoot the button on the wall (shown here) to extend a ledge in front of that button. Turn left again and use your grapple to snag the metal ring at the top of the stone column (shown in this screenshot) and pull it down. Now turn to face the corner between the wall with the button and the one with the column you just pulled down. Take a running jump off the corner of this ledge to land on the freestanding rectangular ledge ahead. Drop down on the right side to the level below (also shown in the previous screenshot).
HEPHAESTUS SWITCH: Now you're on the FOURTH LEVEL. The ATLAS DOOR is just below on one wall. Climb up onto the stone pillar you just pulled down with your grapple. (If you haven't already done that, you can do it now from this level.) It rumbles a bit but doesn't fall as you walk across it to the other side. Climb up on the left and get a small medipack. Jump to grab the higher ledge on the right and pull up. Climb onto the next block and grab the handhold ahead. Traverse around to the right. When Lara braces her feet against the wall, jump up to grab the handhold above. Climb to the left, then up again. Pull up.
Now you're on the TOP LEVEL again. Go up the stairs and use the switch to open the HEPHAESTUS DOOR, below on the FIFTH LEVEL, and extend a ledge in front of the switch. CHECKPOINT 14 registers and 2 more bats fly up from below. Take a running jump from the newly extended ledge back to the central structure. You may get a clearer shot at the bats from here.
Drop down to the FIFTH LEVEL and take a running jump to the freestanding rectangular ledge just as you did before. This time, instead of dropping down to the next level, take a running jump to the ledge in front of the button. (Be sure to shoot the button first to extend the ledge if you didn't do so before.) Take a running jump to grab the handhold above and to the right of the alcove with the button. It looks like it's too far, but Lara can do it. Or, instead of making the long jump, you can hang from the ledge with the button, traverse to the right and jump up to grab the handhold above. (This jump and the sequence that follows are shown in this series of screenshots). Climb to the right and jump to grab the next handhold. Climb to the right again and pull up into the alcove in the corner.
Turn around and jump to grab the horizontal pole. Swing around and jump to grab the stone handhold above the rough archway ahead. Climb to the left so that Lara is directly above the straight section of the doorsill below, rather than the angled part. Lara will miss and fall to her death if you try to grab the angled edge. Drop and grab and, since it's a long drop, press Interact for the saving grab. Pull up into the alcove. Go through to the other opening and very carefully move to the left edge (right if the camera is facing the alcove). As with the previous ledge, Lara will slip and fall if you try to hang from the angled edge, so make sure she steps off where the ledge is parallel with the wall. (Again, refer to the screenshots if you need a visual.) Traverse to the right and pull up into the doorway.
HEPHAESTUS DOOR: CHECKPOINT 15 is triggered as you enter. Follow the hallway to a metal gate. The switch on the right should open the gate, but it's broken. Pulling the switch does open the gate, but then it falls outward into the room, crushing Lara if she happens to be standing under it. So instead climb the handholds in the opposite corner until you can grab long handhold that extends across the room. Climb to the end of it and jump back (not right) to grab the opening above the gate. Pull up and drop down on the other side. The switch that opens the gate from this side is on the left. Ignore it for now and continue along the hallway to CHECKPOINT 16.
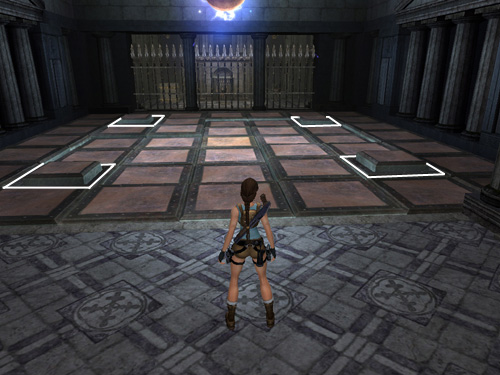
LIGHTNING TRAP: Ahead is a lightning trap. The fiendish disco ball on the ceiling emits bolts of electricity. These aren't instantly lethal (like the ones in the Thor room in Tomb Raider 1), but they will knock Lara down and injure her severely if they hit her. So try to start with full health, just in case. Now take a look at the floor. It has moving tiles that raise and lower in seemingly random patterns. The lightning bolts only strike raised sections of the floor. So the lowered sections are safe. There are also four raised floor tiles which function as buttons or pressure pads. (These are outlined in this screenshot.) In order to open the gate beyond the trap, you must step on each of these four tiles when it is in its lowered position and remain standing on it long enough to depress the tile completely.
Begin by watching the movements of the floor. When one of the buttons lowers and a path opens up leading to it (i.e., the tiles between Lara and the button also lower), run to the button and step on it. Once Lara's weight has depressed the button fully, run or jump off it before the square containing the button rises again. Try to avoid stepping on any raised tiles as you run/jump off the checkerboard to one of the safe areas near the entrance or the gate. With patience, you'll be able to step on all four tiles with little or no injury. Once you've pressed all four, the gate at the entrance closes and the one ahead opens so you can enter the inner room.
HEPHAESTUS'S HAMMER: CHECKPOINT 17 registers as you cross the threshold. On the left is a huge hammer attached to the wall. Stepping on the pressure pad beneath the hammer causes it to smash down, crushing Lara if she doesn't get out of the way in time. Straight across from the entrance is a barred alcove containing the key you seek. There are also 3 small, round pressure pads near the middle of the room.
Grab the handle on the back of the bronze bust mounted on the small pedestal, move it onto one of the round pressure pads and turn it so it faces the nearest brass-bound diamond shape on the floor. Looks like a good fit. Now you'll need two more. Grab the stone block with the brass bands and push it onto the pressure pad beneath the hammer. The hammer smashes down, destroying the block and revealing a second bronze bust. Pull it off the pad. Then maneuver it onto another of the small round pads and turn it so it faces the nearest brass diamond on the floor.
Now approach the pressure pad beneath the hammer once more. Stand on the right side of the hammer so Lara is facing the pad and the wall on which the hammer is mounted is on her right. Step onto the pad and then quickly move back as the hammer comes down. Immediately jump toward the hammer and grab the metal band around it. Quickly jump up to grab the top of the hammer and jump again to climb on top. As the hammer starts to retract, take a running jump to the ledge ahead, where you'll find a large medipack.
Turn around and move to the left side of the ledge (i.e., the side nearest the hammer). Take a running jump to the ledge on the other side of the room beyond the pressure pad. It's a long jump, so be sure to take off from the left side of the ledge, where the gap between the two ledges is smallest, and hold the Jump key so Lara stays in the air a little longer. If Lara falls short, just use the hammer to reach the second ledge as you did the first one. Pick up the shotgun ammo.
ARTIFACT #2: Turn right and take a running jump to grab the horizontal pole. Swing and jump to the ledge ahead. Enter the dark alcove to find ARTIFACT #2 (18/44).
HEPHAESTUS'S KEY: Exit the alcove, turn left and take a running jump to grab the next horizontal pole. Swing and jump to the ledge ahead. Push the stone block off the ledge. When it hits the floor, it shatters, revealing a third bronze bust. Drop down and push this bust onto the remaining round pressure pad. Turn it so it faces the brass diamond on the floor. If you haven't already turned the other two busts to face the center of the room (as shown in this screenshot), do so now. This causes the pressure pad below the hammer to shift.
Go to the pad, step on it and jump back out of the way as the hammer falls. This time the gate in the entryway (beyond the lightning trap) opens, along with the gate in front of the key. Enter and take the KEY OF HEPHAESTUS. (CHECKPOINTS 18 and 19 occur when the gate opens and after you take the key, respectively. Reloading either of these puts you in the same spot as CHECKPOINT 17.)
Getting past the lightning trap is much easier on the way out. Stand near the right wall and watch the moving tiles. Wait for the row along the wall to lower and run across. If the middle tile starts to rise up as you are passing, just jump over it and run/jump on to the exit.
When you reach the gate room, use the switch on the right. This opens the gate, but do not attempt to run through. Lara can't fit between the spikes so she'll be killed when the gate closes. Instead pull the switch and before the gate starts to open, grab onto the wide metal bar at the middle of it. Ride upward as the gate opens. The gate mechanism emits three loud thumping sounds before it closes. Jump up on the third thump and Lara will grab the edge of the opening above just as the gate starts to close. Pull up, drop down on the other side and follow the hallway past CHECKPOINT 20 (same as 15) to emerge where you started.
VERY TALL ROOM WITH CENTRAL STRUCTURE (again): A ledge extends in front of the HEPHAESTUS DOOR as you approach. Take a running jump from this ledge to grab the light-colored handhold on the right side of the central structure. Climb around to the right. Drop to grab the handhold below (which is even with the floor on the FOURTH level), drop again, then climb to the right. Jump to the right to grab a handhold on the next square support column. Drop down to the handhold below, climb around to the left and drop onto the floor just a few inches below. (This is the THIRD LEVEL.) Turn left and drop down to the level below.
Now you're on the SECOND LEVEL. The DAMOCLES DOOR (still closed) is off to one side. Go to the edge below the ATLAS DOOR. Grapple the metal ring and pull to extend a small ledge from the wall. Take a running jump to land on it. Turn right and take another running jump to grab the handhold running along the wall at the same level as the ledge on which Lara is standing. Climb to the right then jump to grab the next small handhold. Now make your way upward and around the corner to the right using the various handholds. Pull up into the alcove above. (This screenshot shows the sequence.) Climb up on the right and duck or roll through the low opening. Carefully step down on the other side.
POSEIDON DOOR: Follow the hallway past CHECKPOINT 21 to another gate with a switch. Pull the switch, grab onto the metal bar in the middle of the gate and ride up as the gate opens. Then, when it starts to close (on the third thumping sound), jump up to grab the opening above. Pull up and drop down on the other side. Kill 3 big rats and continue to the inner room and CHECKPOINT 22.
Pick up the small medipack behind the second column on the right. Jump into the pool, swim down and pull the lever to the left of the gate to open it. Surface for air if necessary. Then swim down through the gate and follow the passage onward and upward to another small room. Climb out of the water near CHECKPOINT 23.
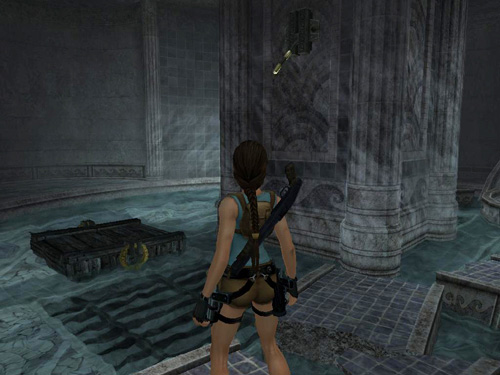
TALL BLUE-TILED ROOM WITH FISH FOUNTAINS: This room has three levels with a domed ceiling above. When you enter, the first level is flooded. There's a lever on the central column which you can't reach yet, an artifact gleaming behind a gate opposite the entrance, and another small medipack in an alcove to the left.
ARTIFACT #3: Hop in the water and swim down to find another lever on the side of the central column. Pull this lever to open the gate in front of the artifact. Surface and retrieve ARTIFACT #3 (19/44).
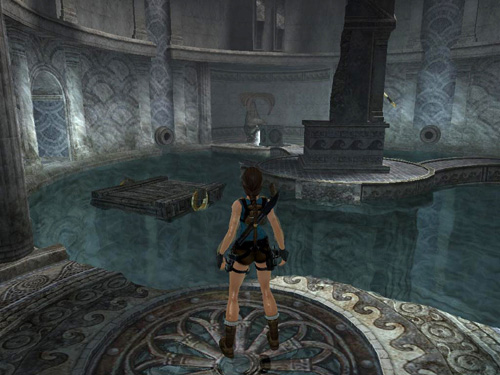
POSEIDON'S KEY: Swim back to the center and climb to the top of the column. Here on the third level, you can see POSEIDON'S KEY behind a gate. There's also an alcove with a fish statue and a stone block, a crumbling alcove with another stone block, and a smaller alcove with nothing in it. Cross the walkway to the alcove with the fish and block. Pick up the 50-caliber pistol ammo. Then pull the block away from the fish statue. Water pours out of the fish's mouth, raising the water level.
Swim across to the crumbling alcove and push the other stone block off the ledge. It sinks, landing on a ledge on the second level. Swim down to the central column and pull the lever on the second level—the one you couldn't reach before flooding the room. This opens a grate on the bottom of the pool, releasing a small, wooden platform, which floats up and gets stuck under a walkway.
Return to the surface and climb out in the alcove with the fish. Push the block against the fish again, stopping the flow of water and lowering the water back down to the second level. Jump into the pool, climb out on the second level and go to the fish statue there. Move the stone block (the one you pushed off the ledge above) in front of the fish to cover the spout, lowering the water level further. Do not drop down from here or Lara will take damage from the fall. Instead, climb down the handholds to the right of the entrance.
With the water drained down to the floor, you can use the grapple to pull the wooden raft to the other side of the room. Try to position it near the grate and lever but not quite on top of the grate (as shown in this screenshot). You want it to float upward into one of the open areas between walkways when you re-flood the room.
Climb back up the handholds near the entrance. Pull the block away from the fish to flood the lower level again. Now swim over to the larger alcove with the circular grate in the floor. From there, grapple and pull the wooden raft so it's not under one of the walkways and more or less below the square opening up on the third level. (This screenshot shows the approximate spot.)
NOTE: If you make a mistake and need to reposition the wooden raft, you can drain or flood the various parts of the room as many times as you need to by moving the blocks in front of the two fish spouts.
Now climb back up the central column to the top. Pull the block away from the fish to raise the water to its highest level. If necessary use the grapple to reposition the wooden raft beneath the square opening (as shown in this screenshot). Jump onto it and from there, jump to grab the edge of the opening. Pull up, grab hold of the narrow ledge on the right, climb around the corner and jump to grab the ledge above the gate. Climb into the opening and drop down in the room with THE KEY OF POSEIDON. Take the key and then pull the switch to open the gate and trigger CHECKPOINT 24.
If you're a good swimmer, you should be able to make it back to the start without lowering the water level. But, if you prefer, you can push the block against the fish again to lower the water to the second level. Then hop into the water and surface near the entrance, crossing CHECKPOINT 25 (same as 23). Jump into the small pool there and swim down, forward and up to surface in the small, square pool where you started. Climb out of the water. (Three of the edges are low enough to reach.) Cross CHECKPOINT 26 (same as 22) and continue to the gate room.
Pull the switch, grab onto the metal bar in the middle of the gate. As the gate opens, ride upward. Then, just as it starts to close (on the third thumping sound), jump to grab the opening above. Drop down on the other side and follow the hallway past CHECKPOINT 27 (same as 21) to the main room.
VERY TALL ROOM WITH CENTRAL STRUCTURE (again): A ledge extends in front of the POSEIDON DOOR as you approach. Take a running jump from this new ledge to grab the handhold on the right corner of the central structure. Jump to the handhold above. Climb around the corner to the right and then jump to the right to grab the freestanding rectangular ledge. Pull up. From here, you can see an artifact tucked away in an alcove ahead. Ignore it for now. You'll return for it later.
DAMOCLES SWITCH: Face the wall with the switch alcove below and take a long running jump—leap off as close to the edge as you can and hold the Jump key in the air for more distance—to land on the slope and slide down to the switch (as shown in this screenshot). You can also jump directly to the switch alcove, but Lara will lose a little health in the process. Use the switch to open the DAMOCLES DOOR, which is off to the left, and trigger CHECKPOINT 28.
ATLAS SWITCH: Hang from the edge of the alcove, climb to the left and drop down twice. Turn left and climb the stairs to the final switch. Pull this one to open the ATLAS DOOR, up on the FOURTH LEVEL, and trigger CHECKPOINT 29. Drop down from the ledge to the floor.
CLIMBING BACK TO THE TOP LEVEL: You're now on the GROUND LEVEL and need to return all the way to the top of the central structure in order to reach the ATLAS and DAMOCLES DOORS. First, head for the central structure and climb onto the low block near one of the square support pillars. Pick up the shotgun ammo. Face the exit (between the colorfully lit keyholes) and then angle Lara a little bit to the left and take a running jump to grab the higher block near the square support pillar. Pull up.
Grab the light-colored handhold and climb around to the right. Jump and grab the ladder and climb to the SECOND LEVEL. The DAMOCLES DOOR is off to the right, the DAMOCLES SWITCH behind. Ignore that door for now and keep climbing. Vault up onto the chunk of broken walkway, face the POSEIDON DOOR and then take a running jump to grab the handhold on the square support column ahead on the left. Climb all the way around to the other side and jump to grab the handhold above. Climb all the way around to the right. The handhold above is too high to reach, so jump to the right to grab the freestanding rectangular ledge. Pull up, turn left and take a running jump to grab the wider ledge ahead (also part of the central structure). Pull up again.
This is the THIRD LEVEL again. The POSEIDON DOOR is on the left and ahead is a wall with 2 metal boxes and a stone column. Ignore those for now and keep climbing. Grab the handhold on the left, climb around the first corner and jump up to grab the handhold above. Climb all the way to the left and then jump to grab onto the next support pillar. Jump up and climb onto the ledge above.
Now you're on the FOURTH LEVEL again. The ATLAS ROOM is straight ahead. Unfortunately the distance to the doorway is too far to jump. So keep climbing. Vault onto the chunk of broken walkway. Grab the handhold on the square column. Then jump straight up to grab the top of the ledge; pull up.
This is the FIFTH LEVEL once more. Turn around to face the HEPHAESTUS DOOR and then jump the gap to land on the jutting corner of the ledge in the middle of the central structure. Grab onto the support pillar ahead and climb around then all the way up to the U-shaped walkway on the TOP LEVEL of the central structure.
At this point, I highly recommend jumping back over to the entrance and using the save point there (CHECKPOINT 30, same as 12). The next section is a little tricky and it helps to have a closer save in case Lara dies.
Return to the right end of the U-shaped walkway, across from the two ledges with the metal rings. Jump over to the one on the right. From there, turn right and take another running jump to grab the handhold near the corner. Drop onto the ledge below. Hang from the edge of this ledge so Lara's back is toward the open room. Climb to the left as far as you can and then drop to grab the handhold below. It's a long drop, so press Interact for the saving grab. Climb to the left and drop once more to grab the ledge below. Pull up and go through the ATLAS DOOR. (These screenshots depict this climb.)
ATLAS DOOR: CHECKPOINT 31 is just inside. The gate room ahead is the same as most of the others. Pull the switch, grab onto the metal bar in the middle of the gate. As the gate opens, ride upward. Then, just as it starts to close (on the third thumping sound), jump to grab the opening above. Pull up, drop down on the other side and follow the hallway past CHECKPOINT 32 to the inner chamber.
LONG RAMP WITH ROLLING GLOBE & DEEP PIT: Ahead is a deep pit. Try not to fall in. To get across, go to the wheel mechanism and grab onto one of the wooden handles. Turn the wheel by pushing the handle. You'll need to press each of the direction keys in turn to make Lara walk around the axle in a circle pushing the handle ahead of her. This gradually closes the retracting floor over the pit. When you've turned the wheel as far as it will go, the floor should be closed all the way. When Lara lets go of the handle, the floor starts to slide open. Quickly run across, jumping the gap in the middle, to reach the other side.
Head up the ramp. (Don't worry; the globe won't roll down yet.) About halfway up on the left side is a handhold you can reach. Climb up and to the left onto the ledge above. Pick up some 50-caliber clips. Drop down to the lower end of the ledge and pull the switch to extend a horizontal pole above the pit. CHECKPOINT 33 registers here. You can't reach the ledge with the medipack and artifact on the opposite side of the ramp yet. So drop down and continue up the ramp.
At the top is a huge statue of Atlas carrying the world on his shoulders. Below are two rows of razor-sharp spears and a tempting box of ammo. You can't reach it yet, so be patient.
Stand as far from the statue of Atlas as you can while still being able to target the 2 buttons behind the statue with your pistols. The targeting reticle doesn't have to be red for your shots to connect. Even with a gray reticle it's possible to hit the target. (This screenshot shows the approximate spot.) Now get ready to shoot and run. When you hit the first button, the statue gives a little lurch and one set of spears retracts. When you hit the second button, the second set of spears retracts, Atlas keels over and the humongous globe tumbles down the ramp toward you. Get moving or it's Croft-cakes for breakfast.
Even with Lara positioned as far from the buttons as possible, I found I couldn't move the camera behind her before making the run. (Maybe you'll have better luck, or maybe this is a feature of the game.) So press and hold Back/Down to start running down the slope toward the camera. When Lara reaches the edge of the pit, press Jump to leap off and grab the horizontal pole. Keep holding Back/Down to swing around the pole—only once—then jump to the other side of the pit. If you're successful, the globe rolls into the pit with Lara safely on the other side.
NOTE: It may be possible to avoid running from the globe altogether. One player suggested an alternate strategy. Shooting the left button first, then move to the right and position Lara in the corner as close to the spears possible. Shoot the right button and then immediately move forward. Lara should take no damage and the globe should pass harmlessly overhead. Then you can get the key and proceed from there. I wasn't able to make this work, but I figured it was worth mentioning.
ATLAS'S KEY: After crossing the pit, turn the wheel mechanism again to close the floor and take a running jump across. Return to the top of the ramp and get those shotgun shells (if you have room in your inventory for them) and the KEY OF ATLAS. This is CHECKPOINT 34.
ARTIFACT #4: When the globe rolled, it broke off the tops of the columns on each side of the ramp. Go partway down and climb the broken column on the left—grabbing onto the right edge of the column where it's flat—to reach the ledge above. Pick up the small medipack and climb onto the upper ledge to get ARTIFACT #4 (20/44). Hop back down to the lower ledge and pull the switch to extend the floor above the pit. Drop down and take a running jump across before it reopens.
Follow the hallway back past CHECKPOINT 35 (same as 32). At the gate, use the switch, grab onto the metal bar in the middle of the gate and ride upward. This gate gets stuck in the up position, so jump back to grab the horizontal pole. When you do the gate closes and you can swing around, jump and grab the opening above. Drop down on the other side and continue past CHECKPOINT 36 (same as 31) to the main room.
VERY TALL ROOM WITH CENTRAL STRUCTURE (again): A ledge extends in front of the ATLAS DOOR as you approach. Before descending to the DAMOCLES DOOR, you can go after the fifth artifact if you like.
NOTE: If you already have the artifact or don't want it, skip the next three paragraphs and continue with the section that begins, "To reach the DAMOCLES DOOR from the ATLAS DOOR...."
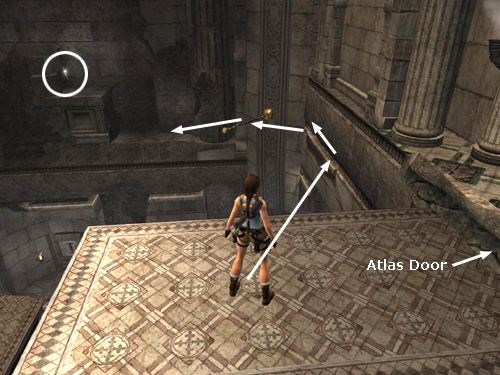
ARTIFACT #5: To get this reward, step out onto the newly extended ledge. Turn around to face the ATLAS DOOR, then turn a little to the left and take a running jump to grab the long horizontal handhold between the ledge and the corner. Climb along that ledge all the way to the left. Jump back (not left) to grab the horizontal pole. While hanging, climb in toward the corner a little if necessary. Then swing around and jump to the ledge ahead. Vault onto the block on the left and pick up ARTIFACT #5 (21/44). (This screenshot shows the path from the door to the artifact.)
Step down onto the lower ledge and take a running jump to grab the horizontal pole again. Swing and jump to the upper handhold on the other side of the corner. If you're following this walkthrough and have not yet explored the DAMOCLES area, climb back along the handholds to the right and pull up near the ATLAS DOOR (and skip the next paragraph).
NOTE: If you have completed all the side areas and just came back this way for the artifact, after getting it and swinging on the horizontal pole back to the handhold near the corner, drop down twice to reach the alcove below. Pull up, turn around and take a running jump to the alcove on the other side of the corner. Grab the handhold above and climb around to the left. Jump to grab the ledge above the DAMOCLES SWITCH. Drop onto the small slope and slide down to the switch (and a CHECKPOINT). Drop to the floor and proceed to the exit.
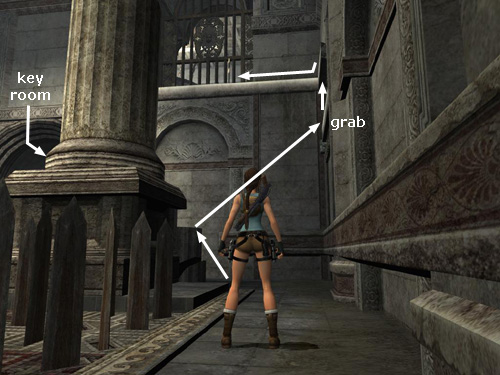
To reach the DAMOCLES DOOR from the ATLAS DOOR, take a running jump from the newly extended ledge to the central structure, grabbing onto the floor straight ahead and a little above the ledge where you start. Climb to the left and drop to grab the handhold on the support column (press Interact for the saving grab). Drop down once more, then jump over to the freestanding rectangular ledge on the right (same as before). Pull up and take a running jump over to the wider ledge between the other two support columns.
Now you're on the THIRD LEVEL again. The POSEIDON DOOR is on the left. Straight ahead is a wall with 2 metal boxes and a stone column. Use the grapple to pull that column down, forming a bridge across the gap. If Lara doesn't immediately grapple the top of the column, use manual aim. Walk across to the other side. (This sequence is illustrated in a series of screenshots.)
Climb up on the right and pull the first metal box as far as it will go. You may have to ease it out gradually to keep it from sliding back. Hang from the edge so Lara's back is toward the open room. Climb to the right and jump past the gap in the ledge to grab on the other side. Climb around to the right and drop down near a small medipack. Return the way you came to the end of the fallen column between the two metal boxes.
Climb up on the left side this time and push the second metal box as far as it will go. Climb back over to the first box and get on top of it. Jump to grab the handhold above the second box. Climb around to the left as far as you can go and drop to grab the lower handhold. After moving the second box, Lara should be able to brace her feet against it. She can then jump to grab the next small ledge on the left. Climb to the right (toward the wall) and around the corner. Then drop down in an alcove with another small medipack.
Dangle from the edge of this alcove and drop to grab the handhold below. Climb around to the right and drop onto the ledge. Carefully slide down the little slope into the doorway.
DAMOCLES DOOR: Follow the hallway past CHECKPOINT 37 to another gate room. This one's a little trickier than the others. Use the grapple to snag the metal ring on the stone block above the gate. Pull the block out of the opening so it falls to the floor with the metal ring on top.
IMPORTANT: In order to avoid a possible bug here, be careful how you use the grapple when pulling down the block. Try to attach the grapple to the top of the block, near the metal ring, rather than at the bottom of the block, as shown in these screenshots. If Lara doesn't do that automatically, use manual aim mode to target the ring. Then, when you pull out the block, it should land with the metal rings on the top and bottom (also shown in the screenshots). If you grapple the block at the bottom, it may land sideways so it's too short to prop the gate open fully, and Lara will be unable to reach the opening above. If you've already encountered this bug, I have included some possible fixes in a footnote at the bottom of the page.
Once you have pulled the block down so it lands ring-side up, throw the switch. Then, when the gate opens, push the block underneath it to prevent it from closing again. Climb onto the block and jump up to grab the metal bar on the front of the gate. From there, jump to grab the opening above. Drop down on the other side and continue to a square pressure pad. Step on the pad to open the door ahead and trigger CHECKPOINT 38.
SWORD ROOMS: The rooms ahead contain a number of sword traps, none of which are active yet. Head through the outer room with the checkerboard floor to the inner room. Pick up a small medipack and 50-caliber ammo in the back right corner. (NOTE: If you already have 120 rounds for this gun, you won't be able to pick up any more ammo until you use some.)
DAMOCLES'S KEY: Take THE KEY OF DAMOCLES from the pedestal and immediately run or jump out of the way to avoid the deadly chandelier of swords that crashes down from above. A brief cutscene shows the outer door closing and various traps in the area arming, followed by CHECKPOINT 39.
The on-screen instructions explain how to walk using Alt + direction keys on the PC (the PC manual incorrectly lists Ctrl as the key for walking) or a light press on the left analog stick if you're using a gamepad. Good advice but not needed yet, since there are no more sword traps in this inner room. You can move freely for now.
Go to the back of the room, run up the ramp formed by the fallen walkway. Jump off the end and grapple the metal hook on the wall above. (If you jump off the ramp too close to the wall, Lara will not grapple the ring. So try and make the jump from the middle of the ramp.) Wall run over to either of the corner ledges. From there, jump onto the central walkway surrounding the key pedestal. This once-square walkway is now broken so it forms more of a U shape.
Go to the right end of the U, jump the gap to the small, freestanding ledge, and from there to the barred alcove. (The alcove on the left contains an artifact, but it's lined with swords, so avoid it for now.) Pull the lever to retract a crucial section of the checkerboard sword trap in the outer room and trigger CHECKPOINT 40. There's a large medipack behind the bars but you can't reach it yet.
Drop to the floor and cautiously enter the outer room (CHECKPOINT 41). In order to avoid each of the huge swords that fall from the ceiling as you approach certain spots. The first of these is just beyond the doorway. After it falls, turn right and follow the wall around (no more falling swords here) until your way is blocked by swords sticking up from the floor.
Turn to face the checkerboard floor and observe the pattern the swords follow when extending and retracting. Stand facing the nearest white square. Then make your way carefully through the swords as they retract. The camera goes a little wonky here, so you need to be especially careful with Lara's movements. Walking through the trap may help. As you go, try stay near the middle of each square because even brushing against the swords in the next square can injure Lara, throw her off balance and prevent you from moving to the next safe square quickly enough.
Here's the sequence (illustrated in these screenshots): Wait for the swords on that first white square to retract then step onto it. As soon as the swords on the two squares ahead retract, move forward onto the red one, then left onto the white one. (You need to do this quickly because the swords on the first white square, then the red one, soon pop up again.) Wait on this white square for the swords on the two squares ahead to retract. Then quickly step forward onto the red square, then right onto the white one. (Again, the ones behind pop back up.) You should now be facing the next red square and one of the support columns. The red square Lara was just standing on should be behind you. As soon as the swords on the two squares ahead retract, run across the red one onto the slightly raised white square between the two columns. This square is safe. No swords pop up. Be careful not to run on into one of the falling swords in the open area near the exit.
If you angle the camera upward, you can see the sword points and anticipate where they'll fall. Then you can avoid them or, if you prefer, carefully walk back and forth to trigger all 7 falling swords without being injured. Then you won't have to worry about accidentally running into them later. (Their locations are shown in these screenshots.)
Now head for the wall on the opposite side of the checkerboard floor from where you entered that trap. You'll be able to walk along this wall all the way to the corner since you used the lever in the inner room to retract the swords blocking the way. Climb onto the short, cylindrical chunk of broken column and jump to grab the handhold near the corner (as shown in this screenshot). Climb up and around to the left and pull up into the second barred alcove. (This side is safe with no swords.) Pull the lever to retract the swords on the other side of the bars, as well as the swords in the white square floor tile near the wall on the far side of the room. CHECKPOINT 42 registers here. Now you can move freely between the inner and outer rooms without having to navigate the checkerboard sword trap again.
NOTE: If you're replaying this level and already have the artifact on the other side of the bars, or if you're not interested in it, don't drop down from this alcove. Skip the next two paragraphs and continue to the exit.
ARTIFACT #6: Drop from the ledge onto the short broken column. Then take a running jump over the red square with the swords still extended (as shown in this screenshot) and return through the doorway to the inner room, crossing CHECKPOINT 43 (same spot as 41). Use the wall run to reach one of the high corner ledges at the back of the room the same way you did before. Jump over to the central walkway surrounding the pedestal where you got the key. Go to the left end and jump into the barred alcove. (As long as you used the lever on the other side of the bars, there should be no more swords here.) Take ARTIFACT #6 (22/44), triggering CHECKPOINT 44.
OPENING THE EXIT: Drop to the floor and go through the doorway (CHECKPOINT 45, same as 41 and 43). Return all the way around the perimeter of the checkerboard room to the short broken column. Climb onto it, jump to the handholds and climb up to the alcove with the lever as you did before.
Climb the narrow, white column on the other side of the alcove. Jump to the square top of the fluted column to the left (as shown in this screenshot). Turn so the alcove with the lever is on Lara's right and jump to the column ahead. From there, jump to grab the narrow, white column in the other barred alcove. Slide down and pick up the large medipack.
Face out over the checkerboard room and take a running jump to grab one of the handholds on the wall to the right. If Lara grabs the lower handhold, jump to the upper one. Climb all the way to the left. Then jump to the left and throw the grapple to snag the metal hook on the wall above. If you can make the wall run and jump back to land on the second column to the left in one smooth sequence (as indicated by the arrows in the screenshot above), more power to you. But I found that maneuver quite tricky using the keyboard controls. The following worked better for me:
Extend or retract the cable if necessary (Interact + Forward/Back) so Lara's feet are on the lower of the two long horizontal bands of decorative carving. Wall run back and forth until Lara is swinging as high as possible. Keep running and move the camera as far as possible to the right, toward the wall, so you're looking at Lara almost side-on. When she runs all the way in the other direction, release the direction controls for a moment, then press Left + Jump to make her spring off the wall and land on top of the fluted column to the left. Or, alternatively, move the camera behind Lara as she runs back and forth along the wall. Then, when she runs all the way to the left, briefly release the direction controls, then press Back + Jump to make her jump to the column.
NOTE: If you're having trouble with this sequence, these screenshots may help. You can also practice in the safe setting of Croft Manor. These are the same moves required to get Artifact #7 in the gym. And, if all else fails, you're welcome to download my PC savegame file from the next checkpoint. Macintosh and Wii save files are also available here. (Instructions are included with the downloads as well as here.)
Jump across the columns (two with square tops, a broken one, and another with a square top) to reach the nearest handhold on the far wall. Climb to the right and jump to grab the handhold in the corner. Climb to the right again, jump past the gap and continue along to the right. Climb around the corner but don't drop down. There's nothing to land on. Instead, jump to the right to land in the alcove.
Grab one of the handles on the wheel mechanism and push. In order to turn the wheel, you'll need to press each of the direction keys in turn so that Lara walks around in a circle pushing the handle ahead of her. This gradually opens the portcullis-style exit door below. When you've turned the wheel as far as it will go, the door should be open all the way. When Lara lets go of the handle, the door begins to close. So quickly drop down off the ledge and run or roll through the door.
Cross the square pressure pad, which reopens the door to the sword room (in case you forgot anything) and triggers CHECKPOINT 46 (same as 38). Follow the hallway to the gate room. Pull the switch but don't try to exit through the gate past the stone block. Lara won't fit and she'll be skewered by spikes when the gate closes. Instead, after using the switch, grab the metal bar on the gate, ride upward as it opens, and then, just as it starts to close (on the third thumping sound), jump to grab the opening above. Drop down on the other side and follow the hallway past CHECKPOINT 47 (same as 37) to the main room.
VERY TALL ROOM WITH CENTRAL STRUCTURE (again): A ledge extends in front of the doorway as you approach. You can't reach the central structure from here. So instead drop to the ledge below, just in front of the ATLAS SWITCH and then hop down to the floor, triggering CHECKPOINT 48 (same spot as 29).
LEVEL EXIT: You should now have all four keys—ATLAS, DAMOCLES, HEPHAESTUS and POSEIDON. Cross the room to the exit, which is flanked by keyholes with colorful lights. If you start with the ATLAS (green) keyhole on the right and work your way to the left, the correct keys will appear at the front of the inventory screen each time you press Interact. CHECKPOINTS 49-51 register when the first through third keys are used. The fourth key opens the exit, after which the game prompts you to save at the first checkpoint in the next level.
NOTE: If you've reached the bottom of the room and are missing any of the four keys, it's possible to go back and retrieve them. Follow the instructions for CLIMBING BACK TO THE TOP LEVEL (above) in order to reach the level(s) where you need to go.
†UPDATE HISTORY: 6/14/07 - First draft of walkthrough posted online.
6/19/07 - Added alternate strategies for the bug in the entrance to the Damocles room.
6/20/07 - Further refined the gate bug strategy.
9/28/07 - Updated various sections with simple shortcuts and other tips sent in by readers. Rephrased a few sections and added a few screenshots for clarity. Added missed CHECKPOINT 6 and changed the numbering for a few of the checkpoints that register more than once.
2/8/08 - Added Nintendo Wii edition info and made a few other minor clarifications, mostly in the first area.
2/11/08 - Changed the numbering system for artifacts, relics and rubbings, as explained in the note below.
4/29/08 - Added Macintosh save files and info. Thanks to Andrew W. and Chris H.
12/11/12 - Added additional tips for the perpendicular jump from a wall run in the Damocles room, thanks to info from Duncan.
ACKNOWLEDGEMENTS: Thanks to Anders, Andrew J., Andy M., BBHSU, Delboy16, Diana, Geoff S., Igor, Jenny, Jo, Juho, Linda, Nate, Native New Yorker in Texas, Niyaz, Nocturnal, Paul K., Rutger, Shayne, a different Stella, Suzanne, Terry and Yvette for their help with this level.
*ABOUT ARTIFACTS, RELICS & RUBBING REWARDS: Finding artifacts and relics (formerly known as "secrets") unlocks various extras like outfits and concept art. The Nintendo Wii game also includes "rubbing rewards" in some levels. I have numbered each of these bonuses in the walkthrough. So, for example, "Artifact #2 (10/44)" means that this is the second artifact in this particular level and the 10th out of 44 artifacts in the whole game. Please see Anniversary Rewards page for more info on all of these.
**ABOUT TIME TRIALS: After completing a level, you will be able to replay it in Time Trial mode to unlock cheat codes. For more info, please see the Time Trials and Rewards pages. For help beating this level's time trial, see Eldin's St. Francis Folly - Time Trial Tips.
‡NOTE ON VIDEO GUIDES: Eldin's videos don't always follow the same strategies I use in my walkthroughs, but if you prefer that format, I think you'll find them very helpful.
BUG AT GATE NEAR DAMOCLES ROOM: If you have run into the bug in the gate room (described above), try the alternatives below.
Earlier versions of this walkthrough recommended killing Lara by jumping from the ledge in the TALL ROOM in order to reload at CHECKPOINT 38. I no longer recommend this because it is possible to survive the fall and trigger the checkpoint on the ground floor. Then you'd have to climb all the way back up to the gate, and the block would be stuck in the wrong position.
IMPORTANT NOTE ABOUT SAVEGAME FILES: The PC save files linked to this walkthrough include instructions for use. Additional save files can be found on a separate Anniversary save page. Please note that my saves were made using the North American DVD version of the game. As far as I know, they are compatible with most other DVD versions and with the Direct2Drive download version. They will not work with certain unofficial versions, which use a different source code.
WAS THIS WALKTHROUGH HELPFUL? If not, I apologize and invite you to contact me with any questions. If you need help right away, I recommend the r/TombRaider subreddit. Other fan-run forums are listed at tombraiders.net/stella/community.html. If this site was useful, please consider supporting it financially or in other ways. For details, visit tombraiders.net/stella/support.html. As always, I welcome your corrections/suggestions. Thank you!
Copyright © 2007- - Stellalune (). All rights reserved. The screenshots and videos included here were made using Fraps. Feel free to copy or print this walkthrough for personal use. By all means, share it with friends, but please include this credit line so people can send me their feedback. No part of this walkthrough may be reproduced on another site without permission. Follow this link for details about this site's advertising and privacy policy.
Stella's Tomb Raider Site: tombraiders.net.