TOMB RAIDER 2013 Quick Guide to All GPS Caches
Updated: 8/13/13(†)
Collectibles Intro | Documents | Relics | Treasure Maps | Challenges
WARNING: This page contains spoilers. No major plot points are revealed, but you will learn more about the various levels and Yamatai's backstory if you read ahead.
There are 75 hidden GPS caches in the game. They are tiny and can be hard to spot, but they do flash when you get close and glow in Survival Instinct view. This guide is designed to help you find any GPS caches you missed. Since you may have picked them up in a different order than I describe in the walkthrough, it will probably help to refer to the annotated maps linked to each section below and compare them to your in-game map to see which caches you still need to find.
Coastal Forest (5)
There 5 GPS caches in this level, 3 in the first part of the forest, 2 more in the area beyond the underground bunker. [Level Map]
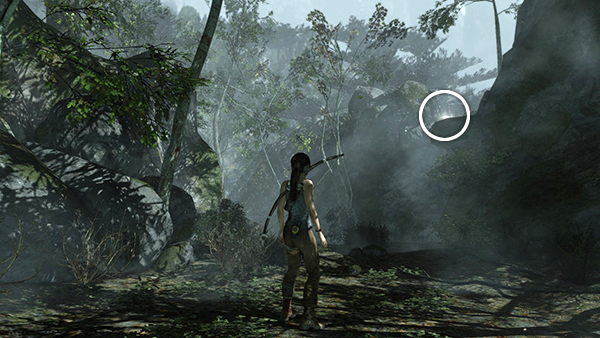
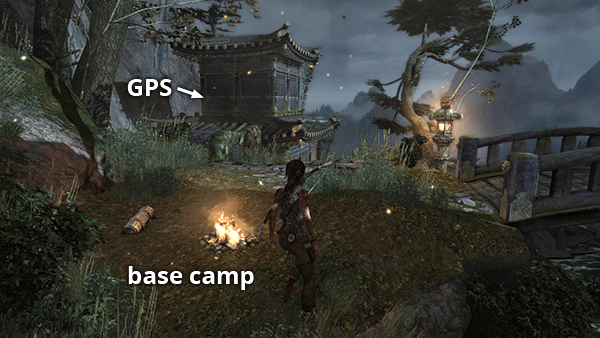
GPS Cache 1/5
The first cache is on a high ledge on the right side of the path leading down from the first base camp to the bunker where you find the Makeshift Longbow. You'll need to climb up from the back side of the ledge to reach it. See here for details. (Click screenshot to enlarge.)
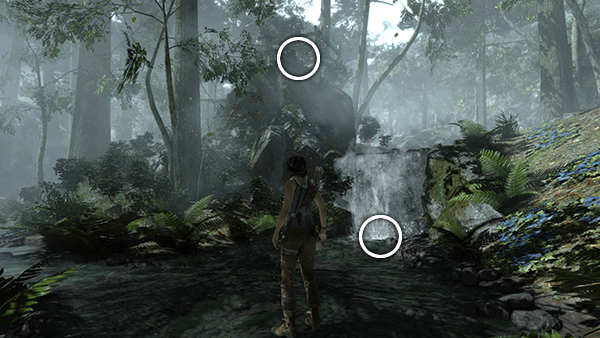
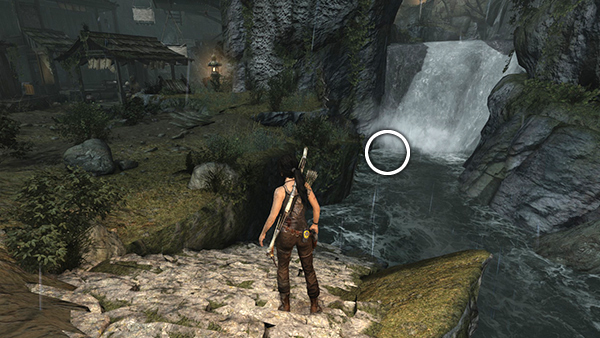
GPS Cache 2/5 and 3/5
Cache #2 is sitting at the base of the little waterfall that spills into a pond at the eastern end of the first forested area. #3 is on the wooden ledge built into the rocks just above this same waterfall. See here for details. (Click screenshot to enlarge.)
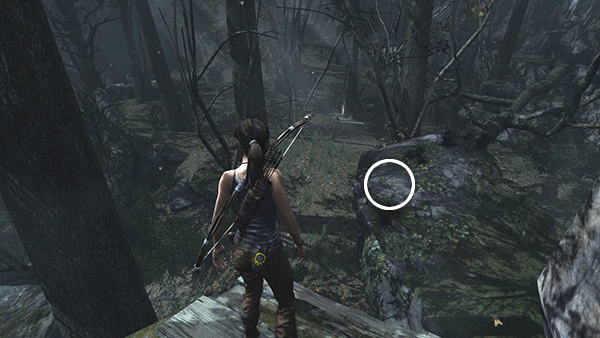
GPS Cache 4
This cache is found on one of the rock ledges along the southern boundary wall of the second forested area, i.e., beyond the bunker and the Forest Ruins Base Camp. See here for details. (Click screenshot to enlarge.)
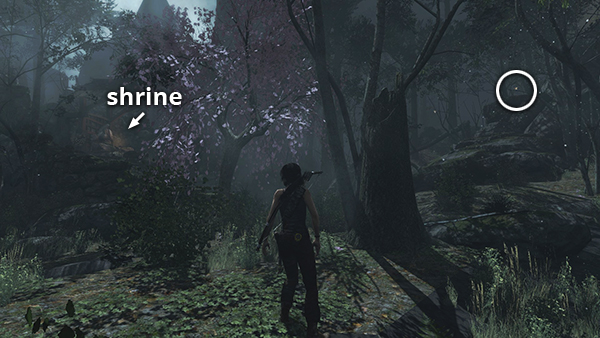
GPS Cache 5
This cache is located on the stepped rock formation opposite the steps leading up to the shrine in the northwest corner of the second forested area. See here for details. (Click screenshot to enlarge.)
Mountain Temple (2)
All of the major collectibles, including the 2 GPS caches, can be found in the area above the long rope ladder. [Level Map]
GPS Cache 1
This cache is in the building directly ahead when you climb the long ladder after escaping from the Solarii. (screenshot) If you return to this area later via fast travel, you'll approach this building from the other side, as shown here. It's the one closest to the Mountain Temple Base Camp. See the walkthrough for details. (Click screenshot to enlarge.)

GPS Cache 2
The second cache is on a small rock ledge just beyond the little pavilion near where you learn to shoot arrows into walls to distract enemies. Go through the pavilion and out the other side. Then climb up on the left to find the cache. See here for details. (Click screenshot to enlarge.)
Mountain Village (15)
There are many GPS caches in this level but some are not accessible the first time you visit. You will need to come back here at least twice to get everything. I have attempted to cover all pickups with minimal backtracking in my walkthrough, but if you missed anything and need to return via fast travel, this guide should help. [Level Maps: first visit | second visit | third visit]
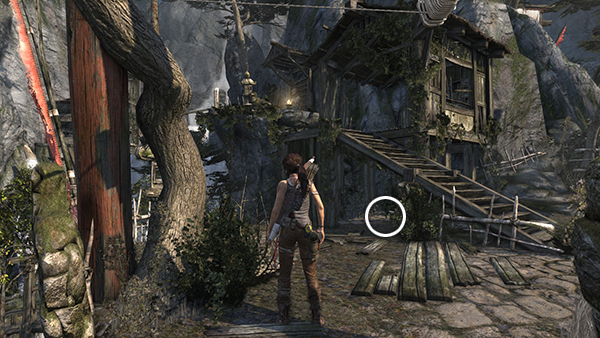
Mountain Village GPS Cache 1
This cache can be found in the stream at the base of the waterfall just north of the Village Plateau Base Camp. See here for details. It's noted on the first visit map. (Click screenshot to enlarge.)
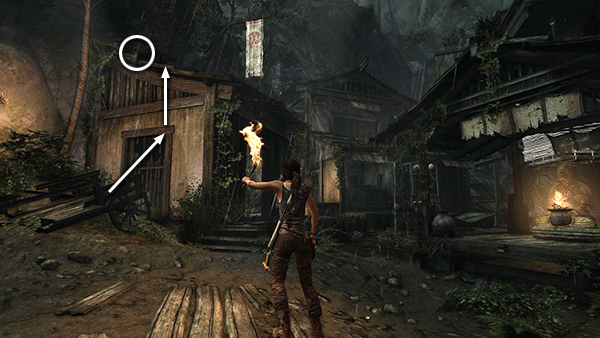
Mountain Village GPS Cache 2
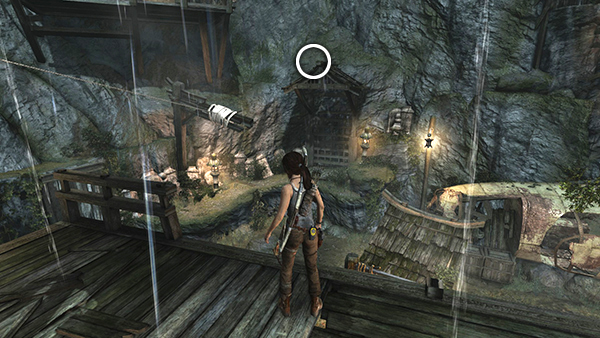
This cache is located on the roof of the leftmost hut in the village proper. Scramble up the wall or use the wooden wagon for a boost to reach it. See here for details. It's noted on the first visit map. (Click screenshot to enlarge.)
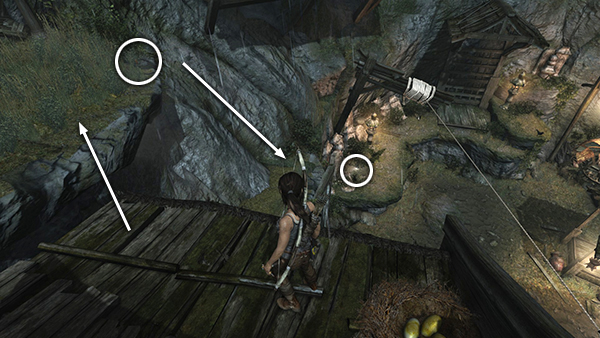
Mountain Village GPS Cache 3 and 4
These two caches are sitting on grassy ledges on the northeast side of the village. To reach them, climb onto the roof of the three-story wooden building, jump from the roof to cache #3, and then slide down to cache #4. If you just missed #4 you can also reach it from below. See here for details. Both are noted on the first visit map. (Click screenshot to enlarge.)
Mountain Village GPS Cache 5
This one is located on the roof of the little shelter built into the cliff wall behind the three-story building. Getting to it is a bit tricky. If you want it on your first visit to the village, see here for details. Otherwise, plan on retrieving it later when you return with the shotgun, as described here. It's noted on the first visit map. (Click screenshot to enlarge.)
Mountain Village GPS Cache 6
This cache is sitting in the water at the opening of the tunnel that leads to the first Challenge Tomb, the Tomb of the Unworthy. See here for details. It's noted on the first visit map, but the GPS icon is partly obscured by the Challenge Tomb icon. (Click screenshot to enlarge.)
Mountain Village GPS Cache 7
This cache is located in the area at the top of the waterfall north of the village. It is accessible on the first visit to Mountain Village but only after obtaining the climbing axe. See here for details. Once there, go around to the far side of the hut on the right and climb onto the roof to find the cache. It's noted on the first visit map. (Click screenshot to enlarge.)
Mountain Village GPS Cache 8
This cache is located in the same area as #7. When you reach that area, as described in the walkthrough, jump across the stream to the larger house on the left. Then go through the doorway on the right and look on the ground to find the cache. It's also marked on the first visit map. (Click screenshot to enlarge.)
Mountain Village GPS Cache 9
This cache is underneath the wooden hut perched on the cliffside north of the village. It can only be reached on the second and subsequent visits to this level. See here for how to reach it from the Village Overlook Camp and here for one of several ways to get there from the Village Plateau Camp. This one is noted on the second visit map. (Click screenshot to enlarge.)
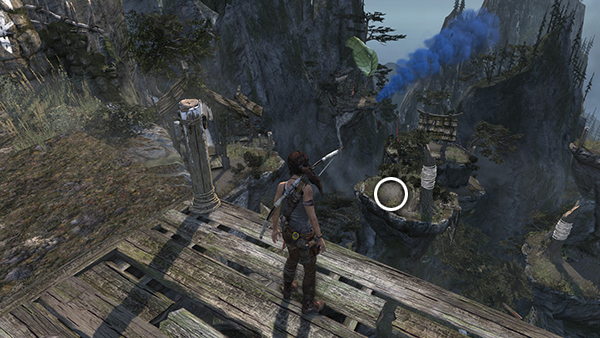
Mountain Village GPS Cache 10
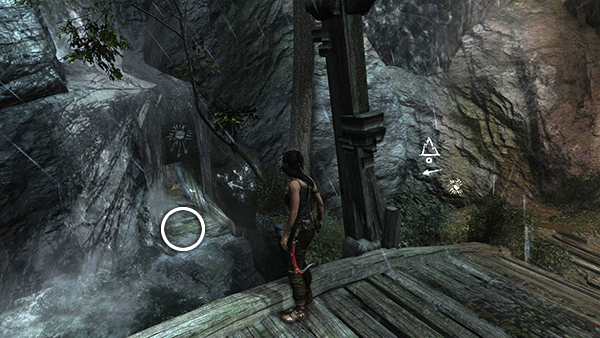
This cache is only accessible on the second and subsequent visits to the Mountain Village and can be found on one of the tall columns in the canyon to the east of the village. Check the second visit map and walkthrough for details. (Click screenshot to enlarge.)
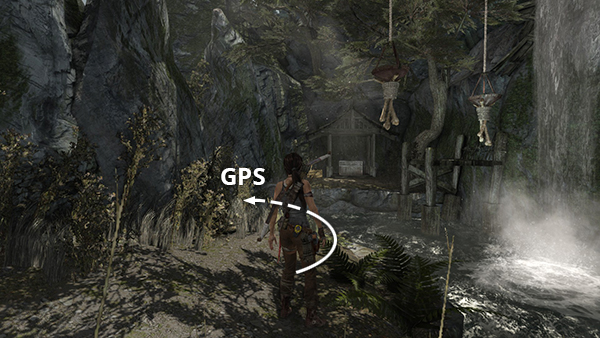
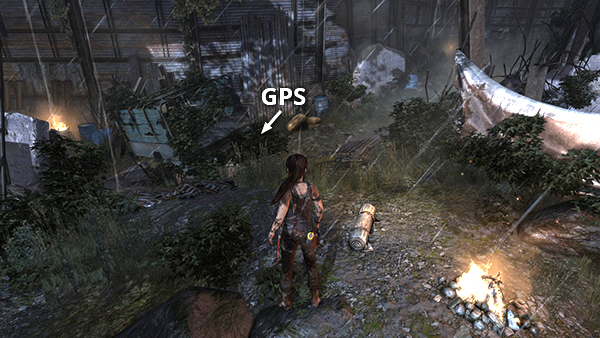
GPS Cache 11
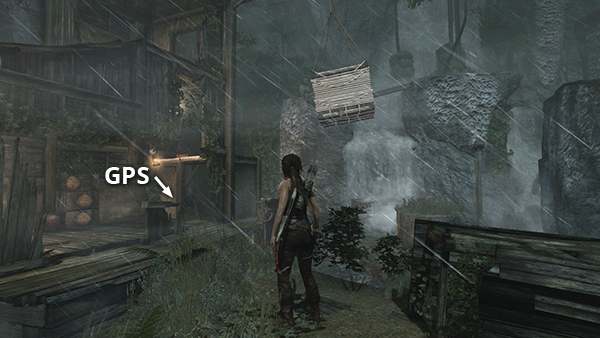
This cache can only be reached after returning from the Chasm Monastery level. It is on the stream bank beyond the Mountain Descent Day Camp, near the hanging salvage nets and burners. See here for details. It's also noted on the third visit map. If you missed it when you first passed through this area and need to return via fast travel, see here. (Click screenshot to enlarge.)
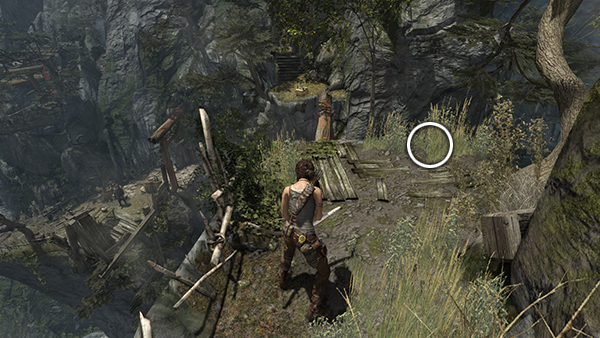
GPS Cache 12
This cache can only be reached after returning from the Chasm Monastery. It's on the high ledge across the stream from the Mountain Descent Day Camp, above the little Solarii encampment. See here for details. It's also noted on the third visit map. If you missed it when you first passed through this area and need to return via fast travel, see here. (Click screenshot to enlarge.)
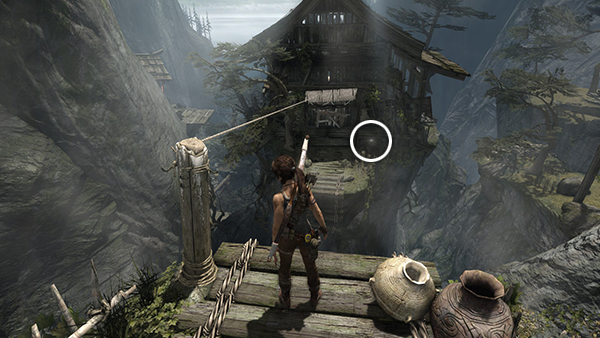
GPS Cache 13
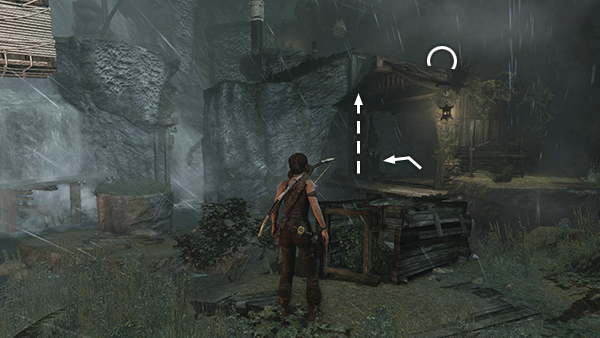
This cache can only be reached after returning from the Chasm Monastery. It's on the north side of the hut with the big bell, where Lara talks to Sam by radio. See here for details. It's also noted on the third visit map. If you missed it the first time, you can return to the Village Plateau Base Camp and use a rope line to reach that building, as shown here. (Click screenshot to enlarge.)
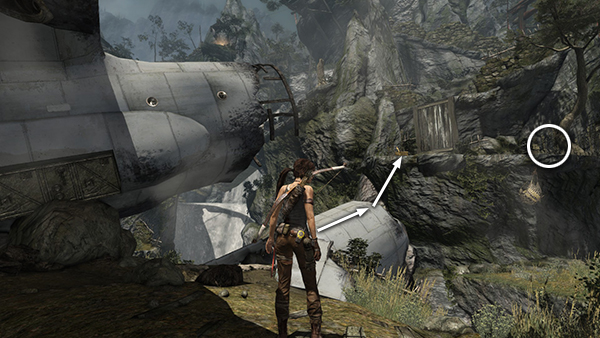
GPS Cache 14
This cache is only available on the second and subsequent visits to the village. To reach it, climb onto the plane wreckage near the Village Plateau Camp and jump from the broken fuselage to the ledge ahead. The cache is sitting in the grass on the right. I cover this one in the third visit map and walkthrough for details. (Click screenshot to enlarge.)
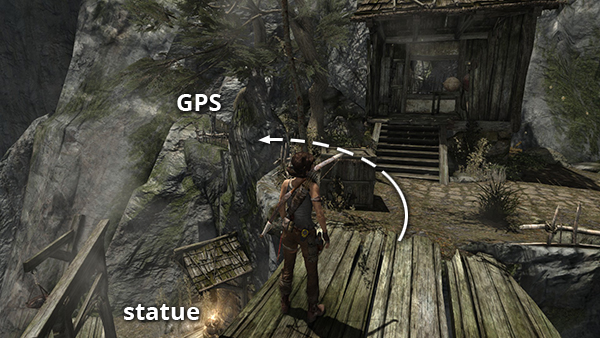
GPS Cache 15
This cache is only available on the second and subsequent visits to the village. It is sitting on a ledge high above and to the southwest of the village. If you follow the ledge up and around from the 10th illumination statue, you'll find the GPS cache on the ground beyond the wooden hut. Again, check the third visit map and walkthrough for details. (Click screenshot to enlarge.)
Base Approach (2)
There are only two caches in this level. Both are easy to miss, but also easy to retrieve later by using Fast Travel to return to the Broken Tunnel Base Camp. [Level Map]
GPS Cache 1
This cache is lying on the ground beside the junked truck near the Broken Tunnel campsite. See here for details. (Click screenshot to enlarge.)
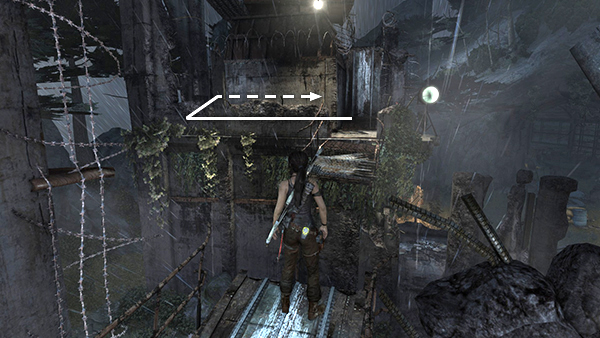
GPS Cache 2
When you get to the end of the level and have to jump across from the building to the tower, instead of scrambling up the wall to reach the level exit, go all the way around to the back of the tower to find this GPS cache. See here for details. (Click screenshot to enlarge.)
Mountain Base (2)
Again, there are only 2 GPS caches in this level. They aren't too well hidden, but if you happen to miss them, it's easy enough to fast travel back to the Map Room Base Camp and retrieve them. [Level Map]
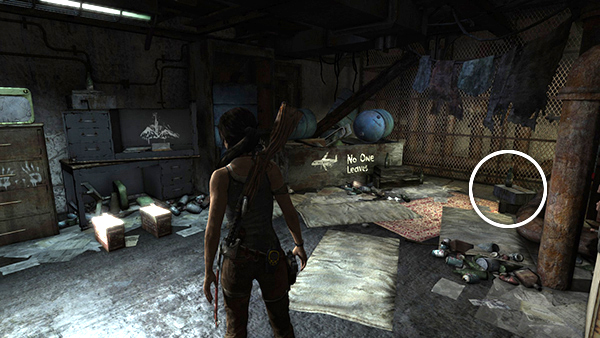
GPS Cache 1
The first cache is in the room just after the one where you obtain the SMG and before you step into the spotlight ambush. It's sitting on the floor on the right, behind some small boxes. See here for details. (Click screenshot to enlarge.)

GPS Cache 2
This cache is lying on the floor of the large room where the Solarii ambush Lara with the spotlight. It's on the right side about halfway along. See here for details. (Click screenshot to enlarge.)
Base Exterior (2)
There is only one GPS cache in this level. [Level Map]
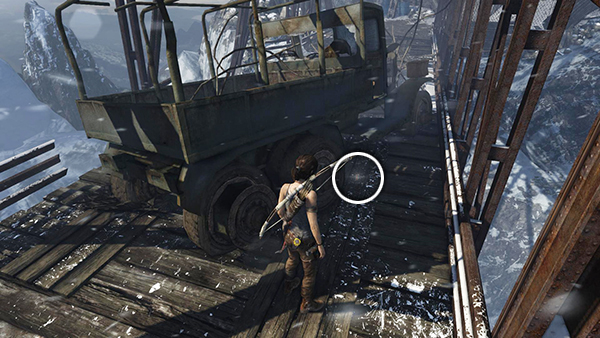
GPS Cache 1
This cache is sitting on the deck of the bridge just beyond the Bridge Overlook Day Camp. It's tucked away behind the junked truck and is easy to miss in the excitement of the QTE attack and the combat that follows. See here for details. (Click screenshot to enlarge.)
GPS Caches Part 2 | Collectibles Intro | TOMB RAIDER Walkthrough | Main Page
†UPDATE HISTORY: 8/13/13 - Page first posted online.
WAS THIS WALKTHROUGH HELPFUL? If not, I apologize and invite you to contact me with any questions. If you need help right away, I recommend the r/TombRaider subreddit. Other fan-run forums are listed at tombraiders.net/stella/community.html. If this site was useful, please consider supporting it financially or in other ways. For details, visit tombraiders.net/stella/support.html. As always, I welcome your corrections/suggestions. Thank you!
Copyright © 2013- Stellalune (). All rights reserved. The screenshots and videos included here were made using Fraps. Feel free to copy or print this walkthrough for personal use. By all means, share it with friends, but please include this credit line so people can send me their feedback. No part of this walkthrough may be reproduced on another site without permission. Follow this link for details about this site's advertising and privacy policy.
Stella's Tomb Raider Site: tombraiders.net.