STELLA'S TOMB RAIDER 1 REMASTERED WALKTHROUGH
Tomb Raider Remastered updates are in progress. For the guides that have not yet been updated, I will continue to link to the ORIGINAL WALKTHROUGHS, which cover all the basics. Please check the introductory notes at the start of the first level for info on my process, modern vs. classic tank controls, etc. This guide covers most but not all possible achievements/trophies. Follow this link for the archived classic Natla's Mines walkthrough.
LEVEL 13: NATLA'S MINES (Remaster)
Updated: 12/23/25(†)
Secrets: 3 Pickups: 30, including pistols, magnums, shotgun, Uzis, 3 fuses, and a key Kills: 3
Save Crystals: 7 (New Game+ only)
LEVEL MAP by VGCartography (used with permission)
Natla's Mines Video Walkthrough by Eldincy‡
OBJECTIVES: The initial goal is to recover your weapons from the nasty men who took them. The first step in doing this is to locate 3 fuses in order to activate some machinery that will help you obtain your pistols. Then it's a matter of making your way through the mine and confronting each of the bad guys. Finally, locate the key that will get you inside the Atlantean pyramid.
IMPORTANT: If you've come to this walkthrough after accidentally skipping some of the level and finding yourself softlocked or missing important items, I recommend restarting the level. To do this, let Lara die. Then, instead of reloading your last save, press Right to turn the page in the passport menu and choose "Restart Level." Then replay following the sequence described here. It shouldn't take too long.
LEVEL START: Swim forward and surface in an UNDERGROUND POOL. To the left (east) is a ledge with some wooden crates. It's too high to reach from below. Ahead on the left (southeast) is a larger ledge with some barrels and crates. There's also a small boat moored there. To the right (west) is a small waterfall. Swim behind the waterfall. Surface and follow the passageway until it widens, but don't bother climbing into the raised tunnel yet. (It's a dead end at the moment.) Just around the corner to the left is a switch. Pull it to open a wooden door elsewhere. (screenshots)
SOUTHEAST LANDING WITH BARRELS, BOXES & BOAT: Return along the passageway to the POOL and swim across to the landing with the boat and barrels. Climb out of the water and follow the tunnel to a cave with mine cart tracks and a drill car blocking another tunnel. Go to the left side of the rock pile behind the striped barricades and pull the movable crate. Climb over it and enter the passage behind. Here you'll find the door you just opened and, beyond it, another switch. Use it to open another wooden door elsewhere. Then return to the POOL the way you came. (screenshots)
Swim across the pool and behind the waterfall again. Follow the passage past the first switch, climb into the raised opening, and continue through the now open door. When you reach the ledge above the POOL, take a running jump to the ledge with the waterfall and striped barricades. Continue along a twisty tunnel to a cavern with a small building suspended from the ceiling. (screenshots)
CAVE WITH GLASSED-IN ROOM & DANGLING BUILDING: Lara will look up as you pass, indicating that this is important. Pick up the large medi pack (1) on the ground. Don't worry; the building won't come down yet. In the glassed-in room on the left, there are 3 receptacles on the wall. You'll need to find 3 FUSES to fit them. There's also some magnum ammo (2) on the floor in one corner (and a save crystal in New Game+, which you might want to save for after you find the fuses). (screenshots)
In addition to the passageway in the northeast corner, where you came in, there are two tunnels leading out of this cave. The small raised opening on the east wall is unreachable at the moment. The wider tunnel to the west is where we're headed now. (screenshots)
CAVE WITH BOARDED-UP ROOMS, TIRES & OTHER JUNK: Here you'll find 2 boarded-up structures, piles of discarded tires, and other debris. The brown wooden crate is movable. Pull it under the opening in the ceiling. Then climb onto the crate and take a running jump to the roof of the building. Drop through the broken tile (42/51) in the back corner. (This counts toward the "After Us the Deluge!" achievement/trophy.) Follow the twisting tunnel to an alcove with a switch. Throw it to shift the boat back at the POOL toward the other ledge. Continue to the end of the passage and drop down onto the crate you just moved. (If you didn't move the crate under the opening, you can still drop, but Lara will lose a little health.) (screenshots)
TRACKS WITH BARRICADES & BOULDER TRAPS - FIRST FUSE: Now follow the mine cart tracks to the wooden door opposite the entrance. It opens automatically and closes again as you continue along the tracks into the tunnel beyond. Striped barricades block the track and warn of boulder traps ahead. Advance to the first barricade to trip the boulder that rolls in from the left. Turn right and grab the ledge that runs along above the track. Don't pull up yet. Instead traverse to the left above the shallow pit where the tracks have collapsed. Now pull up. As long as you don't go toward the boulder on the right, it will not roll. Turn left and follow the ledge, jump the gap, and continue to the end. Avoid the lava pit on the left and enter the tunnel on the right, where you'll find the FIRST FUSE (3) lying on the ground (along with another save crystal in NG+). (screenshots)
NOTE: If you accidentally trigger the boulder trap and manage to jump out of the way in time, you can still continue. Two different ways of doing this are described in a footnote.
SLOPE WITH ROLLING BOULDERS: After picking up the FUSE, continue along the rocky passage as it slopes upward. Where it opens out and slopes up to the left, step forward cautiously and then quickly hop back to avoid a rolling boulder. Turn left and stand under the angled ceiling with the boulder behind and to the right. Side flip to the right to trip the second boulder, then side flip back to the left to safety. Head for the top of the slope and drop through the opening in the floor. You're now where the first (side-to-side) boulder originated. Walk forward to where the two tracks cross, then to the right. This will trip the first boulder above, assuming you didn't trigger it earlier. After it passes, climb onto the ledge and follow it to where that boulder originated (above and to the left of the wooden door). Enter the tunnel on the left and follow the passage to an opening where you can drop back down into the CAVE WITH BOARDED-UP ROOMS. (screenshots)
In this cave there's another tunnel beyond the pile of tires (on the south wall). This leads to a CONVEYOR BELT where you'll find another FUSE. You can't reach it yet, though. (screenshots)
STOREROOM (DRILL CAR SWITCH): Return to the POOL by following the wide tunnel to the east, beyond the tracks. Continue through the CAVE WITH THE DANGLING BUILDING and straight out the other side. When you reach the ledge with the striped barricades, drop into the water below. Swim across and climb onto the small boat, which you moved earlier. Take a running jump from the boat to the ledge with the wooden crates. Climb over the one on the left. (screenshots)
Here you'll find a small room packed with "Natla Technologies" crates. Pick up the magnum ammo (4) inside on the left. Find the movable Natla box (it's slightly darker than the others) and pull it once. Go around to the right and push it into the space where the ammo was. There's another movable box behind the first. Pull it twice. Go around to the right and pull it again to open up the passageway behind it. Enter and use the switch to move the drill car back in the cave to the south. (screenshots)
SOUTHEAST LANDING WITH BARRELS & BOXES (AGAIN) - SECOND FUSE: Return to the POOL, swim to the left (south), and climb out on the ledge with the barrels. Follow the passage to the drill car, which you just moved so it's no longer blocking the tunnel. Go into the tunnel and push the Natla box twice. Go around it and continue forward. Where the passage widens, move forward carefully and pick up the SECOND FUSE (5), which is lying on the ground. Don't go any farther or you'll attract the attention of the cowboy lurking ahead on the right. (screenshots)
NOTE: If you do accidentally activate the cowboy before retrieving your pistols, it's OK. Just run back the way you came, and continue following the walkthrough. The cowboy should soon lose interest and return to the cave where he spawned. You can then deal with him later.
Turn around and follow the tunnel back to the Natla box. Climb onto the box, turn around, and pull up into the short tunnel above. Pick up the Uzi clips (6) and throw the switch to open the door near the CONVEYOR BELT. (screenshots)
To get back there, hop down onto the Natla box, go through the cave with the drill car and out through the tunnel on the left (north) side, which leads back to the POOL. Swim across and surface behind the waterfall. Follow the passage to the ledge above the POOL, just like you did before. Take a running jump to the ledge with the striped barricades. Continue through the CAVE WITH THE GLASSED-IN ROOM & DANGLING BUILDING into the CAVE WITH BOARDED-UP ROOMS, TIRES, etc. (screenshots)
CONVEYOR BELT: This time, go through the doorway on the left (south) wall, beyond the stack of tires, and follow the twisting passageway to the conveyor belt. Follow the left passageway past the belt and through the wooden door you just opened. Here you'll find some Uzi ammo (7) and a switch. Throw the switch to activate the conveyor belt, dumping the THIRD FUSE (8) on the ground in front of it. Take it and return through the twisting passage to the CAVE WITH BOARDED-UP ROOMS. Exit on the right (east) side. (screenshots)
CAVE WITH DANGLING BUILDING (AGAIN): Climb the steps to the GLASSED-IN ROOM. Place the FUSES in their proper spots, and the winch will activate, lowering the small building. Inside you'll find the PISTOLS (9). (screenshots)
NOTES: The first time you use the pistols again, you'll need to select them from inventory. After that the draw-weapons button will work again.
PASSAGEWAY TO SECRET #1: After getting the guns, climb onto the roof of the building. Take a running jump to grab the edge of the raised opening in the east wall and pull up. Move about halfway up the slope, then climb into the raised opening on the right. Continue to a wooden door, which opens as Lara approaches and then closes behind her. Ahead is a lava pit with sloping sides and a collapsing trapdoor. The room with the secret is above the trapdoor on the left. (screenshots)
To unlock the "I'm Not Falling for This Trick" achievement/trophy, you must "Take a secret in Natla's Mines without stepping on trap slide." This is that trap. Save the game just in case. Walk to the edge of the slope, position Lara around the middle of the passageway, then turn slightly to the left, so she's facing the opening above the trapdoor. Use the Look button to check the angle, since the camera tends to drift to the side a bit in tight spaces. Hop back, then take a running jump to land in the opening. This is SECRET #1—a large medi pack and Uzi clips (10-11). (screenshots)
Pull the switch to open the wooden door out in the passageway. Hop down onto the trapdoor (it's safe now), turn right, walk to the base of the slope, then take a standing jump to land at the top of the slope without touching it. If Lara lands on either slope, even on the way out, the achievement/trophy won't unlock. If you've done it correctly, the notification should pop just after you pass the wooden door. (screenshots)
NOTE: You can also take a running jump from the doorway to the passageway above the slope if you prefer.
Alternatively, if you don't care about achievements/trophies, when you come to the trapdoor, turn around to face the wooden door. Slide down the slope and grab the edge as the trapdoor opens beneath Lara. Pull up out of the lava pit and the trapdoor will close again so Lara can stand on it. Climb up into the secret room and proceed as usual. (screenshots)
Once you've collected the secret and the achievement, continue forward and hop down into the lower passage. Turn right (east) and follow the tunnel to a ledge above the POOL. (NG+ players get a save crystal here.) Drop down, swim across the pool, and once again climb out on the landing with the barrels. (screenshots)
NOTE: If you missed the opening to the secret and followed the tunnel all the way to the POOL, you can still go back. Just swim behind the waterfall, follow the passageway back to the cave with the GLASSED-IN FUSE ROOM, climb onto the formerly DANGLING BUILDING and try again.
SOUTHEAST LANDING WITH BARRELS & BOXES (AGAIN) - FIGHT THE COWBOY: Follow the tunnel to the cave with the drill car. Continue along the tracks into the passageway. Then continue past the Natla box to the larger cavern where you got the SECOND FUSE. Now that you're armed, you can take on that cowboy (1). As you move out into the middle of the cave, he starts talking. Then he emerges from behind the pillars on the right with magnums drawn. Let him kill Lara once for the "Deadline" achievement/trophy. Then, if you like, you can go mano a mano. He's not that tough. Just keep moving, and either use the pillars for cover or run/jump past him and roll, so you can shoot him in the back without him doing too much damage. Also, watch where you step. It's easy to fall off the far edge into the lava river or slip into any of the various lava pits. (screenshots)
Alternatively, for a fairly reliable scaredy-cat strategy, draw pistols and run straight forward from the entrance into the middle of the room to get the cowboy's attention. As soon as Lara gets a lock on him, back flip away into the tunnel and up against the wall. Continue to hold Action so Lara fires whenever he's in range. Most of the time, you can just park here and keep shooting, and he'll do little or no damage. (screenshots)
NOTE: I tested the scaredy-cat strat multiple times on a first playthrough but not yet in New Game+. Maybe one in five times, the cowboy will come close enough to actually wound Lara, but even then, she'll lose maybe a quarter of her health. I'm not sure if the cowboy is more aggressive the second time around.
Defeating the cowboy unlocks the "It's Personal Now!" achievement/trophy. He's also carrying your MAGNUMS (12), so be sure to take them back. (screenshot)
LAVA RIVER: Go to the far right (southwest) corner of the cave to a drop-off overlooking a lava river. Down below is a small square ledge jutting out from the wall. Safety drop down to it. (In NG+ there's a save crystal here.) Still facing the wall with the lava river behind Lara, drop and hang from this ledge. Let go and quickly press and hold Action again to grab the ledge below. Pull up and pick up a small medi pack (13). (screenshots)
Grab the crevice in the rock wall and traverse to the right as far as you can. Drop to the ledge below. Go around the corner to the right and grab the next crevice. Again, traverse all the way to the right and drop onto the angled block. (It looks steep, but it's safe.) Turn right and examine the wall ahead. A horizontal crevice runs along below a sloping ledge. Take a tricky running jump (see the note below) to grab the sloping ledge. Let go and grab the crevice below. Traverse to the right and drop down in the doorway. (screenshots)
NOTE: In the remastered game, I experienced a recurring glitch with this jump. Using the normal setup with tank controls—walk to the edge, hop back, then run and jump—Lara would consistently stop at the edge of this angled block and take a standing jump into the lava. Instead, walk to the edge, hop back, then walk one step backward. It's more like half a step, since there isn't a lot of room to maneuver, but if you do this, then take the running jump, Lara should behave.
Follow the passage uphill. Then slide down a steep slope and turn right to emerge near the lava river. The spray of erupting lava will injure Lara if she gets too close. So, rather than jumping directly across the river, move downstream a bit and take a standing jump onto the rectangular block in the middle of the lava falls. Turn left and walk to the end of this block, overlooking the lower pool. Take a running jump to the square pillar on the right. Take another running jump to the next block downstream (not the angled block on the left). Turn right and take a final running jump into the opening in the cave wall. Do not run on toward the wooden crate. There's a boulder trap ahead. You may want to save the game before proceeding. (screenshots)
SIDE TUNNELS - SECRET #2: Lara can stand just inside the opening without triggering the boulder, which rolls in from the left. But as soon as she approaches the wooden crate, the boulder starts to roll. So run forward and immediately push the crate into the room beyond. If you move quickly enough, Lara will be in the safe space where the box was by the time the boulder reaches the end of the tunnel. (screenshots)
NOTES: If instead of pushing the crate, you trigger the boulder and then hop back so Lara doesn't get crushed, you can still get into the secret room. See the ALTERNATE METHOD FOR SECRET #2 in a footnote following the main walkthrough. Also, be sure to get all pickups in this area. You'll need the SHOTGUN to unlock an achievement/trophy a bit farther on.
Go around the crate into a small room. This is SECRET #2. Pull the crate once to the side to reveal an opening in the ceiling. Climb into the room above to find a large medi pack and Uzi clips (14-15). Ignore the opening in the southwest corner, under the electric light. Instead, jump over the opening where you climbed up and follow the passageway to the end. Drop down and walk along the tracks toward the boulder. On the way you'll find more Uzi clips, a SHOTGUN, and another large medi pack (16-18). (screenshots)
IMPORTANT: Make sure you get both sets of items here, since you'll need the SHOTGUN to unlock an achievement/trophy a bit farther on.
Follow the tracks to the end and squeeze Lara between the boulder and the left wall. (The low ceiling prevents you from getting past the boulder on the right side.) To do this, stand with Lara's chest against the left wall and the boulder on her right. Then side flip to the right a few times until Lara squeezes through into the room with the movable crate. Then either repeat the process to get past the boulder to the exit or climb into the room above and drop down through the opening beneath the electric light. Or, if you can't get past the boulder this way, just return along the tracks to the raised opening, climb up, and follow the passage back to the room above the crate. Jump the gap in the floor and drop down through the opening beneath the electric light. You're now on the other side of the boulder, where you started. (screenshots)
LAVA RIVER (AGAIN): Now we'll make our way farther downstream. Take a running jump from the doorway to the nearest tall, square pillar in the lava river. Turn right and take a running jump to the pillar ahead and to the right (not the sloping pillar to the left). From there, take another running jump to the next pillar, and a third to the last pillar on the left. Hop down and go through the doorway. Slide down the slope and land on a small ledge above a lava pit. Take a standing jump to grab the opposite edge. Pull up and continue to the next room, where you'll find a number of boxes marked "TNT." (screenshots)
CAVE WITH TNT BOXES: The darker box in the far right corner moves. Pull it away from the others. Then maneuver it through the doorway into the next room, position it near the opening high on the left (north) wall and use it to climb up into that opening. (There's a save crystal here in NG+.) Make your way up the slope, avoiding the steeper surfaces, and pull up onto the ledge at the top on the right side. (screenshots)
Carefully approach the lava pit with the four sloping sides. Don't try and jump all the way across. The opposite slope is slippery and too steep to stand on. Instead take a running jump to either angled side ledge. Wait there for a boulder to roll down the slope into the pit. Then take another running jump to land on the far side of the pit. (screenshots)
LAVA RIVER (FAR SIDE): Continue to the top of the passage, where the boulder came from, and turn left to emerge on a ledge above the lava river, opposite where you killed the cowboy earlier. Turn right and follow the ledge up and around to the top. Pick up the magnum clips (19) on the ground and throw the switch to detonate the explosives you saw earlier. (screenshots)
Return along the ledge and through the passageway to the lava pit with sloping sides. Cross it the same way you did before: by taking a running jump to one of the side ledges then another running jump to the far side. Continue down the slope, turn left, and drop down into the TNT CAVE, which is now a jumble of rubble and smashed boxes. Climb up and over the pile of rubble into the next area. (screenshots)
SKATE PARK - FIGHT THE SKATER BOY: Ready weapons and enter the skate park. The skateboarder (2) is waiting at the top right corner of this huge room, and he's armed with your Uzis! Let him kill Lara once for the "Deadline" achievement/trophy. Then show him how a real woman fights. If you'd rather not go head-to-head, skip the next 3 paragraphs and check out this safer alternative.
Otherwise, go ahead and bust out those magnums (assuming you're not attempting a pistols-only run). I recommend that you save at least a dozen shotgun rounds for the next fight, against the bald guy, since there's an achievement/trophy that involves the shotgun.
If you're confident enough to fight him on his own turf, you probably don't need my help. Just remember to keep moving so it's harder for him to target Lara, but don't jump around too frantically, since there are lava pits everywhere. If possible, get behind him so you can damage him without being hit yourself.
If you need a little more help, try using the same basic tactics I suggested for the cowboy: Advance into the room, get a lock on your target, and hop/flip back into the entryway while firing. Keep shooting and flip left to right to reduce the damage from his bullets. And of course, watch Lara's health bar and use medi packs as needed. He will sometimes follow Lara into the entryway. There's no completely safe spot on the ground. But if this happens, just keep shooting and flipping, and either you'll finish him off, or he'll skate back outside. If he moves out of range, advance again to get his attention and repeat the back/side flip maneuvers as you chip away at his health. When he finally lands his last ollie, the "Yes, I'm Firing at You!" achievement/trophy unlocks, and you can claim your UZIS (20). (No, I don't know where he was hiding them, and it's probably best not to ask.) (screenshots)
FLOODED ROOM - SECRET #3: To find the third secret—or get to a safe-ish spot from which to fight the skater—begin at the entrance and head to the left. Take a running jump across the lava pit, and either pick up the Uzi clips (21) lying on the ground in the (northeast) corner or make a mental note to retrieve them after the fight. Turn right at the corner and continue forward. Just beyond the next square pillar is one pit filled with water instead of lava. Jump in and swim down and left, through the wooden door, which opens automatically. Pick up small and large medi packs, plus some Uzi ammo (22-24). This is SECRET #3. (screenshots)
Leave the way you entered, but instead of swimming all the way out, go through the wooden door and immediately swim upward to a small room where you can surface. Climb out of the water. Then climb up several more ledges to an opening above the big room with the ramps. Shoot the skateboarder from this opening if you didn't do so already. He can target Lara from below, but this is generally much less dangerous than fighting him on the ground. If he does start shooting, back away from the opening, then step forward again to shoot him the next time he passes by. (screenshots)
When the coast is clear, drop down and get the Uzi ammo (25) lying on the ground just below the opening as well as the Uzi clips (21) in the northeast corner and the UZIS (24) the skateboarder dropped, if you didn't get them earlier. There's also one more Uzi ammo (26) pickup about two-thirds of the way up the west side of the room, just below the ramp that runs along the west wall. The exit is directly opposite the entrance, in the middle of the south wall. (New Game+ players get another save crystal in the passage beyond.) (screenshots)
YET ANOTHER BOULDER TRAP: Exit the skate park, follow the passage to a T, and turn left. At the top of this slope are 3 boulders waiting to roll. Walk up the center and, as the first boulder comes rolling down, side flip to the left or right. (The lava tiles are safe.) The second boulder will then start to roll, so side flip to the other side of the slope. This will set off the third boulder. Flip to the other side, out of the way. Walk as you approach the top of the slope to let a fourth boulder roll past in front of you. At the top, go to the left, through the opening from which the boulder came. (screenshots)
TALL ROOM WITH LEDGES: At the top of the ramp, pull up through the opening in the ceiling. Now you're in a tall room with a number of blocks and ledges. Climb onto the lowest of these. Move to the outer corner of this ledge and take a standing jump onto the next one. From there, it's three more standing-jump-and-grab combinations to reach the block below the opening in the ceiling. Finally, climb up through that opening into a small room with sandy-colored walls. (screenshots)
LOW-CEILINGED ROOMS WITH MOVABLE BLOCKS: This next area involves rearranging several movable blocks in order to access switches and open doors. Refer to the diagram below, as well as this series of screenshots. The diagram follows the sequence of actions more or less clockwise from upper left.
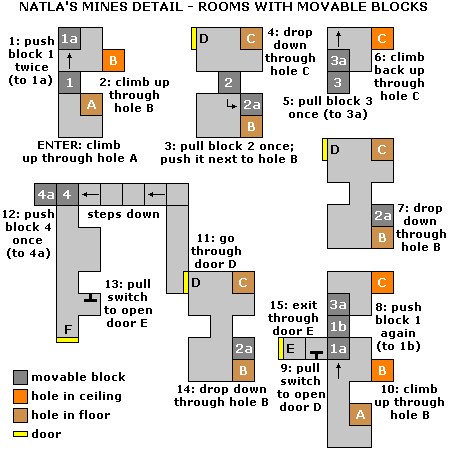
The opening leading down into the TALL ROOM WITH LEDGES is (A) in the diagram. To one side of this opening is a movable block, (1) in the diagram. Push this block twice into the next room (to position 1a). To the right is an opening in the ceiling (B). Climb up through it into the room above. Here you'll find another movable block (2). Pull it once, then go around to the left and push it once so it ends up next to the hole in the floor (at position 2a). Go through the opening where the block was. Here is another small room with an opening in the floor (C) and a gold door (D). Drop through the opening in the floor into a small room with yet another movable block (3). Pull this block once (to position 3a). This will make space for you to rearrange the first block (1a). To return there, climb up through the opening in the ceiling (C), go into the next room, and drop down through the opening in the floor (B). (screenshots)
Now push that first block once more (to position 1b). This will open up an alcove on the left with a switch and a gold door (E) beyond. (There's also a save crystal here in NG+, though you may want to wait to use it until you've completed the rest of the block puzzle.) Pull the switch to open the gold door (D) in the room above. To get back to it, climb through the opening in the ceiling (B), and go through the doorway into the next room. The door is on the left. (screenshots)
Go through the gold door (D) and turn right. At the end of the passage, take a left and go down the steps to another movable block (4). Push this block once (to position 4a). This will give you access to a hallway with alcoves on one side and a gold door (F, for "flaky") at the end. This door opens when you step on a certain spot in the floor and quickly closes. Ignore it unless you just want to use Photo Mode to scout ahead. We'll take a different route. Go to the alcove near that door and use the switch to open the gold door (E) near the first switch. (screenshots)
Return there by following the passage the way you came, back up the steps and through the gold door (D). Ignore the hole in the floor just ahead (C). Instead, continue to the right into the next room and drop down through the other hole in the floor (B). Across from this opening, beyond the switch you used earlier, is the outer door (E) that you just opened. (screenshots)
OUTSIDE NEAR THE PYRAMID - FIGHT THE BALD DUDE: The big bald henchman (3) is waiting outside with a shotgun. He approaches from the pyramid entrance, directly opposite the door where you emerge. Let him beat you once for the "Deadline" achievement/trophy. Then, in order to unlock "Shell Sucker," you'll need to defeat him using a shotgun. So if you found it in secret area #2, equip it now. Then run toward him and start firing as soon as Lara aims at him. Jump past him, roll, and continue firing at his back. This way, you'll get in a few hits before he turns around and starts shooting back. Now flip side to side, continuing to fire, and he should go down fairly quickly. It takes about 10 shotgun rounds to bring him down, assuming you stay fairly close and don't miss. (screenshots)
NOTE: Unfortunately, it's not possible to backtrack for the shotgun. The small lava pit beyond the TNT CAVE is too wide to cross in the other direction. So if you missed it, either save this achievement/trophy for another playthrough, or restart the level.
If you don't care about achievements, you can use the same basic tactic with any weapon: Run out into the open area near the pyramid, get a lock on the enemy, and shoot at him while jumping from side to side. If you like, you can run/jump past him first and then roll and try to hit him in the back. Or run in a circle around him, trying to stay behind him as you fire, so he has a harder time aiming at Lara. He's not extremely hard to kill, but that boomstick packs a punch, so keep moving, and don't hesitate to use a medi pack in the middle of the fight if necessary. (screenshots)
Alternatively, as soon as you enter the pyramid area, turn right and climb onto the low building. The bald enemy can still target Lara from below, but the top of the low roof, just to the right of the angled block, is relatively safe. If he gets too close, you can back away from the edge. Then, when he moves off, step forward and continue firing. You should eventually be able to kill him with pistols from here. (screenshots)
Once the big guy falls, you'll unlock "Shell Sucker!" and/or the "Cheese!" achievement/trophy for defeating him with any weapon. Be sure to take his SHOTGUN. (27)
NOTE: If you already found the shotgun, you'll get shells here instead.
ENTERING THE ATLANTEAN PYRAMID: The doors leading into the pyramid require a key. Let's go find it. Climb onto the ledge above the pyramid entrance. Now take a series of standing jumps up the five flat spots on the side of the pyramid. Walk to the edge of the highest flat spot. Take another standing jump onto the sloping side of the pyramid, and slide down to the ledge in front of the doorway. Go in and use the switch to open two gold doors back in the area where you fought the bald guy. (screenshots)
Slide down the pyramid to the ground and return to the small buildings. The gold door on the left (F in the diagram) and the one straight ahead (E) lead back into the ROOMS WITH MOVABLE BLOCKS. You don't need anything there now. Go through the gold door on the right and pick up some Uzi clips and a large medi pack in the doorway (28-29). Go a little farther in and you'll find the PYRAMID KEY (30). Take it and return to the pyramid entrance. Unlock the doors and enter to finish the level. (screenshots)
†UPDATE HISTORY: 4/20/24 - First major update for the Remastered version. Updates made prior to the Tomb Raider I-III Remastered release, including credit for tips sent in by other players, are tracked in the original guide.
5/27/24 - Added running totals for the break-away tiles needed for the "After Us the Deluge" achievement/trophy.
12/23/25 - Added additional details for the 36 different deaths required for the "Deadline" achievement/trophy.
‡NOTE ON VIDEO GUIDES: Eldin's videos don't always follow the same strategies I use in my walkthroughs, but if you prefer that format, I think you'll find them very helpful.
DARK MODE: I plan to add optional dark mode for these pages, but my current priority is updating the walkthroughs. Meanwhile, may I suggest a reputable dark mode browser extension, such as Dark Reader? (Download only from trusted sites, like darkreader.org or your browser's official add-on/extension site.)
TRACKS WITH BARRICADES & BOULDER TRAPS - ALTERNATE METHODS: If you accidentally trigger the boulder trap on the way to get the FIRST FUSE and manage to jump out of the way in time, you can still continue. Follow the elevated ledge down to where the boulder landed. Be careful not to fall into the lava pit on the left. Face the wall so the boulder is on Lara's left. Step forward so Lara's chest is against the wall and then sidestep to the left as far as you can. Adjust Lara's angle by turning slightly to the right. Then side flip to the left toward the boulder. With repeated side flips, you should be able to gradually squeeze her through the crack between the boulder and the wall and into the doorway near the FIRST FUSE. Continue following the regular walkthrough, above. (screenshots)
Or, if that doesn't work for you, follow the elevated ledge back up to where the boulder originated (above and to the left of the wooden door). Enter the tunnel on the left and follow it to an opening above the CAVE WITH BOARDED-UP ROOMS. Drop down and return along the tracks through the wooden door. When you re-enter the trapped area, the boulder will have reset. Continue following the regular walkthrough, above. (screenshots)
SECRET #2 - ALTERNATE METHOD: If you trigger the boulder trap near secret #2 and hop back out of its way, you can still get into the secret room. Face the wall on the right. Step forward so Lara's chest is against the wall and then sidestep to the left as far as you can. Adjust Lara's angle by turning slightly to the right. Then side flip to the left toward the boulder. You may have to adjust the angle and repeat the side jump several times but eventually Lara will squeeze between the boulder and the wall. Continue to side flip to the left until she reaches the corner behind the boulder. Turn to face the wooden crate. If you have Action Indicators enabled in the Options menu, you'll see the hand icon. Now you should be able to push the crate into the room behind it and access secret #2. (screenshots)
WAS THIS WALKTHROUGH HELPFUL? If not, I apologize and invite you to contact me with any questions. If you need help right away, I recommend the r/TombRaider subreddit. Other fan-run forums are listed at tombraiders.net/stella/community.html. If this site was useful, please consider supporting it financially or in other ways. For details, visit tombraiders.net/stella/support.html. As always, I welcome your corrections/suggestions. Thank you!
Copyright © - Stellalune ( ). The full-color level maps belong to VGCartography and are used with permission. Follow them on Twitter/X, YouTube, and DeviantArt for more fantastic game maps. Feel free to copy or print this walkthrough for personal use. By all means, share it with friends, but please include this credit line so people can send me their feedback. No part of this walkthrough may be reproduced on another site without permission.
Stella's Tomb Raider Site: tombraiders.net.