IMPORTANT: If you haven't already done so, you may want to review the INTRODUCTORY NOTES on the storyline, controls, treasures/relics and saving/checkpoints. These appear at the start of the PROLOGUE walkthrough.
As always, I highly recommend that you do not rely exclusively on the autosave. Instead be sure to save manually at least once or twice each level. Then, if you miss something or run into a bug, you can reload rather than having to replay the entire level. Many common bugs are documented in this walkthrough. They are in hot pink text, like this, so they're easy to spot. I have also included an overview of major bugs without game spoilers. However, not every potential problem is covered here. So be safe; save often in new slots. In case you need them, Underworld Save Files for PC, PS3 and Wii are available.
NOTES ON THE DEMO: The Windows PC and Xbox 360 demos include the first and part of the second section of the Coastal Thailand level (i.e., all of "The Remnants" and part of "Bhogavati"). The autosave checkpoints function, but you cannot save manually. So you must complete the demo in one sitting. Also certain sections of the main menu (e.g., rewards) don't function in the demo.
If this demo is your first Tomb Raider experience, I recommend turning on the Helper Buttons and Training Text in the Game Options menu. These provide on-screen hints to help you learn the controls.
LEVEL 2: COASTAL THAILAND - PART 1: THE REMNANTS | Updated: 3/17/10(†) |
Health Items: 6 Treasures: 10* Relics: 0 Keys/Puzzle Items: 0
Underworld Video Walkthrough by Eldincy‡
*There are 30 treasures in the entire Coastal Thailand chapter. Ten of these can be found in this level. They are numbered 1/26 through 10/26 below.
NOTE: In the full game (not the demo) you now have a choice of outfits for Lara. Choose whichever you like, since the outfits are purely esthetic. You can also choose which secondary weapon to equip first. You'll probably want the spear gun here, but you can always change this later in the PDA. (For more info, see the Underworld Controls page.)
Cinematic: Before setting out, Lara converses with Zip and Alister over the computer uplink. She says she sees no sign of her father's earlier explorations here and surmises that the ruins must be farther inland.
ABOARD THE MOTORBOAT: There are 3 sharks swimming around nearby. You can ignore them and continue onward, shoot them from the deck of the boat with pistols, or take a swim and confront them with the spear gun.
NOTE FOR DEMO PLAYERS: Changing weapons has already been covered in the first level walkthrough, but if you're playing the demo, this will be new info. Please see the footnote at the end of the walkthrough for tips.
The ledge where you're headed (the same one you saw through Lara's camera in the cinematic) is directly opposite the stern of the boat. Swim across to it, but don't climb up yet. Instead, swim around to the right, between the stone pillar supporting the ledge and the small cascade of water coming from above. Face the spot where sunlight illuminates the cliff wall ahead. Then dive beneath the surface to spot two sea anemones anchored to the sea bottom. Swim around to the left between the two anemones and scan the bottom for a small, shiny object. Pick up this treasure (1/30) by swimming near it and pressing Interact. (These screenshots show the location of the treasure.)
Once you have the treasure, surface, swim back around the stone pillar and climb out onto the ledge.
CLIMBING TO THE SMALL CAVE: Once Lara is standing on the small ledge, approach the wall to grab the rough handholds. Climb diagonally upward and to the right. Then continue climbing around to the right and upward. When Lara can't go any farther jump to the right to grab the rough handholds beyond the gap in the rocks. Climb upward as far as possible. Then jump up to grab the man-made stone handhold above. Jump up once more to grab the higher handhold and then climb along it to the right as far as you can go. Here you'll see a small waterfall behind and to the right. Jump to the right to clear the gap and grab the narrow ledge on the next wall. Climb to the right and drop down into a small cave. (This series of screenshots shows the path to the cave.)
Once inside the cave, stay alert; several small spiders jump on Lara. You can shoot them, but it's probably easier to just swat them away and step on them by tapping the Interact key. Inside the cave you'll find a health potion and a treasure (2/30). To pick up each item, just stand near it and press Interact.
NOTE FOR DEMO PLAYERS: Health items are stored in your inventory until you need them. To use a health item, press the Use Medipak key (V on the PC, D-Pad Up on the Xbox).
CLIMBING TO THE PATH LEADING INLAND: (The following is shown in a series of screenshots.) After picking up treasure #2, step out onto the rounded ledge at the mouth of the cave. Jump from there to grab the closest part of the handhold on the wall ahead. Climb to the left, drop down twice, climb down a little and then jump to the left across the gap in the rocks. (Here you are backtracking along the route you took to reach the cave.) If Lara misses that first grab and falls into the water, just swim back to the ledge where you started, grab the rough handholds and climb around the corner to the right.
Now climb upward and to the left, around the left side of the stone column. Continue climbing to the left and upward until Lara is hanging from another man-made ledge. Climb to the left, traversing along the ledge below the stone railing with colorful parrots perching upon it. When you can't climb any farther, jump back to grab a narrow ledge on the stone pillar behind. (Again, check the screenshots if necessary.)
Jump up to stand on this narrow ledge. Press the Right direction key (or press to the right on the control stick) to make Lara sidestep along the ledge to the right (her left). Tilt the control stick or press the direction key that makes Lara lean away from the wall. Then jump in that direction to clear the gap and land on the ledge beyond.
OVERGROWN PATH: Follow the path up the steps and into the greenery. Fight off a few more small spiders and then vault up onto the low ledge on the right. (You may encounter more spiders here depending on how long you lingered on the path below.) Go up the next flight of steps to find another health potion on the landing. Turn right and approach the edge.
GAP WITH HORIZONTAL POLE: Step off onto the slope and, as Lara slides, press Jump to leap off the slope and grab the horizontal pole.
NOTE: If you miss the jump and end up hanging from the ledge below the slope, traverse as far as you can to the right and then jump back to grab the narrow handhold on the pillar behind you. Climb to the right until Lara is hanging below the horizontal pole. Then jump up to grab it. If you fall into the water, you'll need to swim to the first ledge and climb back up the way you came earlier.
Once Lara is hanging from the horizontal pole, traverse hand over hand to the end of the pole and press Jump to climb on top of it. Position the camera behind Lara and then jump forward to grab the ledge ahead. (Or swing around the pole and jump to grab the lower handhold on the wall ahead. Then climb to the right and jump up to grab the ledge above.) Pull up and follow the hallway around to the right to the next checkpoint.
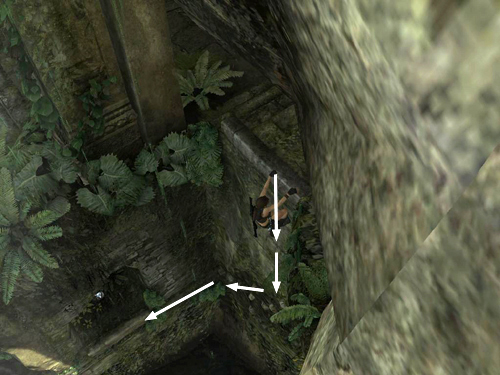
DETOUR FOR A TREASURE: Backtrack a few steps to a ledge above the water. It's on the left if Lara is facing downstairs. Step off the edge to hang from this ledge. Below and to the left there's a small alcove with a treasure. (This screenshot shows the path down.) Drop down twice to reach the bumpy stone handholds on the wall and then climb down and to the left as far as you can go. When you reach the corner jump back to grab the ledge in front of the alcove. Pull up and take the treasure (3/30).
To get back up to the path, first hang from the edge of the alcove. Climb as far as possible to the right and then jump to the right to grab the wall. Climb up and to the right until Lara is hanging below the man-made handholds. Jump up twice to reach the edge. Pull up, turn right and continue along the hallway.
Step out onto the flat, sunny rock ledge. Kill a couple more small spiders and then turn back to face the opening from which you just emerged. Beyond the gap on the right there are two man-made handholds on the wall. Take a running jump to grab the lower of these handholds. Jump up to grab the one above and then jump again to pull up onto it. Press the direction key that causes Lara to lean away from the wall (i.e., Left if the camera is on Lara's left looking straight into the alcove) and then jump in that direction to grab the handhold ahead. Jump straight up twice to grab the ledge above and pull up. (See these screenshots if you need clarification.)
XBOX 360 ACHIEVEMENT/PLAYSTATION 3 TROPHY: To unlock the Master Swan Diver achievement/trophy, upon reaching this ledge, stand at the corner facing out over the water and do a swan dive. (These screenshots show the exact spot.) You may want to follow the path to the next checkpoint and save before doing the dive. Then you can reload instead of having to climb all the way back up. Note that in order to unlock all three Swan Diver achievements, you must dive from the three highest points in the game (over water) during the same play-through. For more info, follow these links to the Xbox 360 Achievements and PS3 Trophies pages.
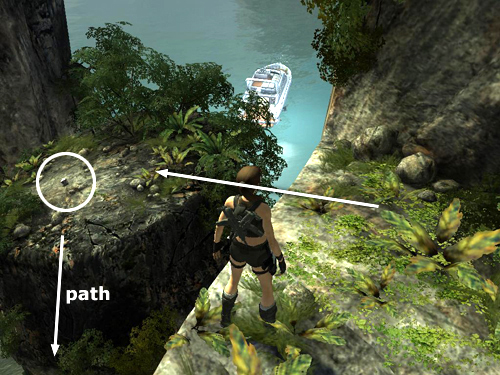
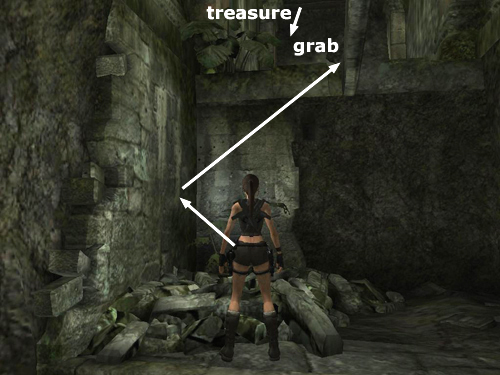
WIDE ROCK LEDGE WITH TREASURE: If you're not interested in collecting treasures, skip this paragraph and continue along the overgrown path. Otherwise, look ahead and to the left. Down below you can see the boat and, a bit closer, a wide, flat ledge with something sparkly lying in plain sight. Take a running jump from the path to clear the wide gap and land on the ledge (as shown in this screenshot). This is quite a long jump, but if you roll as Lara hits the ground, she'll take little or no damage. Pick up another treasure (4/30).
To get back to the path, turn around so the cliff from which you just jumped is above on Lara's left. Then look ahead to spot the sunny ledge where you killed the spiders. Take a running jump down to it. Then repeat the climb up the handholds to the path. (Again, refer to the screenshots if you need them.)
OVERGROWN PATH CONTINUES: Follow the rocky path forward and then around to the right. Continue along the path, which curves around to the right through the dense undergrowth. Keep going until you reach a gap with a metal ring above.
GRAPPLE SWING ACROSS SHALLOW PIT: In Underworld grapple swinging works a little differently than it does in previous games. Stand a few steps from the edge of the pit, then press the Grapple button to attach the cable to the metal ring. With the cable already extended, take a running jump forward off the edge. You may have enough momentum to clear the gap with one swing. If not, just hold the Forward direction key to swing back and forth. Then, when Lara swings toward the far ledge, press Jump to release the cable and land there. If you accidentally drop into the pit, climb out on the side where you started and try again.
Continue forward and to the left along the path. Some growling is audible, but there are no large enemies around. . . yet. When you reach the dark hollow beneath the rocks and tangled tree roots, press Crouch and go through. If you want, you can activate Lara's utility light for better visibility. (F on the PC, D-Pad Left on the consoles.)
ENTERING THE RUINS: Go up the stairs of the ruined building. On the right are 3 breakable jars, one of which looks different from the others. This jar contains a treasure (5/30). Press Interact to smash the jar, then Interact again to take the item.
On the left side of the stairs there's an alcove you can use to wall jump or chimney jump and reach the handholds above. Here's how: First, stand Lara in the corner facing the square support column with the handhold at the top. Adjust her position so she's about halfway between the wall and the column. Jump toward the column. Then, just as Lara touches it, press Jump again to spring back toward the wall behind her. Quickly press Jump again to leap from the wall and grab the handhold on the column. (See the first in this series of screenshots if you need a visual.)
Once Lara is hanging from the column, climb around to the left and jump to grab the next column. Climb around that column to the right and jump up to grab the handhold above. Then jump back to grab a handhold at the top of the first column. Traverse to the right along the temple façade. (Tap Interact in time with Lara's movements to climb or traverse faster.) When you reach the square column on the right side and Lara braces her feet against the column, jump back to grab the column behind.
Climb all the way around to the other side of the column and then jump up to grab the narrow ledge above. Climb to the left as far as possible. Then jump to the left to clear the gap in the ledge. Continue climbing to the left side of the façade. Jump straight up to grab the ledge below the stone balustrade. Then traverse to the right until you can pull up. Go forward toward the temple. (Again, check the screenshots for help with this sequence.)
CLIMBING DOWN TO THE STREAMBED: Walk to the edge overlooking the ruins. Jump to grab the handhold on the tall, square column on the left. (This series of screenshots shows the climb down to the ground.) Jump up to grab the handhold above. Climb around to the right and jump back to grab a handhold on the next column. Climb around to the left and then drop to grab the horizontal pole below.
This pole spans the distance between two columns. While hanging from it, turn to face the horizontal pole connecting the two neighboring columns. Swing around the pole and jump to grab the next pole. Swing around it and jump to grab the horizontal handhold on the wall ahead. (Alternatively, while hanging from the first pole facing the second, press Jump to vault up onto the pole, jump forward to grab the next pole, swing forward just slightly and quickly press jump again to leap from the second pole and grab the horizontal handhold on the wall ahead. This is a little tricky but faster.) Climb to the right along the stone handhold as far as you can go.
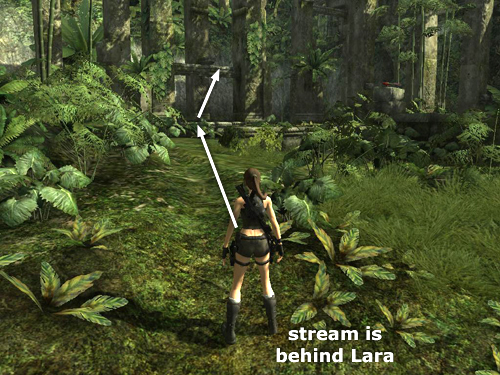
When Lara braces her feet against the wall, you can then jump back to grab the nearest square column. Climb around to the left side and drop down to the lower handhold. Climb to the left then jump to grab the horizontal pole between the two neighboring columns. Climb hand over hand to the other end of the pole. Then drop down four times to reach the ground. Pick up the health potion and then follow the stream away from the waterfall.
A brief cutscene shows a pair of tigers charging down from the hillside on the right bank of the stream.
COMBAT IN THE STREAMBED: Try to keep your distance by jumping and weaving away from the 2 tigers as you shoot at them. Don't bother trying to climb onto the low walls for safety; the tigers can reach Lara there. If you want a safe spot, sprint up the hill on the left bank of the stream and climb onto the horizontal stone beam between two of the square columns. (Sprint is Shift on the PC, L1 on the PS2, LB on the Xbox. This screenshot shows the safe spot.) If you do this, you'll meet a third tiger at the top of the hill. So stay alert. Alternatively, run back to the column where you climbed down and got the health potion. Lara can then shoot the tigers while hanging from the lowest handhold. Keep in mind, though, that the tigers are pretty fast and will try and chase Lara if she runs. So you may have better luck if you just keep moving and firing. If you don't go up the hill, the third tiger will emerge and attack once the first two are dead.
If you have Training Text enabled in the Game Options menu, you'll get some help during the fight. The hints are a little hard to read in the heat of battle, but here's the gist:
NOTE: If you're not sure of the controls for any of the above, see the Underworld Controls page.
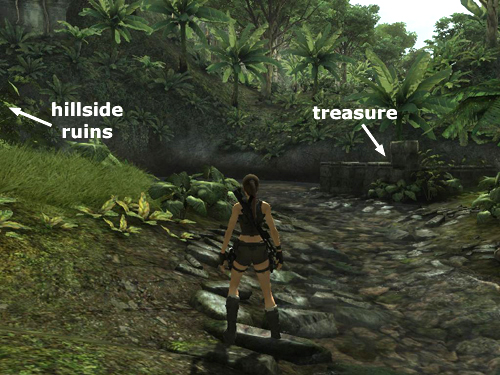
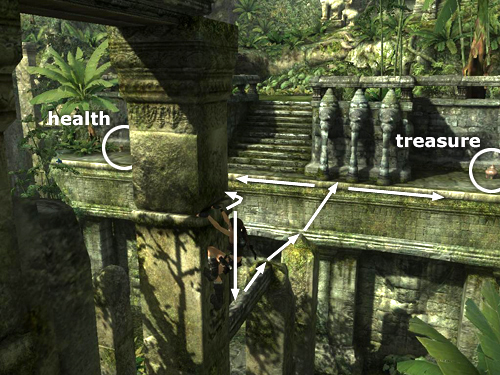
When you've killed all three tigers, make a few pickups: There's another treasure (6/30) in a breakable jar behind the low, L-shaped stone wall near the stream (shown in this screenshot). After getting it, make your way up the hillside to the area with the square pillars (shown in the previous screenshot). Here you'll find 2 health potions on the floor of the ruins.
CLIMBING OUT OF THE STREAMBED: Climb onto the horizontal stone beam between two of the square columns. Walk to the end of the beam and jump up to grab the handhold above on the column. (Check the screenshots if you need them.) Climb around to the left side of the pillar and then jump back to land on the small stone beam projecting out of the column behind. Walk along the beam toward the column and then jump up to grab the handhold above. Climb around to the right side of the column and get ready for a tricky jumping sequence.
Here you have to use the chimney jump maneuver to get from this handhold to another handhold higher up on the same column. While hanging on, press and hold the direction key (or control stick direction) that makes Lara lean back toward the column behind her. (For example, if the camera is on her left, press Right. If the camera is behind her, press Back, etc.) If you test the direction by leaning first, you won't make her jump the wrong way by mistake. Then, still holding the direction key or control stick, press Jump to leap away from the handhold toward the other column. When Lara touches the other column, immediately press Jump again to spring back to the first column. Repeat this twice more (four jumps in all) to leap back and forth between the columns until Lara grabs the higher handhold on the first column. (Again the screenshots show the whole sequence.)
Now decide whether you want the next treasure or not. If not, skip down to the section "CLIMBING TO THE UPPER RUINS," below. To get the treasure, continue with the next paragraph.
ANOTHER SIDE TRIP FOR A TREASURE: From the handhold where you end up after the chimney jump, climb around to the right. The handhold continues around to the other side of the column, but don't climb that far. Instead jump to the left to grab the next column. (These screenshots show the sequence.) Climb to the left and then jump to grab the third column. Climb around this column to the left and drop down onto the horizontal beam below.
Hang from the beam so the columns you just climbed are on Lara's right. Traverse to the left as far as possible and then jump to grab the L-shaped corner handhold on the side of the ruined building. Climb around the corner to the left then up into the ruins.
Follow the passageway around to the right to find another treasure (7/30). From here you can also target and shoot the bats that fly in from the other side of the open area. If you don't get them all now, Lara can shoot one-handed while climbing, as long as she has pistols equipped.
To reach the other side of the ruins, either go back the way you came or, starting from the ledge where you just found the treasure, take a running jump to grab the handhold on the square column ahead and to the left. (These screenshots show the way.) Climb around to the right so that the slender, round column is directly behind Lara, and then jump back to grab it. Climb all the way up the column to perch on top of it. Turn to face the line of square columns and the horizontal beam where you balanced before. Jump forward to perch on top of the broken column. Then jump forward again to grab the handhold on the nearest tall, square column. Traverse around to the right and pull up to stand on the horizontal beam. Turn left and jump straight up to grab the handhold above. Then climb around to the right. Jump to the next column, then the next. (This is where you ended up after doing the chimney jump earlier.)
CLIMBING TO THE UPPER RUINS: From the handhold on the column where you end up after the chimney jump, climb around to the right and drop down onto the horizontal beam. Walk to the far end of the beam and jump to perch on the broken column ahead. Jump forward to grab the narrow, horizontal ledge running along the front of the ruined building. (Check this screenshot if necessary.)
To continue on without pickups, just traverse to the left and pull up onto the stairs. Otherwise, traverse to the right and pull up onto a ledge with a breakable jar containing a treasure (8/30). Then drop back and hang from the edge and traverse back to the left past the stairs. (Again, to move faster while climbing or traversing, tap Interact in time with Lara's movements.) Continue to the left and pull up on the ledge with the health potion. Traverse back to the right, pull up and climb the stairs.
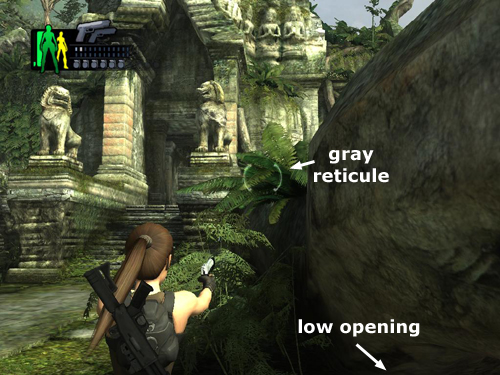
Head to the left and duck under the thick branch. Drop and hang from the L-shaped man-made ledge. Traverse around the corner to the left. Jump past the bushy plant to grab the ledge beyond. Traverse a little farther to the left, pull up and duck through the low opening to reach the open area beyond.
NOTE: If you have Training Text enabled in the Game Options menu, you'll see instructions for the adrenaline headshot maneuver. It is never required at any time in the game, but it may be helpful and even fun once you master it. Fight until Lara's adrenaline meter (the smaller yellow Lara silhouette at the top left of the screen) is full. Then hold the Target Lock key to keep one enemy targeted, move in close and press the Grapple button. Time slows as Lara jumps onto the tiger's back and springs off. At this point you need to aim the red dot at the gray reticle on the tiger's head, using the mouse or right analog stick. When the outer reticle turns red as well, shoot. If you do it right, it's a one-shot kill. The Underworld Controls page gives the specific keys/buttons for each system. I've also made a tutorial video showing the technique in action.
SUNNY COURTYARD WITH TIGERS: As soon as you step out into the open, a pair of tigers attacks from the top of the stairs on the right. During the fight, a third tiger appears.
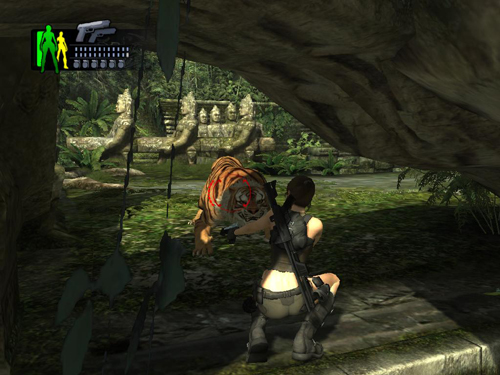
If you prefer a less confrontational approach, here are a couple of alternatives: First, when pulling up into the low opening, move forward slowly and stop as soon as Lara stands up. Then creep forward just a little more, turn right, draw pistols and hold Target Lock to aim at one of the tigers near the ruins (as shown in this screenshot). Now start firing. Even though the targeting reticle remains gray, some of your shots will connect, and eventually the tiger will fall. You'll know it's dead when the gray reticle disappears. When the first tiger dies, the second will charge across the courtyard from it's spot on the high wall opposite the opening where you pulled up. Andy M. suggested sidestepping to allow the charging tiger to run off the ledge. I didn't have too much luck with this, but I found that if you crouch and move back under the tree branch (as shown in this screenshot), the tiger can't reach Lara, and you can easily kill it with pistols. Now move out into the open and you'll only have one tiger to fight.
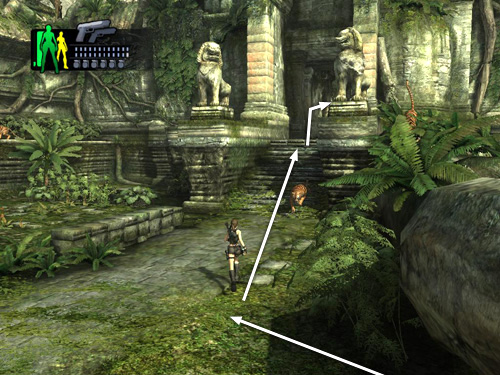
Or try this second alternate strategy: After pulling up into the courtyard and triggering the cutscene, run and jump past the first two tigers and climb onto the flat platform behind the lion statue on the right side of the stairs. (This screenshot shows the spot.) The tigers won't be able to reach Lara there. Once you've killed the first two, you may need to drop down to the ground or jump across to the ledge on the other side of the stairs in order to target the third tiger. You can then climb back up to safety if you like.
If you choose to fight out in the open, take care not to get too close to the drop-off at the opposite end of the courtyard from the stairs. It's easy to step off accidentally while fighting. If you do, Lara will fall to her death.
If you want every treasure, take a little side trip before entering the temple. Otherwise, skip ahead to the section on "ENTERING THE TEMPLE," below. If you'd like to try a shortcut to the treasure, see this page with screenshots. It's a little tricky, so I haven't included it as a the main route.
YET ANOTHER TREASURE HUNT: Climb onto the ledge on the left side of the stairs leading up to the temple. (This set of screenshots shows the longer but safer path to the treasure.) Follow the ledge around to the right, jump to grab the horizontal pole, swing and jump to the opposite ledge. Turn left and go to the end of the ledge. Look down to spot the waterfall that feeds the stream below. Above the pool, two horizontal poles protrude from the wall. This is where you're headed.
Jump straight forward to land on the slope below. Lara will slide down and grab the edge. The horizontal poles are now off to her left. Drop down to grab the handhold below and climb to the left as far as possible. Then jump to grab the first horizontal pole. Swing and jump to grab the second pole. Climb to the left end of the pole and then swing and jump to grab the narrow, horizontal ledge on the wall ahead. Traverse to the left until you can pull up onto the ledge with the treasure (9/30).
To get back to the temple, first turn toward the left side of the ledge. Grab the handhold a little above Lara's head, climb up to the next handhold then traverse to the left along the short stone beam. Pull up to stand on it. Turn to face out across the gap. Walk to the end of the beam and jump across the gap to land on the beam projecting from the opposite wall. (These screenshots show the whole return trip.)
Now either jump toward the wall ahead on the right and grab the edge; or drop and hang from the right side of the beam and traverse around the corner. Continue traversing along to the right. When Lara reaches the support column and braces her feet against it, jump up to grab the handhold above. Then climb all the way up, traverse around the corner to the right and pull up.
ENTERING THE TEMPLE: Cross the courtyard where you fought the tigers and go up the stairs into the temple. Follow the rubble-strewn corridor to the edge of a deep pit.
Wait at the edge for a flock of bats to appear, one by one, at the far end of the pit. Shoot them down before making your way across. First jump from the edge of the pit to the first projecting beam on the right. Turn left, walk to the end of the beam and jump to grab the narrow, horizontal ledge on the opposite wall. Climb to the right. When you reach the square column projecting from the wall, climb around to the right until Lara's back is once again facing the opposite side of the pit. Jump back to grab the broken column on the other side of the gap.
Climb around to the left along the narrow, horizontal ledge. Drop to grab the handhold below. Climb to the left and drop down once more. Climb to the left again and pull up to stand on top of the projecting beam. Walk to the end of it and then jump across to the longer beam ahead. Drop and hang from the left side of the beam. Traverse along the beam and around to the left. Pull up into the opening above.
Follow the hallway, pausing to stomp on a couple of small spiders. Here it may help to turn on your flashlight. Carefully drop down several ledges into the pit ahead. Shoot or step on several more spiders and make your way to the other end of the pit. The pit is actually T-shaped. You drop into it at the bottom of the T. There's a steep slope at the left end and a ledge above at the right end. Climb onto the pile of rocks for a boost to reach this ledge. Pull up.
To reach the next higher ledge, stand on the low pile of rubble facing the left wall (shown in this screenshot). Jump toward the wall and then jump again to spring off the wall and grab the horizontal beam above. Pull up and walk along the beam onto the ledge. Break the clay jars to find another treasure (10/30).
Turn back toward the pit and step out to the end of the beam. Now make your way across the upper level by jumping from beam to beam—first the one ahead on the right, then the one on the left, then back to the right and then on to the next beam on the right. Pause for a moment on the last beam and wait for several small spiders to crawl in along the wall ahead. When you've shot all of them, jump forward to grab the horizontal pole, swing around and jump to the top of the slope ahead.
If you misstep and slide down the ramp into the pit, return to the end where you climbed out earlier, chimney jump back to the first projecting beam and make your way back across the beams to the other side of the pit.
Turn right and pull up onto the staircase ahead. Go forward to emerge in a brightly lit area with a huge statue.
In a brief cinematic, Lara examines the carvings on the wall and finds a reference to Bhogavati, the capital of the lowest level of the Hindu underworld, reputedly populated by snake people. She also identifies the subjects of the double statue below as the god and goddess Shiva and Kali.
†UPDATE HISTORY: 11/05/08 - First draft of Coastal Thailand demo walkthrough posted online. Later the same day, a few cosmetic changes and minor edits for clarity.
11/12/08 - Added note on checkpoints in the introduction.
11/16/08 - Included alternate route back from treasure #7, thanks to a tip from Nick & Charlotte.
11/28/08 - Converted the original demo walkthrough into this document, including changing terminology to reflect info about the new game that wasn't available in the demo (e.g., rewards changed to treasures, etc.) Streamlined path back from treasures #2 and #9 and added screenshots there. Also made a few minor edits for clarity.
12/7/08 - Added bug note at the start of the level.
12/17/08 - Fixed a couple of typos and left/right mix-ups, thanks to corrections from Greg H.
12/27/08 - Updated early combat and adrenaline headshot instructions.
12/30/08 - Added Xbox 360 Master Swan Diver achievement location.
3/22/09 - Made numerous small changes for accuracy and clarity. Also incorporated several great suggestions submitted by the other players credited below and in the walkthrough text, including alternate techniques for the second tiger combat (thanks to Andy M.) and treasure #9 (Casper).
3/17/10 - Removed a bug warning that no longer applies. Apparently the problem in this level is confined to the Wii game. Thanks to aussie500 for this info.
ACKNOWLEDGEMENTS: Thanks to Andy M., Casper, Charlotte, Greg and Nick for their suggestions to improve this level.
NOTE FOR DEMO PLAYERS: Lara's pistols now work underwater, but she also has a spear gun and sticky grenades that can help make short work of the sharks. Lara has instant access to two weapons: her pistols and one alternate. At the start of the game, this is the spear gun. To switch between pistols and spear gun, just press the Change Weapon button. Later, when you want a different secondary weapon, access the Change Weapon screen in the PDA. To use a grenade, press and hold the Target Lock key to target an enemy. When the targeting reticle turns red, showing the enemy is within range, press the Grenade key. Lara also has a new underwater combat maneuver: the evasive dodge. Hold Target Lock to keep one shark targeted. Then move to the left or right and press Crouch. Again, see the Underworld Controls page for more info.
‡NOTE ON VIDEO GUIDES: Eldin's videos don't always follow the same strategies I use in my walkthroughs, but if you prefer that format, I think you'll find them very helpful.
WAS THIS WALKTHROUGH HELPFUL? If not, I apologize and invite you to contact me with any questions. If you need help right away, I recommend the r/TombRaider subreddit. Other fan-run forums are listed at tombraiders.net/stella/community.html. If this site was useful, please consider supporting it financially or in other ways. For details, visit tombraiders.net/stella/support.html. As always, I welcome your corrections/suggestions. Thank you!
Copyright © 2008- - Stellalune (). All rights reserved. The screenshots and videos included here were made using Fraps. Feel free to copy or print this walkthrough for personal use. By all means, share it with friends, but please include this credit line so people can send me their feedback. No part of this walkthrough may be reproduced on another site without permission. Follow this link for details about this site's advertising and privacy policy.
Stella's Tomb Raider Site: tombraiders.net.