IMPORTANT: If you haven't already done so, you may want to review the INTRODUCTORY NOTES on the storyline, controls, treasures/relics and saving/checkpoints. These appear at the start of the PROLOGUE walkthrough.
As always, I highly recommend that you do not rely exclusively on the autosave. Instead be sure to save manually at least once or twice each level. Then, if you miss something or run into a bug, you can reload rather than having to replay the entire level. Many common bugs are documented in this walkthrough. They are in hot pink text, like this, so they're easy to spot. I have also included an overview of major bugs without game spoilers. However, not every potential problem is covered here. So be safe; save often in new slots. In case you need them, Underworld Save Files for PC, PS3 and Wii are available.
LEVEL 2: COASTAL THAILAND - PART 2: BHOGAVATI | Updated: 1/29/17(†) |
Health Items: 13 Treasures: 15* Relics: 0 Keys/Puzzle Items: 2
Underworld Video Walkthrough by Eldincy‡
*There are 30 treasures in the entire Coastal Thailand chapter. Fifteen of these can be found in this level. They are numbered 11/30 through 25/30 below.
SHIVA/KALI STATUE COURTYARD - UPPER LEVEL: After the cutscene, Lara is standing on the wooden platform above the courtyard. The switch on the left is not fully functional yet. If you pull it, the platform jiggles slightly but does not move. You'll need to repair both sides of the mechanism so the switch will work. It doesn't matter which side you do first. Here I've designated the left and right sides when facing the Shiva/Kali statue.
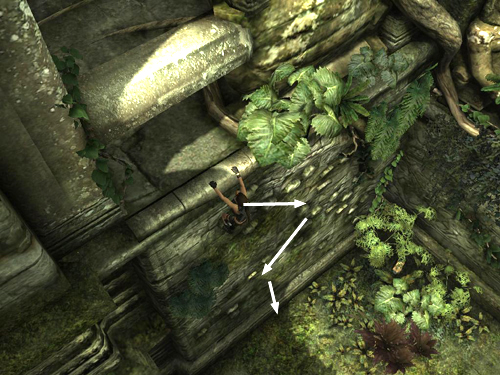
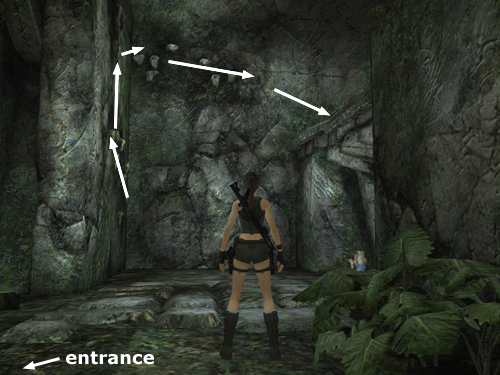
REPAIRING THE LEFT SIDE OF THE MECHANISM: Turn around so the Shiva/Kali statue is behind Lara. Follow the hallway to the right up one flight of steps and down another. (If you go quickly you may catch a glimpse of a reptilian creature skittering up the wall as you come down the second set of steps. Creepy!) At the end of the hall, duck under the stone bar on the right to drop and hang from the ledge. Drop to grab the rough stone handholds on the wall below. Climb down and to the right, then down and left a bit before dropping to the floor. (As shown in this screenshot.)
Shoot the flock of bats that attacks Lara. Then turn so the wall with the rough handholds is on Lara's left. Go forward to the wall and grab the horizontal handhold. (The following sequence is shown in this series of screenshots.) Climb to the right as far as possible and then jump the gap to grab the bottom edge of the banded wall to the right. Traverse around the corner to the right and then climb to the rough handholds on the wall above. Climb diagonally upward and to the right, then downward and right until Lara is dangling from the bottom edge of the ledge again.
If you keep an eye on the Shiva statue as you climb, you'll spot another of those reptilian creatures slithering across its lap. Could it be one of the legendary snake people?
Traverse around the corner to the right, then on around the next corner. Pull up to stand on the narrow ledge in the alcove. Lean toward the other side of the alcove and then chimney jump between the walls to grab the ledge above. Traverse around to the right and pull up onto the ledge.
Turn left and use the grapple to pull out the metal ring. (Press Grapple to hook the ring, then Interact to pull.) This frees one side of the mechanism so it will work correctly. Turn around to find a health potion at the other end of this ledge.
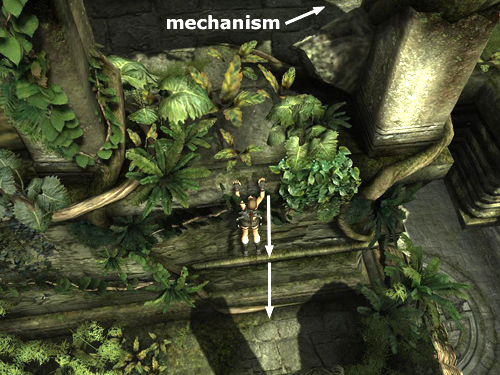
Return toward the mechanism, turn right, drop and hang from the ledge above the area where you killed the bats earlier (shown in this screenshot). Drop down twice to reach the floor. Turn around, cross the room and turn left. Approach the gap high above the SHIVA/KALI COURTYARD.
REPAIRING THE RIGHT SIDE OF THE MECHANISM: Use the metal ring above (shown in this screenshot) to grapple swing across the gap to the opposite ledge. Kick the breakable jar to find another treasure (11/30). Then roll under the bar into the room beyond.
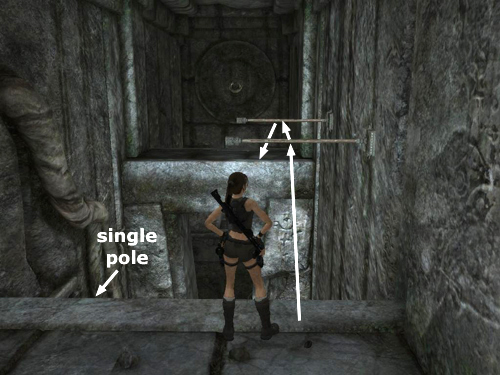
There's a pole with gold bands lying on the floor to the left. Stand near it and press Interact to pick it up. Approach the square column with the hole in it and press Interact again to place the pole in the hole. Jump up to grab the pole and turn right. Pull up to stand on the pole and then jump to grab the handhold on the next column. Jump to the next column on the right and then jump and grab the corner ledge on the wall. (See these screenshots if you need visuals.)
Climb to the left end of the corner ledge. Then climb upward onto the rough handholds above. Continue upward and to the right until Lara is holding onto another narrow corner ledge. From there, jump back to perch on top of the broken column behind. Shoot another flock of bats and then jump to the top of the next column. From there, jump to grab the ledge ahead and pull up.
Pick up another health potion on the floor to the right. Then turn around and approach the mechanism. Jump straight up to grab the gold-bound pole protruding from the mechanism. Press Interact to pull the pole out of its socket. Now this side of the mechanism is operational.
Return to the edge of the ledge where you climbed up. Instead of dropping down, jump to grab the handhold on the nearest column (as shown in the first of these screenshots). You can press Crouch to drop the pole first, or just jump and Lara will drop it automatically. Climb around to the right and pull up onto the short beam projecting from the side of the column.
Jump forward to perch on the broken column ahead. From there, jump to grab the ledge beyond. Pull up and duck under the stone bar into the hallway above. (If Lara stutter-steps and won't pull up, try moving a little to the right of the center of the opening. Pull up and wait a moment for Lara to gain her footing. Then move forward.) Turn right and follow the hallway back to the wooden platform.
DESCENT TO THE LOWER LEVEL: Pull the switch to trigger a situational adrenaline sequence. The game shifts into slow motion as the wooden platform drops out beneath Lara's feet. Hit the Grapple key to snag the metal ring on the wall and stop Lara from falling. After the adrenaline sequence finishes, rappel down the wall. (Hold Interact + Down. Then, when Lara reaches the bottom, press Crouch to release the cable.) Alternatively, press and hold Crouch as soon as the adrenaline sequence begins, and Lara will ride the falling platform down safely.
NOTE FOR DEMO PLAYERS: The Underworld demo finishes just before the adrenaline sequence, but if you'd like to continue playing beyond the end, it's possible to do so by taking advantage of a glitch in the game. For details, check out this YouTube video. Of course, you could also just buy the game and enjoy the whole thing. ;)
SHIVA/KALI STATUE COURTYARD – LOWER LEVEL: As you move out into the open, 4 or 5 nagas finally get over their shyness and attack. There are two of each color: The green ones seem a little less aggressive but have the ability to spit poison from a distance. The red variety is tough and very tenacious. They can easily knock Lara off her feet, so try not to let them get too close. If that does happen, try vaulting over them and resume shooting from the other side. (To do this, hold the Target Lock button to keep one particular naga targeted. Then run toward it and press Jump to leap onto its back, rebound off and land facing it.)
The shotgun is a great weapon in close quarters, but if you want to keep moving and dodging, the pistols or semi-automatics will work better. Lara is much more maneuverable holding two weapons. Also, the shotgun takes longer to reload, leaving Lara vulnerable during the process.
I don't recommend using grenades against the nagas, unless you've got plenty of room to maneuver, since they have a tendency to charge toward Lara, carrying her own explosives back to her. Double ouch!
There's a semi-safe spot within reach: If you sprint toward the Shiva/Kali statue and hide behind it, often the nagas will act if they can't reach Lara, enabling you to shoot them with pistols at your leisure. If Lara won't lock onto them in normal combat mode, try Precision Aim (Z on the keyboard or R3 if you're using a controller). (Thanks to Christine for this tip.)
Along with the huge Shiva/Kali statue, there is also a chunk of crystal mounted on a small pedestal and 2 smaller statues, whose pedestals are mounted on tracks in the floor. They move but don't do anything useful yet. You'll be back later.
Return toward the fallen wooden platform and go through either side doorway. The left and right passages meet up again at the bottom of the stairs. If you take the passage on the right, watch out for another green naga, which may attack from behind. (I didn't encounter it myself, but a few other players have.)
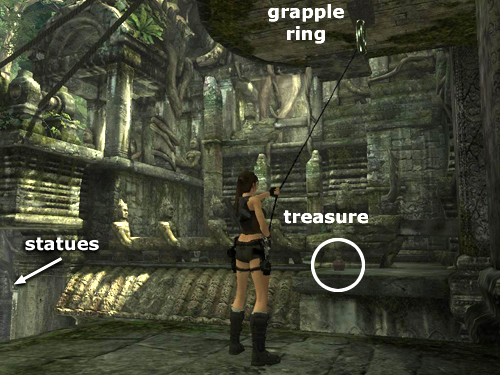
SMALL ROOM WITH A HOLE IN THE FLOOR: Here you'll see a pair of lion statues and a larger cobra or naga statue with a metal ring on it. (The clay jars are all empty.) Stand facing the naga statue across the square hole in the floor. Grapple the ring and step off the edge. Then rappel down the side of the shaft into the hall below. Press Duck to release the cable.
Step forward to trigger a short cinematic, in which Lara examines the ruins and notes their similarity to the ones at Niflheim.
DIMLY LIT HALLWAY WITH NORSE RUNES: After the cutscene, smash one of the breakable jars on the left side of the hallway to find a treasure (12/30).
The gate at the end of the hall doesn't open. Instead you'll have to go over it. About halfway along the hallway on the left when facing the gate, you'll see a stone ledge low enough for Lara to reach. Climb on top of it. (These screenshots show the whole climbing sequence.) Jump straight up to grab the handhold above and behind. Jump up again to grab the L-shaped ledge above. Climb around to the left and then jump across the hallway to grab a handhold on the other side.
Traverse to the left past the support column and pull up to stand on the next beam. Turn and jump across the hall to land on another beam there. Drop and hang from this beam and traverse along to the right. (You can tap Interact in time with Lara's movements to traverse faster.) Once you've passed the next support column, pull up to stand on the beam. Now jump back across the hall to the beam on the other side. Hang and traverse to the left along this beam past the support column. Pull up, walk to the end of the beam and jump to the ledge above the gate. Hang from the opposite edge and use the crevices between blocks on the left side of the gate to drop down to the floor. Go up the stairs to an open area with lush vegetation.
A short cutscene showing the layout of the area ends with a lingering shot of the gate on the left.
NOTE: This walkthrough covers what I hope is the most direct route through this area with all pickups. If you don't care about treasures and such, I've described a QUICK ROUTE TO THE TWO GEMSTONES in a footnote at the end of this walkthrough.
OVERGROWN RUINS WITH TWO GATES: After the cutscene finishes, shoot a few bats and pick up a health potion on this first landing. Advance down the stairs a little at a time. When you do, another pack of nagas, 2 red and 2 green, gradually emerges.
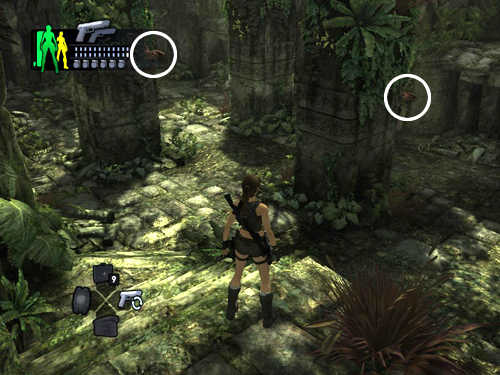
If you take the stairs on the right and go slowly, you'll see the 2 red nagas clinging to the nearest of the square columns and peering around toward you. (They're circled in this screenshot.) To get them moving, target one of them with pistols or the assault rifle. Even if the targeting reticle is gray instead of red, you'll still hit with some of your shots. (You will not be able to aim grenades accurately until the reticle turns red.) Once you start shooting, the red nagas will drop down and approach, and the 2 green ones will join them. Keep firing and back up the stairs if necessary, and you should have enough time to shoot them all before they reach Lara.
Alternatively, you can climb to a safer spot and snipe the lizards from above. (These screenshots show this strategy in action.) Then it's just a short jump over to the FIRST GEMSTONE, as described below.
RIGHT SIDE GATE AND FIRST GEMSTONE: From the landing on the right side of the stairs leading down from the entrance (i.e., the same spot where you stood to shoot the nagas if you used the strategy above), climb the bumpy stone handholds on the wall to reach the ledge above and find a health potion. (These screenshots show the path from the stairs to the gemstone.)
Go around behind the fat, square pillar and climb onto the horizontal beam. Walk to the left and jump up to grab the handhold on the fat pillar. Climb to the right and jump to grab the long, narrow ledge. Pull up to stand on it and then sidestep to the left (Lara's right). Jump forward to grab the top of the square pillar. Pull up. Standing on top of this pillar triggers a flock of bats from across the ruins. Try and deal with them before moving on.
Turn so the open area is on Lara's left and the horizontal beam is below on her right. Now you're aiming for the little, open room ahead with the ornate, metal lotus flower. Jump to grab the edge of the floor and pull up. Approach the lotus and press Interact to take the FIRST SHIVA GEM, affectionately referred to in archaeological circles as "Shiva's Right Volkswagen Headlight. ;)
Doing this also opens one of the two gates in the doorway directly below, as well as one of the gates in the corresponding structure on the other side of this area.
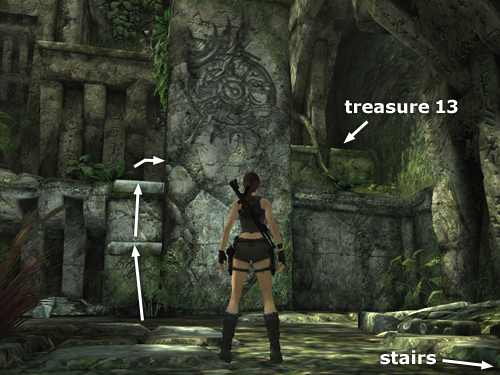
TREASURE IN DARK CORNER ALCOVE: To get down, grapple the metal lotus and rappel down the front of the gate structure. Turn left and look ahead to spot a small, dark corner alcove containing a treasure. That's where you're headed next. (These screenshots show the route.) With the gate still on Lara's right, step off the ledge to hang from the edge. Climb to the left as far as Lara will go. Then jump back to land on the wide ledge below the treasure alcove. Climb the rough stone handholds on the big, square column. Then jump straight up to grab the narrow, horizontal ledge above. Climb to the right and then jump to grab the ledge across the way. It's a long jump, so Lara will not be able to hang on at first. Press Interact to do a saving grab and keep her from losing her grip. Traverse along the ledge to the right and pull up into the alcove to get the treasure (13/30).
If you don't care about getting all the kills, simply hang from the edge of the treasure alcove, traverse back to the left and pull up. Then the green naga mentioned below will not appear. Skip the next two paragraphs and continue climbing.
If you want all the kills, drop down from the treasure alcove, turn left and head past the square column with the rough stone handholds toward the far side of the ledge. After passing the square column, turn around, draw that shotgun (Target Lock button) and begin backing away. A green naga climbs down the wall on the left. If you're looking out for it, you should be able to shoot it before it reaches Lara. There may also be a few small spiders. If you used the shotgun against the naga, either step on the spiders or switch to pistols to save ammo.
NOTE: If Lara falls or drops down to the floor, you don't have to climb all the way up to the RIGHT GATE to get back to this ledge. There are handholds on the wall just below the square column. This screenshot shows the spot. Climbing up here will trigger the appearance of the green naga mentioned in the last paragraph if you didn't already kill it.
Climb the rough handholds on the square column as you did before getting treasure #13. Before jumping across to the ledge, shoot any stray spiders lurking there. Then repeat the jump with saving grab and pull up onto the ledge next to the one where you got the treasure.
Climb onto the higher ledge on the left. A red naga scurries down the wall ahead. If you draw pistols and start shooting as soon as you spot it, you can do quite a bit of damage before it closes in. Otherwise, keep backing away while shooting, and if you get too close to the edge, jump over the naga to get behind it so it doesn't knock Lara off the ledge.
TREASURE ON TOP OF THE SQUARE PILLAR: Once the naga is dead, go to the back wall and climb the rough stone handholds. (The path to and back from the next treasure is shown in these screenshots). Climb upward and to the right, then jump straight up to grab the higher handholds. Climb farther to the right and jump to grab the L-shaped corner ledge. Climb around the corner and on to the right, past the tree trunk embedded in the wall. Jump straight up to grab the ledge above and pull up. Pick up another health potion and turn around to face out over the open area. Jump from the corner of this ledge to the top of the square pillar where you climbed up earlier. Take the treasure (14/30). Then turn right and jump down to the ledge near the climbable wall.
TREASURE ON THE HIGH CENTER LEDGE: Again, grab the rough stone handholds and start climbing upward and to the right. Jump up to grab the next set of handholds. This time climb to the left and jump to grab the base of the staircase. This is where the red naga came from earlier. Pull up and climb the stairs. On the right you'll find another treasure (15/30) and on the left, a health potion. (These screenshots show how to obtain this treasure and the next.)
ANOTHER TREASURE BELOW: Walk to the front edge of the platform. Step off and hang from the edge. Drop and grab the edge of the ledge below. Pull up and get another treasure (16/30).
Now move to the left edge of the ledge (i.e., left when Lara's back is toward the open area). Hang and drop to grab the L-shaped handhold below. Drop from there to the floor. (Again, check the screenshots if necessary.)
TREASURE IN FAR LEFT CORNER OF RUINS: Turn around and pick up the health potion in the bushes just ahead. Then head toward the other side of the ledge, but watch out because another pair of nagas, one of each color, tries to ambush Lara from behind. If you face the alcove where you dropped down and back up toward the wall, you'll be able to see them coming.
When you've killed the lizards, switch to pistols if necessary and pick off another flock of bats that flies in from the other side of the ruins.
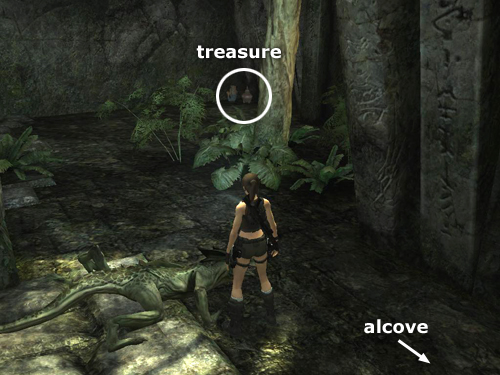
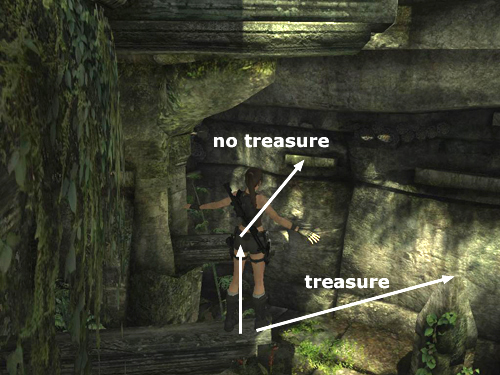
Look in the dark corner for some more breakable jars, one of which holds a treasure (17/30). (This is the far left corner relative to the entrance to the ruins, far right if you've just dropped down from the alcove, as shown in this screenshot.)
Now return to the alcove where you dropped down after getting treasure #16 and before fighting the last pair of nagas. It's on the left side of this ledge if Lara is facing the area entrance. (This screenshot shows the spot.) Chimney jump up the walls of the alcove to reach the L-shaped handhold. Climb as far as possible to the right. Jump across the gap to grab the edge of the next ledge. Pull up.
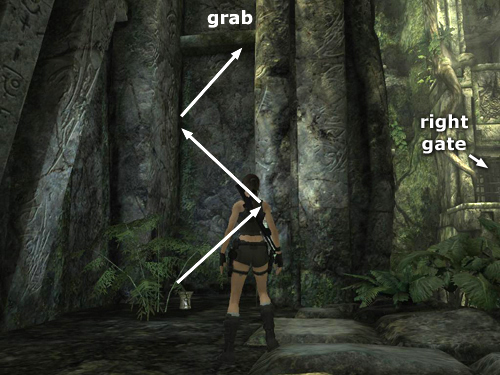
LEFT SIDE GATE AND SECOND GEMSTONE: Lara is now standing on a large, roughly U-shaped stone ledge made of big, weathered rocks. Go to the left and dangle off the ledge so Lara's back is toward the entrance to these ruins. Traverse to the left. When you reach the square column that interrupts the horizontal ledge, watch out for 2 red nagas that appear off to the left. You can probably shoot them one-handed while hanging from this ledge. Or, pull up, move away from the edge and wait for them to climb up to Lara. A few well-placed shotgun blasts should then take care of the problem. When the coast is clear, hang from the ledge again and climb to the left. Jump past the square column to grab on where the ledge continues on the other side. Pull up.
Turn right to face the square column. Use horizontal stone bands to climb the column. (Jump straight up twice, climb around the corner to the right, and then jump up three times to reach the top.)
While standing on top of the column, turn left and grapple the metal ring mounted on the right side of the structure with the metal lotus and SECOND SHIVA GEM. Step off the edge to hang from the cable and then climb up onto the ledge. When you take the stone, the remaining gates open—one just below, the other on the far side of this area.
NOTE:There's a treasure on the corner ledge to the left of the ledge with the lotus, but you can't reach it from here. Keep going. You'll get it shortly.
Grapple the metal lotus and rappel down the front of the structure to land near the open gates. A cave-in prevents you from going very far, but there's a health potion on the floor just beyond where the two gates were. Now step out onto the ledge and turn around to face back toward the cave-in.
If you're not interested in getting every item, the ramp below on the left will deposit Lara safely on the ground.
TREASURE ON HIGH CORNER LEDGE: To get the treasure, first jump over the ramp to land on the ledge beyond. (These screenshots detail the climb.) Head toward the corner to find another health potion hidden in the greenery. Then climb the rough stone handholds on the square column. Climb upward then to the right. Jump to grab the L-shaped corner ledge. Climb around to the right and pull up into the alcove. Chimney jump between the walls of the alcove to reach the ledge above. Climb to the left and pull up next to the treasure (18/30).
To get down, just hang from the ledge and drop down twice. Then either cross the ledge and slide down the ramp to the ground or hop down onto the steps near the area entrance.
LEAVING THROUGH THE RIGHT GATE: Return up the stairs on the left side of the entrance (i.e., the stairs that were on the right earlier when you first entered this area). When you reach the first landing, climb the rough handholds on the wall, just as you did before when climbing to the FIRST GEMSTONE. Go around behind the square pillar, but this time don't bother climbing onto the beam. Instead go under it and jump across the gap to grab the edge of the ledge near the gate. (These screenshots show where to go.) Traverse to the left and pull up near the RIGHT GATE, which should be open if you've retrieved both SHIVA GEMS.
GRAY STONE HALLWAY WITH DEEP PITS: Follow the hallway to the first deep pit. Grapple the metal ring mounted on the archway ahead. Step off the edge and swing across the pit to the other side. Follow the hall as it turns to the left. Continue to the next pit.
If you aren't searching for treasures, you can skip the next section and proceed to the exit. Skip down to the section LEAVING THE GRAY STONE HALLWAY, below. (You can also climb up and get the health potion and then leave without the treasure.)
Grab the horizontal pole sticking out of the left wall (as shown in the first of these screenshots). Pull up to stand on top of the pole. Walk toward the wall and jump straight up to grab the handhold above. Climb to the left and jump to grab the stone archway. Jump up twice to get on top of it. Pick up the health potion on the floor ahead.
Now move to the right side of the ledge and jump onto the jutting stone beam just ahead. (Again, the screenshots show the way.) Drop and hang from it so Lara is facing the wall. Traverse to the left, past the stone support, and pull up to stand on the next beam. Turn around and jump across to the stone beam on the other side of the hallway. Turn right and walk to the wide ledge ahead. (This is the top of the archway with the metal ring where you swung across the pit earlier.)
Cross this ledge and walk out onto the beam on the right side. Turn right and jump across the pit to the beam on the other side. Drop and hang from the beam and traverse to the right past the next stone support. Pull up onto the short, broken beam. Walk to the end and jump to the ledge with the treasure (19/30).
To get down, move to the left side of the ledge and hang from the edge near the right wall. Drop down twice to reach the floor. Now you're back at the entrance from the ruins. Enter the gray stone hallway once more. Grapple-swing across the first pit and follow the hall to the second pit.
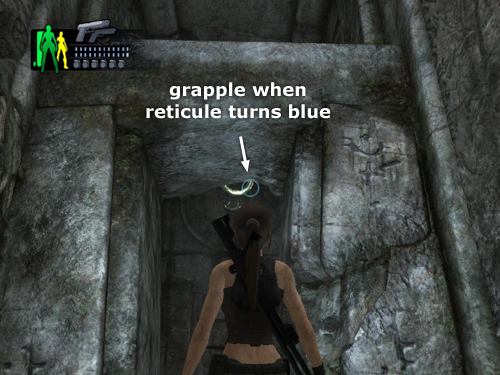
LEAVING THE GRAY STONE HALLWAY: When facing out across the second pit, you can see 2 metal rings: one mounted just under the archway ahead, the other at the center of the circular carving on the far wall. You can't grapple the second ring from here, but you may be able to reach the first one using Precision Aim. Press Z on the PC or click the right stick (R3) on the PS3/Xbox to enter Precision Aim mode. Then aim at the metal ring. When the reticle turns blue (as shown in this screenshot), fire the grapple. If you can't grapple the ring at first, try adjusting Lara's position so she's standing at the edge of the pit with a good view of the ring. Once the grapple is anchored, swing across the pit to the other side and proceed to the exit.
If this shortcut doesn't work for you, take the long route instead: Grab the horizontal pole sticking out of the left wall. Stand on the pole and jump to grab the handhold on the wall. Climb to the left and jump to grab the stone archway. Jump up twice to get on top of it. (You've done this before if you went after treasure #19.) This time, instead of climbing across the stone beams, turn to face out over the second pit. There are two horizontal poles sticking out of the right wall (shown in this screenshot). Jump forward to grab the first one, swing, jump and grab the second, then swing and jump to the ledge ahead. Grapple the metal ring on the wall ahead and step off the ledge. Lara should land on the ledge in the doorway. Detach the cable and move on.
RUINS WITH PAGODA-LIKE STRUCTURE AND TIGER: Follow the hallway to the left and up the stairs. As you near the top, draw your pistols (using the Target Lock button) and advance slowly. Lara will target a tiger lurking in the undergrowth ahead before it spots her. Quickly fire a few shots to injure the big cat before it runs off to the right and hides. Switch to the shotgun, step out and finish it off.
Pick up another health potion on the ground to the left. Now head for the far right corner of this area, where you'll find a cluster of clay jars. One of these contains a treasure (20/30).
Return to the front of the pagoda-like structure. Climb onto the low ledge there and jump to grab the lowest handhold on the front of the building. (These screenshots show the path from here to the next treasure.) Climb to the left and pull up to stand on the narrow ledge. Jump from there to perch on the nearer of the two pointed pillars. Jump to grab the L-shaped handhold at the top of the carved wall panel ahead. Climb to the left and then jump to grab the edge of the wide ledge with the treasure (21/30). Pull up and take it.
Hang from the edge of the ledge where you climbed up, traverse all the way to the right toward the wall. Then jump back to grab the small L-shaped handhold on the carved wall panel. Climb to the corner and press the direction key or analog stick to make Lara lean away from the wall toward the pointed pillar. Jump to land there.
Turn to face the second pointed pillar and jump over to it. Turn right and jump to grab the nearest horizontal stone band on the side of the pagoda. Climb to the left, past the bend, and drop to grab the handhold below. Climb to the left and pull up to stand on the narrow ledge. Now chimney jump between the two walls to reach the ledge above. Pull up onto the overgrown path and shoot a flock of bats. Continue up the weedy path to a ledge with a health potion.
Hang from the edge of this ledge and drop to grab the narrow, broken ledge below. (The following sequence is illustrated in this series of screenshots.) Traverse to the right. (Don't worry about the gap here; Lara will move right past it.) Continue traversing to the right out onto the jutting stone beam. Pull up to stand on it.
Jump forward to grab the handhold on the wall ahead. Climb to the left around two corners so Lara is hanging above another horizontal handhold. Don't drop down, though. Instead jump back to land on the stone beam behind. Walk to the end of it.
Now, if you don't want the next treasure, turn left and jump to the next beam. Then jump forward to grab the nearest handhold on the wall ahead (as shown in this screenshot). (Skip the next two paragraphs.)
If you do want the treasure, walk to the end of the first beam and jump to perch on the pointed column ahead. (Again, refer to the screenshots if necessary.) Jump forward to grab the lower of the two horizontal stone bands on the wall ahead. Jump up to grab the band above and climb to the right as far as Lara will go. Make sure you've climbed around the corner before jumping back to grab the ledge with the treasure (22/30). Traverse to the right, pull up and take your prize.
To get back, jump from the ledge to the pointed column. Then turn right and jump to grab the lower of the two horizontal stone bands on the wall ahead. These are the same horizontal bands you climbed a moment ago to reach the treasure. Climb to the left and jump to grab the shorter stone handhold ahead on this same wall. (The previous set of screenshots shows this as well.)
PAGODA AREA – UPPER LEVEL: To reach the upper level, climb along this handhold to the left and jump toward the corner. Lara will grab the next handhold on the perpendicular wall. Climb to the left and then jump straight up to grab the wooden pole. Turn left, swing around the pole and jump to grab the narrow ledge ahead. Jump straight up to stand on it. Then jump up three more times to reach the ledge above.
Head to the left up the steps. Walk out to the edge of the broken ledge. Turn left and jump to grab the long, light-colored ledge with vegetation growing above it. Traverse along this ledge to the right. When you reach the end, jump to the right to grab the edge of the wide, flat ledge ahead. Pull up.
The opening above on the left is where you're headed, but you can't reach it directly. Instead, go to the right along the shaded colonnade. On the far wall there's a stone slab handhold you can reach. Grab it and pull up to stand on top of it. Sidestep to the right (Lara's left) and jump to grab the light-colored band on the nearest square column. Climb around to the right and pull up onto the horizontal beam. Ready those pistols to shoot another flock of bats that approaches from the other side of the ruins.
When you've dealt with the bats, walk across the beam and jump up to grab the light stone band on the next column. Climb around to the other side of the column and jump back to perch on top of the next broken column. Jump from there to grab the light stone band on the next column. Climb around to the right and pull up onto the beam. Walk to the end and jump into the doorway that you couldn't reach earlier. Follow the hallway to a deep pit.
DEEP PIT WITH JUTTING BEAMS AND HORIZONTAL POLES: To cross the pit, begin by jumping to the first horizontal stone handhold on the left wall. Climb to the end and jump to grab the next handhold to the right. Climb to the right until Lara is hanging above a horizontal beam that spans the width of the pit. Drop down onto it and walk across to the other side. Turn left and jump to the broken beam ahead. Turn left and walk to the end of the beam. Jump forward and to the right to grab the higher of the two stone handholds on the opposite wall. Climb to the right and jump straight up to grab the horizontal pole.
Climb hand over hand toward the end of the pole. Turn to face the other horizontal poles ahead and swing, jump and grab the first one. This pole goes from one wall to the other. So climb along it to the right before attempting to swing and jump to the next pole, which only sticks out so far from the right wall. Swing and jump from the third pole to the far side of the pit. Go through the next small room and up the stairs.
DIMLY LIT ROOM WITH LOW CEILING: Don't just rush forward into this room, since there are 2 green nagas waiting for you there. If you advance slowly you can target them as they climb down the wall. As long as you don't step down onto the floor, you can probably kill them without losing much health.
When you've cleared the room, head for the far right, where you'll find another treasure (23/30). Get it and then head for the sunny open area, which is the SHIVA/KALI STATUE COURTYARD - MIDDLE LEVEL - LEFT SIDE.
RIGHT ARM BALANCE PUZZLE: Go forward and step onto the raised platform that is part of a large balance scale. Lara's weight lowers the platform, operating a mechanism that lowers one of the Shiva statue's right arms.
Step off the scale and pick up the health potion on the floor straight ahead. Stay sharp, though. A flock of bats approaches from behind the statue.
When you've killed them all, climb back up onto the ledge next to the scales. Go to the right and follow the open walkway up a set of stairs and around to the right. Another green naga appears at the top of the next set of stairs. Back away shooting and you should be fine. When it's dead, continue up the stairs.
Step up onto Shiva's hand and press Interact to place one of the SHIVA GEMS into the circular receptacle. Return to the scales and hop up onto the raised platform. Lara's weight pushes it down, operating the mechanism in reverse to raise Shiva's right arm again. When the two right hands line up, a beam of sunlight is refracted through the gem into the courtyard below.
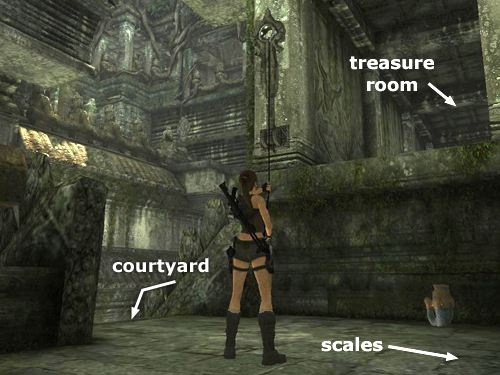
Now head for the corner of the open area with the scales that overlooks the courtyard below. Mounted on the wall is a metal bracket with a round hole in it. (This screenshot shows where it is.) Grapple the bracket and press Interact to pull it down into its horizontal position. With your grapple still attached to the bracket, step back off the edge and rappel down to the lower level of the courtyard. Release the cable by pressing Duck.
SHIVA/KALI STATUE COURTYARD - LOWER LEVEL (again): When you reach the floor, detach the cable and turn around to face the opposite wall. Another green naga appears near the corresponding metal bracket high on the other side of the courtyard and climbs down the wall toward you. If you shoot it as it descends, you can kill it before it reaches Lara.
To reach the upper level on the other side of the statue, you'll need to grapple another metal bracket above on that side. Stand on the circular track in the floor at the edge of the shady area. Point the camera upward so you can see the bracket and fire the grapple. Once it is anchored securely, walk toward the wall and jump straight up so Lara hangs from the cable. Then reverse rappel up the wall (Interact + Forward). When you reach the high ledge, release the cable.
SHIVA/KALI STATUE COURTYARD - MIDDLE LEVEL - RIGHT SIDE: From the ledge with the metal bracket where you climbed up from below, turn right and vault up into another DIMLY LIT ROOM WITH A LOW CEILING. If you stay to the right or middle of this room and avoid the area with the breakable jars on the left, you can prevent the appearance of 3 nagas in this area. Go to the far end of the room to retrieve another treasure (24/30). Then return to the sunny area.
If you do move close to the wall with the jars (i.e., on the left when approaching the treasure, right when leaving), the nagas don't appear immediately. Instead, when you move out into the light, a green naga appears on the open walkway ahead on the right, and 2 red ones ambush Lara from behind.
LEFT ARM BALANCE PUZZLE: Hop down into the low area with the balance scale. This scale is missing one platform so you'll have to use a little ingenuity to operate it. (These screenshots show the whole procedure.)
Grab the metal cage in the far corner and drag it over to the scale. Position it on the right side so it is touching the edge of the platform. Climb back onto the ledge and go up the stairs and around to the back of the statue holding the scale platforms. Grab the stone band on the square column behind the statue. Jump up to grab the horizontal pole above. Climb out to the middle of it. Then swing and jump to the next pole, then the next. Lara's weight on the third pole tips the scales, raising the platform and lowering one of Shiva's left arms.
If you've positioned the cage as described above, it should keep the scale platform from sinking back to its original position. So Shiva's arm should remain lowered even after you move on.
Still hanging from the third pole, turn to face the ledge and the other two poles. Climb on top of the pole, as shown above, and then jump to grab the second pole. Swing and jump to the first pole, then the ledge ahead. (Or, if you prefer, drop to the floor, climb back onto the ledge and return to the walkway behind the statue holding the scale.)
NOTE: If this method doesn't work for you and the scale platform sinks below the top of the cage when Lara lets go, causing Shiva's arm to rise up again, try this alternate strategy. Position the metal cage against the front edge of the scale platform instead of on the right. Climb back onto the ledge and go around to the back of the statue holding the scale platforms. Climb up to the poles and jump across to the third one. Again, Lara's weight will pull down the pole, raising the scale platform and lowering Shiva's arm. Now drop to the floor and quickly push the metal cage beneath the scale platform. With the cage in place, the scales cannot tip back to their original position and Shiva's arm stays down.
Follow the open walkway around to the big hand. Step up onto it and place the SECOND SHIVA GEM in its receptacle. Return to the scale and pull the cage out from under the platform. As it sinks back to its original position, Shiva's arm rises again. When Shiva's two left hands line up, another beam of sunlight is refracted down into the courtyard below.
Return to the area with the scale and cage. Grapple the metal bracket where you climbed up before and rappel back down to the lower level.
SHIVA/KALI STATUE COURTYARD – MOVABLE STATUES WITH FANS: Now it's time to move the smaller statues of Thai dancers holding reflective fans. (These screenshots show how to position both statues.)
First go to the statue sitting on the straight track. Stand beside it and press Interact to grab on. Push or pull the statue along the straight track to where it joins the circular part of the track. Let go (Interact), move around to the left side of the statue and grab on again. Now push the statue clockwise along the circular track a little more than 180 degrees, until the beam of sunlight coming from the SHIVA GEM above reflects off the fan the statue is holding and into the crystal. If necessary, adjust the statue's position to keep the reflected beam of light steady.
Now go to the second statue and pull or push it counterclockwise along the circular track toward the other statue. Pull or push the statue along the straight track to the other side of the circle. Then move the statue along the circular track just a short distance toward the pedestal with the crystal.
As both beams reflecting off the fans converge, the crystal amplifies the light and focuses it on the bindi on Kali's forehead. This triggers an elaborate mechanism that lowers the floor beneath the statues, revealing a doorway.
NOTE: If you dropped down into this area before placing the gemstones in Shiva statue's hands and raising them to create the beams of light, it's possible to do so now. Grapple either of the metal brackets on the ledges above and then climb back up the wall onto the ledge above. (screenshots) Then follow the instructions for the Left and/or Right Arm Balance Puzzles above.
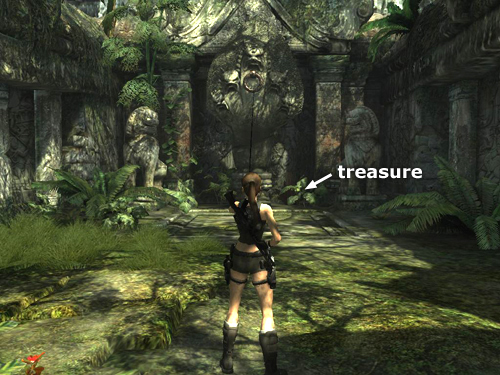
SMALL COURTYARD WITH NAGA STATUE: Go through the doorway beneath the statues into the small roofless area beyond. On the ground, to the right of the naga statue, you'll find the last treasure (25/30) in this area. (This screenshot shows the spot.)
To open the exit, stand facing the naga statue several steps back from the square decoration on the floor. Grapple the metal ring on the statue and press Interact to pull on the cable and send the statue crashing through the floor, revealing a large square opening.
NOTE: I found this section a bit temperamental in the PC game. Unless Lara was standing in just the right spot, no amount of pulling would topple the statue. So if you're having the same problem, refer to the previous screenshot, which also shows the proper positioning for pulling down the statue. Also try tapping the Interact key repeatedly instead of just holding it down. If all else fails, try this: Open the main menu, select Audio/Visual > Display settings, and then turn on VSYNC.
†UPDATE HISTORY: 11/05/08 - First draft of Coastal Thailand demo walkthrough posted online.
11/28/08 - Added rest of level.
12/17/08 - Fixed a few typos and left/right mix-ups, with help from Greg H.
3/12/09 - Fixed typo in header where treasure count was mistakenly listed as 14 instead of 15. Thanks to mad god for pointing that out.
3/22/09 - Made numerous small changes for accuracy and clarity. Added a few screenshots and rearranged others. Also incorporated several great suggestions submitted by the other players credited below, including the updated technique for the Shiva/Kali left side balance puzzle (submitted by several different people) and the direct, no-treasures route through the ruins where you find the gemstones.
3/14/10 - Fixed the treasure count in the header. All treasures were included in the walkthrough, but I had the wrong total listed above. Thanks to Treeble for pointing this out.
6/14/14 - Added note about climbing back up from the area with the movable statues holding fans.
1/29/17 - Added VSYNC solution for the bug at the end of the level, thanks to a tip from Ole.
ACKNOWLEDGEMENTS: Thanks to Alex R., Chris W., Christine, Diana, Don F., Gene, Gerry N., Greg H., Auntie Harry, John D., Ole, RG, Rolly, Saman, Shironda, Toni and Treeble for their helpful suggestions for this level.
QUICK ROUTE TO THE TWO GEMSTONES: On entering the OVERGROWN RUINS WITH TWO GATES, pick up the health potion on the first landing and kill the 4 nagas down below. (The main walkthrough has hints if you need them.) Now cross the open area to the far left corner and use the rough handholds on the walls to climb to the ledge above. (This screenshot shows where to climb.)
Deal with some bats and 2 nagas there. Go to the right side of the ledge, pick up another health potion and chimney jump up the alcove to the L-shaped handhold. (This screenshot shows the spot.) Climb to the right. Then jump across the gap to grab the edge of the next ledge. Pull up.
Hang from the front edge of this roughly U-shaped stone ledge so Lara's back is toward the entrance. Traverse to the left. Kill 2 red nagas. Then jump past the square column to grab on where the ledge continues on the other side. Pull up then climb to the top of the square column. (Again refer to the main walkthrough for details if necessary.)
Turn left and grapple the metal ring mounted on the right side of the structure with the ornate, metal lotus flower. Step off the edge to hang from the cable. Then climb up onto the ledge and take the SHIVA GEM. (This would be the second gem had you taken the longer route.) One of the two gates on either side of the ruins opens. Grapple the metal lotus and rappel down the front of the gate structure. Then jump across the gap on the left side of this ledge, pick up another health potion in the bushes and jump down to the stairs below the entrance.
Go up the stairs, past the entrance, and down the other side. On the landing between the two flights of stairs, grab the rough stone handholds on the wall and climb to the ledge above. (These screenshots show the sequence.) Get another health potion, go around behind the fat, square pillar and climb onto the horizontal beam. Walk to the left and jump up to grab the handhold on the fat pillar. Climb to the right and jump to grab the long, narrow ledge. Pull up to stand on it and then sidestep to the left. Jump forward to grab the top of the square pillar. Pull up.
Kill another flock of bats. Then jump to grab the edge of the little, open room with the metal lotus. Pull up and take the SHIVA GEM. (This would be the first gem if you'd taken the longer route.) This opens the remaining gates on both sides of the ruins. Grapple the lotus, rappel down the front of the gate structure and exit here. (Pick up the main walkthrough above at the section GRAY STONE HALLWAY WITH DEEP PITS.)
‡NOTE ON VIDEO GUIDES: Eldin's videos don't always follow the same strategies I use in my walkthroughs, but if you prefer that format, I think you'll find them very helpful.
WAS THIS WALKTHROUGH HELPFUL? If not, I apologize and invite you to contact me with any questions. If you need help right away, I recommend the r/TombRaider subreddit. Other fan-run forums are listed at tombraiders.net/stella/community.html. If this site was useful, please consider supporting it financially or in other ways. For details, visit tombraiders.net/stella/support.html. As always, I welcome your corrections/suggestions. Thank you!
Copyright © 2008- - Stellalune (). All rights reserved. The screenshots and videos included here were made using Fraps. Feel free to copy or print this walkthrough for personal use. By all means, share it with friends, but please include this credit line so people can send me their feedback. No part of this walkthrough may be reproduced on another site without permission. Follow this link for details about this site's advertising and privacy policy.
Stella's Tomb Raider Site: tombraiders.net.